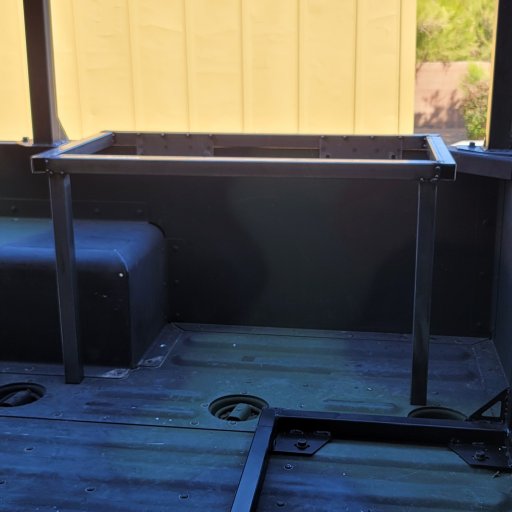
M1102 Trailer Build

  • HTML tutorial

Phillysteak

Rank IV

Enthusiast III

1,116
Arizona
First Name
Philip
Last Name
Haasnoot
Member #

24385

The enclosure I'm designing for it has a shelf with the cutouts for the inlet/exhaust manifold on the diesel heater. And the fuel pump mount at 45 degrees, I was reading that it is optimal to have the pump at that angle, fuel filter mounts in the vertical orientation I believe. I need to figure out a good way to duct the heated air out the side with some type of PVC bulkhead so I can easily cap it for storage/transit.

From what I've read these oil/fuel pumps don't have much suction head capacity, only around 12 inches, but they can push fuel uphill quite far. I might design the pump into a screw-on ring that matches the fuel can, that way it will only have to prime about 12 inches and then push uphill for 24ish inches. Some testing will be required to make sure this actually works.

untitled.133.png
 
  • Like
Reactions: DzrtShamrock

DzrtShamrock

Rank V
Launch Member

Pathfinder III

1,876
Colorado Springs, Colorado, USA
First Name
Kyle
Last Name
Betts
Member #

13310

Ham/GMRS Callsign
KF0AWV
@DzrtShamrock Originally I designed these mounts for the propane when I thought I'd be using 20lb canisters, working on a smaller simplified version for the 11lb cans I'm going with:

View attachment 185717
I've seen those online as well. I'm fueling a propane stove, propane water heater, and a gas firepit. I hadn't thought of doing two smaller tanks but I like that idea from the perspective of weight distribution and the ability to ensure the firepit doesn't eat up gas needed for the other two.
 

DzrtShamrock

Rank V
Launch Member

Pathfinder III

1,876
Colorado Springs, Colorado, USA
First Name
Kyle
Last Name
Betts
Member #

13310

Ham/GMRS Callsign
KF0AWV
The enclosure I'm designing for it has a shelf with the cutouts for the inlet/exhaust manifold on the diesel heater. And the fuel pump mount at 45 degrees, I was reading that it is optimal to have the pump at that angle, fuel filter mounts in the vertical orientation I believe. I need to figure out a good way to duct the heated air out the side with some type of PVC bulkhead so I can easily cap it for storage/transit.

From what I've read these oil/fuel pumps don't have much suction head capacity, only around 12 inches, but they can push fuel uphill quite far. I might design the pump into a screw-on ring that matches the fuel can, that way it will only have to prime about 12 inches and then push uphill for 24ish inches. Some testing will be required to make sure this actually works.

View attachment 185795
Reference the heat ducting, maybe dryer vent/duct?
 

Phillysteak

Rank IV

Enthusiast III

1,116
Arizona
First Name
Philip
Last Name
Haasnoot
Member #

24385

@DzrtShamrock A flanged mount would certainly work, I would probably steer clear of dryer vent/duct work as it's galvanized and won't hold up to the elements for very long; although it is cheap so replacing it every few years wouldn't be the end of the world. A 3" aluminum blast gate looks like a good option, $15 for an aluminum gate and it would solve the sealing issue when traveling to keep bugs and critters out:


Then using hose clamps like these would make connecting the duct heading to the tent easy:

61UUh2TLneL._AC_SL1500_.jpg
 
  • Like
Reactions: DzrtShamrock

DzrtShamrock

Rank V
Launch Member

Pathfinder III

1,876
Colorado Springs, Colorado, USA
First Name
Kyle
Last Name
Betts
Member #

13310

Ham/GMRS Callsign
KF0AWV
@DzrtShamrock A flanged mount would certainly work, I would probably steer clear of dryer vent/duct work as it's galvanized and won't hold up to the elements for very long; although it is cheap so replacing it every few years wouldn't be the end of the world. A 3" aluminum blast gate looks like a good option, $15 for an aluminum gate and it would solve the sealing issue when traveling to keep bugs and critters out:


Then using hose clamps like these would make connecting the duct heading to the tent easy:

View attachment 185813
That looks really clean. And being as it's readily available would be easy to find a replacement if necessary.
I agree the galvanized probably wouldn't hold up as long, especially with central AZ heat and sun. But the availability of replacement parts has been on my mind a lot lately as I work on my own build.
 
  • Like
Reactions: Phillysteak

Phillysteak

Rank IV

Enthusiast III

1,116
Arizona
First Name
Philip
Last Name
Haasnoot
Member #

24385

@DzrtShamrock It's on my mind as well. I really was torn between using 20lb tanks for propane and the 10lb ones, pulling up to any home depot/ lowes while on the road to swap out a 20lb tank was the original idea. Surprisingly the Lowes/Home Depots around where I'm living have been completely out of refilled tanks for weeks. Ultimately I opted for the 2 x 10lb tanks instead of the single 20lb because of the way I need to mount them. If your trailer has a flat spot that you can sit the tank on and not worry as much about the overall weight of it the 20lb might be your better option. I figure with a new tank the hydro test is good for 12 years and I'll just need to keep a mental note of places around here that will fill empty tanks. A 10lb tank should run a 10,000 BTU camping stove for roughly 22 hours on full blast, and can run a propane water heater at full blast for 8 hours.

So rough math here:
15-20 minutes of cooking 3 times per day -> 1 Hour/Day * 10,000 BTU/hr = 10,000 BTUhr / day
15 Minute shower per day x 2 People -> 30 Minutes/Day * 28,000 BTU/hr = 14,000 BTUhr / day

So a 10lb tank would last ~ 215,940 BTUH / 24,000 BTU/hr = 9 Days

I'm assuming the instant propane water heater is burning propane constantly when in use, I don't have one on hand yet to see. If it burns propane mostly when water is flowing through it and turns the burn rate down when water stops flowing you would get a much longer burn rate out of it. Either way 9 days on a 10lb tank isn't bad at all.

I just made this fire pit to bring along as it takes up minimal room, but I also have a BioLite brand fire pit which is my primary; which propane fire pit did you end up grabbing?

Assembled V1.jpg Flat V1.jpg
 

DzrtShamrock

Rank V
Launch Member

Pathfinder III

1,876
Colorado Springs, Colorado, USA
First Name
Kyle
Last Name
Betts
Member #

13310

Ham/GMRS Callsign
KF0AWV
@Phillysteak That's about the same math I came up with for stove and water heater figures. I got a simple 18" pit off of Amazon. I think it's rated up to 58k BTU. If I remember my math, an 11lb tank will power it for about 4 days, burning at half power for about 3hrs a day. It's been a while since I did that math though.
I've looked at two different types of water heaters: portable, tankless heaters like the Camplux and RV-style heaters. Tankless heaters can be turned off altogether when not in use so they won't burn anything. Mounting and elevation ratings are the biggest concerns I have. With the portables they're all different sizes, so if it has to be replaced the size requirements might change. But they're cheaper than the RV heaters. RV heaters on the other hand are made for standard spaces and they have their own ventilation built in. They're larger and heavier though. The efficiency of the heater at elevation has been something I'm still working through. One bit of feedback I got was to expect about a 4% loss in efficiency for every 1000ft gain above 4000ft.
On the note of getting tanks refilled, I had good luck with State Trailer over on 83rd Ave and Peoria. It's been a while since I've played around with the OB member's map, but there is a way to put propane refill options on there.
 

Phillysteak

Rank IV

Enthusiast III

1,116
Arizona
First Name
Philip
Last Name
Haasnoot
Member #

24385

A beautiful sunny day today made welding the tire/fuel support rack a pleasant experience.

20210130_130345.jpg 20210130_144756.jpg

I'm really loving these welding squares from Fireball tool, I used to use magnetic squares to try and hold tubing together with mixed results. These clamps make welding larger assemblies a breeze. I need to adjust the height of the front portion of the rack so the fuel cans won't hit the front wheel crank. Once I get that dialed in it's time to weld on the front mounting plate, gussets, and rattle can.

20210130_164952.jpg

The Jerry can mounts fit a little too snug for comfort, especially if the fuel cans swell during the summer heat. I'm going to add bump up a few dimensions and get these welded.
20210130_165254.jpg
 
  • Like
Reactions: DzrtShamrock

Phillysteak

Rank IV

Enthusiast III

1,116
Arizona
First Name
Philip
Last Name
Haasnoot
Member #

24385

Was able to weld the bulk of the fuel carrying rack this weekend:

20210131_150025.jpg 20210131_163251.jpg

Well it wouldn't be a project without at least one screw up....
When I went to test-fit it onto the trailer before mounting the front molle plate I realized that the front frame was welded at a slight angle and won't fit over the front of the trailer.

20210131_174958.jpg 20210131_175734.jpg

My plan is to grind the welds down as best as I can, and create a few cuts with a hack saw leaving just the top weld intact so that I can adjust the angle of the front frame to be parallel with the back. Then re-weld it in place..... we'll see how that goes. If that doesn't work I'll have to cut off the front rack completely and weld on some spacers. This is what I get for rushing....
 

Phillysteak

Rank IV

Enthusiast III

1,116
Arizona
First Name
Philip
Last Name
Haasnoot
Member #

24385

Working on the layout of the diesel heater box, opted for two blast gates; One for the intake and another for the hot air towards the tent. I've read that recycling the air in very cold climates works well to keep the tent warm. With this setup I can run the heater as I originally planned drawing fresh air in and hot air to the tent. But in cold climates or higher altitude I could run a return air duct to the intake to recycle the air.

Heater Box 1.PNG

Four grommets through the back of the enclosure: Hot Exhaust line, Cold air intake, Fuel Line, and electrical. Since I have to run an electrical cable to this box I'm going to mount the license plate to the door with a few license plate LED lights to meet AZ requirements, connected to pin 3 on the 7 pin trailer harness (running lights). The 12v to the heater will run to the electrical sub panel in one of the side storage bins and ultimately to the lead acid battery in the trailer. I'm going to add a disconnect switch to this box as the heater still apparently draws current when not in active use; although I have to be careful to allow the heater to complete the shutdown sequence prior to killing power to it as the residual heat can fry the electronics. The heater runs the fan on high after you command it to shut down to cool the heating chamber before powering off, if you cut power to it during that shutdown sequence the heat will make its way to the control board.

@DzrtShamrock I found this video series by an Australian gentleman who does a fantastic job of dissecting every component of the Chinese webasto clone diesel heaters and variants. This video goes into detail on fuel delivery and running these heaters direct from a diesel can:
 

Phillysteak

Rank IV

Enthusiast III

1,116
Arizona
First Name
Philip
Last Name
Haasnoot
Member #

24385

Three quick cuts with the sawzall and a bit of manual negotiations with the box tubing; The Fuel rack frame fit properly over the front lip of the trailer. I'll need to change the hardpoints that mount the frame to the bed before finishing the welds, but the four hardpoints in the front lined up perfectly so rivnuts were installed. I decided to stick with 3/8-16 hardware to limit the number of tools I need in order to keep the trailer up and running off road; I used 3/8-16 bolts to mount the tent rack frame to the trailer as well.

20210202_175152.jpg

Hopefully tomorrow after work I can finish welding the frame and get a few coats of satin black paint on it. I've been holding off on welding the jerry can mounts to force myself to stay focused on the rack.
 
  • Like
Reactions: PyroTek_98_23

Phillysteak

Rank IV

Enthusiast III

1,116
Arizona
First Name
Philip
Last Name
Haasnoot
Member #

24385

Cut a few more jerry can mounts with an adjusted design to give the cans a bit more room, after tack welding them together I decided to give my prototype propane mount a try. Needs a bit of work to get the bottom to align for welding but I think I can salvage it. Just need to cut one more propane tank mount and the fuel rack is complete.

20210206_172916.jpg

20210206_172305.jpg

I was able to snag a Dometic camping toilet for $120 off of Etrailer... Didn't even know they sold them so it was a good find.

Now since the toilet arrived I started designing a shower/privacy/bathroom annex:
Shower Collapsed.PNG

Shower Expanded.PNG
 
  • Like
Reactions: DzrtShamrock

Phillysteak

Rank IV

Enthusiast III

1,116
Arizona
First Name
Philip
Last Name
Haasnoot
Member #

24385

Thank you @DzrtShamrock , I'm digging the fuel mounts so far too; Especially since I can squeeze a 3 gallon diesel in the original M1102 jerry can mount for the heater. Still need to cut a V3 of the propane mounts, almost there just a few minor fittment issues to iron out.

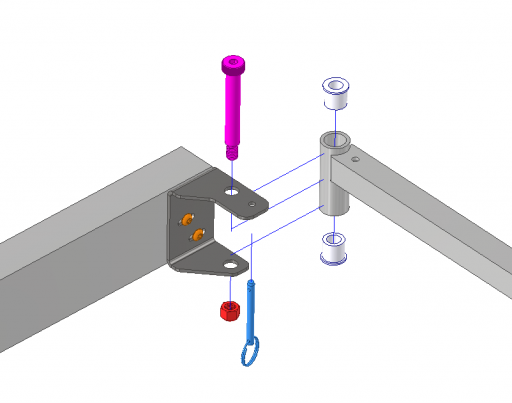
As for the shower area hinges I'm planning on using press-in delrin or bronze bushings and a shoulder bolt. I couldn't find any OTS hinges that fit the bill, the ones that were close were just too expensive to justify:

Hinge V1.PNG
 
  • Like
Reactions: DzrtShamrock

Phillysteak

Rank IV

Enthusiast III

1,116
Arizona
First Name
Philip
Last Name
Haasnoot
Member #

24385

Waiting for my new TIG welder to arrive with all the crazy winter weather has been interesting. Thankfully it landed in Phoenix so hopefully this week I can find time to finish welding the Jerry can and propane mounts to get them ready for powder coating and finally move on to the storage boxes.

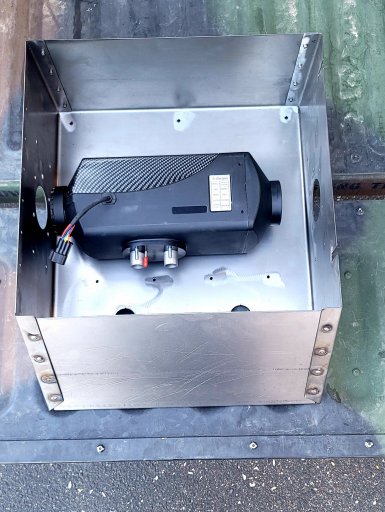
I prototyped the heater box out of 16GA CRS but wasn't completely happy with how the bends came out, working on a V2 design to simplify the sheet metal bends. Planning to make these boxes out of 0.08" 5052 Aluminum for the finished version:
20210213_161724.jpg

Now I need to figure out how to power the heater and trailer when off grid. Originally I was going to buy a Jackery 1000 but after seeing my friends unit I wasn't completely thrilled with it. Bluetti seemed like a good option too but for $2,000 it's still really expensive for what it is. I've built large custom lithium packs for several clients in the past (Electric vehicles, electric race boats) so I'm going to just make my own. Having a few friends out in TX / TN / North Cali in need of backup power changed my plans up a bit as well. At some point I'm going to make a LiFePO4 prismatic pack for the trailer in the range of 8kW, in the meantime I decided to make a 2.5kW portable LiPo to fulfill my offroad power needs in the short term. Since the main goal of this rig was to get out in the bush for astrophotography a 2.5kw pack with 200 watts of solar input should keep all my equipment powered up.

Render V1.149.png

Specs for the current design:
1 x AC Input (Goes to internal DC power supply for on-grid charging)
1 x Solar Input (Max 400 Watts solar input)
4 x 120 VAC Outputs (12A max )
4 x USB-A Outputs (3A each)
2 x 12 VDC outputs (2A)

2500 watt battery bank, MPPT solar charger, 24VDC 10A power supply for on-grid charging, 1500W Sine wave inverter (3000W surge), PWM fan and temp controller, Battery charge/discharge monitor. I hate that most of the solar generators on the market are not weather resistant, once you close the lid on this design it has the same IP68 rating as the pelican case is designed to.

Now I need to find my battery spot welder....
 
  • Like
Reactions: DzrtShamrock

Phillysteak

Rank IV

Enthusiast III

1,116
Arizona
First Name
Philip
Last Name
Haasnoot
Member #

24385

TIG finally came in and I... Am.. Rusty... Need to get some seat time on the new rig before I finish welding up the Jerry can mounts. I attempted to power coat one of the propane mounts and the infrared lamps were just not getting hot enough to fuse the powder properly, so this one will have to be stripped and sent out to my buddy for proper powdercoating.

20210224_165601.jpg 20210227_142331.jpg

The 10L steel jerry can for the diesel heater arrived and fits perfectly, I might pick up another one to mount behind the wheel well inside the trailer.
20210227_143921.jpg

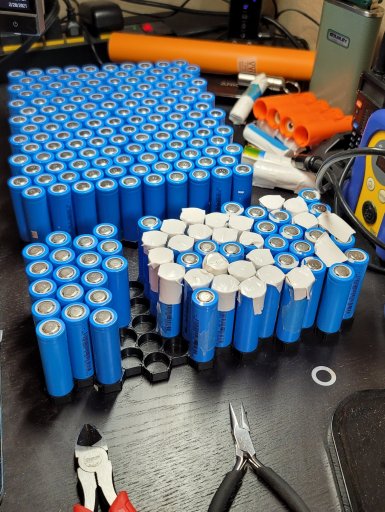
Changed the design of the Solar Generator around a bit to make it more weather resistant. Waiting on the battery spot welder to arrive but in the meantime I've salvaged enough 18650 cells to build a 1.5kW pack for it. Trying to find a better source for battery packs to salvage but I guess most of the E-waste companies in the valley figured out they can double dip, charging companies to "recycle" their electronics and then charging anyone who wants to actually recycle the batteries.

20210228_235531.jpg

Render V1.151.png
 

Attachments

  • Like
Reactions: teamblkdog

Phillysteak

Rank IV

Enthusiast III

1,116
Arizona
First Name
Philip
Last Name
Haasnoot
Member #

24385

Started laying out the storage boxes around the trailer but mounting them just to the top rack didn't pass the smell test. I'm opting instead to build a sub frame on each side of the trailer to take the weight of the storage boxes. Having these sub frames will also give me more options for mounting the water tank and battery sub systems. I might add some rings to both sides to give me more options when ratchet-strapping equipment down to the bed as well.

Frame_Test_1.PNG
 
  • Like
Reactions: M Rose

Phillysteak

Rank IV

Enthusiast III

1,116
Arizona
First Name
Philip
Last Name
Haasnoot
Member #

24385

I decided to use off-the-shelf tool boxes for storage on the trailer rather than build the boxes myself, since Milky way season is here I want to get the trailer out on the road soon. The prices on Steel and Aluminum seem to keep creeping up every day so this weekend will be the tool box support frame build while I wait on the boxes to be delivered.

Fired up the laser cutter to test fit the parts that came in so far for the Solar Generator, prototyped it out of 1/4" birch plywood since they are $4 a sheet. Once I get everything in place and have a few test runs under my belt I'll cut a finished plate from 6061-T6 Aluminum.
160424230_10157474511237273_8429552893533797741_o.jpg
 

Phillysteak

Rank IV

Enthusiast III

1,116
Arizona
First Name
Philip
Last Name
Haasnoot
Member #

24385

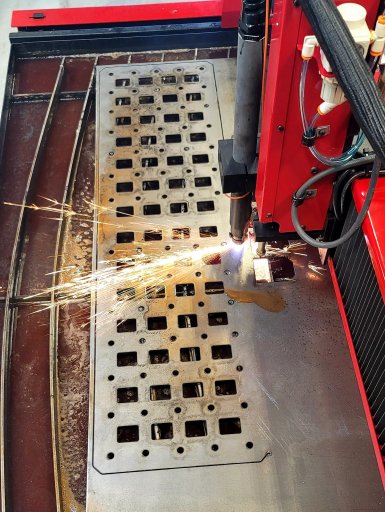
With steel prices on the rise I wish I had bit the bullet and ordered all of the steel I needed for this build when I started. Picked up 1.25"SQ 14 gauge steel tubing for the tool box support racks. Finally finished welding and painting the fuel rack mounts:

20210328_165134.jpg

I still need to plasma cut the gussets / tube end caps / Footings, but I'm happy how the tool box supports are coming out. They bolt onto the side of the trailer using the existing rivnuts and just need one extra set of rivnuts for each box. The 16 gallon grey water tank gets here this week so I am going to test fit that under the left side front toolbox before finishing that support.

20210328_152320.jpg

The front right tool box support stand is the perfect spot to mount the battery pack. We had a power outage at work and realized the server UPS batteries were overdue for a change, so hopefully I can find enough SLA batteries to build a 150-200AH 12V pack. I wanted to build a LiFePo4 chemistry pack but... free SLA batteries aren't something to complain about.

20210328_170307.jpg

I'm thinking of adding a second pump to the grey water system and run that through a multi stage filter. With the intention being I can refill my grey tank from streams/rivers as we tend to camp near water whenever we can. Need to see the minimum micron rating I'll need to keep the nasties out of the grey water tank.
 
  • Like
Reactions: Houston D and Road