M1102 Trailer Build

  • HTML tutorial

DzrtShamrock

Rank V
Launch Member

Pathfinder III

1,876
Colorado Springs, Colorado, USA
First Name
Kyle
Last Name
Betts
Member #

13310

Ham/GMRS Callsign
KF0AWV
Well I tried to satiate my desire to add a 270 Degree awning with the Smittybilt but it just wasn't cutting it. Pulled the trigger on an OVS awning and I was extremely impressed with the build quality. The provided mounts were phenomenally manufactured but just wouldn't work for my bizarre application (Que Plasma Cutting sounds).

I've had two end cuts of 1/4" thick hot rolled steel sitting around for a few years, always just too small to use but fortunately just the right size for these mounts. I was a bit impatient and couldn't wait for my BK01 powdercoat to arrive, so the mounts got the metal flake treatment.

View attachment 228746 View attachment 228747

I stuck with the U-Bolt mounting system of the old awning which worked out great. Overall the system is solid and I don't feel the need to add a third support in the middle:

View attachment 228750

Overall it sticks out an additional 4" compared to the Smittybilt but considering the amount of coverage it's well worth it. Very impressed with both the build quality of the awning and the included components. They provide plenty of guide ropes, additional poles, and stakes for windy conditions.

View attachment 228749

View attachment 228748

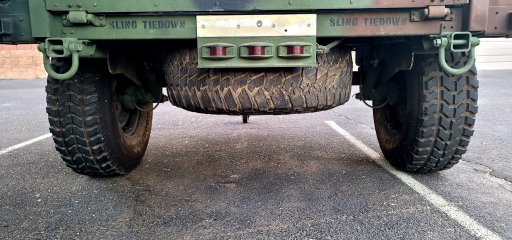
Next up is relocating the spare tire, I purchased a winch but to mount the tire properly I'll need to pick up some additional 1" SQ tubing and weld a frame together. The electrical subsystem is also up next, all of the components have been sitting patiently for me to finally install them. I might take this opportunity to remove all of the tool boxes and make touch up the paint in a few spots first.
Man that thing is looking great! How much space do you have inside the trailer between the tool boxes? I’ve got a lot of catching up to do.
 
  • Like
Reactions: Phillysteak

Sparksalot

Rank VI
Launch Member

Influencer III

4,312
Bastrop County, TX, USA
First Name
Rex
Last Name
Drake
Member #

19540

Ham/GMRS Callsign
KI5GH
Service Branch
Air Force
@Flyfishin.aa.ron So far so good on the backup camera, refresh rate is a tad slow for highway driving. Anything above 60 Mph and you'll start to notice the refresh rate, enough to bother me at least.
I try to keep my speed under 60 when backing up.
 

Phillysteak

Rank IV
Member

Enthusiast III

1,116
Arizona
First Name
Philip
Last Name
Haasnoot
Member #

24385

@DzrtShamrock right now the "cargo" bay measures 46" wide between the boxes (48" Wide in-between the tool box support frames), 5.5' Long (I'll gain about 18 more inches once the tire is relocated), and 40" Tall. On our last camping trip we had a camping mattress in the bed sleeping two adults and a German shepherd so there is plenty of space in there for extra sleeping space in good weather. I can still fill 4x8 sheet goods with the tailgate down. It will also fit large reclining sofas if the need arises as I found out a few months ago.

@OcoeeG Having access to a plasma certainly saved me a bunch of cash on this project, I couldn't imagine hand cutting all of the brackets and mounts.

@TahoePPV haha certainly words to live by! But having the camera on the highway certainly makes for a nice rear-view mirror replacement. No matter how fast I pull this trailer up out of the Phoenix valley inevitably I'll have a small roadster up my rear trying to pass at the first opportunity.
 

Contributor III

124
Raleigh, NC, USA
First Name
Kirk
Last Name
Main
Just registered to come by and tell you how awesome this is! I just picked up my M1102 and am doing a similar project. Loving your solenoid lockout idea, curious if you did anything for wheels/tires/axle? I'd like to match it to my 2018 JLUR but can't find any hub conversions and don't really want to replace the axle. Brand new to all this so would love any insight you can offer (as I read through this entire post again)
 

Phillysteak

Rank IV
Member

Enthusiast III

1,116
Arizona
First Name
Philip
Last Name
Haasnoot
Member #

24385

@MutinyOffroadAdventures Howdy and welcome! I appreciate your praise on this project, I've been learning as I go and honestly it can be a bit tricky to find information pertaining to the M1101/M1102 trailer components.

I'm pretty limited on lift/tire/spring options on my WK2 so I started there and lifted the vehicle 2.5", pintle hook on a riser, and I'm working on fitting airbags into the rear coil springs. All of that to try and keep the 37" standard tires on the M1102, and it's still not level. Discount Tire won't touch the military rims which is a problem here in Arizona, because of that I am most likely going to reduce the tire to a 33-34". Allegedly Chevy Silverado 2500 rims will fit (8 lug on 6.5" Center) and I have been keeping an eye on my local classifieds for a set. I've made temporary peace with the thought of having different hole patterns on the Jeep and Trailer, considering the trailer has a spare and the Jeep is going to get a hitch mounted swing for a spare of it's own; But I get wanting to have both the same and that was my original thought. Hopefully relocating the military spare under the M1102 shifts the CG enough so I don't have to replace the rims/tires yet.

If you want to have both front/rear tires with the same hole pattern you are going to have to either machine an adapter, or purchase one if you can find it; Keep in mind you'll have to cut down the existing studs to fit the adapter which means no going back (Without replacing all of the studs).

My top tips for starting out:
1 - User Manual: Shutt won't give it to you directly, but it's important to save a copy for lubrication requirements and brake service. Do a google search for " TM 9-2330-392-13&P " and you'll find a few websites that you can download the manual from (For Free).

2 - Grease your bearings, no one on earth knows how old that grease is or how many miles your trailer has been dragged around. I would also check the bearings while the trailer is up on a jack to make sure they spin freely. You can actually jack up both tires off the ground with the rear supports and front wheel if you don't have a jack handy.

3 - Make sure your tire pressure is set correctly, mine were set at 30 PSI when I bought the trailer; They should be at 17 PSI.
 

Contributor III

124
Raleigh, NC, USA
First Name
Kirk
Last Name
Main
@MutinyOffroadAdventures Howdy and welcome! I appreciate your praise on this project, I've been learning as I go and honestly it can be a bit tricky to find information pertaining to the M1101/M1102 trailer components.

I'm pretty limited on lift/tire/spring options on my WK2 so I started there and lifted the vehicle 2.5", pintle hook on a riser, and I'm working on fitting airbags into the rear coil springs. All of that to try and keep the 37" standard tires on the M1102, and it's still not level. Discount Tire won't touch the military rims which is a problem here in Arizona, because of that I am most likely going to reduce the tire to a 33-34". Allegedly Chevy Silverado 2500 rims will fit (8 lug on 6.5" Center) and I have been keeping an eye on my local classifieds for a set. I've made temporary peace with the thought of having different hole patterns on the Jeep and Trailer, considering the trailer has a spare and the Jeep is going to get a hitch mounted swing for a spare of it's own; But I get wanting to have both the same and that was my original thought. Hopefully relocating the military spare under the M1102 shifts the CG enough so I don't have to replace the rims/tires yet.

If you want to have both front/rear tires with the same hole pattern you are going to have to either machine an adapter, or purchase one if you can find it; Keep in mind you'll have to cut down the existing studs to fit the adapter which means no going back (Without replacing all of the studs).

My top tips for starting out:
1 - User Manual: Shutt won't give it to you directly, but it's important to save a copy for lubrication requirements and brake service. Do a google search for " TM 9-2330-392-13&P " and you'll find a few websites that you can download the manual from (For Free).

2 - Grease your bearings, no one on earth knows how old that grease is or how many miles your trailer has been dragged around. I would also check the bearings while the trailer is up on a jack to make sure they spin freely. You can actually jack up both tires off the ground with the rear supports and front wheel if you don't have a jack handy.

3 - Make sure your tire pressure is set correctly, mine were set at 30 PSI when I bought the trailer; They should be at 17 PSI.
Thank you sir! Very helpful. Can you give any more insight into your battery DIY design? On tires and wheels, yeah I get that. I'm going to go with some 8x6.5 wheels and put probably 33"s on it.
 

Phillysteak

Rank IV
Member

Enthusiast III

1,116
Arizona
First Name
Philip
Last Name
Haasnoot
Member #

24385

@MutinyOffroadAdventures I did a build log on the portable Battery setup here if you want to see what is under the hood: Rugged Solar Generator 2.5kW

Once I get the spare tire winch finished this week I'm going to start on the trailer mounted electrical setup so I'll have some documentation on that part of the build in the next few weeks.
 

Phillysteak

Rank IV
Member

Enthusiast III

1,116
Arizona
First Name
Philip
Last Name
Haasnoot
Member #

24385

Tried to make the most out of what could be the last 85 degree weekend for a while and remount the spare tire. I relocated the triplet rear indicator lights to give the spare some room on either side, I just didn't feel right about having the tire pressing on the wiring harness. Just had to grind off the heads of four rivets holding it on and transfer the hole pattern to the rear. I'm planning to add some D-rings for the Y-strap spare tire harness just as an added precaution and to keep the tire from shifting off-road.

20220517_191150.jpg

I have a cross member welded up to give the tire a second flat bar to rest against, it's quite stable for now but I can see the 1/4" thick L-Channel damaging the tire off road. Instead of purchasing the Lippert extension for the winch I ended up sourcing a 3/8" drive socket extension and modifying it to fit. Just plug a ratchet into the extension or a drill with an adapter and off you go:

20220517_185459.jpg

I took some dimensions and might have the space to mount a 15 gallon water tank underneath as well, finding a tank the correct size is proving difficult so I might have to break out the TIG welder and fab a custom aluminum tank. If I end up doing that I can at least add some internal baffles.
 

Sparksalot

Rank VI
Launch Member

Influencer III

4,312
Bastrop County, TX, USA
First Name
Rex
Last Name
Drake
Member #

19540

Ham/GMRS Callsign
KI5GH
Service Branch
Air Force
Tried to make the most out of what could be the last 85 degree weekend for a while and remount the spare tire. I relocated the triplet rear indicator lights to give the spare some room on either side, I just didn't feel right about having the tire pressing on the wiring harness. Just had to grind off the heads of four rivets holding it on and transfer the hole pattern to the rear. I'm planning to add some D-rings for the Y-strap spare tire harness just as an added precaution and to keep the tire from shifting off-road.

View attachment 231239

I have a cross member welded up to give the tire a second flat bar to rest against, it's quite stable for now but I can see the 1/4" thick L-Channel damaging the tire off road. Instead of purchasing the Lippert extension for the winch I ended up sourcing a 3/8" drive socket extension and modifying it to fit. Just plug a ratchet into the extension or a drill with an adapter and off you go:

View attachment 231241

I took some dimensions and might have the space to mount a 15 gallon water tank underneath as well, finding a tank the correct size is proving difficult so I might have to break out the TIG welder and fab a custom aluminum tank. If I end up doing that I can at least add some internal baffles.
Have you looked into marine suppliers for a water tank. When I built my teardrop, I ended up with way more boat parts than anything else on it.
 

overland_fam

Rank II

Enthusiast I

404
Wasatch County, Utah, United States
First Name
Nick
Last Name
Randall
Member #

25468

This is one of the best M110X build threads I’ve seen. Thank you for sharing!

I’m about to embark on a similar project and was planning to go to a CNC plasma shop to get the corner plates cut out. Any chance you still have those files saved?
 
  • Like
Reactions: Phillysteak

Phillysteak

Rank IV
Member

Enthusiast III

1,116
Arizona
First Name
Philip
Last Name
Haasnoot
Member #

24385

Thank you @overland_fam ! Certainly has been an adventure working on this trailer. I have the entire trailer modeled in CAD so I can certainly share the components you need. I've attached the PDF drawings below for the corner mounts and the center mounts if you choose to use those hardpoints as well. These plates were designed for 2" square tubing, if you go bigger they would need to be adjusted.

I can send over the DXF cut files, shoot me a DM with your E-mail address, the OB forums won't allow me to attach .DXF files to the post =/
 

Attachments

tjZ06

Rank V
Launch Member

Advocate I

2,268
Las Vegas/Palo Alto
First Name
mynameisntallowed
Last Name
Adams
Member #

20043

@MutinyOffroadAdventures Howdy and welcome! I appreciate your praise on this project, I've been learning as I go and honestly it can be a bit tricky to find information pertaining to the M1101/M1102 trailer components.

I'm pretty limited on lift/tire/spring options on my WK2 so I started there and lifted the vehicle 2.5", pintle hook on a riser, and I'm working on fitting airbags into the rear coil springs. All of that to try and keep the 37" standard tires on the M1102, and it's still not level. Discount Tire won't touch the military rims which is a problem here in Arizona, because of that I am most likely going to reduce the tire to a 33-34". Allegedly Chevy Silverado 2500 rims will fit (8 lug on 6.5" Center) and I have been keeping an eye on my local classifieds for a set. I've made temporary peace with the thought of having different hole patterns on the Jeep and Trailer, considering the trailer has a spare and the Jeep is going to get a hitch mounted swing for a spare of it's own; But I get wanting to have both the same and that was my original thought. Hopefully relocating the military spare under the M1102 shifts the CG enough so I don't have to replace the rims/tires yet.

If you want to have both front/rear tires with the same hole pattern you are going to have to either machine an adapter, or purchase one if you can find it; Keep in mind you'll have to cut down the existing studs to fit the adapter which means no going back (Without replacing all of the studs).

My top tips for starting out:
1 - User Manual: Shutt won't give it to you directly, but it's important to save a copy for lubrication requirements and brake service. Do a google search for " TM 9-2330-392-13&P " and you'll find a few websites that you can download the manual from (For Free).

2 - Grease your bearings, no one on earth knows how old that grease is or how many miles your trailer has been dragged around. I would also check the bearings while the trailer is up on a jack to make sure they spin freely. You can actually jack up both tires off the ground with the rear supports and front wheel if you don't have a jack handy.

3 - Make sure your tire pressure is set correctly, mine were set at 30 PSI when I bought the trailer; They should be at 17 PSI.
You need to be looking at 2010 and older GM 2500/3500 8-lug wheels, just FYSA. 2011+ went to 8x180mm.

-TJ
 
  • Like
Reactions: Phillysteak

Houston D

Rank III
Member

Contributor II

797
Jasper, AL, USA
First Name
Houston
Last Name
Dill
Member #

28729

Thank you @overland_fam ! Certainly has been an adventure working on this trailer. I have the entire trailer modeled in CAD so I can certainly share the components you need. I've attached the PDF drawings below for the corner mounts and the center mounts if you choose to use those hardpoints as well. These plates were designed for 2" square tubing, if you go bigger they would need to be adjusted.

I can send over the DXF cut files, shoot me a DM with your E-mail address, the OB forums won't allow me to attach .DXF files to the post =/
Thank you for these drawings. I was contemplating how to get these measurements today so I could lay it out in Solidworks or Fusion 360. Any cad files would be greatly appreciated. I optimistically bought the trailer almost a year ago while too sick to actually build it then received a heart transplant 6 months ago which now has me up to the task :grinning:. Basically I was dyeing but had a change of heart (for real) :tearsofjoy: Seeing everyone's builds on here has me jazzed to get started!
 
  • Like
Reactions: Phillysteak

Crfracer47

Rank I

Enthusiast I

201
Sonoma County, CA, USA
First Name
Ethan
Last Name
Stockton
@Phillysteak, have you found your trailer to be top heavy at all? Any concerns of roll overs? I am in the process of designing the rack for mine, and my brother thought it might be a little too top heavy and roll over prone. From looking at your pics, it looks like the top of your rack is about 20-24" above the bedrails, which is only a little shorter than I am planning (though I will have a bit more structure to mine as I'm planning a spinning top deck so no matter where I have to park, I can get my ladder to a clear area). I will be adding about 50gal of water in the bed, a spare tire carrier for 2 spare tires on a customer rear bumper, and other misc items in the bed, so I think that should lower the center of gravity a fair bit, and reduce the likelihood of being too top heavy, but wanted to know how it had been going for you so far.
 
  • Like
Reactions: Phillysteak

Phillysteak

Rank IV
Member

Enthusiast III

1,116
Arizona
First Name
Philip
Last Name
Haasnoot
Member #

24385

@Crfracer47 It's not as top heavy as it might appear, so far this rig has tracked amazingly well on the trails and if anything my tow rig sways more than the trailer. I think with a bed mounted water tank and a spare tire you'll have a hard time trying to roll a rig built on a M110X. When we get to our camping location we always deploy the rear support stanchions and can barely rock the trailer tossing and turning in the tent. The bigger problem I've had is balancing the tongue weight, with the spare mounted towards the front my Jeeps suspension was not too thrilled.

@Overlanding Lawyer Thank you! Still a long way to go but i've been loving the process overall. The goal is to get the trailer in show shape for the Overland Expo in Flagstaff next year :grimacing:
 

Crfracer47

Rank I

Enthusiast I

201
Sonoma County, CA, USA
First Name
Ethan
Last Name
Stockton
@Phillysteak, Thanks for the reply. That's about what I expected to hear. I might still try to lower my overall height a little, but figure if I can keep it no taller than it is wide, it should be pretty darn stable, even with a bit of weight up high. Getting it to be balanced fore and aft is probably going to be a little more of a challenge, but I'm towing with a Ram 2500 diesel, so I'm really not worried about the tongue weight (I pretty regularly haul at or near max GCVW with trailers that weigh more than max gross on the M110X's), other than an incorrectly balanced trailer won't track properly. Again though, not super concerned as my truck will weigh enough more that even if the trailer sways a little, it shouldn't have much effect on the truck.
 

Swhirstein

Rank IV
Launch Member

Advocate III

1,316
Davenport, Iowa, USA
First Name
Scott
Last Name
Hirstein
Member #

9592

Rack welding completed and decided to paint it before I started mounting everything. Four cans of Krylon fusion in Satin black did the trick, my welds won't win any awards but they'll hold. Tomorrow the Smittybilt XL Gen2 tent gets mounted for a test run, excited to get it out in the wild and free up garage space.

View attachment 183124

I've been working on the side boxes and rear storage boxes. Side boxes will probably be made from 0.08" thick aluminum with riveted construction, although I do have a spool gun for my MIG and might just stop being a baby about learning how to use it to weld these boxes rather than rivet them. On the rear of the trailer I'm planning to build one "wet" box, I love kayaking so I wanted a space to store wet gear away from everything else. The other rear box is for the diesel heater, the heater is on the way so once I get my hands on it to take dimensions I can finalize these boxes.

View attachment 183126

I need to work on the mounts for the gas cans and propane, probably going to downsize to two 11 pound propane tanks. Being able to roll into a big box store and swap the tank would be convenient, but even some home depots around me are completely out of 20lb propane tanks at the moment; So going with 11lb tanks and having them refilled will work fine. I figure in the winter I can swap out one 5 gal jerry can for diesel to run the heater, but in Arizona that would only be for a few months and then I can switch back. I've been racking my head for a better spot to mount a spare tire, but for now it seems like the front of the trailer cargo area is the most secure spot. I plan to mount the tire to a rack bolted to the trailer which will also help support the fuel/propane rack. Originally I was going to remove the stabilizers that come on the M1102 trailers so I can mount the fuel rack lower, but they are very well built and I opted to leave them; The only down side is the fuel rack will have to be mounted 6-8 inches higher.

View attachment 183125
Should put those jerry cans on a swing arm so you can access your spare more easily. Maybe mount the spare on a hinge so you aren't throwing your back out trying to get it out of there. Just my .02! I haven't gotten all the way through this thread, but the build looks pretty awesome so far!