solar/battery/power-supply solution

  • HTML tutorial

Christian

Rank IV
Launch Member

Advocate III

1,402
Duesseldorf, Germany
Member #

3690

hey guys,

didn't know where to place, hope the DIY section is ok. I want to share my installation of a solar powered dual battery and ac-power supply system in our daily driver, without losing cargo space .. frankly, this is LR3/4 specific, but may be adapted to other rigs with similar trunk trims and quarter panel space.

here's the radar, an overview of all the components and connections:
Stromversorgung.001.jpeg

not shown on the pictures: there are two 100W solar panels in series on the roof, simply bolted onto thule square bars. why in series, and why 200W? because by this the solar charge controller starts earlier, and works longer, even in not-that-optimal light situations, due to the higher voltage. I wanted the panels to charge the battery even with overcast skies.

the cut out where I wanted to place all the stuff (it's where the LR3/4 trim has a deep 'dent'):
IMG_0975.JPG

then, closing the trim with abs plastics wrapped in pleather:
IMG_1026.JPG

the stand construction for battery and devices is made of strong coated plywood:
IMG_1027.JPG

all attached to each other and the quarter panel with ultra strong body work adhesive. holds a ton:
IMG_1030.JPG

here's the setup of all devices:
IMG_1133.JPG
left to right
- not visible, the shunt for the battery monitor
- the battery
- the solar charge controller
- the battery combiner solenoid/relay
- the 180W inverter (the tiny relay is for the light in the switch)

and here are the power outlets, 230V AC controlled by switch:
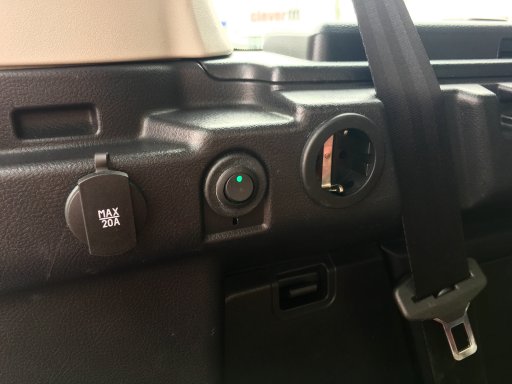
IMG_1090.jpg

battery monitor:
IMG_0048.jpg

hope this gives a bit of inspiration, don't hesitate to ask me anything you wanna know about it.

cheers,
christian
 
Last edited:

Tim

Rank VI
Launch Member

Influencer II

4,750
Oxford, UK
First Name
Tim
Last Name
Lunn
Member #

0671

Very neat and comprehensive. Got a few ideas reading this. Thanks for sharing.


Sent from my iPhone using OB Talk
 

VCeXpedition

Rank V
Launch Member

Off-Road Ranger I

2,932
Pleasant View, UT, USA
First Name
Dan
Last Name
Rich
Member #

0582

Ham/GMRS Callsign
K6DHR
Wow, super clean and sanitary install. Nice work. You have a lot of faith in that adhesive, I'm not familiar with it, but myself would be very careful, most of the roads I drive in the desert southwest of the U.S. are heavily corrugated and I'd be afraid that that stuff would shake loose.

Clearly, I need to up my solar game. 200W! Crikey.

Dan.
 
  • Like
Reactions: Infomage

VCeXpedition

Rank V
Launch Member

Off-Road Ranger I

2,932
Pleasant View, UT, USA
First Name
Dan
Last Name
Rich
Member #

0582

Ham/GMRS Callsign
K6DHR
Dumb question, what is the difference between connecting in series vs parallel? It's 200W in series, does the controller function better at a higher voltage? Or is it wattage?

Sent from my HTC One_M8 using OB Talk mobile app
 

Christian

Rank IV
Launch Member

Advocate III

1,402
Duesseldorf, Germany
Member #

3690

every MPPT charge controller starts its work at a certain voltage. mine at battery voltage +5V due to specs. so with the panels in series it starts earlier to put out charge voltage and current, and longer. or at last at overcast skies.

wattage stays the same, of course. but the weird thing with the charge controller is, that it seems to be able to convert voltage into current! each panel delivers under ideal conditions about 5,5A. in series it'd still be 5,5A cause just the voltage would add up. but: output current is higher. in summer at noon about 10A.


EDIT: I will run only a Snomaster BD/C-40 and LED camp lights from the 90Ah deep-cycle battery. So in order to get full autarky I put 2x100W on the roof to make the entire system work self-sufficient in the months of April through October, with mid european insolation, and without having to fire up the engine. Maybe it's a bit overdesigned, time will tell. With the roof rack (hope to get a Baja Rack over here in Europe) I may go down to 2x50W. We'll see.
 
Last edited:
  • Like
Reactions: VCeXpedition

Rolasolar

Rank V
Launch Member

Enthusiast III

1,815
Forest Lake, Queensland, Australia
First Name
Dave
Last Name
Gurman
Member #

1707

If you have the room the 100w panels will provide good charge even in cloudy conditions. Also the advantage in series is higher voltage at lower amps which means less voltage drop to the regulator.

Sent from my SM-G900I using OB Talk mobile app
For the same wire size.

Sent from my SM-G900I using OB Talk mobile app
 

Pd.Dross

Rank III
Launch Member

Contributor III

864
Rio Rancho, NM, USA
First Name
Douglas
Last Name
Dross
Member #

4034

Do you have some kind a wiring diagram, and a component list? I am waiting to put a set up like this on my trailer as well as have vehicle charge that battery's as well.

Sent from my SM-G900V using OB Talk mobile app
 

bonesky

Rank II
Launch Member

Traveler I

309
Boston
Member #

5235

I've been thinking about doing the same thing. Want to be able to charge camera batteries and other electronics while off the grid for a few days. Being able to produce small amounts of hot water without starting a fire would a nice to have also.
 

Christian

Rank IV
Launch Member

Advocate III

1,402
Duesseldorf, Germany
Member #

3690

I've been thinking about doing the same thing. Want to be able to charge camera batteries and other electronics while off the grid for a few days. Being able to produce small amounts of hot water without starting a fire would a nice to have also.
hot water, no. forget it. 5mins of showering, at least 10kW needed, you can calc for yourself. the rest, easy peasy.


Sent from my iPhone using OB Talk
 

bonesky

Rank II
Launch Member

Traveler I

309
Boston
Member #

5235

I'm talking about enough hot water for drinking. With 10kW, I believe you are thinking heating gallons of water quickly for a shower. I'm not looking to do that. I want just enough hot water for instant meals, tea or coffee.

Only 800W is needed to phase change water to steam and this at low flow rates at around 15-18 g/min. Not looking for this.

800W travel water kettle

This one is 120W and takes 15 minutes to come to a boil.

Both options above may work depending on the setup and how long one is willing to wait for hot water for making tea, coffee, or meals.
 

Christian

Rank IV
Launch Member

Advocate III

1,402
Duesseldorf, Germany
Member #

3690

got ya.

yes, would be possible. but you'd lose precious power for running important devices such as your fridge, while you could heat water with propane.

your 12V compressor fridge won't run on propane ;-)

Gesendet von iPhone mit OB Talk
 

Flipper

Rank V
Launch Member

Member III

2,865
Florida
First Name
John
Last Name
F
Member #

5021

hey guys,

didn't know where to place, hope the DIY section is ok. I want to share my installation of a solar powered dual battery and ac-power supply system in our daily driver, without losing cargo space .. frankly, this is LR3/4 specific, but may be adapted to other rigs with similar trunk trims and quarter panel space.

here's the radar, an overview of all the components and connections:
View attachment 17912

not shown on the pictures: there are two 100W solar panels in series on the roof, simply bolted onto thule square bars. why in series, and why 200W? because by this the solar charge controller starts earlier, and works longer, even in not-that-optimal light situations, due to the higher voltage. I wanted the panels to charge the battery even with overcast skies.

the cut out where I wanted to place all the stuff (it's where the LR3/4 trim has a deep 'dent'):
View attachment 17913

then, closing the trim with abs plastics wrapped in pleather:
View attachment 17914

the stand construction for battery and devices is made of strong coated plywood:
View attachment 17915

all attached to each other and the quarter panel with ultra strong body work adhesive. holds a ton:
View attachment 17916

here's the setup of all devices:
View attachment 17917
left to right
- not visible, the shunt for the battery monitor
- the battery
- the solar charge controller
- the battery combiner solenoid/relay
- the 180W inverter (the tiny relay is for the light in the switch)

and here are the power outlets, 230V AC controlled by switch:
View attachment 17918

battery monitor:
View attachment 17919

hope this gives a bit of inspiration, don't hesitate to ask me anything you wanna know about it.

cheers,
christian
Nice job ! A little tip , dress your wiring with split loom . Makes a clean install and also protects the wires from chaffing. Like where you put the display.
 

bonesky

Rank II
Launch Member

Traveler I

309
Boston
Member #

5235

I don't have a fridge at the moment, as they are expensive. When I get more serious about it, a fridge will happen. The main priority is charging electronics. If I wanted hot water, I would unplug or switch off the other items temporarily, then fire them back up.

I did look 12v dc power coolers, this is only 48W. Using a piezo plate cooler could be a good cheap way to get started. If you load everything cold in the cooler to start, then it won't have to work as hard for the entire trip.
http://www.my12voltstore.com/Fun_Kooler_12V_p/p25.htm
 

Christian

Rank IV
Launch Member

Advocate III

1,402
Duesseldorf, Germany
Member #

3690

nope, just a few thermo-electric (peltier!) fridges are having a thermostat. and they suck more as double the Amps as a compressor fridge. try ro rent one, but save your money for serious equipment.


Gesendet von iPhone mit OB Talk