

hey guys,
didn't know where to place, hope the DIY section is ok. I want to share my installation of a solar powered dual battery and ac-power supply system in our daily driver, without losing cargo space .. frankly, this is LR3/4 specific, but may be adapted to other rigs with similar trunk trims and quarter panel space.
here's the radar, an overview of all the components and connections:

not shown on the pictures: there are two 100W solar panels in series on the roof, simply bolted onto thule square bars. why in series, and why 200W? because by this the solar charge controller starts earlier, and works longer, even in not-that-optimal light situations, due to the higher voltage. I wanted the panels to charge the battery even with overcast skies.
the cut out where I wanted to place all the stuff (it's where the LR3/4 trim has a deep 'dent'):

then, closing the trim with abs plastics wrapped in pleather:

the stand construction for battery and devices is made of strong coated plywood:

all attached to each other and the quarter panel with ultra strong body work adhesive. holds a ton:

here's the setup of all devices:

left to right
- not visible, the shunt for the battery monitor
- the battery
- the solar charge controller
- the battery combiner solenoid/relay
- the 180W inverter (the tiny relay is for the light in the switch)
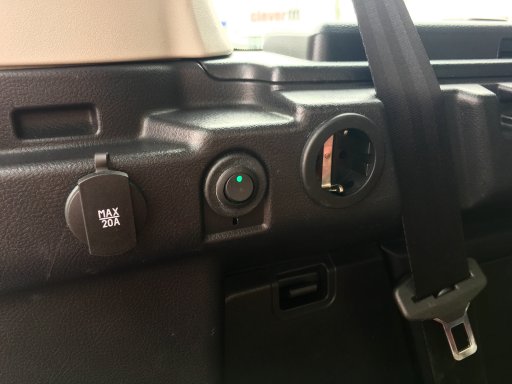
and here are the power outlets, 230V AC controlled by switch:
battery monitor:

hope this gives a bit of inspiration, don't hesitate to ask me anything you wanna know about it.
cheers,
christian
didn't know where to place, hope the DIY section is ok. I want to share my installation of a solar powered dual battery and ac-power supply system in our daily driver, without losing cargo space .. frankly, this is LR3/4 specific, but may be adapted to other rigs with similar trunk trims and quarter panel space.
here's the radar, an overview of all the components and connections:
not shown on the pictures: there are two 100W solar panels in series on the roof, simply bolted onto thule square bars. why in series, and why 200W? because by this the solar charge controller starts earlier, and works longer, even in not-that-optimal light situations, due to the higher voltage. I wanted the panels to charge the battery even with overcast skies.
the cut out where I wanted to place all the stuff (it's where the LR3/4 trim has a deep 'dent'):
then, closing the trim with abs plastics wrapped in pleather:
the stand construction for battery and devices is made of strong coated plywood:
all attached to each other and the quarter panel with ultra strong body work adhesive. holds a ton:
here's the setup of all devices:
left to right
- not visible, the shunt for the battery monitor
- the battery
- the solar charge controller
- the battery combiner solenoid/relay
- the 180W inverter (the tiny relay is for the light in the switch)
and here are the power outlets, 230V AC controlled by switch:
battery monitor:
hope this gives a bit of inspiration, don't hesitate to ask me anything you wanna know about it.
cheers,
christian
Last edited:


