


Off-Road Ranger I
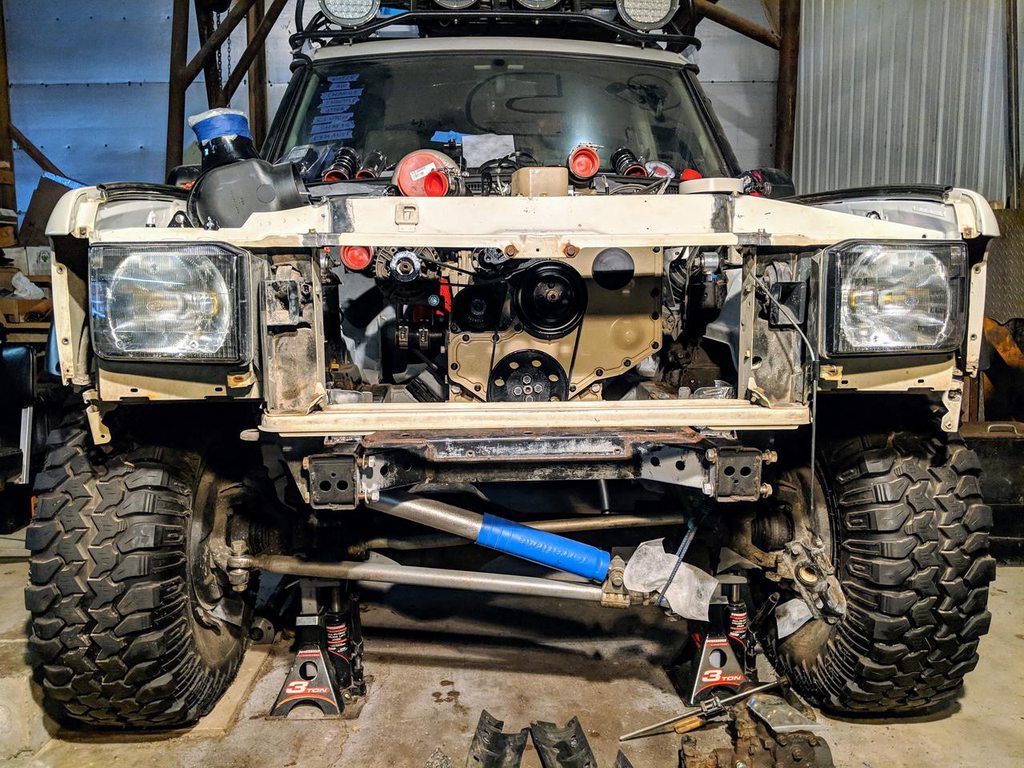
Getting this core support reattached got a bit more complicated than I expected! Doing it right beats hacking it all back together, & the cold slowing me down also gives me more time to think & come up with my hair-brained ideas.
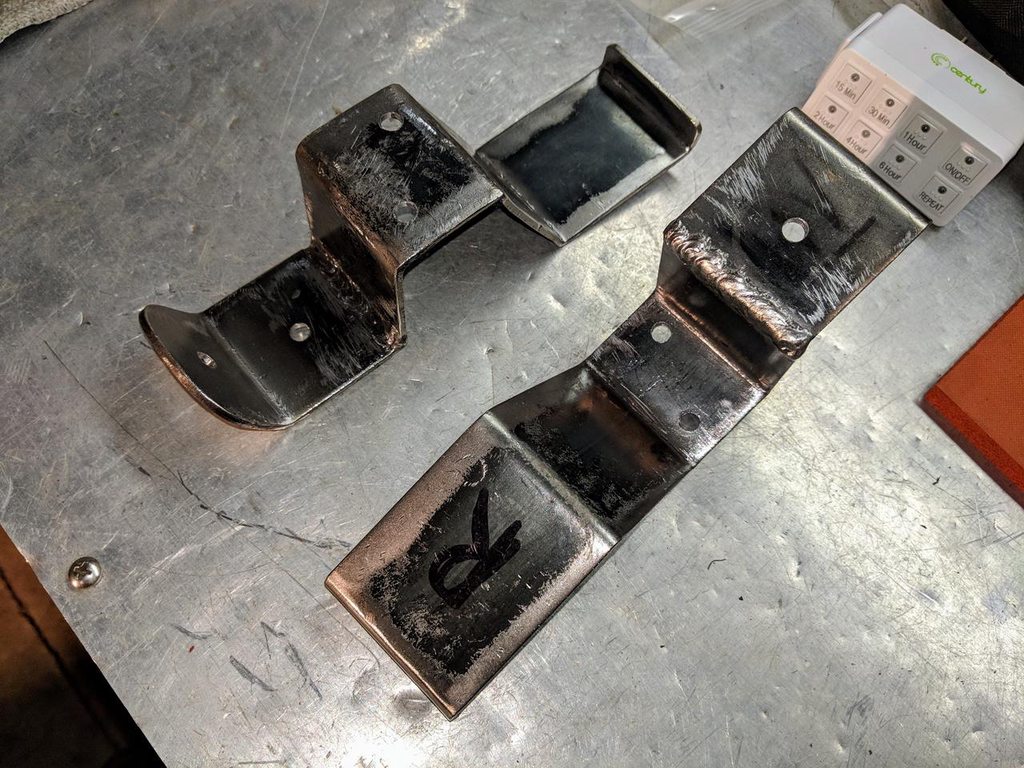
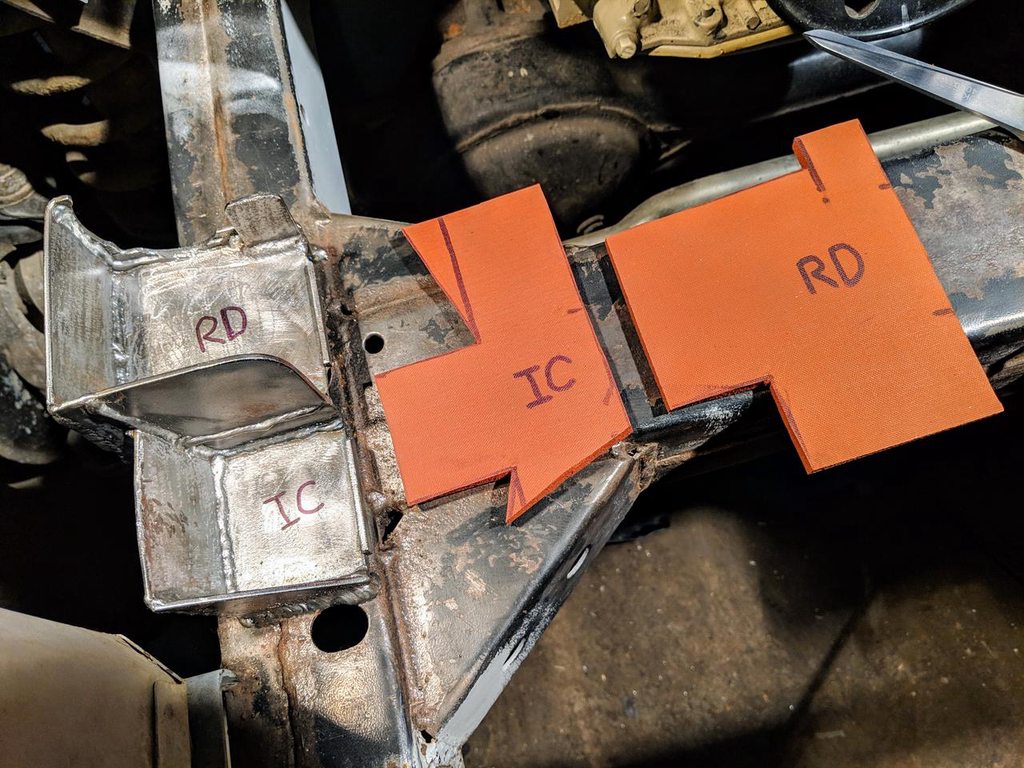
I started with a stick of 1"x1/8" flat stock. And after a healthy amount of bashing & grinding I formed some lengths of it to match the profile of the deceivingly complex shapes in the upper core support of the Rover:
Not that I expect to have to reach in there with a crane all that often like I did in the testing phase (which was the reason for cutting out the core support in the first place), but I had always wanted to put the upper core support back with bolts for easier maintenance later, rather than factory original with spot welds:

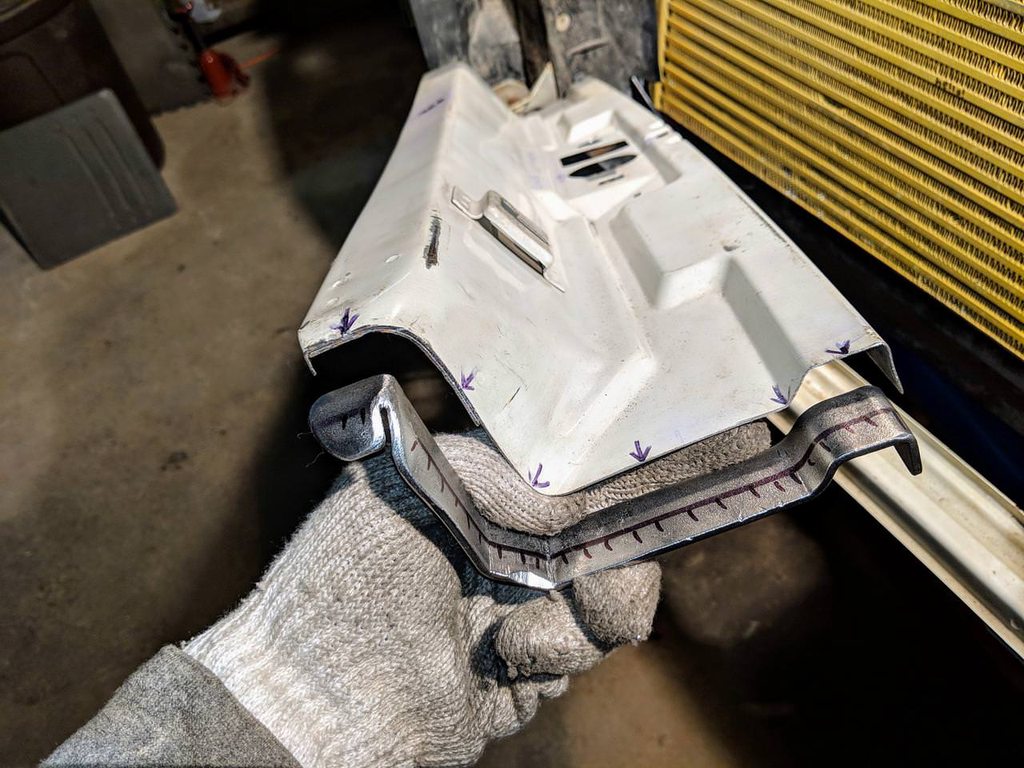
I'm welding these new flaps of steel to the now removable center section, & then bolting to the outer sections with 3 bolts each + some added support to keep the holes from going egg-shaped in the sheet metal over time:

I started with a stick of 1"x1/8" flat stock. And after a healthy amount of bashing & grinding I formed some lengths of it to match the profile of the deceivingly complex shapes in the upper core support of the Rover:
Not that I expect to have to reach in there with a crane all that often like I did in the testing phase (which was the reason for cutting out the core support in the first place), but I had always wanted to put the upper core support back with bolts for easier maintenance later, rather than factory original with spot welds:
I'm welding these new flaps of steel to the now removable center section, & then bolting to the outer sections with 3 bolts each + some added support to keep the holes from going egg-shaped in the sheet metal over time:
Last edited:
Off-Road Ranger I
Thanks! It's been a ton of fun building up from bone stockThis thread is amazing. Awesome build man

Very much looking forward to rocking on it once again here after some crazy busyness moving house & getting rid of a huge chunk of my possessions. Trying to be more minimal in anticipation of hitting the road & living out of it for some extended runs before too long.

Cool. Been wondering about the build. Thought you might have given up.Thanks! It's been a ton of fun building up from bone stock
Very much looking forward to rocking on it once again here after some crazy busyness moving house & getting rid of a huge chunk of my possessions. Trying to be more minimal in anticipation of hitting the road & living out of it for some extended runs before too long.
Off-Road Ranger I
Nope! Sadly just had to temporarily back burner the Rover for a bigger project. But there is an upside, despite all the time lost to moving... selling the old house should make for a healthy cash injection to the project!
Like this plump marshmallow...?
Or more of a toasty one like this...?
Like this plump marshmallow...?
Or more of a toasty one like this...?
Off-Road Ranger I
Changing homes done. Back to work on the Rover! *insert whip-crack sound here*
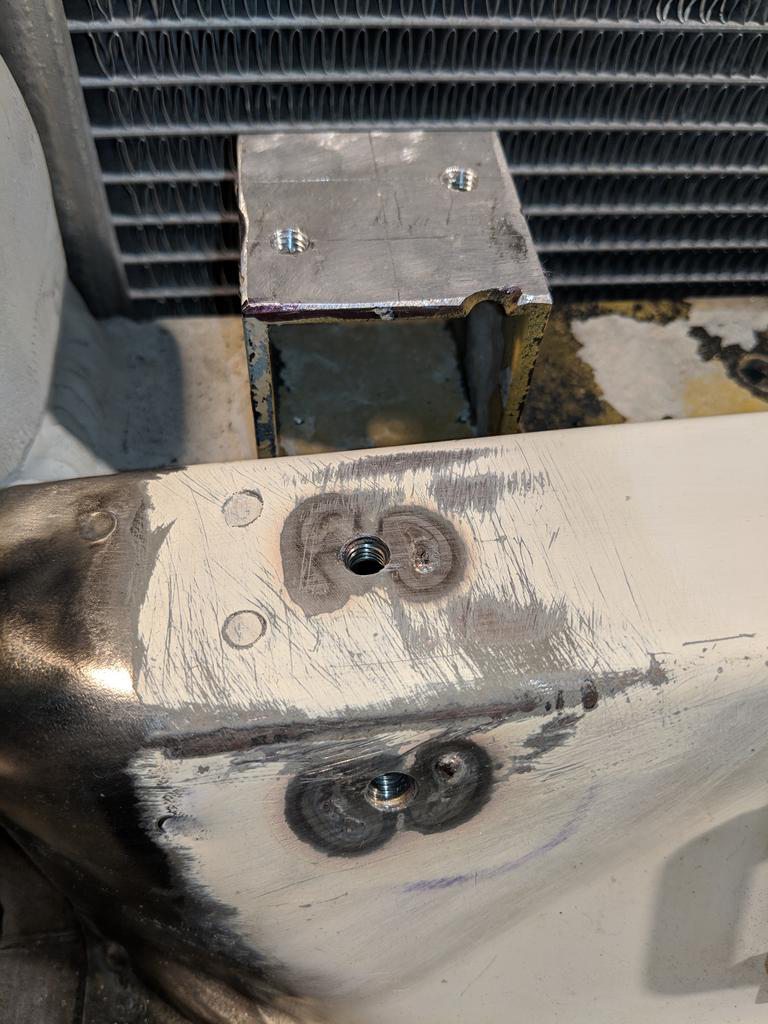
I stitch welded (welding in bursts, saves warping or cracking thinner metals) these hand formed 1" x .125" (25 x 6mm) steel brackets that I made up onto the underside of the upper core support webbing that I'd cut out before, complete with captive nuts underneath:

I couldn't help but think that over time (+no shortage of flex & vibrations) these bolts that pass thru the small holes in the sheet metal side could easily wear out their bores & go oblong, or even worse crack the sheet steel. So I ran over to the local hardware & stocked up on thick washers to accompany each hole with a weld bead:
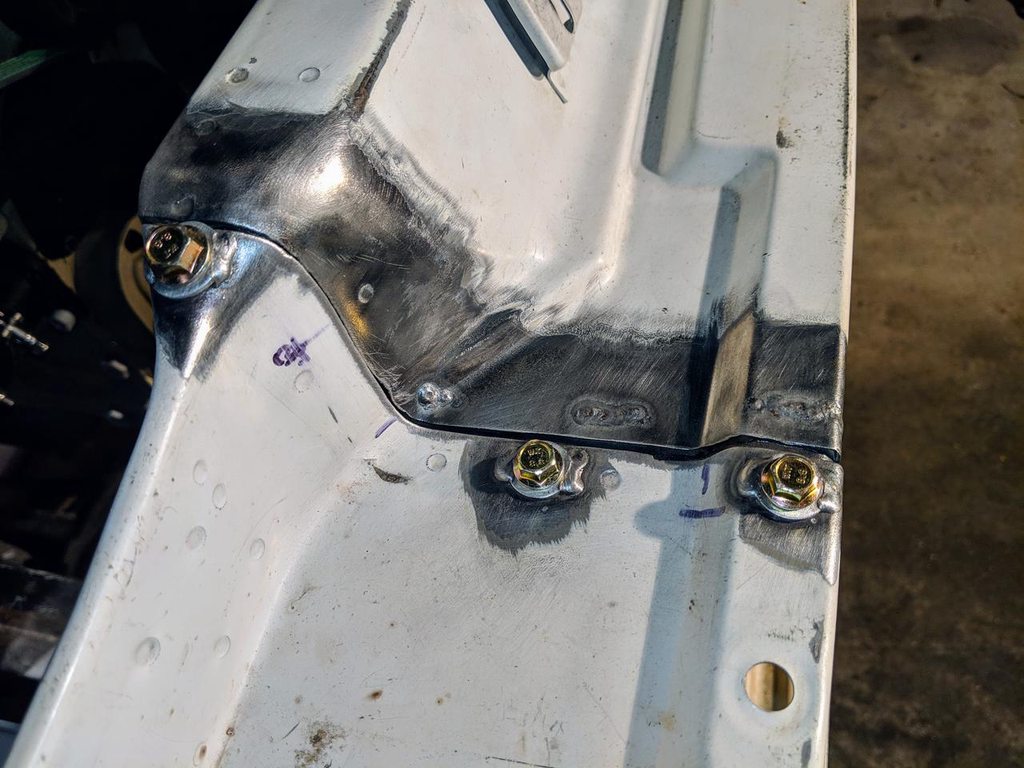
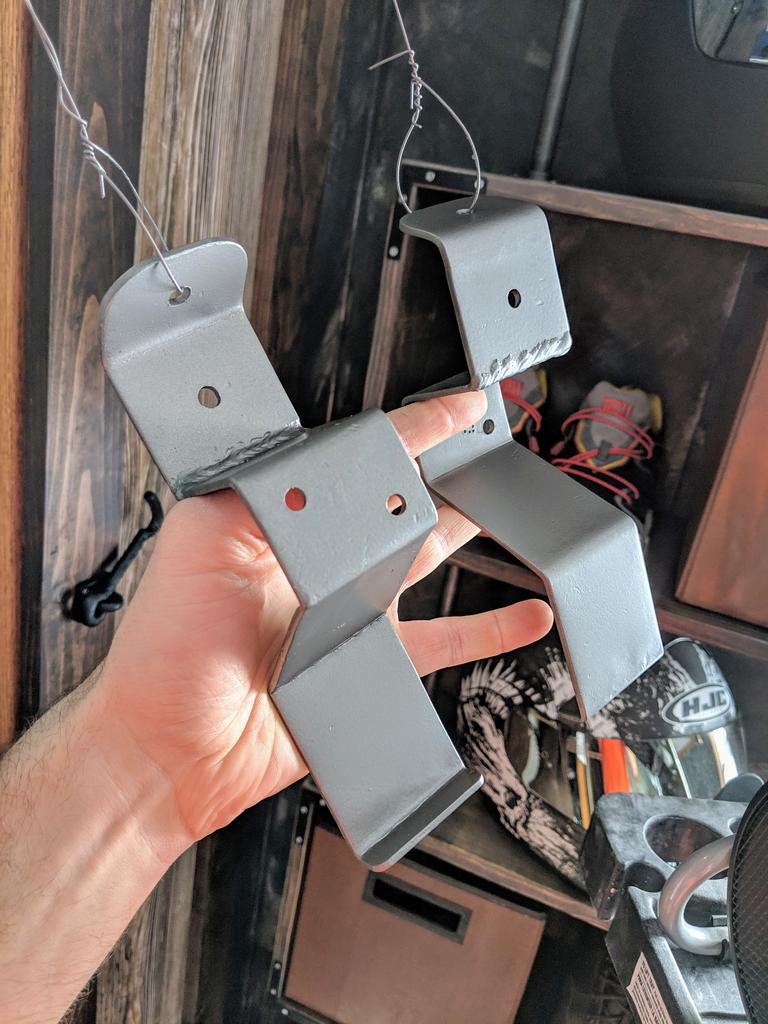
Now it's reattached with the 6 new 10mm bolts that are just long enough so they don't hang down & rust up (the yellow zinc chromate coating helps with that as well!). It stiffened up the whole front-end fantastically, right back to how it was pre-chopping apart for the engine fitment testing phase:
Next up I'm on to the upper cooler mounts & a bunch of plumbing. Spring's approaching quick!
.
I stitch welded (welding in bursts, saves warping or cracking thinner metals) these hand formed 1" x .125" (25 x 6mm) steel brackets that I made up onto the underside of the upper core support webbing that I'd cut out before, complete with captive nuts underneath:
I couldn't help but think that over time (+no shortage of flex & vibrations) these bolts that pass thru the small holes in the sheet metal side could easily wear out their bores & go oblong, or even worse crack the sheet steel. So I ran over to the local hardware & stocked up on thick washers to accompany each hole with a weld bead:
Now it's reattached with the 6 new 10mm bolts that are just long enough so they don't hang down & rust up (the yellow zinc chromate coating helps with that as well!). It stiffened up the whole front-end fantastically, right back to how it was pre-chopping apart for the engine fitment testing phase:
Next up I'm on to the upper cooler mounts & a bunch of plumbing. Spring's approaching quick!
.
Off-Road Ranger I
I swear I meant for this segment to be maybe 3-4 minutes... but all that steel bashing playing at 300-500% speed looked so comical I couldn't bring myself to leave it on the cutting room floor of my hard drive.
Off-Road Ranger I
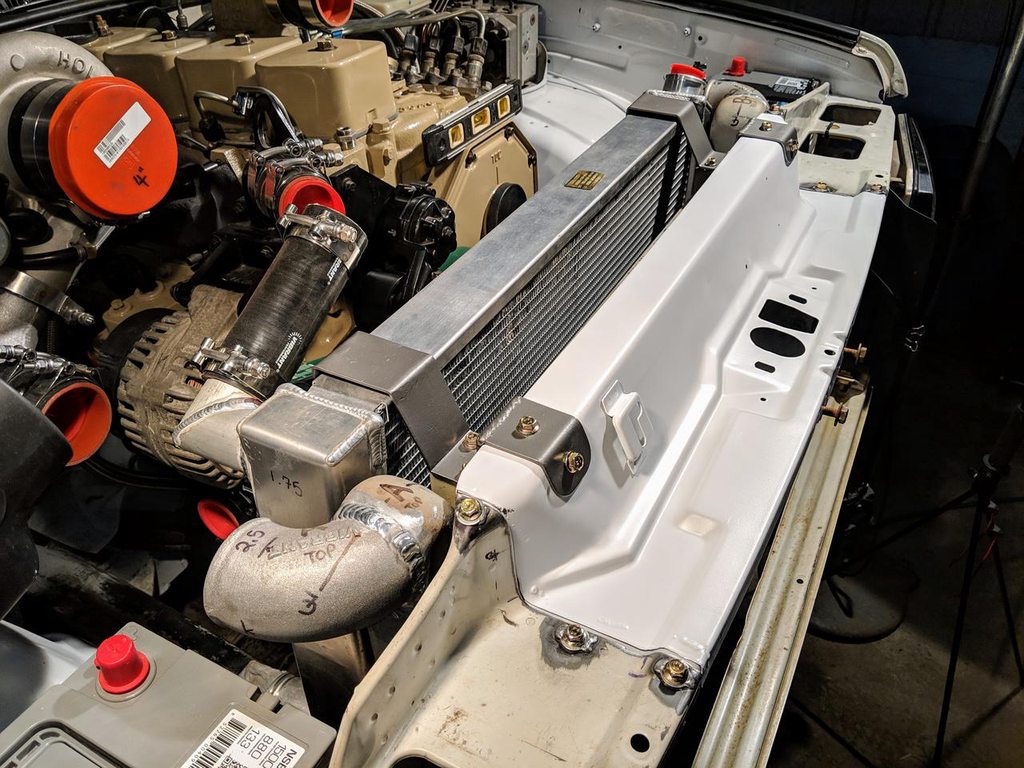
I bashed sections of 2" steel plate into a shape that will become my new upper cooler mounts with some added rubber padding:

The 2 pieces together fit on either side of my new removable core support & reach over the tops of the charge cooler & radiator like so:

Now welded up & drilled to match the nuts that I'll weld into the core support & charge cooler brackets:
Finished editing up the work I'd done on new turbo oil supply + drain lines, also a new easier to reach dip-stick to replace the stubby one, & a temporary crankcase vent so that I can start it soon (will be rerouted up alongside the snorkel when I build it).
The 2 pieces together fit on either side of my new removable core support & reach over the tops of the charge cooler & radiator like so:
Now welded up & drilled to match the nuts that I'll weld into the core support & charge cooler brackets:
Finished editing up the work I'd done on new turbo oil supply + drain lines, also a new easier to reach dip-stick to replace the stubby one, & a temporary crankcase vent so that I can start it soon (will be rerouted up alongside the snorkel when I build it).
Off-Road Ranger I
Those pair of funky shaped brackets I made up do fit closely over top of everything, but how to attach them? I poked a pair of holes in the upper core support along both sides of the front & upper faces, then welded flanged nuts underneath. For the charge cooler I drilled holes in the little box-sections on top & threaded the holes to match all the hardware I've added up front so far:
Here you can see how the brackets hang in a cantilever fashion, from the upper core support towards the engine, where they suspend the charge cooler & lean on the radiator top with a "grip" that will have rubber foam to keep the new steel from rubbing thru the comparatively delicate aluminum:

It's been far too cold to paint anything lately, so thankfully my upper core support being bolt-on now allowed me to bring it home with the brackets for a fresh coat of satin white to match the rest of the front clip:

I tried out a (new to me) type of polyurethane spray & brush-on paint called Steel-It with a seemingly unique method of using stainless steel solids in suspension. If even half the marketing hype is to be believed I'd call it worth a try. After a mess of research I think it may be what I end up using after I clean up my frame rails & all the new mountings for a fresh coat... when it's warmer of course! It seems like a good combination to have salt & abrasion & UV resistance + the ability to weld right thru it. Not a bad looking finish either:
Here you can see how the brackets hang in a cantilever fashion, from the upper core support towards the engine, where they suspend the charge cooler & lean on the radiator top with a "grip" that will have rubber foam to keep the new steel from rubbing thru the comparatively delicate aluminum:
It's been far too cold to paint anything lately, so thankfully my upper core support being bolt-on now allowed me to bring it home with the brackets for a fresh coat of satin white to match the rest of the front clip:
I tried out a (new to me) type of polyurethane spray & brush-on paint called Steel-It with a seemingly unique method of using stainless steel solids in suspension. If even half the marketing hype is to be believed I'd call it worth a try. After a mess of research I think it may be what I end up using after I clean up my frame rails & all the new mountings for a fresh coat... when it's warmer of course! It seems like a good combination to have salt & abrasion & UV resistance + the ability to weld right thru it. Not a bad looking finish either:
Off-Road Ranger I
Cooler mounts are done!
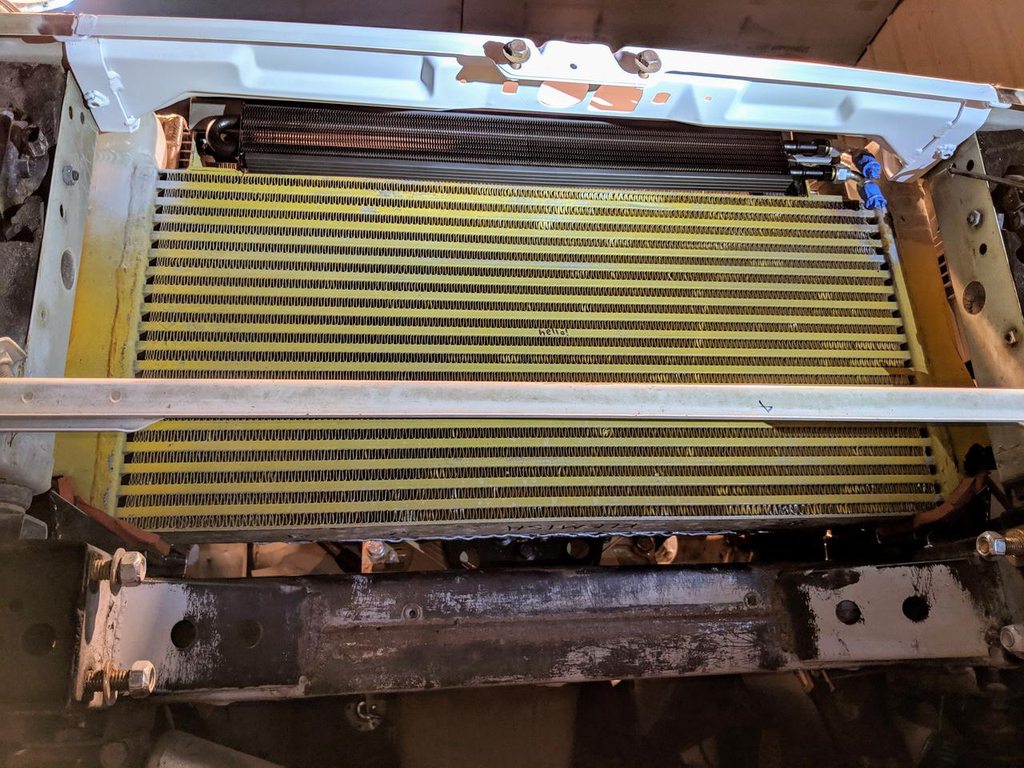
But before I get to that I first needed to cut up this sheet of high-temp silicone sponge rubber to fit as cushions in my new lower cooler mounts:
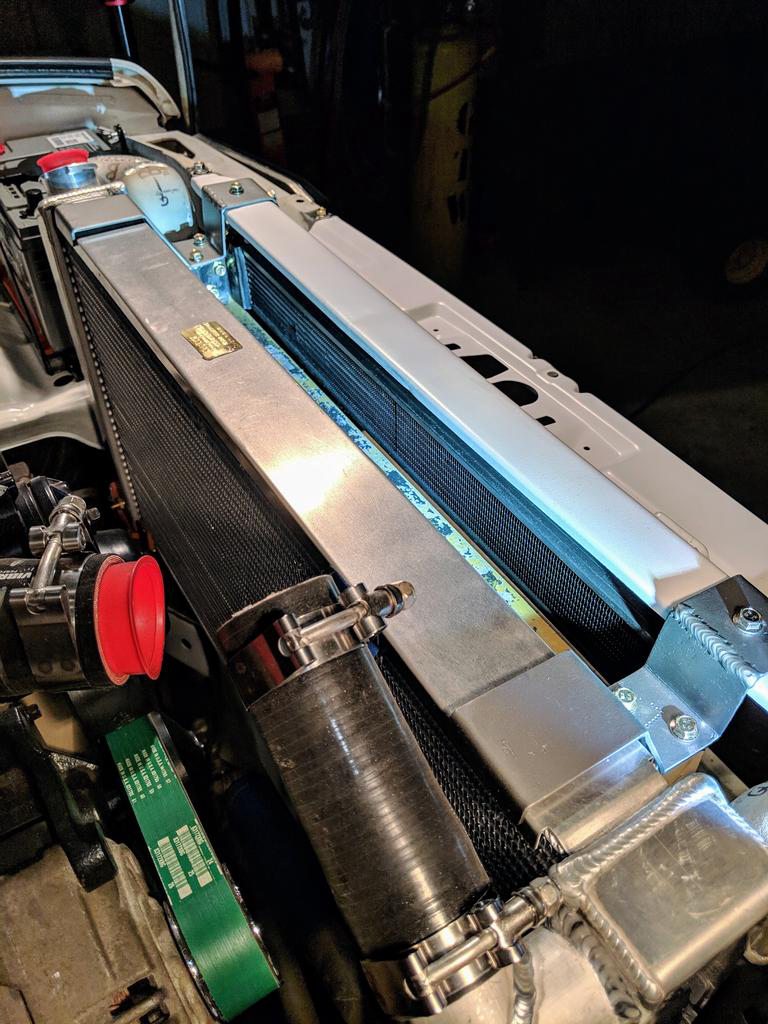
The freshly painted & now bolt-on upper core support, here along with my new custom upper cooler mount brackets. Sure is beginning to make the rest of the front structure look grubby, all of which I'd happily paint when it's not in danger of frosting right over in the shop:
A pair of bolts thread into both the core support & charge cooler, while the radiator is gripped under tension from above with another strip of foam rubber between the new steel & the aluminum radiator. The very same material I'll use between the 2 coolers to guide the incoming air from trying to squeeze out between them before it's done it's necessary temperature hand-off:

And all those hours of work mashed into a video clip:
Now onto the steering cooler, battery cables, & some pipe plumbing.... then to start it up again finally after over a year of fiddling with it!
.
But before I get to that I first needed to cut up this sheet of high-temp silicone sponge rubber to fit as cushions in my new lower cooler mounts:
The freshly painted & now bolt-on upper core support, here along with my new custom upper cooler mount brackets. Sure is beginning to make the rest of the front structure look grubby, all of which I'd happily paint when it's not in danger of frosting right over in the shop:
A pair of bolts thread into both the core support & charge cooler, while the radiator is gripped under tension from above with another strip of foam rubber between the new steel & the aluminum radiator. The very same material I'll use between the 2 coolers to guide the incoming air from trying to squeeze out between them before it's done it's necessary temperature hand-off:
And all those hours of work mashed into a video clip:
Now onto the steering cooler, battery cables, & some pipe plumbing.... then to start it up again finally after over a year of fiddling with it!
.
Hi. Congratulations from Spain for your very great job. I would like to try to do something similar but only about interior camper tuning. It will be possible to have the autocad files for this purpose? Thank you and good luck. If you can, it will be great install in your "beast" portal axels. Greetings
Off-Road Ranger I
Thanks, & yes I do plan to create a drawing package & have complete cabinet kits available once this swap's complete.Hi. Congratulations from Spain for your very great job. I would like to try to do something similar but only about interior camper tuning. It will be possible to have the autocad files for this purpose? Thank you and good luck. If you can, it will be great install in your "beast" portal axels. Greetings
I repurposed a new transmission cooler to become my steering cooler, which fits oddly perfect (swear I planned that... yeah uh huh) in the gap between the charge air cooler & the upper core support structure:
Man am I glad that I didn't hack off the old upper mounting pads (meant for the original step-van installation) from the charge air cooler! They've come in hugely handy for tapping bolts into:

I'm plumbing this new cooler in-line of the low pressure side of the system, between the steering gear output & the pump's reservoir input. It may be overkill for now, but it makes sense when you factor in the relatively low total system volume (maybe solved with a future hydroboost setup) & a planned steering-ram to assist the drag-link with tires getting larger & heavier. Materials that are better at heat transfer are often the softer materials too... so the high mounting position should keep it safe from debris, well clear of the winch, much easier to work on, & even though it's above the reservoir it shouldn't cause too much of a fuss with cool-down overflow:

Enthusiast I
Neat job!
I have installed a Gwyn Lewis steering assist ram on my friends 110 here in the UK, was a brilliant kit and great improvement.
I bought a DIY version off a friend and it wasnt as good, the steering cylinder was too big and the quality of fittings and fixtures fell short of the Gwyn Lewis kit tbh.
I have installed a Gwyn Lewis steering assist ram on my friends 110 here in the UK, was a brilliant kit and great improvement.
I bought a DIY version off a friend and it wasnt as good, the steering cylinder was too big and the quality of fittings and fixtures fell short of the Gwyn Lewis kit tbh.
Off-Road Ranger I
I think any steering ram I add will need to be custom since I don't seem to have any Rover left in the steering system now that I think about it... kinda funny now coming to that realization haha! The pump's an old Saginaw unit, steering gearbox is from a Land Cruiser, hoses are all my own custom jobs, & all the steering links are great big custom pieces I built using 1.5" tubing & 3/4" rod ends.Neat job!
I have installed a Gwyn Lewis steering assist ram on my friends 110 here in the UK, was a brilliant kit and great improvement.
I bought a DIY version off a friend and it wasnt as good, the steering cylinder was too big and the quality of fittings and fixtures fell short of the Gwyn Lewis kit tbh.
Last I looked into it I was guessing that I'd end up with a PSC ram custom fitted, but I'll have to look into this GwynLewis ram & see if I could order some individual parts to custom fit to my setup.
Enthusiast I

Advocate I
Off-Road Ranger I
I've always wanted to work on my own ideas like this that I can build to my ideal specifications & take my time to learn new things along the way... it's such a fun project!Love seeing updates on this beast!
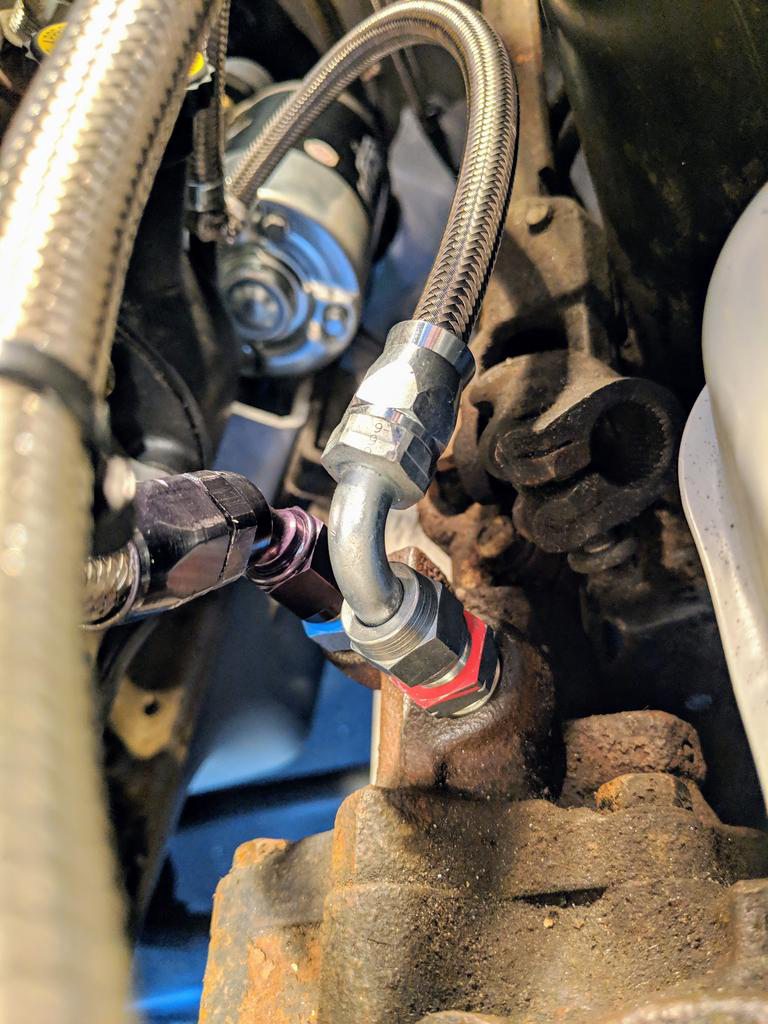
Steering lines & cooler are done & mounted! That being said... I know how I operate so I'm sure I'll modify them again... BUT as it stands pre-hydroboost-with-a-ram-idea I'm quite happy with it:
Power-steering fluid cooler is tucked up nicely, well within the path of incoming air, & easily removed/set aside for any future work:

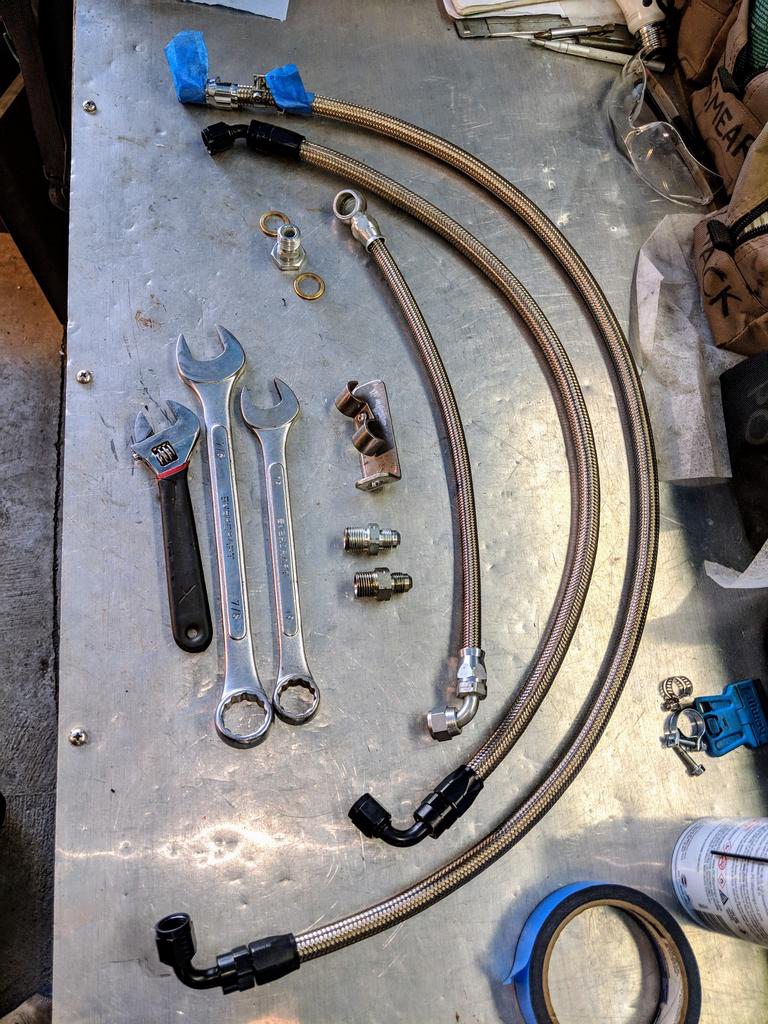
I used more of the Eaton AeroQuip hoses & fittings I've been using so far in the project. For the high pressure side it's -6AN SS wrapped teflon with steel fittings, & for the low pressure sides it's -6AN SS wrapped rubber with aluminum fittings. The red & blue paint was to remedy me going completely mad second guessing which is input vs. output on the brand-new-used Land Cruiser steering gear:
A little bracket with a double-hump clamp (much like what I used to hold my fuel lines underneath) kicks off from the battery tray bolt to lock down the hoses right where I want them as they make the turn around the charge cooler. All the routing of the hoses keeps them plenty safe but with enough slack to make future maintenance a breeze:

Next up is hard-line pipe building, custom battery cables... & starting it!
.
