

Off-Road Ranger I
And here's the process of plumbing the steering thru the fishy little eyes of a couple GoPro cameras:
Off-Road Ranger I

Member III
16986
What a fantastic idea. Surely that window fix is not home made, it looks very professional. Is it a kit or something. I hate my windows and I think only one goes up and down anymore. The fix isn't costly but the labor would kill most of us if more than one window needs fixing. Three cheers for you and your solutions for the whole rig. If I had the money I would follow your build. It's nice to see someone has the time and money to tackle such a project. Money well spent I might add. Congratulations and thanks for the info supplied here.Right around the same time I decided to go forward with an idea I was contemplating after a hilarious failure of the drivers front window. Picture this: tapping the window-down button very briefly as the window instantly free falls after a loud snap & crashes right into the very bottom of the door followed by the metallic clanging of all the window mechanism parts piling up around it. I had to pull over, more to stop swerving as I laughed then to deal with the window.
My idea with the truck as a whole is to simplify to the extreme, so power windows are out & I'm adopting a race car inspired manual window setup. Had some worry that the winter would put a real beating on these new window prototypes, but they held up perfect!
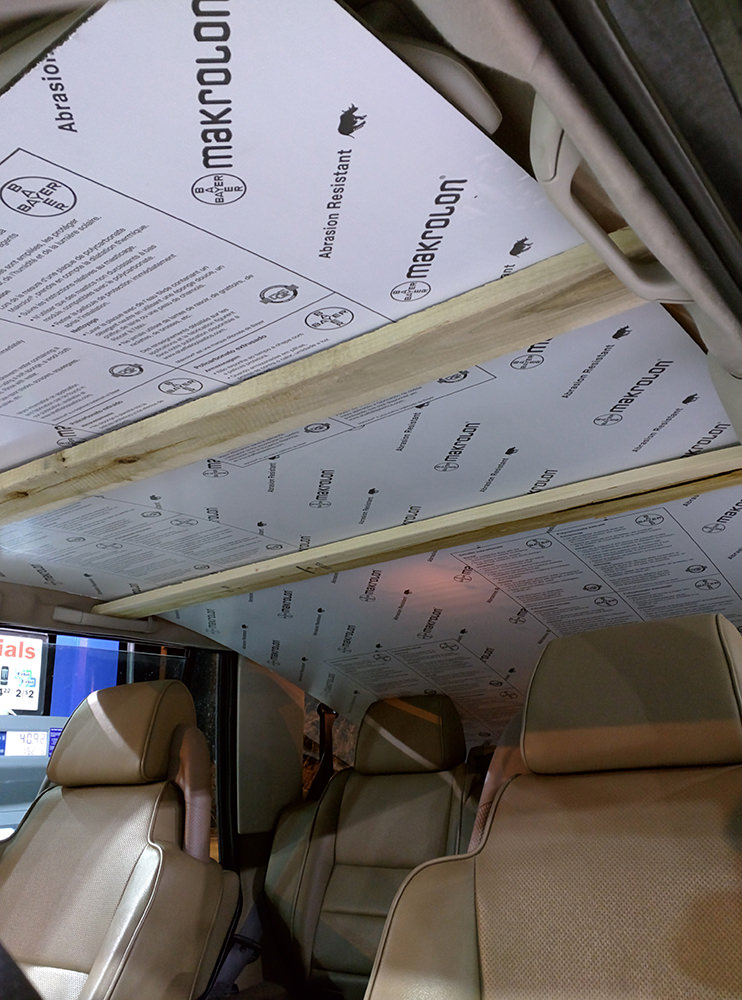
Had to get creative to get the whole sheet of Makrolon home (super tough plastic to replace the glass).
Here's a quick clip of the final product:
cont...

Traveler II
Off-Road Ranger I
I tried hard to avoid cutting/drilling anything for mounting, so I only used existing threaded holes in the body to attach it all, and if I recall correctly the bolt holes towards the rear are 5/16"-24 & the forward row of holes originally used for the rear row seat-belts are 3/8"-24. I love seeing all the different builds people come up with for these things, best of luck with the build!Absolutely love this build, i'm in the middle of turning my D2 into a fishing camper, out of interest could you tell me the size bolts you used for attaching the floor to the chassis?
Off-Road Ranger I
Sometimes I worried that I was "going overboard" on all the info/pics... but then I think how handy it is every time I stumble upon an in-depth build thread on the various forums.Love this thread, great inspiration for my 2003 Disco camping project!
Off-Road Ranger I
Thanks, & it's 100% home made. Did a bunch of study on materials, took a bit of what I've learned in rally racing & off road trucks, & just started going for it. My Rover's windows failed pretty catastrophically, so a repair back to the costly & unreliable original design just didn't make sense. I figured it would take a few prototypes to get the new design ironed out, but I guess I got lucky & ended up with manual windows just like I hoped for. They are stupid simple really, just Makrolon + seat belt webbing + Cobra Buckles. Only thing I might change is building some sort of spring-loaded track to open/close them even more rapidly.What a fantastic idea. Surely that window fix is not home made, it looks very professional. Is it a kit or something. I hate my windows and I think only one goes up and down anymore. The fix isn't costly but the labor would kill most of us if more than one window needs fixing. Three cheers for you and your solutions for the whole rig. If I had the money I would follow your build. It's nice to see someone has the time and money to tackle such a project. Money well spent I might add. Congratulations and thanks for the info supplied here.

Influencer II
Off-Road Ranger I
Thanks! Maybe I need even more projects to work on... because I swear my "ideas" list for this thing keeps growing faster then my "built" list shrinks.Great thread! Looking forward to seeing what else you do on your Disco!
Off-Road Ranger I
I have a whole line of other project vehicles that are really challenging to ignore while I should be wrenching on the Rover. Some are nearly finished but I use almost every day (lifted Subaru wagon, off road BMW motorcycle), and some others collecting dust in a mid-build state until I have more time (CRX rally car, 71 cafe racer), and even more I'd like to start! (a new drift missile, an electric car to experiment with).i wonder what is next after you will finished this one. Remember you will find empties after project completed.
Traveler II
That's what normally happens! I have the same problem with my 2001 Range Rover.Thanks! Maybe I need even more projects to work on... because I swear my "ideas" list for this thing keeps growing faster then my "built" list shrinks.
Off-Road Ranger I
Full disclosure... my thoughts on that are the bomb-proof wheels were honestly a bit of overkill for the level my build was at the time. I predicted an engine swap was in my future back then, had I not expected that & had a do-over then nope I would've went with non-beadlock aluminum or simple steelies with cheap weld-on outer beadlock rings. Like you've said, with the diesel & the way the build's going they make much more sense looking forward, but at ~135lbs each they are a real handful for the 4L V8's power levels (or stock axle parts for that matter). My plan is to custom mount used Range Rover Sport brakes, either the giant 6-pot calipers or the 4-pots depending of course on what I can safely fit in the barrel of my wheels.I'll say it again.. this is the best disco build I've seen
Question about your wheels and tires. I know you run the Trailworthy Fab hummer wheels. I'm considering doing the same, but I'm concerned about losing power, and the increased unsprung weight. Factory alloys weigh around 30 pounds, and those steel hummers weight 75. Add in 37" military tires... yeah, lot of weight. Any thoughts about it? Granted it will be less of a problem with your diesel engine, but would you do it again on a rover V8? I have all the driveline upgrades, and plan on putting in 4.12 gears, hd axles and lockers, so that's all taken care of. I don't know of any upgrade for the brakes though?
I'm currently on the Terrafirma 16x7 alloy wheels, and they don't make the beadlock kit anymore, so I'm on the hunt for wheels and tires.
Thanks, that answers that. I'll stick with my alloy wheels and get the beadlock kit.Full disclosure... my thoughts on that are the bomb-proof wheels were honestly a bit of overkill for the level my build was at the time. I predicted an engine swap was in my future back then, had I not expected that & had a do-over then nope I would've went with non-beadlock aluminum or simple steelies with cheap weld-on outer beadlock rings. Like you've said, with the diesel & the way the build's going they make much more sense looking forward, but at ~135lbs each they are a real handful for the 4L V8's power levels (or stock axle parts for that matter). My plan is to custom mount used Range Rover Sport brakes, either the giant 6-pot calipers or the 4-pots depending of course on what I can safely fit in the barrel of my wheels.
Off-Road Ranger I

Traveler II
Great work Tinker! Love your Disco.Ticking a ton of little things off the list before the startup. It takes a pile of hours & hardly feels like anything's getting done... but it has to be done.
I took some time aside from the startup checklist to get the front end back together. Moved them up in the order of things done just because it makes me happy to see it finally looking like a truck again!
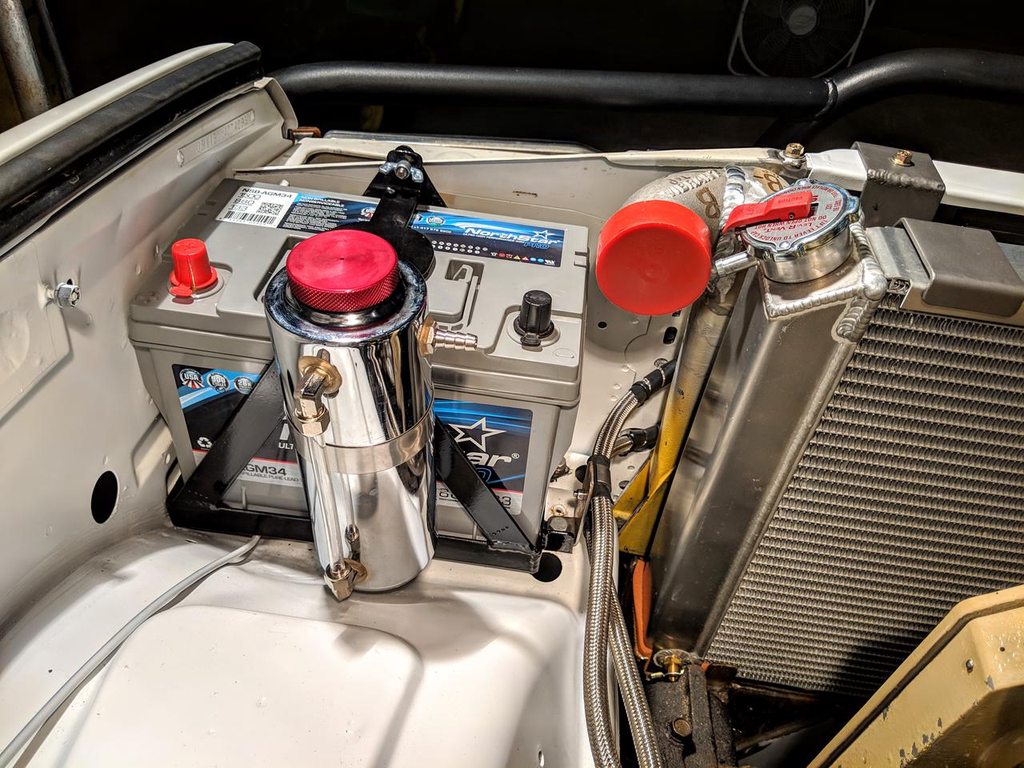
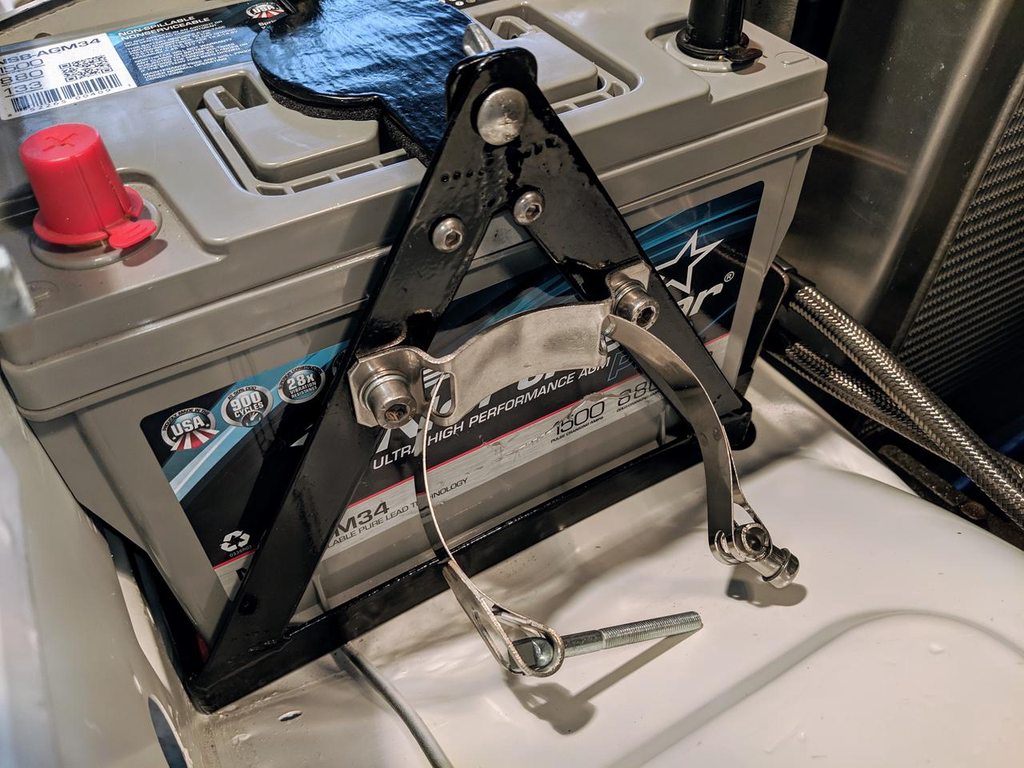
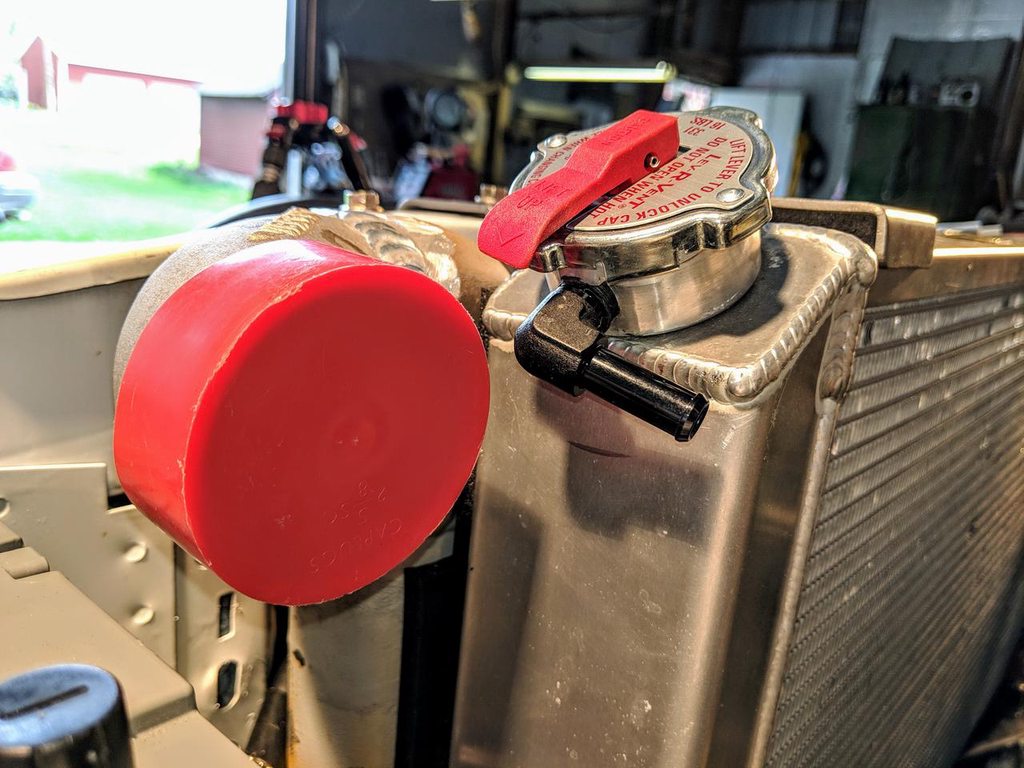
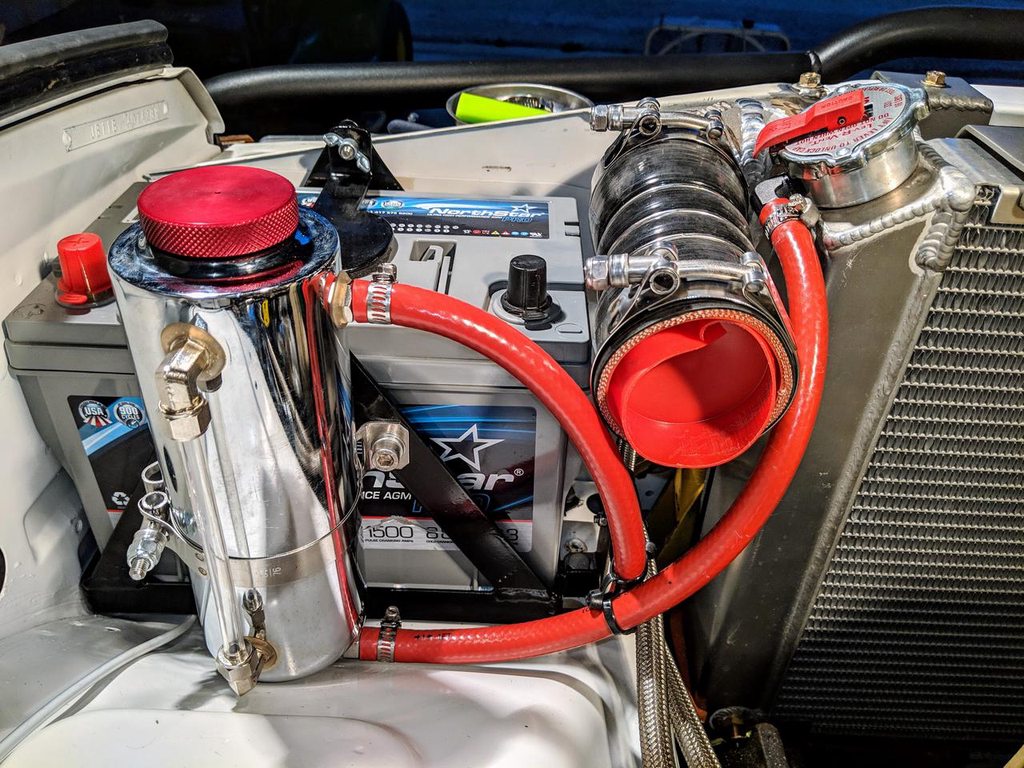
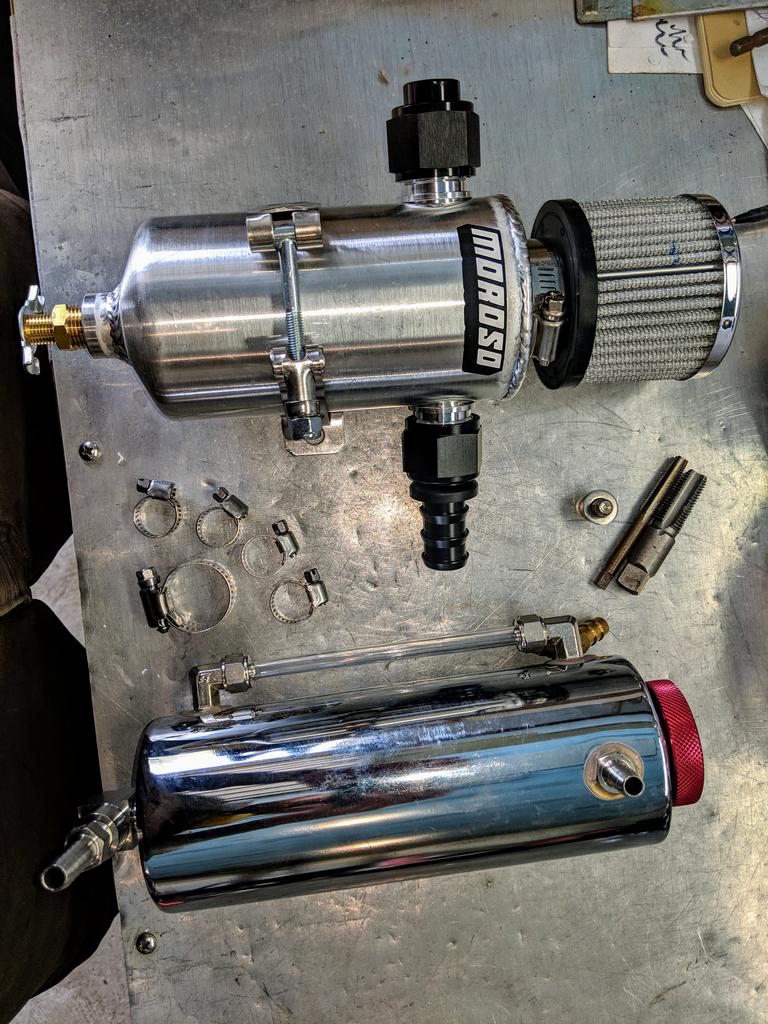
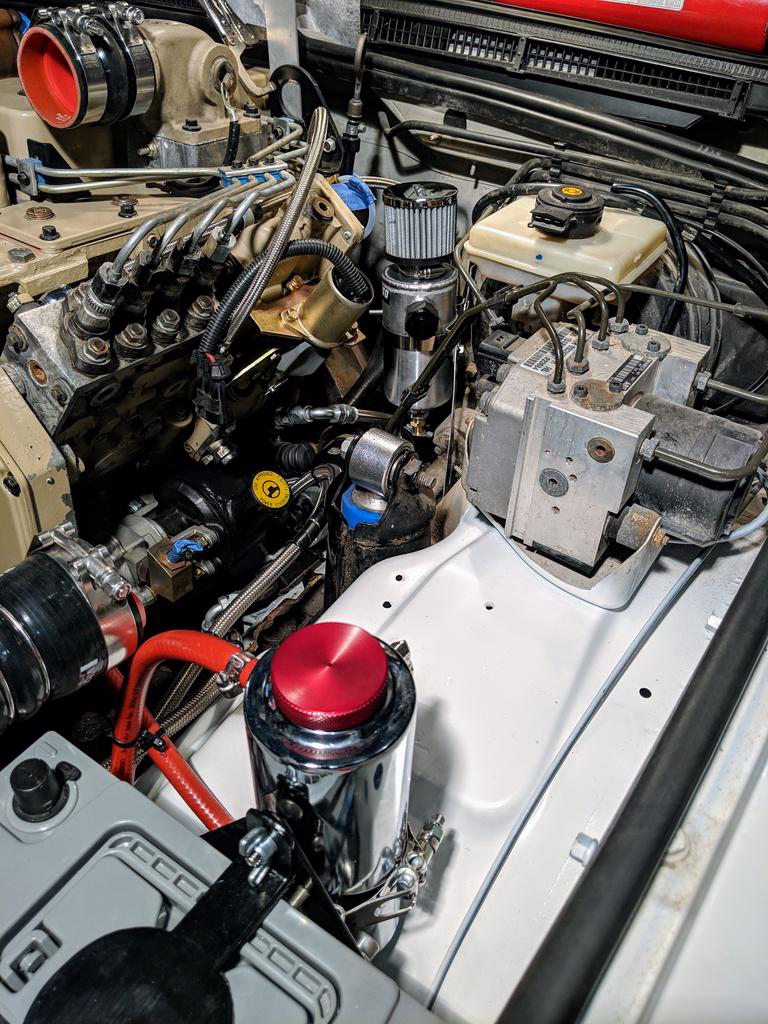
Nearly forgot to mount the coolant expansion tank before I got the coolant hard pipes done. I drilled & tapped a pair of holes into my custom battery box to hold the strap that winds around the tank. Might change out that clamp though, not totally convinced the supplied strap clamp is going to hold up to all the vibration. I had to also tap the bottom of the tank for NPT threads so I can put the fitting in that I want, not a big deal because I really like the breather cap + sight glass level indicator. The barb under the neck of the radiator cap that feeds this tank is also getting changed out for an elbow fitting, because as you can see it's pointed directly at the cold-side charge pipe:
Off-Road Ranger I

I was chomping at the bit to get the wheel & tire upgrade going, but it was becoming quite clear that 35" tires were going to be trouble if I didn't create clearance first. When the flexi flares arrived I did my best to not have a panic attack at the idea of taking an angle grinder to all 4 corners of my beloved truck. Didn't help that the instructions basically said "Check package contents & install flares", which I have to admit didn't inspire much confidence. When I took to the internet for guidance I found a whole lot of nothing, save for a blurry photo filled forum thread on expedition portal for the 1st generation Discovery. It's not very often you run into this problem these days so it seemed appropriate to dive head first into the project & have a go at making an instructional video on the install as I worked through it.
So here it is, my first attempt at an entertaining install video:
cont...
Headliner started to sag pretty bad & I had an idea for a simple fix.
Not terribly easy to remove, thing's huge:

Roll-on bedliner application:

Reinstalled, looking good!

cont...


