"Nanuuq" my Land Rover Discovery 2 diesel swap, ...forever a project!

  • HTML tutorial

Hafaday

Rank V
Launch Member

Pathfinder I

2,271
Richmond, VA.
Member #

7455

Right, & that's awesome! The CDL is a big upgrade (Center Differential Lock in the Land Rover transfer cases, for anyone else wondering). I was half tempted to chuck a 1.00 gear-set in mine when I was putting the HD pin in the locking case... but figure I should just wait & go nuts building up my spare later so that I can stay focused on the swap.
You are doing one hell of a job on this build.

Throwing this out there if the HD pin ever takes a dump. https://www.ashcroft-transmissions.co.uk/diy-rebuild-kits/lt230-rebuild-kits/ashcroft-lt230-atb-diff.html
 
  • Like
Reactions: Tinker

Jeff Blake

Rank V
Launch Member

Enthusiast III

I was very tempted to go with the ATB, especially since my center diff definitely had some wear in it.

Why 1.00 gears? To regear the difs instead? I went with 1.41 as it's a perfect match for my 32" tires and don't want to regear the diffs anytime soon (because if I did, I'd want lockers and HD axles, and that's looking like $4-5K).
 
  • Like
Reactions: Ben Cleveland

Hafaday

Rank V
Launch Member

Pathfinder I

2,271
Richmond, VA.
Member #

7455

I was very tempted to go with the ATB, especially since my center diff definitely had some wear in it.

Why 1.00 gears? To regear the difs instead? I went with 1.41 as it's a perfect match for my 32" tires and don't want to regear the diffs anytime soon (because if I did, I'd want lockers and HD axles, and that's looking like $4-5K).
Copy/understand that.
 

Tinker

Rank V
Launch Member

Off-Road Ranger I

2,357
West Michigan
First Name
Mike
Last Name
Klemish
Member #

5606

Tinker

Rank V
Launch Member

Off-Road Ranger I

2,357
West Michigan
First Name
Mike
Last Name
Klemish
Member #

5606

I was very tempted to go with the ATB, especially since my center diff definitely had some wear in it.

Why 1.00 gears? To regear the difs instead? I went with 1.41 as it's a perfect match for my 32" tires and don't want to regear the diffs anytime soon (because if I did, I'd want lockers and HD axles, and that's looking like $4-5K).
Just trying to push the gearing more into the 4BT's happy place, which is craaaaaazy low. We're talking peak torque at 1500-1600 rpm! As someone who's fairly new to diesels... that still sounds nuts when I say/type that. With this upgraded turbo & a bit of fine tuning with help from some friends it may very well be creeping up on 600 lb-ft torque :fearscream:

Not that the current 3.54 axle diff ratios + 1.211 center diff ratio is bad by any means, just that a center diff with the 1.003 gear get's it near perfect:
 

Hafaday

Rank V
Launch Member

Pathfinder I

2,271
Richmond, VA.
Member #

7455

Those things are tough as nails from what I've read. Been a big fan of their work & parts, not to mention how helpful Dave's been every time I throw some wacky question his way!
Just trying to push the gearing more into the 4BT's happy place, which is craaaaaazy low. We're talking peak torque at 1500-1600 rpm! As someone who's fairly new to diesels... that still sounds nuts when I say/type that. With this upgraded turbo & a bit of fine tuning with help from some friends it may very well be creeping up on 600 lb-ft torque :fearscream:

Not that the current 3.54 axle diff ratios + 1.211 center diff ratio is bad by any means, just that a center diff with the 1.003 gear get's it near perfect:
Rock on, Man... Rock on.
 

Tinker

Rank V
Launch Member

Off-Road Ranger I

2,357
West Michigan
First Name
Mike
Last Name
Klemish
Member #

5606

Picked up a few more sticks of 1/4" wall DOM tube & the threaded LH/RH weld-in inserts to rebuild my drag link, which needs to be a little longer to reach the new Land Cruiser steering gear that mounts outside the frame rail:


Every time I looked at the new transfer case input yoke it was driving me nuts, just a feeling that I was forgetting something. Then when I was trying to carry it, waddling around with it, suddenly I had a boot full of gear oil... AHA! I forgot to put the plug bolt back thru the bore of it! I'd left it stuck in the old transmission, now that's sealed up:


The Rover's hi/lo range shift fork housing on the transfer box was sitting a little too close to the tunnel for comfort, gave it some massage with a lump of steel on a stick:


Attacked the fuel-fill port with various sharp things, including a bad choice to try a 1" drill bit... that got a little squirrely so I switched out for an aggressive rat-tail file to open it up to accept the larger diesel pump nozzles, also with the combination of vise-grips & a few hex keys I was able to bend the flapper back in place to match the new bore:


After lots of pondering laid out under the truck, think I've nailed down a desirable way to secure the new fuel lines under there. I'll weld strips of steel with nuts welded on that I can bolt these fancy stainless double-hump line clamps that I found on summit. Putting them right between the frame & body could be annoying to work with in the future, & requires plastic push-in clips that I'm not a fan of. These teflon-lined braided hoses are fairly stiff, shouldn't need all that many of these brackets, maybe 5 or 6:
 

Tinker

Rank V
Launch Member

Off-Road Ranger I

2,357
West Michigan
First Name
Mike
Last Name
Klemish
Member #

5606

The adapter for the lift-pump arrived (the 4BT uses a camshaft driven fuel pre-pump in place of an in-tank pump), so the engine side of the fuel supply is finally connected & ready to receive the go juice:


My new fuel-sender setup's ready to go now, so much simpler! Complete with aluminum "straws" (straight down pickup + angled return to try to keep any foaming action away from the pickup) & an upgraded weather resistant deutsch wire connector on the level sensor:


Also threw together some patterns to drill the transfer case flange's rectangular bolt pattern into the rotor for my parking brake:


I should have the tank back up in there & the all the fuel hoses lashed down tomorrow, pretty excited to check the fuel system off my list!
 
  • Like
Reactions: Hafaday

Tinker

Rank V
Launch Member

Off-Road Ranger I

2,357
West Michigan
First Name
Mike
Last Name
Klemish
Member #

5606

Fuel system is complete!

Sender is threaded into the tank & the hoses affixed. I intentionally looped the hoses from the drivers side over to passenger to give me enough extra length to attach/detach the fittings while on the ground, rather than fight with wrenches up above the tank:


The tank & skid plate are back up in their home, with new tank-strap pads to better protect the plastic tank from rubbing, also upgraded the fill & vent hoses with much improved clamps... since the originals all but disintegrated!


Cut, ground, filed, bashed, & drilled up a handful of brackets to solidly hang my hoses off the frame. I also welded the nuts on so that bolting the stainless double-hump clamps would be way easier while laying underneath:


Ran a wire-wheel over the frame, enough to make a bald spot to weld the brackets on. Hosed 'em down with paint of course... but nothing fancy for now seeing as the frame needs a whole going over with a bucket of POR15 coating. Was something I planned to do eventually, but the corrosion underneath was a bit accelerated before I devised a method to dry out the ever damp concrete in the building (due to being half buried in a hill).


And here the hoses & brackets fully assembled, with rubber sleeves under the clamps & sleeves over any place that might try rubbing:


Here's the assembled forward section leading up from the driver's frame rail to the engine, with enough slack to allow the 4BT to shake around & not sever it's new plumbing:
 
  • Like
Reactions: dolli310

Tinker

Rank V
Launch Member

Off-Road Ranger I

2,357
West Michigan
First Name
Mike
Last Name
Klemish
Member #

5606

Now that there's not a choking cloud of ready-to-explode gasoline fumes under the truck... I can get back to work on the divorced transfer-case crossmember!

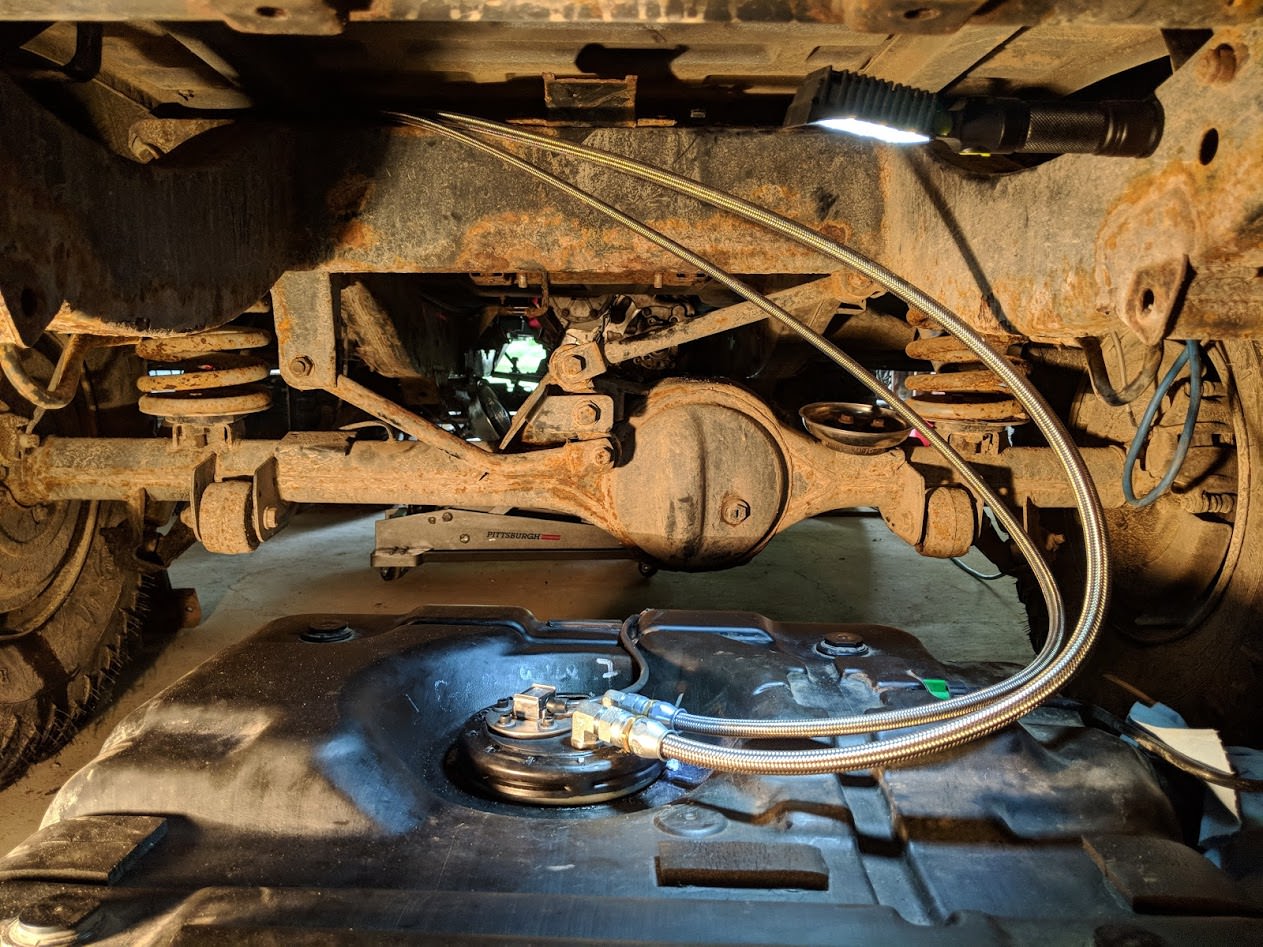
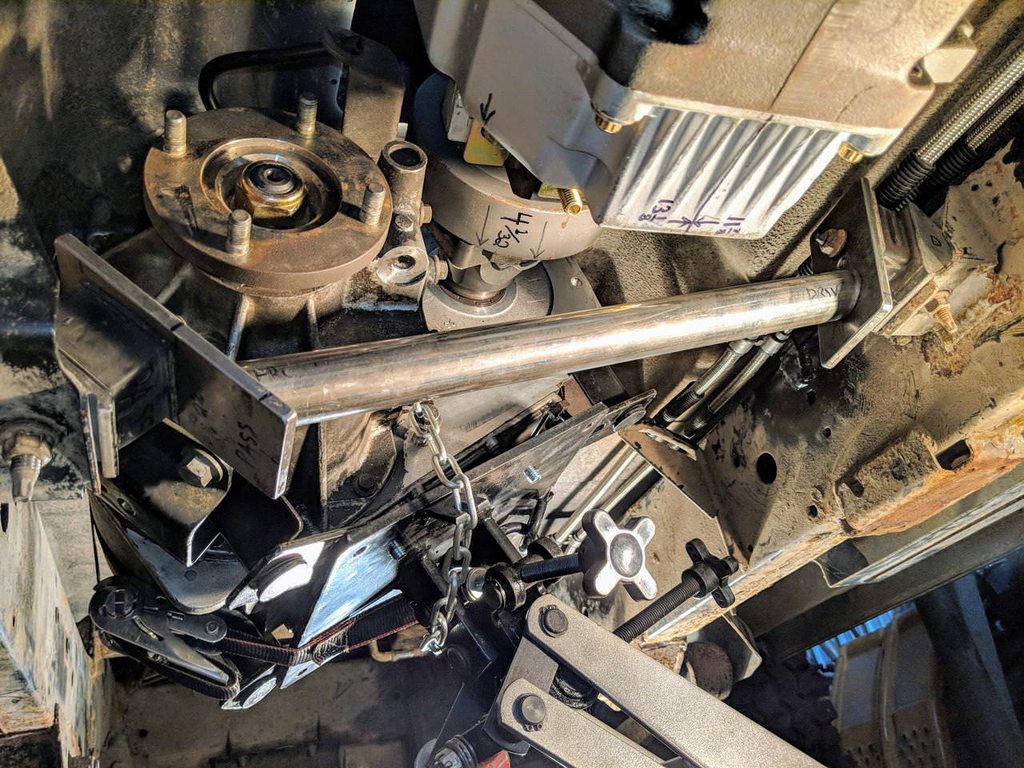
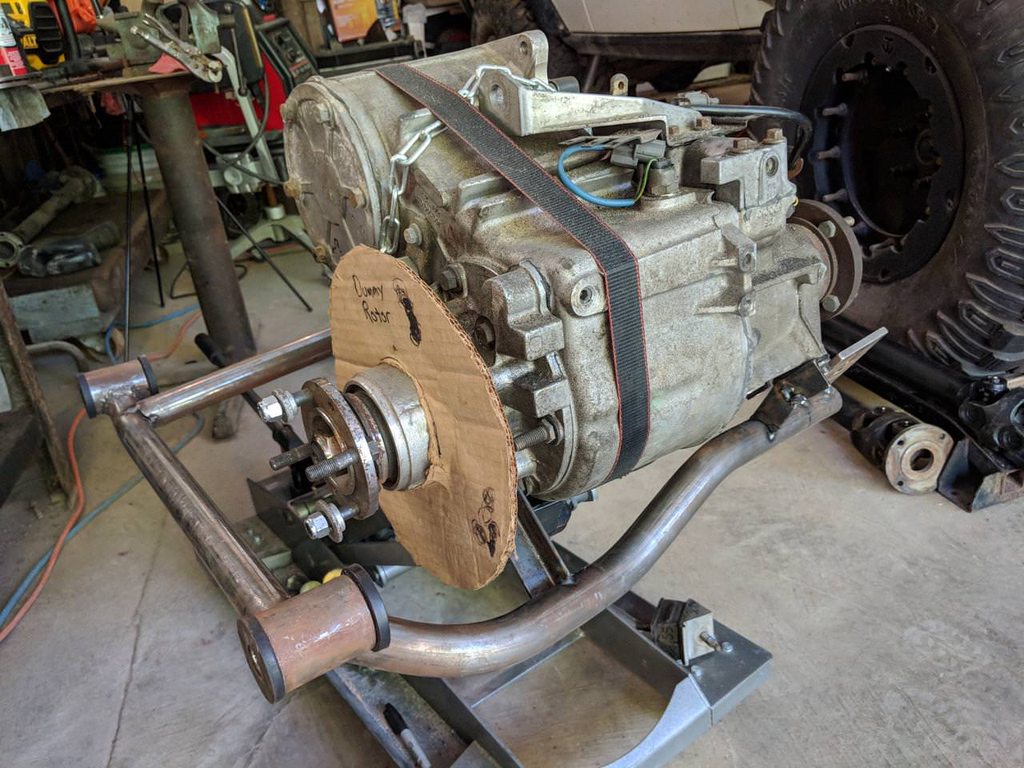
First order of business was to be sure the whole assembly was as level & straight as I could manage. Good thing I'm paranoid about getting it all really straight, because I forgot I had left the engine mount studs finger tight & it wiggled its way a bit crooked. Much better now:


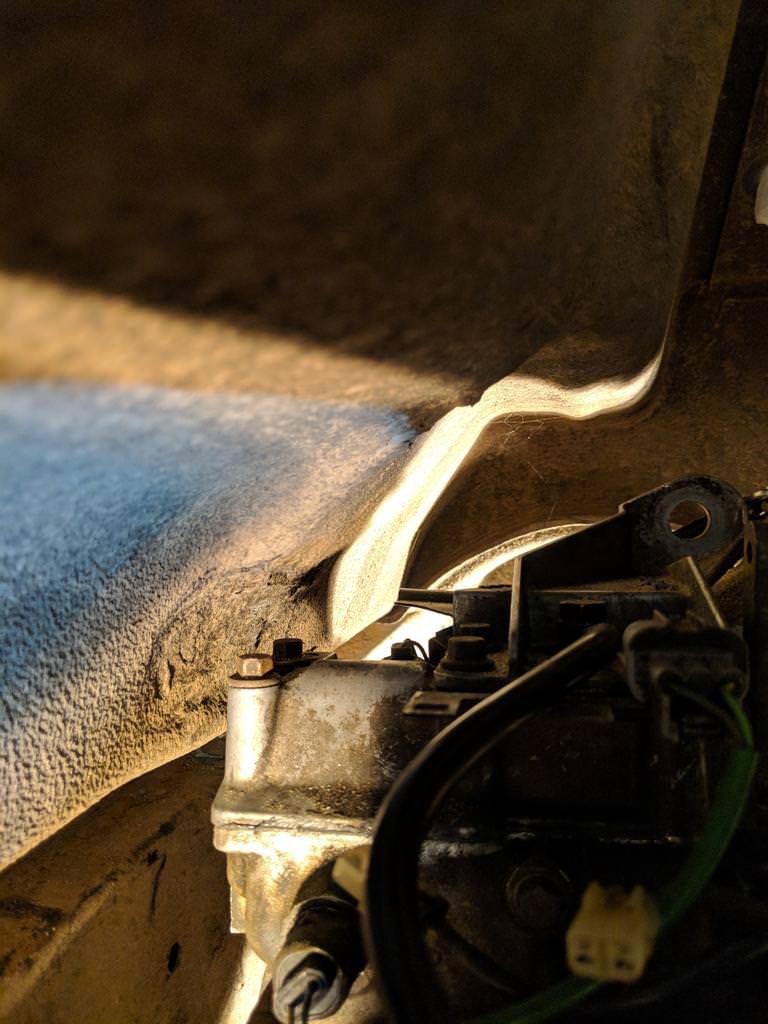
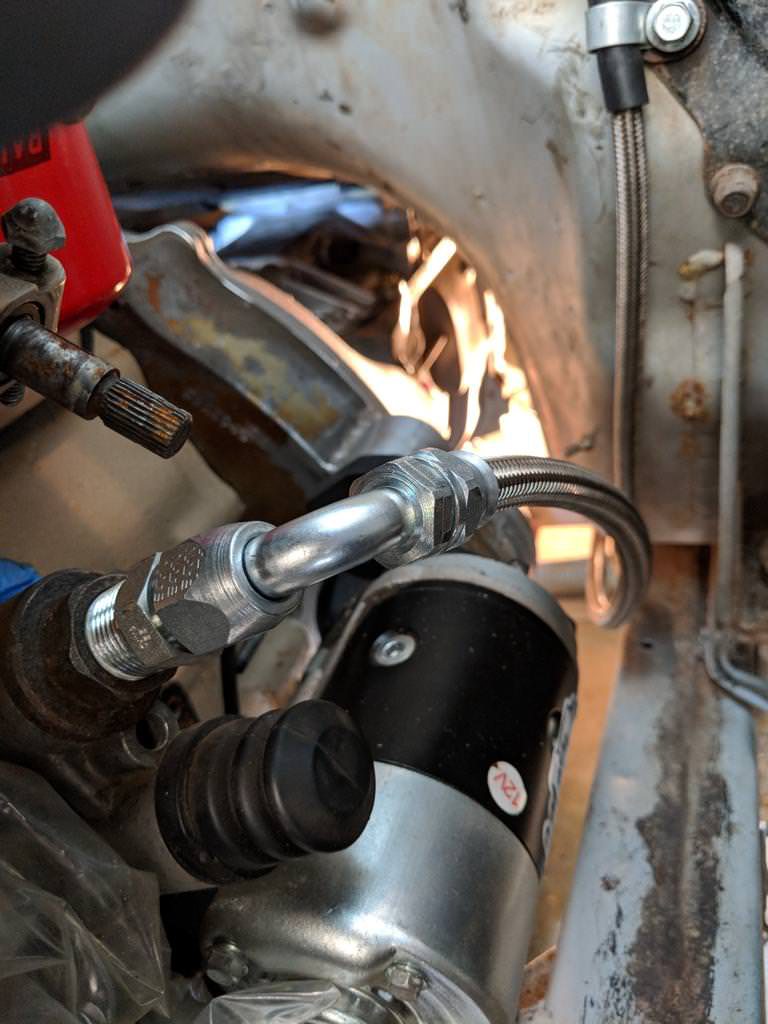
Luckily the input face of the transfer-case has a large & flat machined surface (that used to be where it mated to the old transmission) so that I can accurately measure the yokes are dead straight:


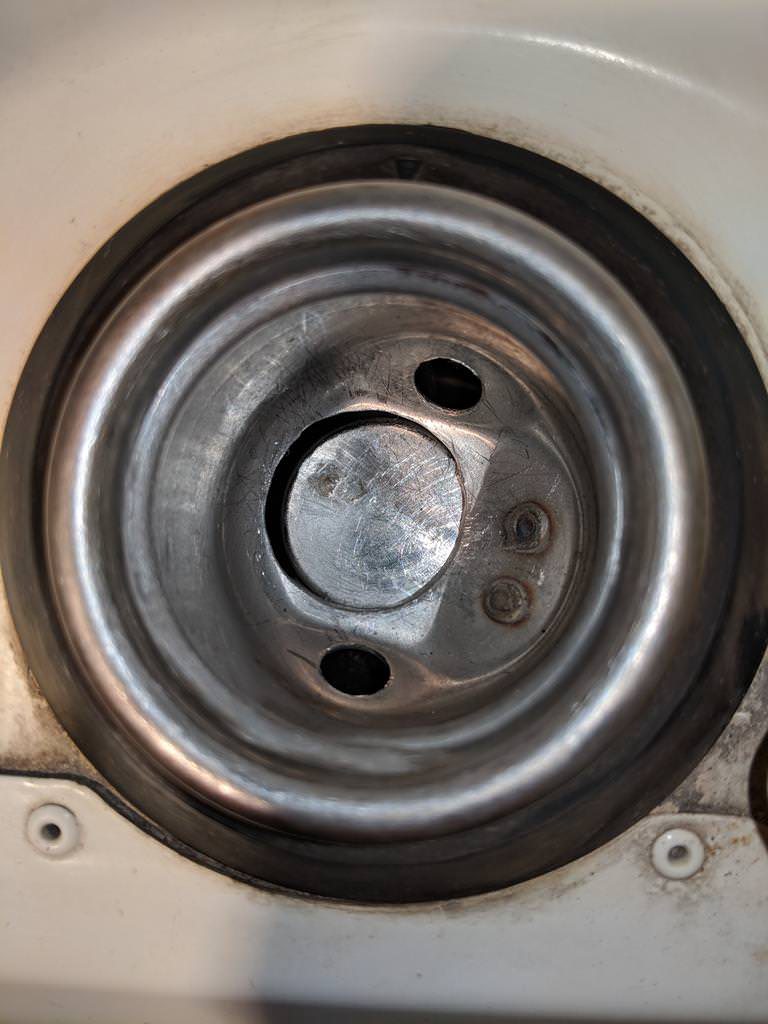
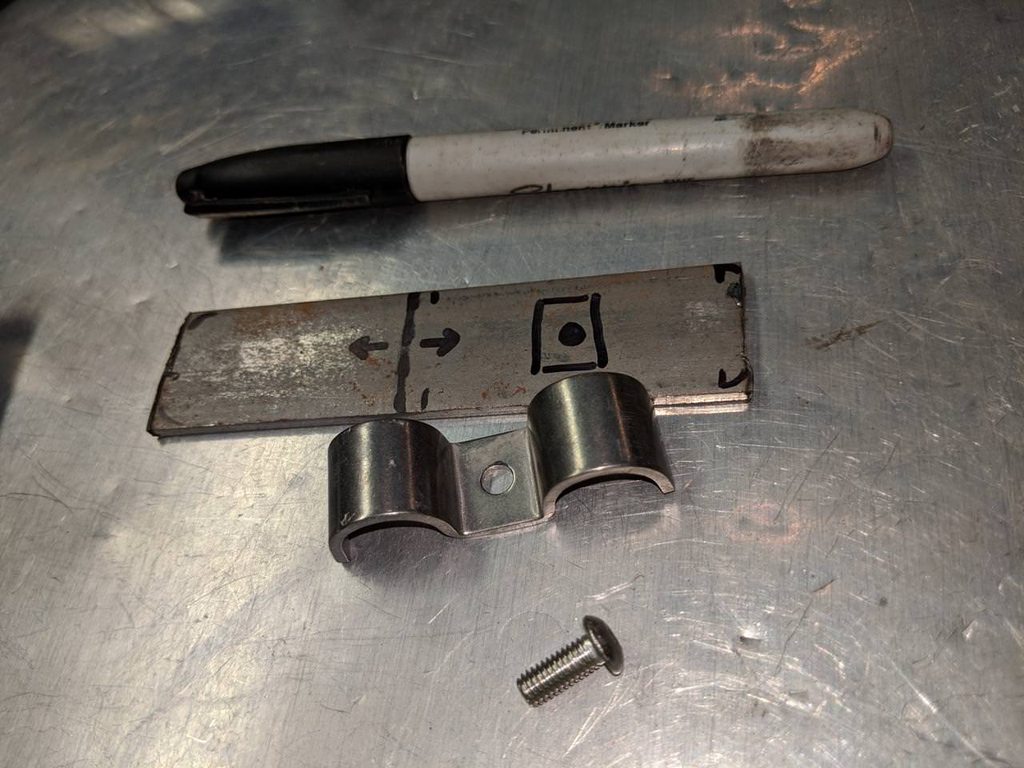
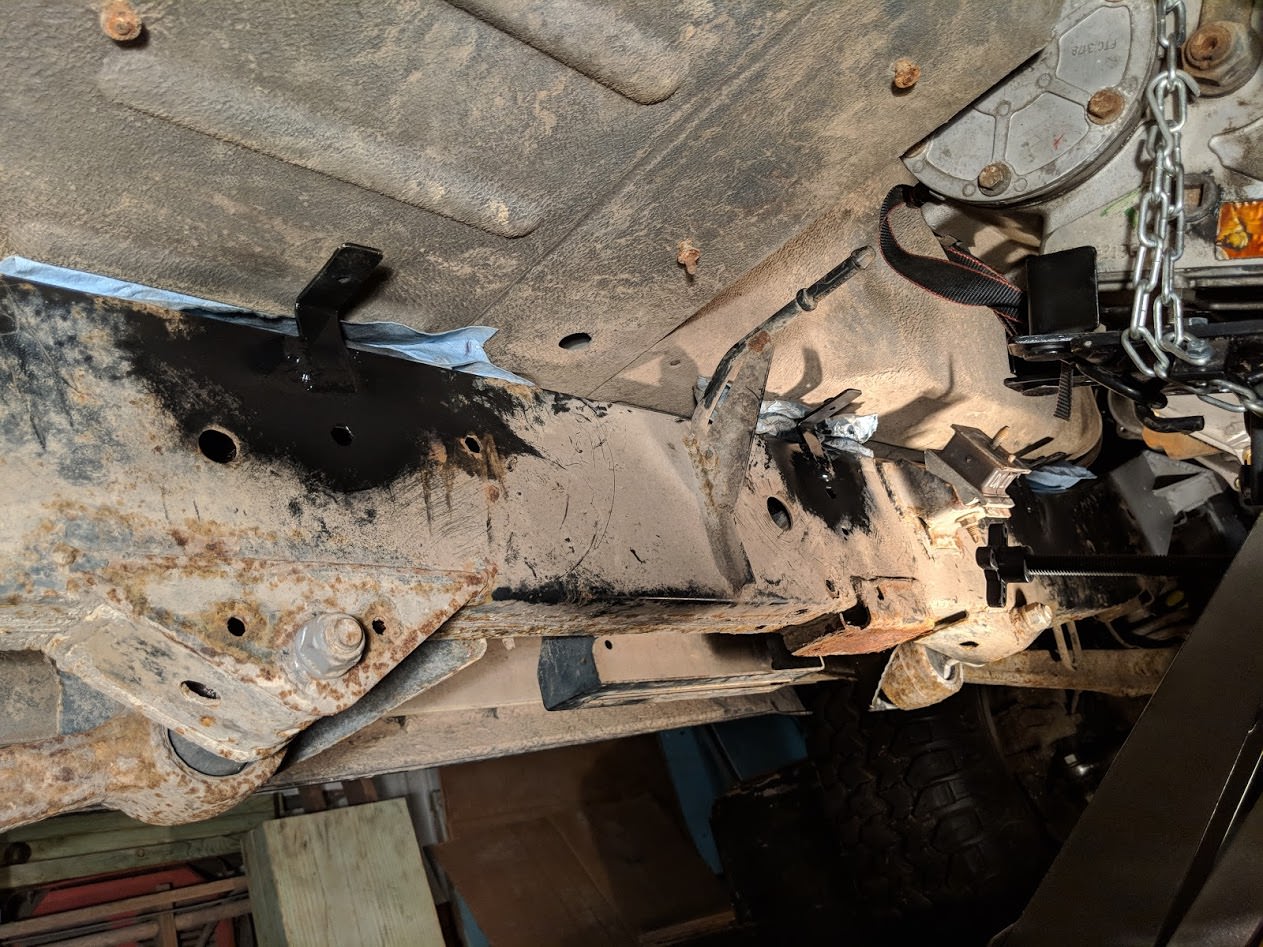
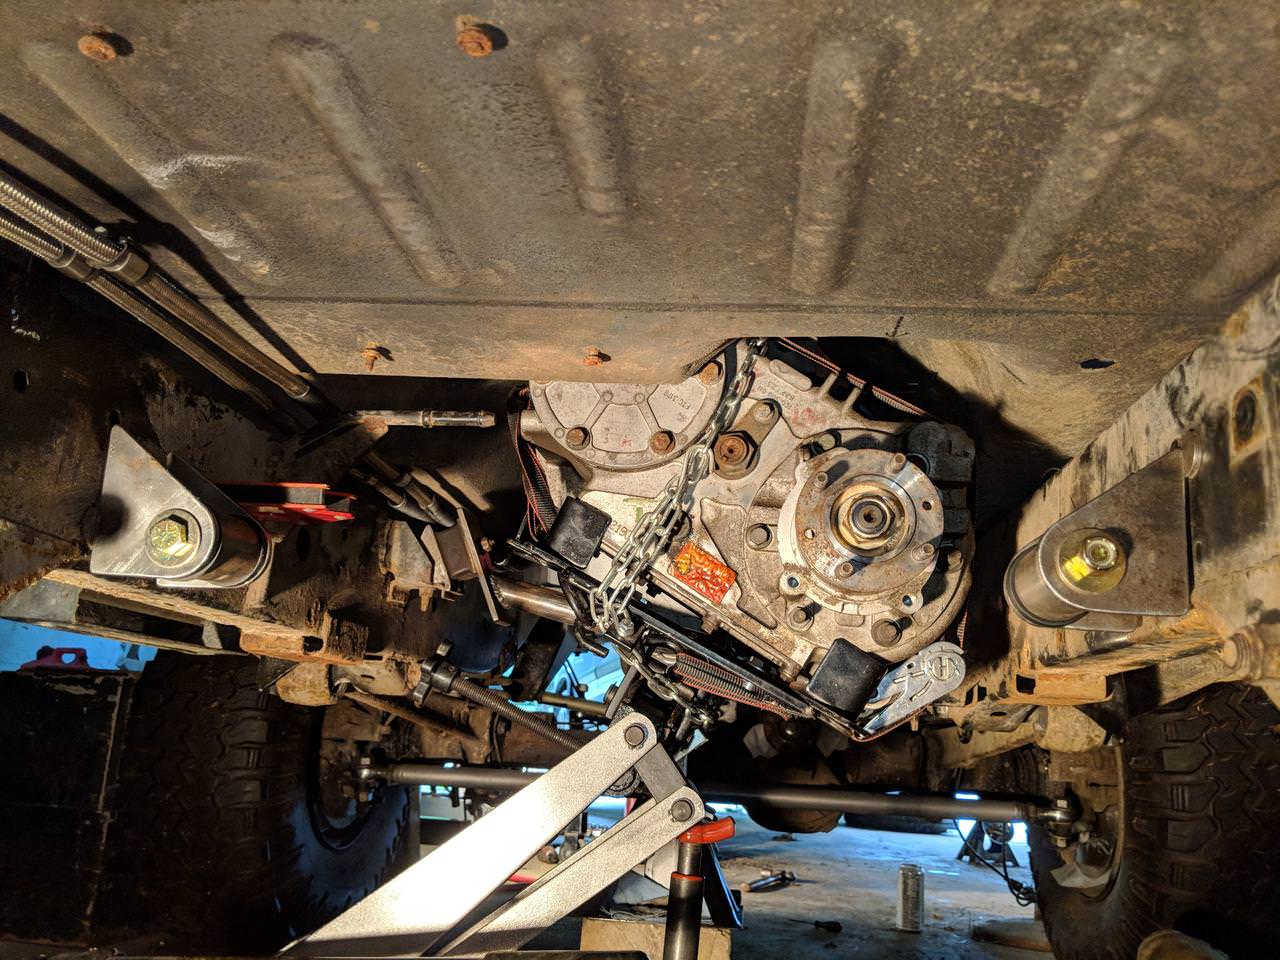
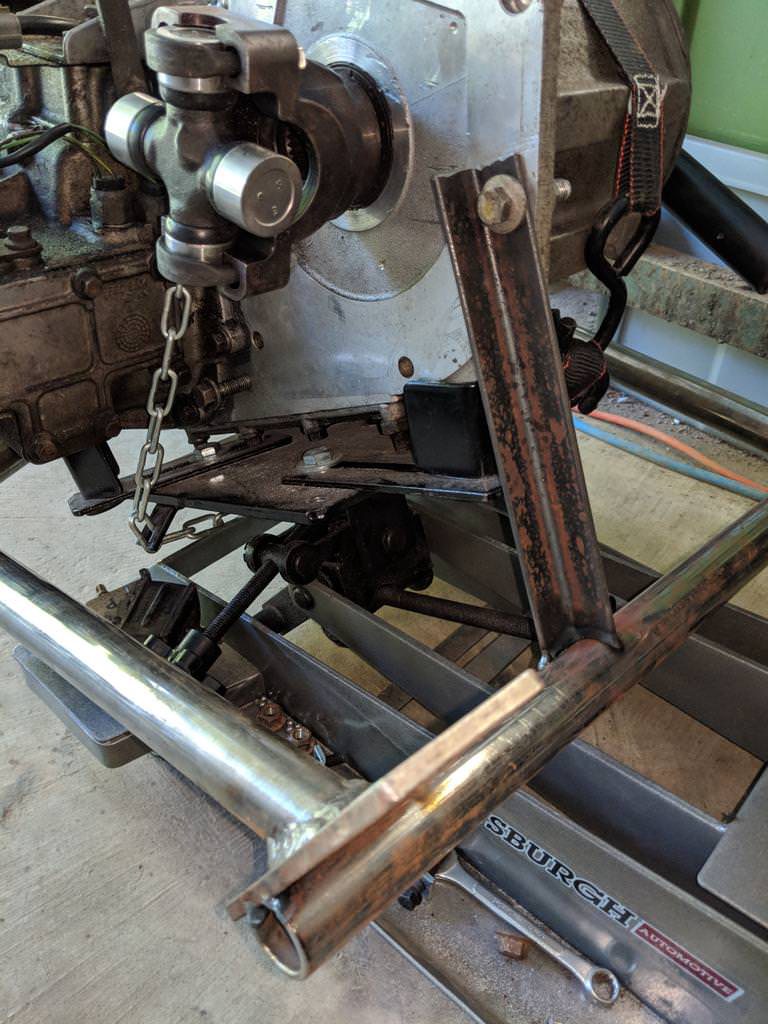
Started by making up a pair of plates to mesh with the old drivetrain isolaters on the frame, these will make up the forward half of the mounts:


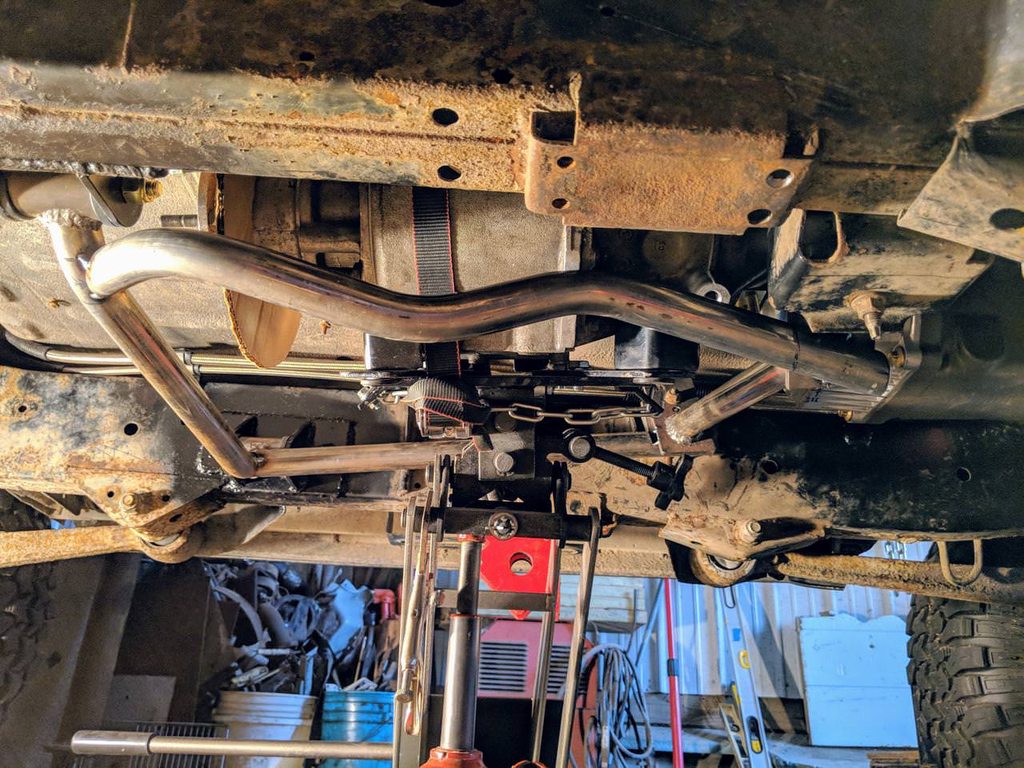
The transfer-case & transmission will be bolted nearly solid to this crossmember I'm building, then the crossmember will be rubber mounted to the frame. The idea is to limit movement between the transfer case & transmission by linking them together. For the sake of reducing deflection in the u-joint between them under high torque loads, while still reducing some vibration transmitted to the frame. AND if I do it right then it'll be easy to work on by dropping out as a unit & staying out of the way of any areas that need maintenance/visual-checks from time to time.

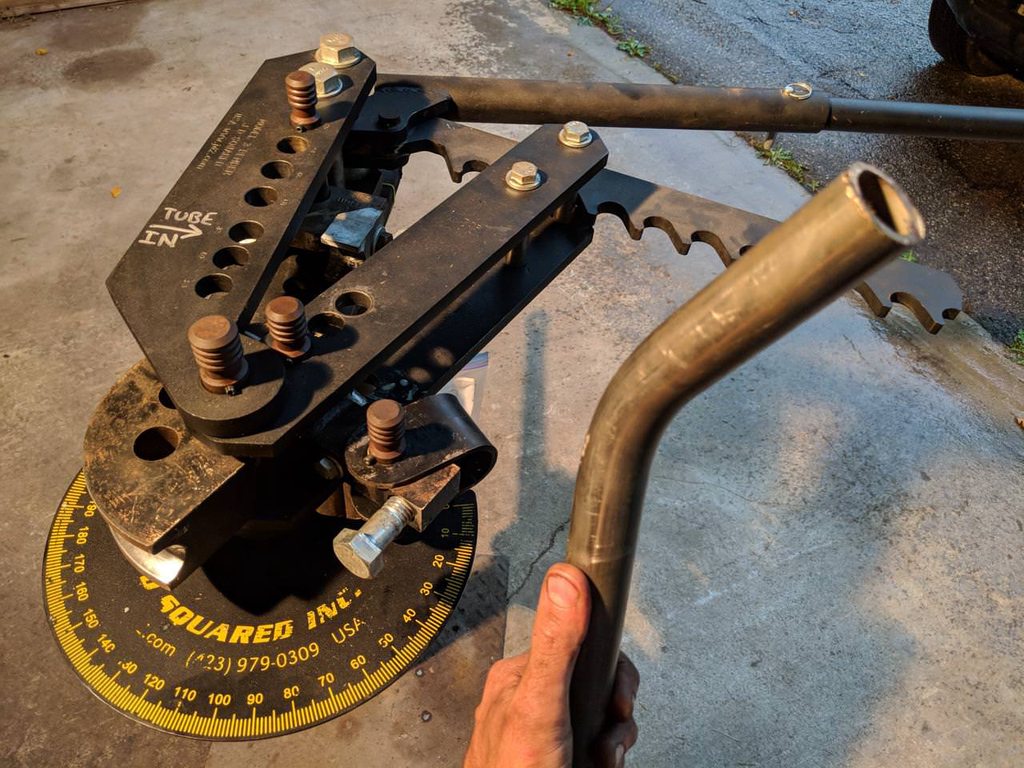
The crossmember will be constructed of 1/4" plate & 1.25" DOM tube, forming a box with an "X" inside if all goes to plan:


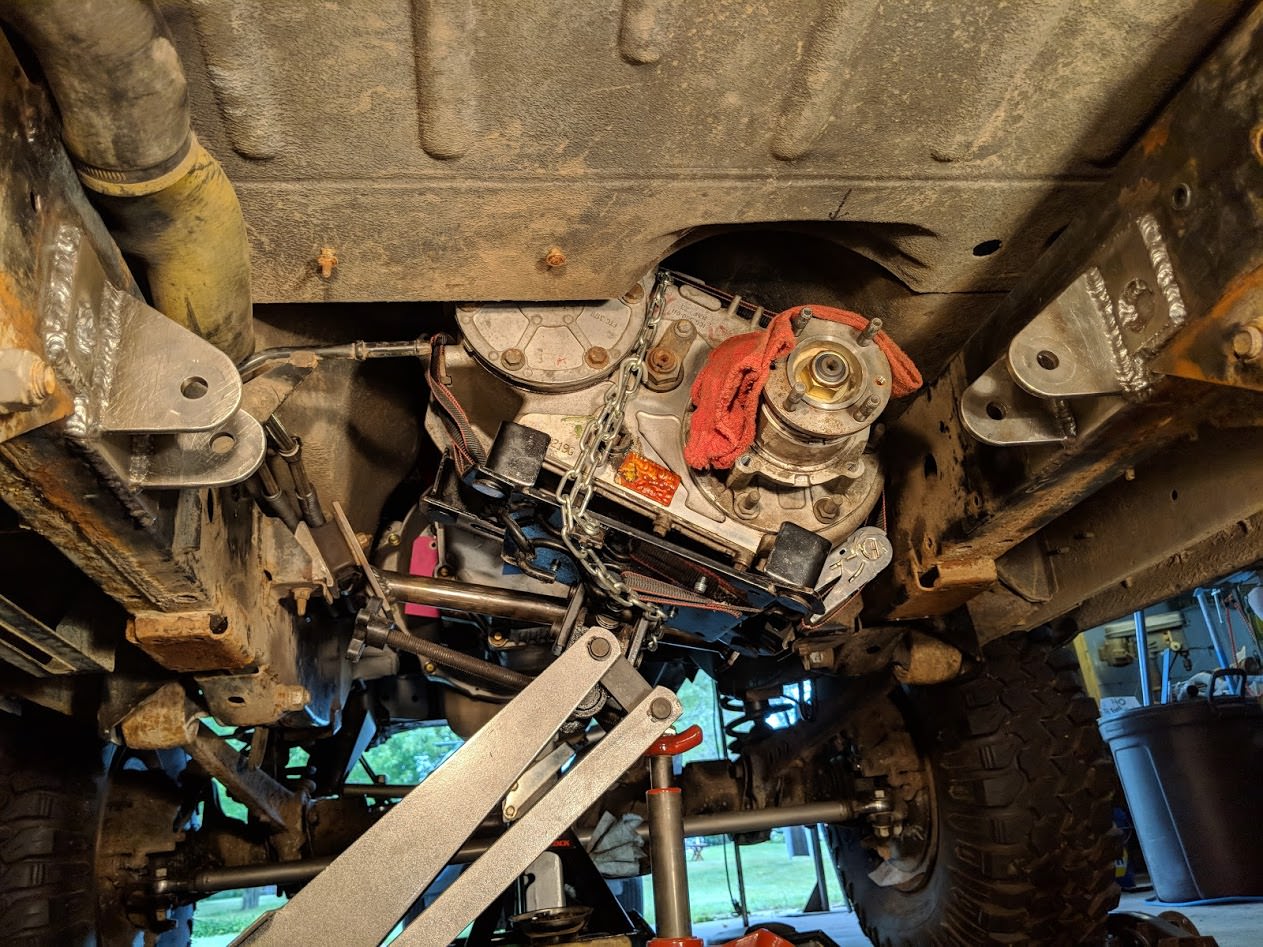
Next up I'll build the rear half, which will be more complex, requiring a new pair of tabs welded to the frame rails. Forward connection's all burned in:
 

Hafaday

Rank V
Launch Member

Pathfinder I

2,271
Richmond, VA.
Member #

7455

To back up some...

I know you are going with a disc for the hand/parking brake (very interested in this). but I came across this item in a build video and looks interesting at that. https://www.estopp.com/

Now granted, if someone is running open diffs.. you would loose the functionality to fool the system when applying the parking brake so the other wheel will pull when stuck. but locking the Estopp down in 4-low. you have pretty much have braked all 4 wheels thru the t-case. and made yourself a land anchor. or at least till you start sliding when winching or what have you.

I kinda dig this thing and wonder how much crap I'd be in, for replacing the handbrake for this during a vehicle inspection.

Just thinking out loud.
 
  • Like
Reactions: Tinker

Tinker

Rank V
Launch Member

Off-Road Ranger I

2,357
West Michigan
First Name
Mike
Last Name
Klemish
Member #

5606

To back up some...

I know you are going with a disc for the hand/parking brake (very interested in this). but I came across this item in a build video and looks interesting at that. https://www.estopp.com/

Now granted, if someone is running open diffs.. you would loose the functionality to fool the system when applying the parking brake so the other wheel will pull when stuck. but locking the Estopp down in 4-low. you have pretty much have braked all 4 wheels thru the t-case. and made yourself a land anchor. or at least till you start sliding when winching or what have you.

I kinda dig this thing and wonder how much crap I'd be in, for replacing the handbrake for this during a vehicle inspection.

Just thinking out loud.
I've never seen that before! I haven't tested the routing of the handbrake lever's cable just yet, & it's good to know of some alternatives in the case that it doesn't snake down under there like I'd hoped.
 

Tinker

Rank V
Launch Member

Off-Road Ranger I

2,357
West Michigan
First Name
Mike
Last Name
Klemish
Member #

5606

Started on the rear lateral for my divorced crossmember with a pair of laser-cut tabs I've had laying around for a while. They oddly matched up damn near perfect to the weld-in bushings I picked up. Needed another set so I got to work chopping a like pair from some 1/4" plate a friend hooked me up with. Sure made it easier having the laser-cut pair to copy from! Here they are mocked up in place:


I'd considered trying to sneak the rear lateral bar behind where the handbrake rotor will hang off the transfer-case's rear output flange, but it's just too close for comfort & would make servicing later a pain. With the bar behind the brake I just had to confirm I'll have plenty of clearance under the double-joint of the rear driveshaft at a really extreme angle... while also not hanging under the plane of the frame rails. Here's where the plate I'm making next will go:


Made up a mirrored pair of 1/4" plates that the tabs will hang from. Then this whole set gets welded to the frame with the 3 big holes for welding thru, kind of like a plug weld. (Why the plate too? To spread the load over a larger area, rather than just 2 thin strips of weld along the tabs that would likely pull/warp that vertical section of the frame out of square, or even worse by cracking. And is 1/4" plate steel overkill? Yup. Probably.)


Finally getting to dust off my bender & actually make something proper with it! The tube I'm using for all this is 1-1/4 x .120 wall DOM, real nice to work with & no worry of splitting since it's seamless. This rear lateral is getting a shallow bend on both ends, with short legs up from those bends getting "fish mouthed" right to the weld-in bushings:
 

Tinker

Rank V
Launch Member

Off-Road Ranger I

2,357
West Michigan
First Name
Mike
Last Name
Klemish
Member #

5606

I cleaned up the sections of frame that need modifying & splattered both the raw patches of frame & the backside of my new brackets with weld-thru primer. Burned in the new rear brackets... far from my best mig weld work, but hey it's tricky when you're upside down & trying to not to catch fire!


Managed to find myself a great deal on a "new old stock" example of the Donaldson air filter I've been hunting, less than half of retail & only a few scuffs 'n dents. Thing's more solidly constructed than I had even hoped for! Despite it's substantial girth it should work perfect with an idea I have for a saddle of sorts cut into the fender liner with a pair of straps to lash it down. Why not just a big cone filter? Secondly for the monstrous CFM requirements of this engine. But primarily to give me a sealed filter assembly to feed a snorkel, which that big pipe aimed up a bit will run into the inner fender area & out along the a-pillar:


My new dual batteries arrived too :grinning: Did a fair share of research, & short of lithium batteries these things are really hard to beat. Especially being made just a few states south-west of here:
 

Tinker

Rank V
Launch Member

Off-Road Ranger I

2,357
West Michigan
First Name
Mike
Last Name
Klemish
Member #

5606

I had a feeling my Subaru would eventually come in handy for the Rover project, doing something other than lugging around it's heavy parts...

...tube bender hold down device!
 
  • Like
Reactions: Hafaday

Tinker

Rank V
Launch Member

Off-Road Ranger I

2,357
West Michigan
First Name
Mike
Last Name
Klemish
Member #

5606

I'm a noob with a proper tube-bender like this, so I'm taking my time & trying to not waste this pricey DOM tubing as I work out this transfer case crossmember/cradle. It's been challenging to get it all right in a sweet spot between the original frame crossmembers, high angle driveshafts, also where the exhaust will route. All while keeping it easy to remove & tucked up high for the maximum ground-clearance possible. Gave myself ~3/4" above the center frame crossmember:


In combination with ~3/4" below the rear driveshaft at it's absolute lower limit, which at the moment is overkill... but I'm building much better 3-link & 4-link replacement suspension setups soon after this & I'll want all the extra flex clearance I can get for future proofing:


Took a bit off the lowest hanging part of the transfer case housing (nothing important, just an unused section of casting) that was in the way of the new mounting:


Good grief this trio of compound bends in the passenger-side parallel tube were a head scratcher! First bend clears around the hand-brake rotor, then the other 2 bends loop over the frame crossmember (mounts to the 4-bolt pad in the foreground) to meet under the plate of the forward lateral:


Now for triangulation bars & risers to bolt up with the transfer box & transmission!
 

Tinker

Rank V
Launch Member

Off-Road Ranger I

2,357
West Michigan
First Name
Mike
Last Name
Klemish
Member #

5606

I wonder if my time estimates when metal fabricating need a rethink... could be I'm just out of practice, or a factor of using a shop not setup as my own. But maybe I should guess first, then multiply by 8, take a deep breath, & double all that!
:expressionless:

Anyway, I was about to start fish-mouthing my cross tubes, to triangulate the outer frame of tubes, when it dawned on me that the transmission jack was going to be more in the way than I expected... bugger! Well, after plenty of pondering on the issue I decided to wing it & whip up some temporary legs to lock the transfer box to the frame right where I want it. The theory is that the angle iron legs (that are mostly out of the way for the things I need to add next) should allow me to drop the whole thing & flip it over to burn in all my tubes + brackets:


Being out from under the truck should make it WAY easier to do it proper too. Getting the assembly down was fairly easy, thankfully. Could become a more challenging process once it has a skid plate under, exhaust tubing alongside, & driveshafts hanging off. But I'm confident in the design so far:
]

Coming together just like I'd hoped! Kind of a drivetrain "sub assembly" all-in-one: