My teardrop project v1.0

  • HTML tutorial

old_man

Rank V
Launch Member

Member III

2,827
Loveland, Colorado
First Name
Tom
Last Name
Houston
Member #

8300

Ham/GMRS Callsign
WØNUT Extra
Drawing it out doesn't cut it for me. The concept picture is almost scaled correctly and I still didn't know how it would be when it was done.
I taped the opening to what was a standard door size and I would catch my shoulder, head and tear the tape. Then once inside, I realized I didn't like the window size and placement. Got the size set and they were sold out of what I wanted. Found another size and did the tape again. My rear cabinets and doors were the same.
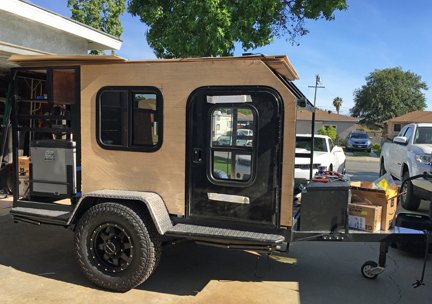
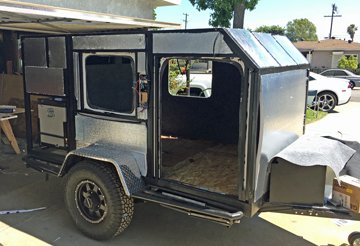
I am a blue tape and cardboard mockup guy.

A tip: find a local business that specializes in building shipping containers and packing for industries. They will have very large single sheets of cardboard that you can cut and tape to build a proto before spending big bucks on materials and having to scrap them.

Sometimes I actually get sheets of .125 Masonite for the same purpose.
 

smritte

Rank V
Launch Member

Member III

2,827
Ontario California
First Name
Scott
Last Name
SMR
Member #

8846

Ham/GMRS Callsign
KO6BI
Ive been using poster board for my mock ups. It's actually difficult to find some that's not too thin. I tend to save the larger cardboard box's for that reason. Next sheet metal project I do, I'll look into a place that makes shipping containers.
 

smritte

Rank V
Launch Member

Member III

2,827
Ontario California
First Name
Scott
Last Name
SMR
Member #

8846

Ham/GMRS Callsign
KO6BI
Been waiting on a few critical parts. Got the doors in and the roofing material came in today. Going to try and buy the material for the inside and outside walls tomorrow. All I got done last weekend was the spare tire mount installed and I decided to add in a rear bumper. That by itself changed a few things.
Starting this weekend I should be cutting my sides out and setting up my doors and windows.
 

Canyon_Cliff

Rank VI

Influencer I

3,364
Victorville, California
First Name
Clifford
Last Name
Bennett
Member #

3539

Ham/GMRS Callsign
KM6YHU
Hey Scott, are you going to deal the bottom for winterization? I need to get some of the extruded double wall plastic sheeting that is used for sealing the bottom of travel trailers. My trailer has not been winterized and I need to do that. I am wondering where to get the sheeting. Any ideas?
Cliff
 

smritte

Rank V
Launch Member

Member III

2,827
Ontario California
First Name
Scott
Last Name
SMR
Member #

8846

Ham/GMRS Callsign
KO6BI
Hey Scott, are you going to deal the bottom for winterization? I need to get some of the extruded double wall plastic sheeting that is used for sealing the bottom of travel trailers. My trailer has not been winterized and I need to do that. I am wondering where to get the sheeting. Any ideas?
Cliff

I was looking at this today and decided to enclose the bottom and throw some insulation in. I heard about the plastic sheeting but don't know about it yet. That may be something I'll look into when I finish the bottom.
 

smritte

Rank V
Launch Member

Member III

2,827
Ontario California
First Name
Scott
Last Name
SMR
Member #

8846

Ham/GMRS Callsign
KO6BI
Got some more work done today but only got two pictures.
In the beginning of this build, I wanted to try out one of the Ark XO trailer jack's. The jack on my M-100 is a standard one wheel jack. Off road it was a struggle to move it around on the jack. I had read alot about the Ark jack and ordered one for this build. While I was shopping , I saw one that looks just like it for cheaper. I've been burned by copies and didn't go that route.
Today I finished modding my Ark jack. I'm not too happy with it overall and needed to make it work properly. The sloppiness is about the same as cheaper jacks and it was too short. Those are easily dealt with or ignored. My big issue was how poorly the wheel turned. I had already extended it 4 inch's and today fixed its poor turning. If I knew I was going to have to mod it, I would have gotten the cheap one.

Thrust Bearings.jpg
I drilled out the wheel hub and installed a bronze bushing. Removed the plastic washer and installed thrust bearings. The original design used a plastic (teflon?) washer in between the jack and wheel hub. It didn't like changing directions and was a bit sloppy. The thrust bearings can handle several thousand pounds but will have to be cleaned and re-greased occasionally. I can do this when I re-grease the hubs each year. Now it turns very easy.

Doors 1.jpg
Got driver and passenger side's, inside and outside cut out. I only had time to get the door and one window installed. These are in temporarily and will be removed so I can add in some bracing and prime the wood. I didn't get a pic of the other side when I completed it, just this side.

Looking at this picture, you can see that my fender is almost hitting my tire. The springs should have been more than enough. I believe the company that sold these over rated them. This is something I will deal with after i'm done.
 
Last edited:

MMc

Rank V

Influencer II

1,749
San Dimas, Ca.
First Name
Mike
Last Name
McMullen
Member #

18647

It’s looking great! Maybe bring it to a SGV meet up after it’s done. I would love to see it up close.
It’s too late now, just a idea from Mexico. Many boat trailers use the spare tire as the third tire to move the trailer around and launch with.They have square tube inside another one that is pinned so it can be turned 180 degrees on the front of the trailer. It has a right angle up to thrust bearing and a full sized tire mounted at a 90 degree angle. When they want to move the trailer it’s jacked up the spare tire is flipped over and it moved by pushing it around. The spare becomes the third tire and works in the dirt. It works like what you have now but uses the spare tire as the roller.
 
  • Like
Reactions: smritte

smritte

Rank V
Launch Member

Member III

2,827
Ontario California
First Name
Scott
Last Name
SMR
Member #

8846

Ham/GMRS Callsign
KO6BI
Hey Scott, are you going to deal the bottom for winterization? I need to get some of the extruded double wall plastic sheeting that is used for sealing the bottom of travel trailers. My trailer has not been winterized and I need to do that. I am wondering where to get the sheeting. Any ideas?
Cliff
Looking today I found two. One is more for trailers the other for motorhomes. The one recommended for motor homes is the thicker one. I'm putting the thinner one under mine. I have to figure out how to attach it though. I haven't read much on it but it seems like it has to be held in place not glued. Maybe some stainless flat bar and screws?

The one recommended for trailers
The one recommended for Motorhomes
 

smritte

Rank V
Launch Member

Member III

2,827
Ontario California
First Name
Scott
Last Name
SMR
Member #

8846

Ham/GMRS Callsign
KO6BI
No new pictures.
I got the sides cut out (inside and outside). Reinforced the framing slightly around the windows and door. Interior roof panel cut and mocked up. I was going to stain the interior wood but I don't like how my seams will look. Decided to paint the interior a lite blue/grey. Got the paint and looked at carpet. The floor is going to be a lite grey indoor/outdoor.
My roofing material came in. After researching the crap out of what to do with the roof, I chose a PVC rubber "skin". It will reflect a good amount of UV and will most likely last longer then me. The best price I found was RecPro.
The heat over the weekend got to the point where I stopped working.

What I have left is, cut out the front and rear interior and exterior walls. Mock up the rear hatch doors. Pull all the wood back off, sand, seal and paint interior then reinstall. Mount fuse block, switch panel, roof fan and lights (interior). Install insulation then exterior panels. The exterior will be primed only at this point. Once roof panel is installed, I will be installing 1.5 inch aluminum angle around the edges. Then paint exterior and install roof rubber last.

Somewhere in here I need to figure out my awning. The goal is to have one that will store on the side and have panels to give me an enclosure if I need it. I don't want a Bat Wing and the ARB is where I'm heading at this time.
 

smritte

Rank V
Launch Member

Member III

2,827
Ontario California
First Name
Scott
Last Name
SMR
Member #

8846

Ham/GMRS Callsign
KO6BI
The July heat slowed me down a bunch. Got a few things done and only a couple of pic's.
Here is how I set up my water filter and my quick disconnects for propane and water.

One thing that always bugged me was how most people mount quick disconnects for their an board air systems. They make some very creative mounts to hold the fittings. I don't like complicated and what I do is use a brass pass through. It is simple and strong. You drill a hole and mount. What could be easier.
Here's how I mounted my fittings for my water and propane.

Pass through.jpg
Here are the pass through's and mounting bracket. The inside hole is 3/8 thread. Outside is 5/8

Quick disconnects side.jpgQuick disconnects front.jpg
When the door is shut, I have 1/2" clearance. They do not slide out with the fridge.

Filter.jpg
The water filter will be behind my vent. Remove vent panel and access filter. I went with the 4" housing.

That's it for now.
 
Last edited:

smritte

Rank V
Launch Member

Member III

2,827
Ontario California
First Name
Scott
Last Name
SMR
Member #

8846

Ham/GMRS Callsign
KO6BI
I got as much done this weekend as possible. The heat was killing me.
I changed my mind again on the interior. Instead of painting the inside i decided on outdoor carpet. I had bought a good quality paint and didn't waste it. I painted front and back of all the interior panels before carpeting them.
What I accomplished was, install all but the front interior panels, installed my insulation, finished my water system, got most of my propane line run and mounted my switch/fuseblock mount.

Headliner.jpg
interior cpt.jpg Switch panel.jpg
Here i'm gluing the carpet to the headliner and the next pic is the interior so far. My rear cabinets need to have doors made. I will probably just use nets to cover the openings. In the left corner you can see my switch panel. I wanted to be able to just reach in and hit the light switch without fumbling. Hanging down are my overhead light wiring and fan wiring.


isulation Dr.jpg insulation ps.jpg
Here's my insulation. The front pieces are just sitting in there. I need to cut my front brace and make the panel for it. I learned something new here. Installing the roof insulation would have been better on a cloudy day. The reflection off of this stuff was horrible.
 

smritte

Rank V
Launch Member

Member III

2,827
Ontario California
First Name
Scott
Last Name
SMR
Member #

8846

Ham/GMRS Callsign
KO6BI
I can see the light at the end of the tunnel!

This weekend I primered the sides, bonded all but the rear panels and test fit my doors and windows for the final time.
The check list is slowly getting smaller.
Major items left and do are, buy diamond plate for the front and sides. The sides and rear will have a 10 inch strip along the bottom and the front will come up half way. Need to buy the aluminum angle to run along the edges, fill the small holes and seams then paint.
Plus a never ending list of small things.
I think i'm going to fix my suspension issue with a spring over. My shackle is in a good spot and ill gain 4-5 inch. That will put me where i wanted to be anyway.

I got two pictures of the test fitting of the driver and passenger sides. Unfortunately, everything comes off for final sealing and paint.


test fit driver.jpg

test fit pass.jpg
 

665.0coupe

Rank I

Enthusiast I

261
Central, KS, USA
First Name
XXX
Last Name
XXX
Ham/GMRS Callsign
KE0ZLR
Looks great!! What material did you use to cover the outside and roof? What is going to cover the seams and transitions?