My 2011 Tahoe LT. build, a work in progress.

  • HTML tutorial

Charles M

Rank V
Launch Member

Member III

2,771
Wickenburg, AZ, USA
First Name
Charles
Last Name
M
Member #

17640

Ham/GMRS Callsign
K1CJM
Charles, thank you for putting this thread together! Lots of ideas and great information.

I have been willing to build an air up/down system similar to yours for some time now. Could you share more details about it, and maybe parts needed? Was it difficult to assemble?

Thank you!
It is pretty easy. A complete parts list would depend on your rig and how you want to do it.
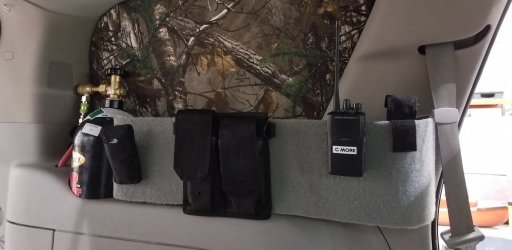
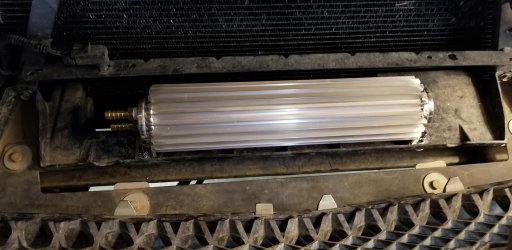
Refering to the photo below... The bottom hose when dis-connected lets the air out when you air up it connects to the air supply. In my rig that is a CO2 tank or a back up air pump.

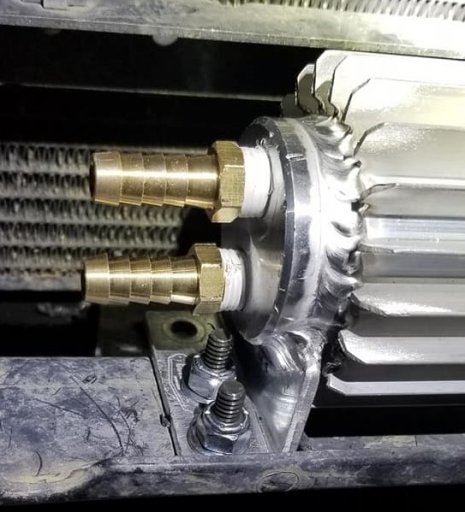
Going from the bottom hose up it goes into a ball valve, into a 3 way distribution block. The block has a standard air gauge (1 pound increments 0 to 60) screwed into one hole the other two outlet holes have quick connects in them for airlines to plug into.

This is an old photo with the air lines plugged into the 3 way. My set up now has a single line running from the back to mid -vehicle with a T - fitting and hoses to each side door terminating into female quick connects . So this three way is in the back beside the tank now.

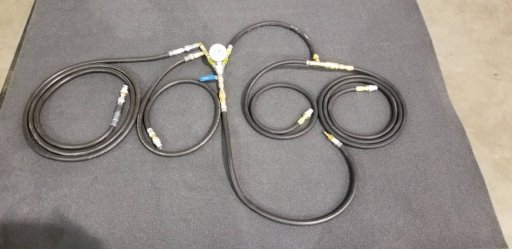
Each side hose assembly will have the following. T-fitting with a male quick connect for plugging into the connector at the side door, two hoses with Haltec H- 5265 standard bore locking (closed) air chucks on the ends. The closed chucks only allow air to pass when connected. These connectors have three locking lugs instead on just one. They will not fall off when connected properly. Hoses... If you use CO2 you want to use heavy duty reinforced hose because if you get liquid CO2 in the lines it can cause the lines to fail.... If you have an air pump any line will work. I use heavy lines so I can cut them to length and use crimp on clamps. Check out the following photo and feel free to ask any other questions.

Most of the parts can be found at Harbor freight except the air chucks, you can get them on Amazon.


Air up144929.jpeg
 

Attachments

  • Like
Reactions: RoarinRow

Charles M

Rank V
Launch Member

Member III

2,771
Wickenburg, AZ, USA
First Name
Charles
Last Name
M
Member #

17640

Ham/GMRS Callsign
K1CJM
Still adding more stuff... I am completing the installation of insulation all the doors were done before and the headliner is done now also. To do this installation you have to drop the headliner unfortunately the wiring can not be disconnected so you can only drop it and work around it from either side. The headliner install took 3 hours total.

20200726_134825.jpg
The insulation is inserted between the ribs in the roof then I also put on tape to close off the holes in the ribs. Be sure to work around and behind your curtain airbags so the insulation will not interfere with the Air bag deployment. I also put more insulation behind the rear air-conditioning ducts too.

20200726_154502.jpg

Next project is installing a shelf and bin on the left side. First step was making a template so I can cut a piece of aluminum sheeting for the base. The underside of this base will also allow access into the storage below the shelf.

20200805_172655.jpg

This is the cut out for the base. Sorry in the photo below it is actually upside down and the thinner area to the left will actuall go towards the front.

20200805_172721.jpg

This is the wall area looking at it form where the rear window is. I cut the sides 1 inch longer so I could bend them over for mounting tabs. The base section will drop in here and be held in place with rivets.
20200805_172734.jpg

After the pop rivets are installed I took a hammer and flattened the rivets out. The flatter side of the rivets are on the inside so they will not snag on anything stored in there. So far this only weighs about a pound. I am working on building things to be lighter and easy so at all costs I will avoid wood in all of my construction.
20200805_175954.jpg

I am pre-fitting it here and everything fits perfect. Next step will be putting carpet on the outside and putting in some quick release fasteners that will hold it against the side. I will also install a 3/8 inch thick block under the bottom it will go into the factory hole to locate the shelf and help hold it in place.
20200805_180223.jpg

This is the right side before the carpet was installed on it I will include new photos when both side are done. On the right side there is room for 2 down jackets in stuff sacks and also two mid weight jackets and other things.
20191205_163335.jpg
 
Last edited:

Sparksalot

Rank VI
Launch Member

Influencer III

4,312
Bastrop County, TX, USA
First Name
Rex
Last Name
Drake
Member #

19540

Ham/GMRS Callsign
KI5GH
Service Branch
Air Force
Still adding more stuff... I am completing the installation of insulation all the doors were done before and the headliner is done now also. To do this installation you have to drop the headliner unfortunately the wiring can not be disconnected so you can only drop it and work around it from either side. The headliner install took 3 hours total.

View attachment 165825
The insulation is inserted between the ribs in the roof then I also put on tape to close off the holes in the ribs. Be sure to work around and behind your curtain airbags so the insulation will not interfere with the Air bag deployment. I also put more insulation behind the rear air-conditioning ducts too.

View attachment 165826

Next project is installing a shelf and bin on the left side. First step was making a template so I can cut a piece of aluminum sheeting for the base. The underside of this base will also allow access into the storage below the shelf.

View attachment 165827

This is the cut out for the base. Sorry in the photo below it is actually upside down and the thinner area to the left will actuall go towards the front.

View attachment 165828

This is the wall area looking at it form where the rear window is. I cut the sides 1 inch longer so I could bend them over for mounting tabs. The base section will drop in here and be held in place with rivets.
View attachment 165829

After the pop rivets are installed I took a hammer and flattened the rivets out. The flatter side of the rivets are on the inside so they will not snag on anything stored in there. So far this only weighs about a pound. I am working on building things to be lighter and easy so at all costs I will avoid wood in all of my construction.
View attachment 165830

I am pre-fitting it here and everything fits perfect. Next step will be putting carpet on the outside and putting in some quick release fasteners that will hold it against the side. I will also install a 3/8 inch thick block under the bottom it will go into the factory hole to locate the shelf and help hold it in place.
View attachment 165831

This is the right side before the carpet was installed on it I will include new photos when both side are done. On the right side there is room for 2 down jackets in stuff sacks and also two mid weight jackets and other things.
View attachment 165832
I’ve had a similar view of the headliner in mine, when I installed three antennas in the spots thoughtfully provided by the previous owner.
 

Charles M

Rank V
Launch Member

Member III

2,771
Wickenburg, AZ, USA
First Name
Charles
Last Name
M
Member #

17640

Ham/GMRS Callsign
K1CJM
First step after the carpet glue dried over night was to trim it out. It only took a few minutes with a razor blade to trim this out. From there I did a few minor adjustments and marked and drilled mounting holes and installed it.. Took maybe 20 minutes... Also for those who wonder what an aluminum compartment with carpet like this weighs... About 6 pounds total...
20200806_150331.jpg

This is what it looks like mounted in place I use plastic push in fasteners they are a 1/4 inch diameter and will have no problem holding it in place. To remove it for accessing underneath storage I only have to remove three pins and lift it out of the way. With the carpet you can velcro these pouches or any other things to the sides. I will add a pouch for my cell phone since my bed is inside here. You can also see my CO2 tank here with the air line that is routed through the vehicle for fast air up/downs.
20200806_164206.jpg

The passenger side compartment was made in the past it also has carpet on it for attaching velcro pouches for accessories. You can see the large plastic buttons used on both units to hold them in place you can find these in automotive stores or on line. They can be removed in just a few minutes if you need to get behind them. The black wire to the right is for powering my elect water pump when it is being used while camping. The pouches pictured are magazine pouches and will hold misc. things or maybe even a magazine.. This is a good place to keep our radios hers on this side mine on the other. We have commercial encrypted radios so no one else can monitor what we are saying on them they compliment the Ham radio mounted in the truck.
20200806_164148.jpg
 
Last edited:

Charles M

Rank V
Launch Member

Member III

2,771
Wickenburg, AZ, USA
First Name
Charles
Last Name
M
Member #

17640

Ham/GMRS Callsign
K1CJM
I cracked a radiator tank last week and I really hate those cheap plastic unit the factory uses.
So, I got a Cold case all aluminum radiator in today and installed it. The stock radiator is only a single tube and the single tube is much narrower than each of the rows in the cold case. The two tubes in the Cold case are equal to three standard tubes. With each tube being 1.25 inches wide.
20201107_135640.jpg

The Cold Case GMT570A is a very nice looking unit it cost $406 shipped to my house. It has a nice polished tank and the overall workmanship looks good the TIG welds look a lot better than I can do...
20201107_135744.jpg

It comes with new transmission cooler fittings. You will reuse the original rubber mounting pieces on the top and bottom. All the stock hoses and connections are there and in the right place.
20201107_135748.jpg

I did run into a fitment issue like Dave mentioned above the top upper bracket came in slight contact with the upper radiator support. It wasn't a real hard contact but, since this will see a lot of off road use I wanted to give it a little more wiggle room so I took a few minutes to cut some extra clearance. It may be possible my stock rubber pieces were old and very hard so they didn't allow the radiator to sit lower.
20201107_141219.jpg

The stock lower fan housing normally fits into the area where the stock radiator does not have tubes so, the fan housing will have a gap between the radiator and the housing.
20201107_174621.jpg

For now I just pushed the bottom in enough to hold the bottom of the housing in place and decided not to worry about the gap for now. In the future if it gives me any problems I might do some trimming to fit the housing in closer.

With the additional cooling the gap between fan housing and radiator should not matter. On my first short test drive it took a little longer to heat up and the running temperature was about 15 to 20 degrees less than normal.
 

peeeeetey

Rank IV
Launch Member

Member II

889
Harrisburg, NC, USA
First Name
Pete
Last Name
Meuser
Member #

20275

Ham/GMRS Callsign
GMRS WREL270
I am sweating out about the possibility or rear axle bearings...Nasty job (at least for me).
 

Charles M

Rank V
Launch Member

Member III

2,771
Wickenburg, AZ, USA
First Name
Charles
Last Name
M
Member #

17640

Ham/GMRS Callsign
K1CJM
So the radiator I got had a bad transmission cooler bung on it. it has a low spot on the face of it I would guess about .030
127503572_10159057713266738_367733482661662188_n.jpg

I tried a rubber washer but I didn't expect it to hold up very long. I contacted Cold Case and they gave me the option to exchange it ( I am guessing that would take a few weeks for it going back and forth. Or they send me their dual pass external cooler.
127280886_10159057713141738_6471502380050323613_n.jpg

I opted for the external cooler and it mounted up pretty easy just in front of the condenser/radiator. This unit holds a lot of oil too. It is their 12 inch dual pass cooler.

126328624_10159057600386738_2377870036887381010_o.jpg

I did have to drill an extra hole in the coolers mounting foot on the left side.

127458947_10159057600161738_57177007599506115_o.jpg
 

Charles M

Rank V
Launch Member

Member III

2,771
Wickenburg, AZ, USA
First Name
Charles
Last Name
M
Member #

17640

Ham/GMRS Callsign
K1CJM
If that is a NPT thread, the seal is in the threads not the point where the two faces make contact.
No it is not NPT If it was it would be easy to seal. It is a Transmission adapter something like the OEM connector.
 
The trans lines into the radiator is actually a fluid warmer. It warms up the trans faster, and also for winter conditions.
Heat is a killer but cold trans fluid can be too.
If you have a trans temp gauge, keep an eye on it this winter
 

Charles M

Rank V
Launch Member

Member III

2,771
Wickenburg, AZ, USA
First Name
Charles
Last Name
M
Member #

17640

Ham/GMRS Callsign
K1CJM
The trans lines into the radiator is actually a fluid warmer. It warms up the trans faster, and also for winter conditions.
Heat is a killer but cold trans fluid can be too.
If you have a trans temp gauge, keep an eye on it this winter
I have several temp gauges displayed on my truck.
My 180* thermostat doesn't start to open until 160* to flow water through the radiator.

Yesterday with air temps in the 80's
After 10 minutes
Water temp 145
Eng oil 140
Trans. 115 with my exterior cooler.

In 15 minutes
Water 180
Engine oil 180
Trans oil 165

This winter when it drops down to 60 degrees on our cold days it might take a few extra minutes to warm up...
Conversely last summer when it was 118* the trans was running at 225 - 270 pulling a small trailer.
 
If you're dipping into ice cold temps, where the trans fluid remains thick for a long time, becomes a problem.
I just noticed you're in AZ, so it's probably not a concern.

I have a friend that did the same and removed the trans warmer lines to the radiator (I'm in socal)
with added external cooler w/ fan. His goal was to take the heat load off the radiator, to aid engine cooling.

If your trans temps are still high next summer, a easy option would be a good oil cooler to replace the finned tube.
Good options in the future if temps become an issue.

Enjoying your build thread!

I have several temp gauges displayed on my truck.
My 180* thermostat doesn't start to open until 160* to flow water through the radiator.

Yesterday with air temps in the 80's
After 10 minutes
Water temp 145
Eng oil 140
Trans. 115 with my exterior cooler.

In 15 minutes
Water 180
Engine oil 180
Trans oil 165

This winter when it drops down to 60 degrees on our cold days it might take a few extra minutes to warm up...
Conversely last summer when it was 118* the trans was running at 225 - 270 pulling a small trailer.
 

Sea Pickle

Rank I

Enthusiast I

231
West Milford, NJ, USA
First Name
David
Last Name
Bryan
Awesome build! Looking to build the same gen Tahoe soon myself and will be saving this for a ton of great ideas!

Btw with that swing out tire rack are you able to pull a trailer behind it? I'm mainly building for fishing trips and love the swing out idea especially with the kitchen
 

Charles M

Rank V
Launch Member

Member III

2,771
Wickenburg, AZ, USA
First Name
Charles
Last Name
M
Member #

17640

Ham/GMRS Callsign
K1CJM
Awesome build! Looking to build the same gen Tahoe soon myself and will be saving this for a ton of great ideas!

Btw with that swing out tire rack are you able to pull a trailer behind it? I'm mainly building for fishing trips and love the swing out idea especially with the kitchen
Mine does have a hitch built into the swing out I think the weight limit is the same as the factory still.