Marn's M416 Build

  • HTML tutorial

Marn

Rank IV

Enthusiast III

1,135
Reno, NV
Nothing super special here. My old pop up that I drag down a lot of back roads is really starting to fall apart, so I picked up an M416 on my last trip down to Vegas. I looked at a couple, and landed on this one It was 100% ready to roll, with 2 year old tires, the original rims and tires included as spares, LED lights, 2 year old bearings and a brand new set of replacement bearings, and it even included a pintle hitch. Aside from the LED lights, it's 100% stock which is what I wanted.

No visible rust, some flaking paint and a little surface crust underneath, a couple dings and dents in the tub, and it had been very sloppily painted. I had intended to paint it without doing a complete tear down and refinish, but there were so many runs and drips in the paint I figured I'd do it right.

The only odd thing I have noticed is that it sits a little low in one corner. I've seen a number of other trailers that in pics at least LOOK like they sit a little off camber, so many its from a hard life of use, or 1960's government contract manufacturing, who knows. I've decided to simply shim the tub in that corner to get things a little more level. about 1/2" shim should take care of it. the frame sits level across the axle, so its just one of the corners.

Untitled by Marn, on Flickr


Anyway, drug it home with my lil' truck. 500 mile trip and I didn't even know it was there.

Untitled by Marn, on Flickr
trailer1 by Marn, on Flickr

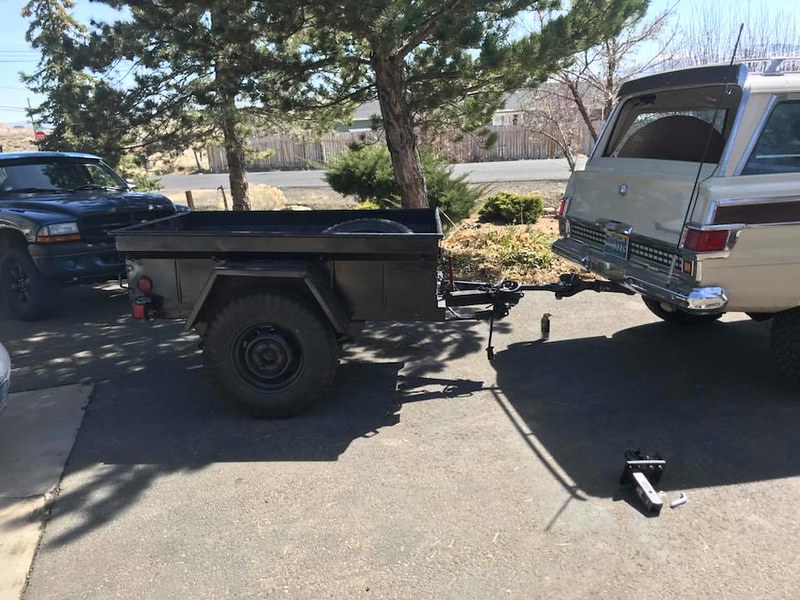
Hooked it up behind the wag to see how it'll sit, looks pretty decent. SLIGHTLY low in the front.
trailer3 by Marn, on Flickr
trailer2 by Marn, on Flickr

So, as mentioned, decided to do a full repaint. So, threw on my respirator and went to work with some grinding wheels.
Untitled by Marn, on Flickr

Presently, the whole tub is primed on the outside sides. For the underside, I'm going to hit it with a wire wheel and bed line the bottom. I will also be bed lining the interior up to the top rail. Just going to use black Monstaliner. I've wired wheeled the interior and removed any of the flaking stuff in there, but I'm not intending to strip it down to bare metal.

I need to finish be stripping the fenders, then I will move onto the bottom of the tub. The frame has been wire wheeled, and will be getting shot with a coat of summit racing's chassis paint. Then the tub will get shot with whatever color I choose, and plopped back on the frame. At this point, the actual "build" will begin as time and money allow.

Likely planning to use an adjustable rack system like a Thule XSporter, so I can raise and lower the RTT for travel. I want to have about 6' under the tent, but want to keep the COG as low as possible while driving.

We'll see what I come up with. :-)
 
Last edited:

ArkansasDon

Rank V
Launch Member

Member I

1st of all, love the Jeep Wagoneer. Glad to see you stripping this, it shows your are serious about making this classic last & giving it a new proper face lift. "kudo's" to ya. The height of the rack sounds good I have mine @ 65" off the ground to the bottom of the RTT. I'm 6ft 2" tall & I wanted @ that height so I can remove the cover & install the cover easily w\o step stool. My rear awning is @ 76" off the ground to the underneath of the awning.
005.JPG
 
Last edited:

Marn

Rank IV

Enthusiast III

1,135
Reno, NV
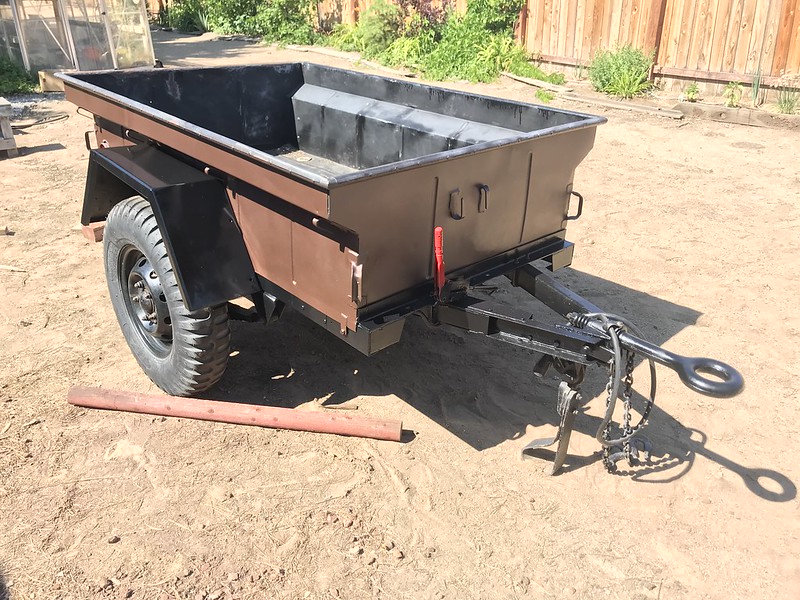
Wow! Its been months since I've worked on or written about the lil' trailer. I recently picked up a 1974 F250, and told myself before i got too deep into that I need to put the trailer back together. Well, i spent 3 weeks or so messing around with the truck and still ignored the trailer. Finally got off my butt yesterday, painted the tub, painted the frame (and battled a wasp nest in the process), stripped the fenders, and painted them, then set it all back together.

Today, I'll be picking up hardware and bolting it all together. At this point I will at least have a usable trailer that isnt in bits and pieces. Not sure how fast the build will progress as we are diving into major home renovations this month and cash flow will be tied up for a bit.

So, I'll call this a 3/4 assed restoration. Not half assed, but not full on either. Pulled the tub, stripped it, wire wheeled the inside, wire wheeled the frame, primed and painted the tub, repainted the frame with summit racing chassis paint, should be good enough for my needs.

Next up is bed lining the interior.

I wasnt super sold on the color at first, its some metallic matte chestnut, I wanted something fairly low key, didnt want to do a hammered finish, too glossy and too busy. But as this dried and the sun went down, its growing on me, especially with the two tone. I like it.


Untitled by Marn, on Flickr
 

ShyTRex

Rank II
Launch Member

Contributor III

327
Moscow Mills
First Name
Greg
Last Name
Rice
Member #

9837

Following! love these things... wish I had gotten one instead of my space trailer!
 
  • Like
Reactions: Bouncer

Marn

Rank IV

Enthusiast III

1,135
Reno, NV
Next up, is trying to level out the tub a little bit, and then building a stationary rack with the help of a friend. Very simple square rack, with raised ends that will clear the tent so we can haul kayaks or a canoe or something without it resting on the tent. Should have that all done in a week or two. I'm itching to use this damn thing.
 

Una4dbl

Rank 0

Traveler I

Next up, is trying to level out the tub a little bit, and then building a stationary rack with the help of a friend. Very simple square rack, with raised ends that will clear the tent so we can haul kayaks or a canoe or something without it resting on the tent. Should have that all done in a week or two. I'm itching to use this damn thing.
Looks great. I think if you remove the pintle and put it in the bottom hole it'll lift the front just enough.
 

Marn

Rank IV

Enthusiast III

1,135
Reno, NV
Looks great. I think if you remove the pintle and put it in the bottom hole it'll lift the front just enough.
The actual frame is bent. Front passenger corner sits low almost an inch. I’m not talking about leveling the trailer at the hitch, but trying to square up the tub.

It sits pretty level behind my Wagoneer with the current location of the lunette :-)
 

Marn

Rank IV

Enthusiast III

1,135
Reno, NV
Busy weekend, but things are coming together.

This is the first fabrication project i have ever worked on, and am being guided by a friend. I've probably done about 75% of the welds, a ton of the cutting, both with saw and plasma, etc. The welds are ugly, but i have been assured they should be plenty strong.

I decided to keep it simple, and go with a static rack, not an adjustable height. I know this offers some drawbacks, but given the type of wheeling that I do and the fact that we still arent 100% sure the RTT idea is going to be right for us, i decided on simplicity and low cost.

We measured up for the floor of the tent to be right about 6'2" off the ground. This should be ideal for the annex, with several inches of wiggle room either up or down. The main disadvantage here is having a 200 pound tent 6' up in the air. If I'm not mistaken, this puts the tent height at 32" above the lip of the trailer. I will definitely be testing it out before taking it anywhere crazy. But i believe with proper loading (keeping a good bit of tongue weight) it should be plenty stable.

At any given time its being towed it will be loaded with at least 300-400 lbs of crap....10 gallons of water, 5-10 gallons of gas, spare wheel/tire, RTIC cooler full of food, a second cooler full of beer, battery, tongue box, chuck box full of stove/kitchen gear, Propane tank, fire wood, yadda yadda. I may even eventually have the water tank mounted under the trailer, further lowering the COG.

Anyway. 2" angle iron for corner brackets, 1 1/2" square tube for everything else, and then some plate gussets. Even just clamped in place its SOLID. Rocks the whole trailer when you try to move it. I have zero concern about the stability of the rack.

Also, the front and back corners were left high in order to provide a bit of a guard for the tent. I'm not sure what we will do for the final height, we left them long so they could go as high as the tent when closed, or we can lower them a bit. Either way, all we have left to do is run the 2 cross bars for the tent to mount to, then run the 2 end "loop" cross bars and cut to the right height. And that's all she wrote!


The 10* inward lean is nice thus far because it keeps the upper bar away from my head and whatnot when reaching in and lifting bins or gear out of the trailer.

Untitled by Marn, on Flickr

Untitled by Marn, on Flickr

Untitled by Marn, on Flickr

Untitled by Marn, on Flickr

Untitled by Marn, on Flickr

Untitled by Marn, on Flickr

Untitled by Marn, on Flickr
 

Marn

Rank IV

Enthusiast III

1,135
Reno, NV
Well. Its almost done.


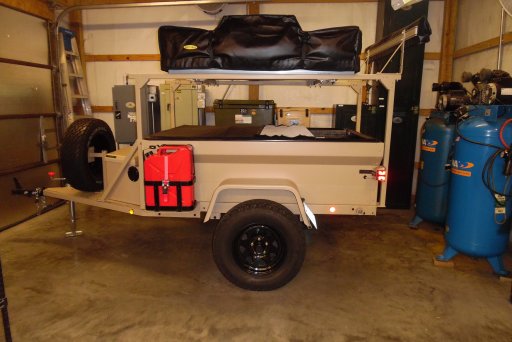
Got everything mounted. Decided to forego the front cross bar, and opted instead to mount the tent as far forward as possible to add some tongue weight. In the back we just did about an 8" raised cross bar in case I wanted to toss anything up there. Also just finished it off a little nicer.


Threw the tent on top, and the rack is pretty damn solid. I cannot see or detect any flex in it at this juncture, it just rocks the suspension of the trailer. we'll see how stiff it feels once the trailer is loaded down. It pulled home (10+ miles) just fine, I didn't take any corners fast or anything because it was empty and therefore top heavy. I had it up to around 50mph, and it pulled 100% normal.


The tent is just above roof line, almost exactly the height as if it were mounted to a rack on the vehicle.


Yay, now my trailer/tent combo is worth more money than my friggin' truck.

Untitled by Marn, on Flickr


Got it home and set up up the next day, easy enough to set up, stable enough as is, but I have some legs for the rear of the trailer on their way to me. The height is about perfect.

Untitled by Marn, on Flickr
 
Last edited:

vegasjeepguy

Rank V
Launch Member

Advocate II

2,566
Gravette, AR, USA
Member #

1130

Very nice setup and great job fabricating the rack. My only concern with going high with the RTT is the CG. I’ve had my trailer up on one wheel a few times on some rougher trails and would think it would’ve tipped over if the CG was higher. Looking forward to hear how it works out.
 
  • Like
Reactions: Graeman

Marn

Rank IV

Enthusiast III

1,135
Reno, NV
I have the same concerns, but don't really have any other option for the time. I highly doubt this will be going anywhere super rough, as my trucks both lack any true off road capability.

I have plans drawn up to create a raising and lowering system, but it will only drop the rack 15" which wont do a ton for the COG.
 
  • Like
Reactions: vegasjeepguy

Marn

Rank IV

Enthusiast III

1,135
Reno, NV
More work done. Painted the rack, added some bubble levels.


Added stabilizer jacks under the rear to make sure it doesnt go tippy tippy backwards. I can jump up and down in the back now and no issues.


Picked up some lvelling blocks so I can get it pretty close to level in every direction. also makes it easy to level the front using the stock landing gear. Looked briefly into adjustable landing gear but said nah.


Picked up the most sturdy bin I could find. Looked at sportsmans, cabelas, and home depot. All the stuff by plano was flimsy. This thing is solid as a rock. I can sit on it and it doesnt bow. Plenty of locking points to keep honest people honest, and will allow me to store my smaller gear securely when we are away from the trailer for the day.


Last thing I need to do before the first trip this weekend is mount up the spare tire in the front. Have a rack designed, but havent built it yet. Should be easy peasy.


Untitled by Marn, on Flickr

Untitled by Marn, on Flickr

Untitled by Marn, on Flickr


Untitled by Marn, on Flickr
 

Marn

Rank IV

Enthusiast III

1,135
Reno, NV
First time dragging it behind the wag. The damn pintle hitch is too long, had to add a few extensions to the chains, same situation as the hitch on my F250 because the dealer supplied bumper extends way out. Either way, towed fine, its a little clunky. Trailer still needs some more tongue weight. I'll be fabbing up a spare tire mount next week, that will go in front of the tub, and will likely mount a battery and box up there as well.

Untitled by Marn, on Flickr
 

Marn

Rank IV

Enthusiast III

1,135
Reno, NV
Well, the tent works. We just went to a campground this weekend for the initial shakedown run.


About 200 miles on the jeep this weekend, trailer towed great. It set up great, broke down fairly slowly, but apparently I can leave the annex attached. That will make things alot easier. Anyway, it performed well. I have some adjustments in my way of setting it up and tearing it down that I need to make, but I'm pleased so far. Basically its to the point where all I need to pack into the trailer is the large bin, small bin (kitchen gear), chairs, cooler, wood, and water. Then toss whatever clothing we pack into the jeep, and off we go. It all fit great in the trailer. Looking forward to refining this process.

Also, super not liking the combo pintle/ball hitch. The adjustable setup I have that I use on my Ford and Dodge to pull the trailer has a pintle that is just a dedicated pintle, no ball. I cant hear or feel the trailer at ALL when towing with either of those vehicles. The second I start driving with this combo hitch on the wagoneer, it's super friggin' bangy and clangy. I'm going to assume the regular pintle hitch is the difference here, not that i simply cant hear or feel it on either the Ford or the Dodge.


Untitled by Marn, on Flickr

Untitled by Marn, on Flickr

Untitled by Marn, on Flickr

Untitled by Marn, on Flickr
 
Last edited: