1984 Ford Bronco Project

  • HTML tutorial

Enthusiast II

1,250
Hartford, SD
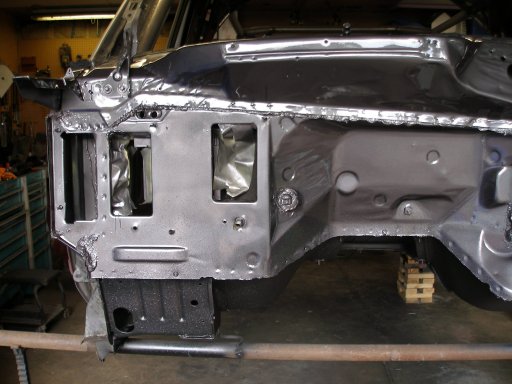
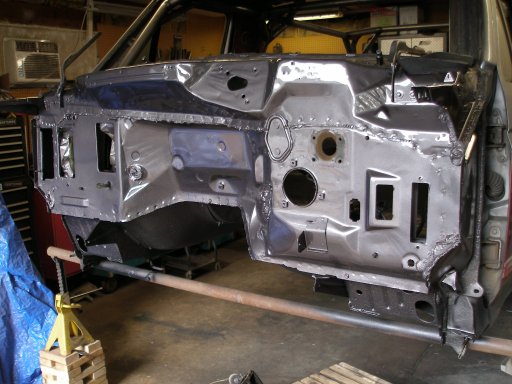
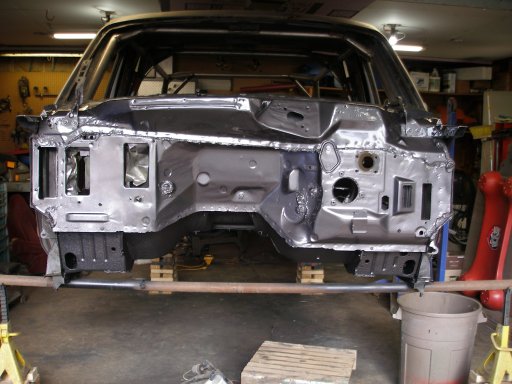
I got the silly idea that the firewall may as well match the exterior paint so it got cleaned up and a little color update.

Before.

P1010006.JPG

And After some cleaning a little sanding and parts removal.
P1010011.JPG


P1010013.JPG

P1010014.JPG

P1010016.JPG

And yes I'm aware it serves no purpose other than cosmetic. But I think it turned out pretty good. Now it's time to remove the old body of the green bronco and get it ready to go under this one.
 

Lanlubber In Remembrance

Rank V
Launch Member

Member III

2,827
Mimbres, NM, USA
First Name
Jim
Last Name
covey sr
Member #

16986

Ham/GMRS Callsign
none - BREAKER BREAKER HAND HELD CB AND WALKIE TALKIE
I got the silly idea that the firewall may as well match the exterior paint so it got cleaned up and a little color update.

Before.

View attachment 119548

And After some cleaning a little sanding and parts removal.

View attachment 119549


View attachment 119550

View attachment 119551

View attachment 119552

And yes I'm aware it serves no purpose other than cosmetic. But I think it turned out pretty good. Now it's time to remove the old body of the green bronco and get it ready to go under this one.
Will you be putting sound deadening spray on the interior quarter panels, doors and roof, so that it dosent sound like a hollow tin can going down the road ?
 

Enthusiast II

1,250
Hartford, SD
Will you be putting sound deadening spray on the interior quarter panels, doors and roof, so that it dosent sound like a hollow tin can going down the road ?
Yes sir. I've sprayed lizard skin sound deadening on almost all the interior. Then I am going to put down 3/8 thick sound insulation everywhere I can before the carpet and interior goes back in.
 

Lanlubber In Remembrance

Rank V
Launch Member

Member III

2,827
Mimbres, NM, USA
First Name
Jim
Last Name
covey sr
Member #

16986

Ham/GMRS Callsign
none - BREAKER BREAKER HAND HELD CB AND WALKIE TALKIE
Found a diamond in the rough.

Work begins soon :-)

One... count it.... one... rust spot.

(Texas)View attachment 120438View attachment 120439View attachment 120440
They are not that rare in my neighborhood but I couldn't find a single one (affordable) when I was looking for a rig to build. I'm an old Ford man and it was hard for me to build something else other than a Ford.

I'm always amazed when people lift their trucks to get ground clearance and then defeat the purpose by adding those ugly step bumpers. Other than that I like your new rig.
What engine does it have in it ? Auto or standard ? Factory locker in rear ?
 

IronPercheron

Rank VI
Launch Member

Pathfinder I

3,346
Sweeny Texas
Member #

0990

They are not that rare in my neighborhood but I couldn't find a single one (affordable) when I was looking for a rig to build. I'm an old Ford man and it was hard for me to build something else other than a Ford.

I'm always amazed when people lift their trucks to get ground clearance and then defeat the purpose by adding those ugly step bumpers. Other than that I like your new rig.
What engine does it have in it ? Auto or standard ? Factory locker in rear ?

Bumpers are a necessary evil, and as long as they are above the differential it won't impede much if any. Worth it to house my beloved Warn 8274.

It's a 302/E40OD truck. I pick up a 351/ZF5 F250 next week. Will be swapping 10.25 rear with 4.10s, 351W, zf5, and I have 1978 front components for a coil sprung D60.

It will be more truck than anyone would ever need.
 

Lanlubber In Remembrance

Rank V
Launch Member

Member III

2,827
Mimbres, NM, USA
First Name
Jim
Last Name
covey sr
Member #

16986

Ham/GMRS Callsign
none - BREAKER BREAKER HAND HELD CB AND WALKIE TALKIE
Bumpers are a necessary evil, and as long as they are above the differential it won't impede much if any. Worth it to house my beloved Warn 8274.

It's a 302/E40OD truck. I pick up a 351/ZF5 F250 next week. Will be swapping 10.25 rear with 4.10s, 351W, zf5, and I have 1978 front components for a coil sprung D60.

It will be more truck than anyone would ever need.
I was talking about the side steps hanging down, not the bumpers. I never heard of a 10.25 rear gear ratio, what did that come out of. The tires must have been 60" diameter. 4.10 is a good all around gear as long as the tires stay under 35" Dia. (IMHO)
 

Camp_Llama

Rank IV
Launch Member

Member III

1,046
Lexington, Kentucky
First Name
Seth
Last Name
Lamar
Member #

6940

10.25" is not in reference to the ratio. It's the size of the ring gear diameter the sterling axle that came in the rear of OBS F-2/350s.
 

Lanlubber In Remembrance

Rank V
Launch Member

Member III

2,827
Mimbres, NM, USA
First Name
Jim
Last Name
covey sr
Member #

16986

Ham/GMRS Callsign
none - BREAKER BREAKER HAND HELD CB AND WALKIE TALKIE
10.25" is not in reference to the ratio. It's the size of the ring gear diameter the sterling axle that came in the rear of OBS F-2/350s.
Thanks, I should have realized you were talking about ring gear size. That's a heavy dude. Full floaters are great performance diff's, just heavy.
 

tjZ06

Rank V
Launch Member

Advocate I

2,268
Las Vegas/Palo Alto
First Name
mynameisntallowed
Last Name
Adams
Member #

20043

That's a heck of a find! And your work so far on the first one is impressive, so clean.

-TJ
 

Enthusiast II

1,250
Hartford, SD
Got started removing everything I may need or could use on the new one. And getting the body ready to remove.

20190928_194225.jpg

20190929_171159.jpg

20190929_171210.jpg

With all the glass removed and such it was time to flip the body onto the trailer.

20191006_094226.jpg

Now I have easy access to the rest of it.

20191006_094234.jpg

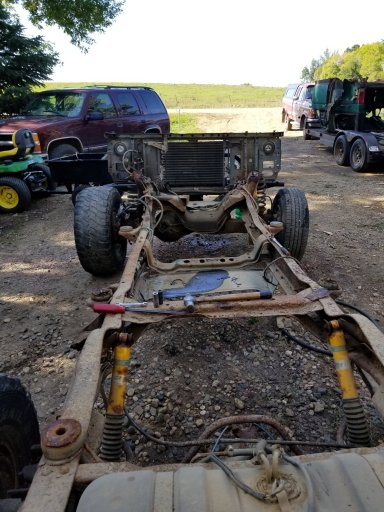
Unfortunately I found some thin spots in the frame due to rust. So now we are back to swapping mechanical goodies into the newer frame.

20191006_094240.jpg

Engine, transmission and transfer case removed.

20191006_135701.jpg

20191006_135657.jpg

Starting to think this would make a fun little buggy build...

20191007_072406.jpg

Now I just have to take the axles and bumpers off. I also need to remove the rear leaf spring hangers and swap 2 of them onto the newer one to replace damaged ones.
 
  • Like
Reactions: bonsaidave

Lanlubber In Remembrance

Rank V
Launch Member

Member III

2,827
Mimbres, NM, USA
First Name
Jim
Last Name
covey sr
Member #

16986

Ham/GMRS Callsign
none - BREAKER BREAKER HAND HELD CB AND WALKIE TALKIE
Got started removing everything I may need or could use on the new one. And getting the body ready to remove.

View attachment 121736

View attachment 121737

View attachment 121738

With all the glass removed and such it was time to flip the body onto the trailer.

View attachment 121739

Now I have easy access to the rest of it.

View attachment 121740

Unfortunately I found some thin spots in the frame due to rust. So now we are back to swapping mechanical goodies into the newer frame.

View attachment 121741

Engine, transmission and transfer case removed.

View attachment 121743

View attachment 121742

Starting to think this would make a fun little buggy build...

View attachment 121744

Now I just have to take the axles and bumpers off. I also need to remove the rear leaf spring hangers and swap 2 of them onto the newer one to replace damaged ones.
Which frame will you use, the one in the garage or this one outside the garage.
 

Lanlubber In Remembrance

Rank V
Launch Member

Member III

2,827
Mimbres, NM, USA
First Name
Jim
Last Name
covey sr
Member #

16986

Ham/GMRS Callsign
none - BREAKER BREAKER HAND HELD CB AND WALKIE TALKIE
The one in the garage from the 95. Was hoping for the easy route of just using everything under the body from the old one. But found some thin spots in the frame so now I get to do it the more involved way.
Well with a little grinding and flitch plating and shortening you may have that buggy frame after all. Another fun job for a different rig some day.:grinning:
 

Enthusiast II

1,250
Hartford, SD
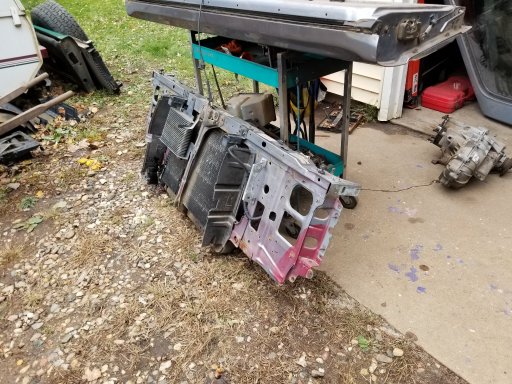
Spent a little time in the garage to day. Decided to take the engine out of the 95 frame this afternoon. Made a little more room by removing the core support. I wanted to check the lower mount area anyway.

20191013_171424.jpg

With the bumper and the core support out of the way. It was pretty easy to slip the engine out.

20191013_171419.jpg

One crusty poor running engine out.

20191013_171404.jpg

One almost empty frame ready for cleanup. And then time for some prep work and reinstalling of the goodies.

20191013_171411.jpg

I still need to pull the axles and front bumper/winch off the old frame and get them presentable and installed.
 

Enthusiast II

1,250
Hartford, SD
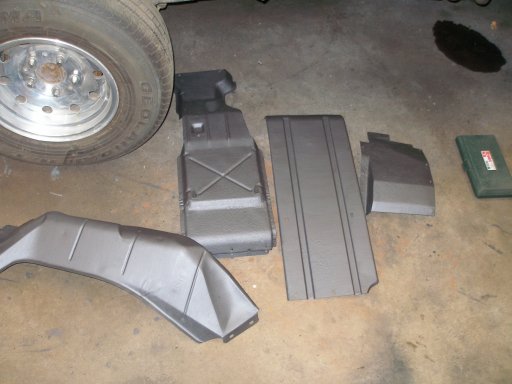
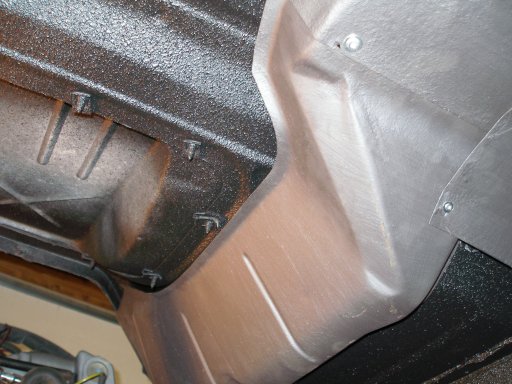
When I went to put the exhaust heat shields back on the body my ocd got the best of me. Just couldn't bring myself to reinstall the dirty and rusty shields. So it was time for some cleanup.

20191010_234144.jpg

After the first coat of high temp paint. I used some POR15 high temp gray.

20191011_231420.jpg

Second coat on and drying.

P1010001 (2).JPG

Time to rivet them back in place.

P1010006 (2).JPG

P1010005 (2).JPG

P1010004 (2).JPG

P1010003 (2).JPG

Turned out pretty good. Some how I managed to resist the urge to spray some lizard skin on the top side of the shields to help reduce heat transfer.
 

M Rose

Local Expert
Mod Team
Member

Advocate III

5,584
Northeast Oregon, United States
First Name
Michael
Last Name
Rose
Member #

20990

Ham/GMRS Callsign
W7FSB
Service Branch
US ARMY Retired
Man this is going to be one slick Bronco when you're done. You want to help me on my 89?