What Did You Do With Your Rig Today?

  • HTML tutorial

slowlane

Rank II

Enthusiast III

443
Wisconsin USA
First Name
Tim
Last Name
Bender
Pulled the heads off the VW engine and as suspected the #3 exhaust seat is hammered. There is also a crack starting its way from the spark plug hole to the exhaust valve seat. This thing definitely made it home on borrowed time. The head had already been welded sometime in the past. It's had a good run, but it's done. Found another head locally that was pretty crusty but cleaned up okay. New head has no combustion chamber cracks and good valve seats. The exhaust guides on the new head were smoked though so I replaced them. On an aircooled VW, guide replacement is a pretty basic affair of hammering out the old guide, putting the new one in the freezer for a while to shrink it a bit, and then hammering it in. Easy. Replaced the exhaust valves in both heads. Transferred valve springs, keepers, and intake valves from the bad head to the new one. Lapped in all valves on both heads and lapped cylinders to heads as Type-1 aircooled VW engines don't use head gaskets. The cylinder seals right against the combustion chamber. Cleaned and honed the cylinders and cleaned up the old pistons. New piston rings and a seal kit are on the way. I have to clean out the plugged heat riser in the intake manifold, replace the engine compartment seal on the car, and replace the transaxle mounts as they have turned to jelly from years of oil leaking on them. Then I'll put it all back together and hopefully get a couple more years and 20k or so out of the engine. Not a proper rebuild by any means, but I just want the car functional again while I build a more powerful replacement engine as having only 40hp is getting tough in modern traffic.

Here are some pictures of where the engine is at currently.

Engine as it sits this afternoon after cleaning. Surprisingly it is totally dry around the oil cooler. I'm not messing with those seals. Don't fix what's not broken, right?
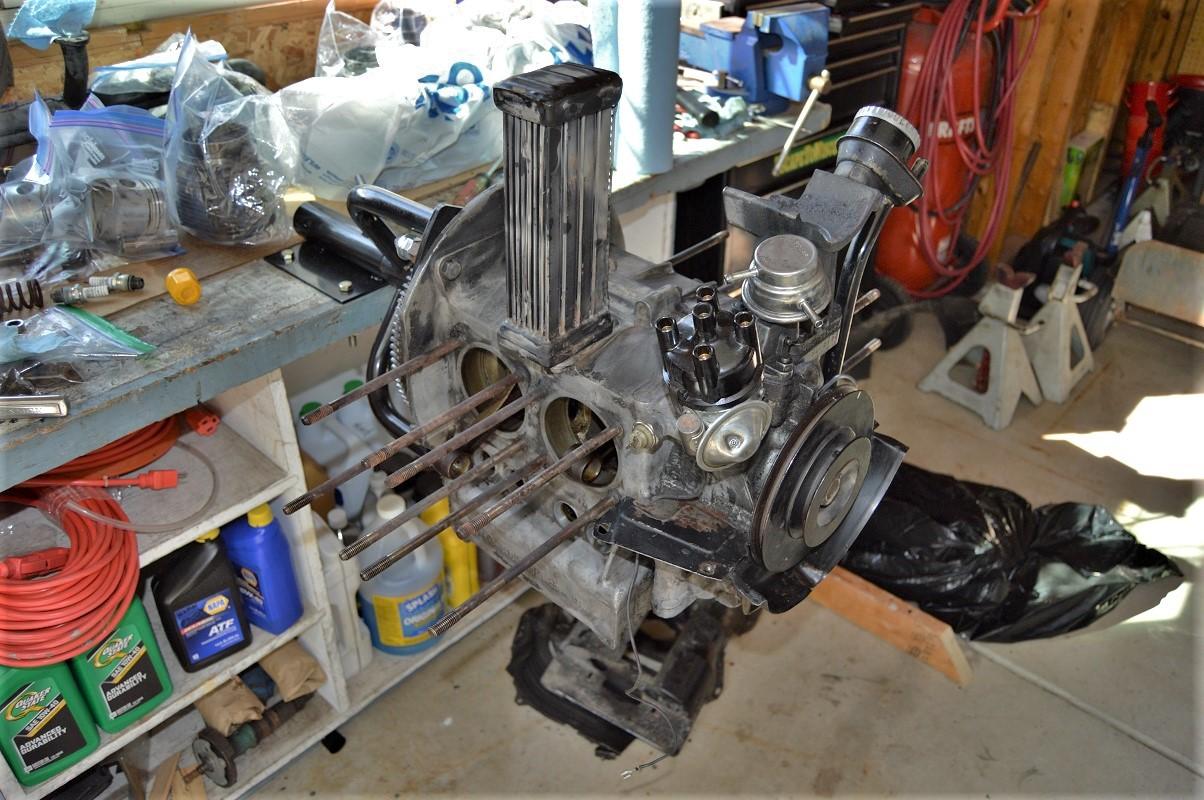
Image may have been reduced in size. Click image to view fullscreen.


Pistons and cylinders cleaned and bagged. Sorry didn't feel like unpacking them for a picture. They're not all that interesting anyway.
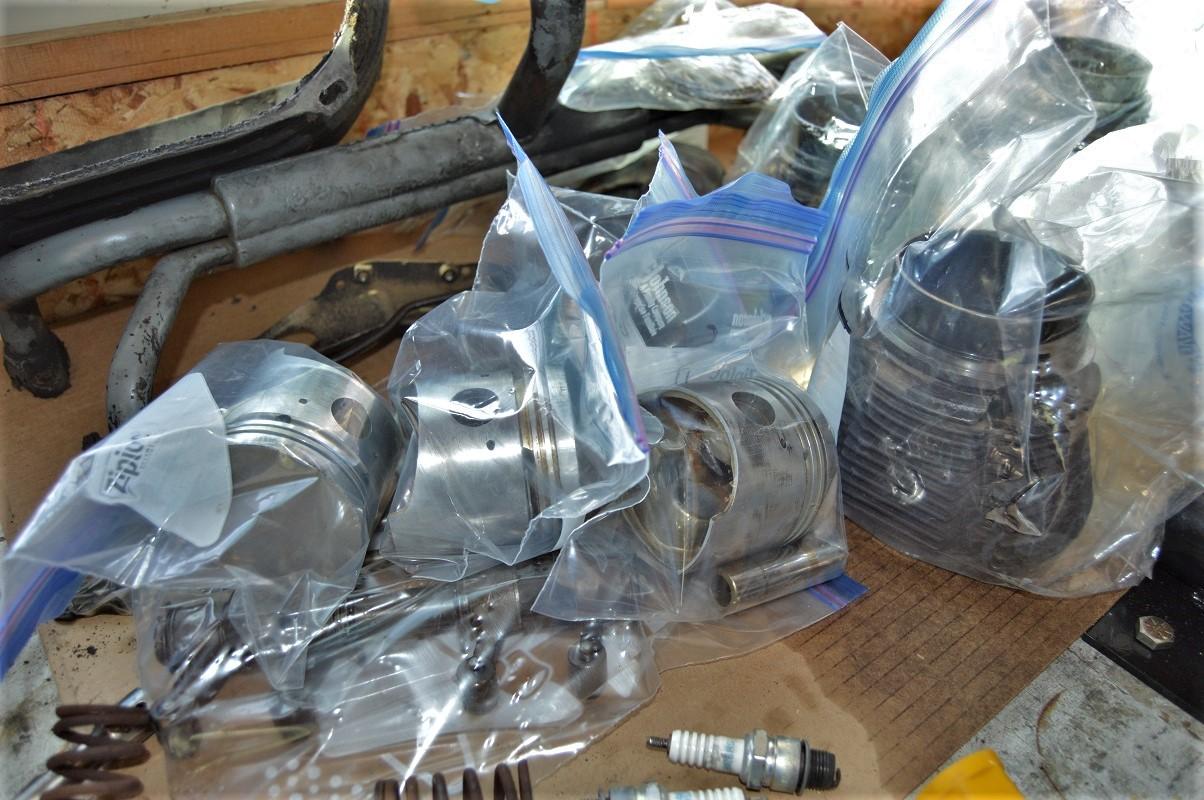
Image may have been reduced in size. Click image to view fullscreen.


Cylinder heads "rebuilt". New head is on the right. Still need to install exhaust studs on the new one.
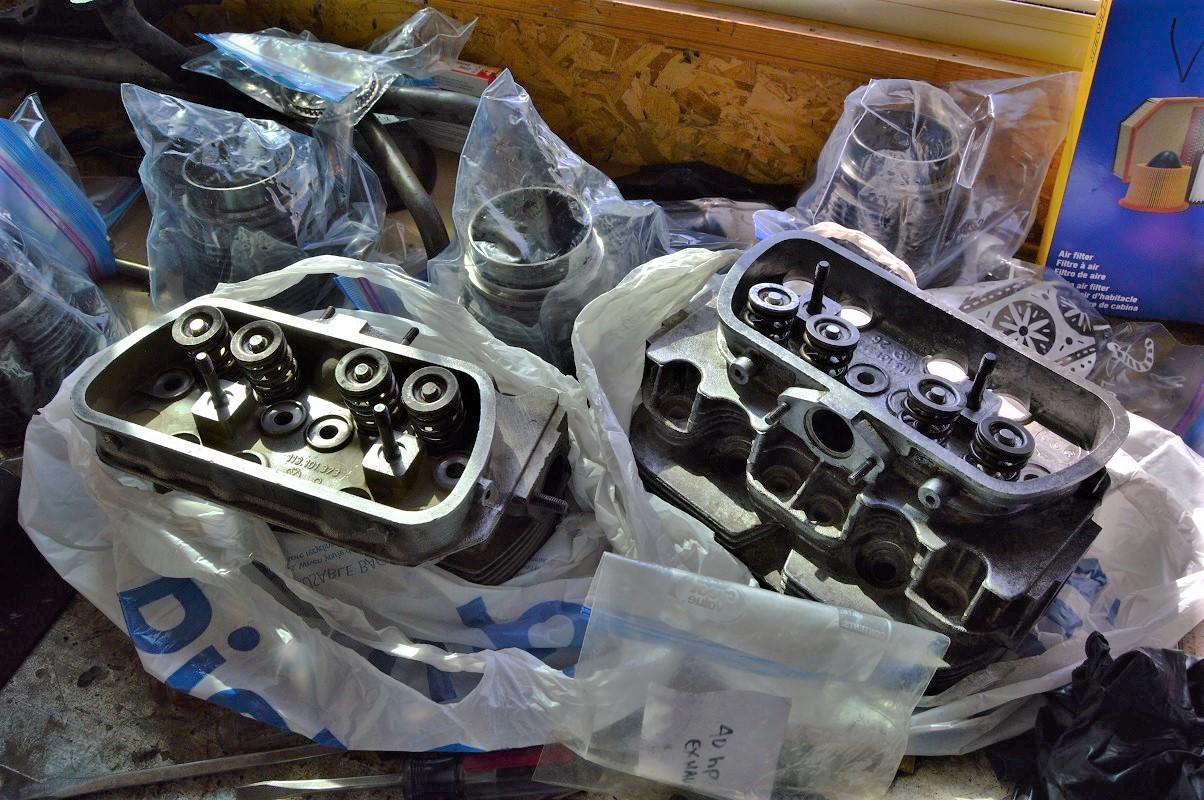
Image may have been reduced in size. Click image to view fullscreen.


Here's the #3 combustion chamber on the old head with the hammered seat on the right. It is BEAT in. The crack from the spark plug hole is hard to see between the Sharpie marks. The head had already been welded in that spot as well as several others sometime in the past. It's had a good run.
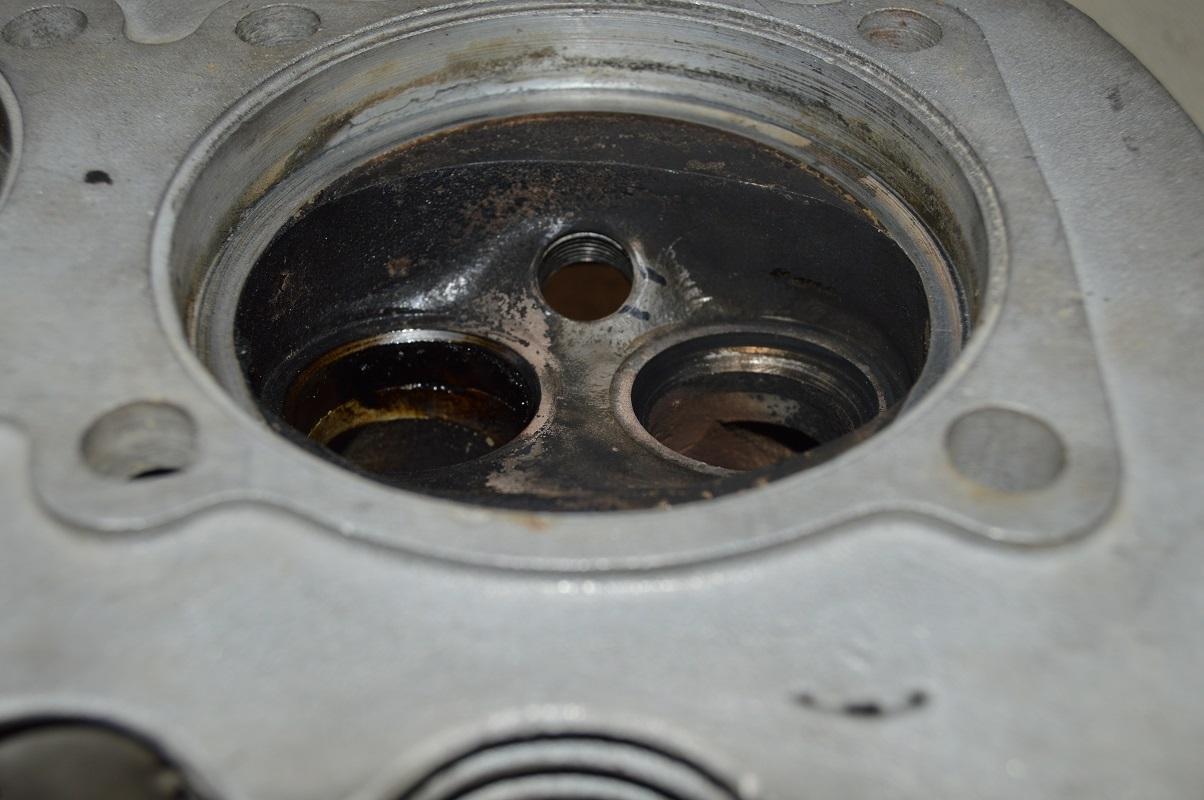
Image may have been reduced in size. Click image to view fullscreen.
 
Last edited:

roots66

Local Expert, Texas USA
Launch Member
Member

Off-Road Ranger I

3,507
Weir, TX, USA
First Name
Mike
Last Name
Roots
Member #

16968

Ham/GMRS Callsign
GMRS: WSGB862
Service Branch
USAF
Second trip to/from Houston. The drive still sucks, but the quality time with my kid is priceless.
 
  • Like
Reactions: Shahn and DosTacos

Tundracamper

Rank VI
Launch Member

Influencer I

3,068
Tuscaloosa, Alabama, USA
First Name
Steve
Last Name
Shepard
Member #

22670

I tried out the camera holder I built to sit on top of my Yeti cooler in the passenger seat. It was made with two layers of foam and some spray contact adhesive. With the velcro strap it sits right on top of the cooler and keeps my camera gear within easy reach while keeping it from sliding all over the place.

648EC57A-BAFD-4BAF-9270-69F8DE259FDB.jpegCamera holder with velcro strap

DFC76FCB-906D-44B4-8130-B660A83ABD22.jpegCamera holder installed

3FD8E0AE-8EBA-4338-89DD-36645A9DED2A.jpegVelcro strap close up

CD702B7D-35DF-45D9-91B7-A37D141F3ABA.jpeg
View from driver’s seat
 

2WheelRob

Rank V
Member

Traveler III

1,747
Austin, TX, USA
First Name
Rob
Last Name
Yarger
Member #

31533

I tried out the camera holder I built to sit on top of my Yeti cooler in the passenger seat. It was made with two layers of foam and some spray contact adhesive. With the velcro strap it sits right on top of the cooler and keeps my camera gear within easy reach while keeping it from sliding all over the place.

View attachment 259016Camera holder with velcro strap

View attachment 259018Camera holder installed

View attachment 259019Velcro strap close up

View attachment 259020
View from driver’s seat
Clever. I like it.
 

PapaDave

Local Expert Northern ID and North East WA
Member

Protector II

8,868
Coeur d'Alene, ID, USA
First Name
Dave
Last Name
Addington
Member #

10123

Ham/GMRS Callsign
KN6BKH
I installed my 270 awning mounts. I have an iKamper that opens to the side and you can’t tuck an awning up close to it without interference, so I designed and made mounts that telescope. They slide out 4”, utilize push button snaps to lock, a bolt to keep it from separating, and set screws to keep them from rattling. They each are strong enough to hold my body weight.

EB91EA56-44E2-4AAC-85FD-A0E11B86D563.jpeg27A1AC0E-61D7-4CA3-8D83-30FC1ABDDB82.jpegF0E37B0B-0B6A-432C-B2EF-DCA0F0AEB178.jpegE407263F-D22E-4BCB-AD16-B1298979179E.jpegF62765B3-5214-45A0-9164-A99CE554FF0A.jpegE97B3FEC-1609-4B05-8076-B2EF7BDB51B6.jpeg
 

Staticline40

Rank V
Launch Member

Member II

2,268
Fort Mill, SC, USA
First Name
Mark
Last Name
Tebo
Member #

12262

Service Branch
US Army Retired
I installed my 270 awning mounts. I have an iKamper that opens to the side and you can’t tuck an awning up close to it without interference, so I designed and made mounts that telescope. They slide out 4”, utilize push button snaps to lock, a bolt to keep it from separating, and set screws to keep them from rattling. They each are strong enough to hold my body weight.

View attachment 259025View attachment 259026View attachment 259027View attachment 259028View attachment 259030View attachment 259029
That's awesome, I'll buy a set!
 
  • Like
Reactions: Kent R and PapaDave

Influencer II

980
South Carolina, USA
First Name
Ryan
Last Name
Haskins
I installed my 270 awning mounts. I have an iKamper that opens to the side and you can’t tuck an awning up close to it without interference, so I designed and made mounts that telescope. They slide out 4”, utilize push button snaps to lock, a bolt to keep it from separating, and set screws to keep them from rattling. They each are strong enough to hold my body weight.

View attachment 259025View attachment 259026View attachment 259027View attachment 259028View attachment 259030View attachment 259029
Like it a lot. How do you like the box you have in the Voodoo Fabrication rack?
 
  • Like
Reactions: PapaDave

PapaDave

Local Expert Northern ID and North East WA
Member

Protector II

8,868
Coeur d'Alene, ID, USA
First Name
Dave
Last Name
Addington
Member #

10123

Ham/GMRS Callsign
KN6BKH
I installed my 270 awning mounts. I have an iKamper that opens to the side and you can’t tuck an awning up close to it without interference, so I designed and made mounts that telescope. They slide out 4”, utilize push button snaps to lock, a bolt to keep it from separating, and set screws to keep them from rattling. They each are strong enough to hold my body weight.

View attachment 259025View attachment 259026View attachment 259027View attachment 259028View attachment 259030View attachment 259029
Like it a lot. How do you like the box you have in the Voodoo Fabrication rack?
By box you mean the toolboxes? They’ve been really handy on my trips. Currently one has my impact driver and impact wrench, the other has random gear like a lantern and jiggler siphon for my Rotopaxs
 

Kent R

OB Executive Director
Staff member
Mod Team
Moderator
Member

Pathfinder III

5,200
El Dorado, Ca
First Name
Kent
Last Name
Reynolds
Member #

1632

Ham/GMRS Callsign
K6KNT
Service Branch
Retired Firefighter
Pulled the heads off the VW engine and as suspected the #3 exhaust seat is hammered. There is also a crack starting its way from the spark plug hole to the exhaust valve seat. This thing definitely made it home on borrowed time. The head had already been welded sometime in the past. It's had a good run, but it's done. Found another head locally that was pretty crusty but cleaned up okay. New head has no combustion chamber cracks and good valve seats. The exhaust guides on the new head were smoked though so I replaced them. On an aircooled VW, guide replacement is a pretty basic affair of hammering out the old guide, putting the new one in the freezer for a while to shrink it a bit, and then hammering it in. Easy. Replaced the exhaust valves in both heads. Transferred valve springs, keepers, and intake valves from the bad head to the new one. Lapped in all valves on both heads and lapped cylinders to heads as Type-1 aircooled VW engines don't use head gaskets. The cylinder seals right against the combustion chamber. Cleaned and honed the cylinders and cleaned up the old pistons. New piston rings and a seal kit are on the way. I have to clean out the plugged heat riser in the intake manifold, replace the engine compartment seal on the car, and replace the transaxle mounts as they have turned to jelly from years of oil leaking on them. Then I'll put it all back together and hopefully get a couple more years and 20k or so out of the engine. Not a proper rebuild by any means, but I just want the car functional again while I build a more powerful replacement engine as having only 40hp is getting tough in modern traffic.

Here are some pictures of where the engine is at currently.

Engine as it sits this afternoon after cleaning. Surprisingly it is totally dry around the oil cooler. I'm not messing with those seals. Don't fix what's not broken, right?
Image may have been reduced in size. Click image to view fullscreen.


Pistons and cylinders cleaned and bagged. Sorry didn't feel like unpacking them for a picture. They're not all that interesting anyway.
Image may have been reduced in size. Click image to view fullscreen.


Cylinder heads "rebuilt". New head is on the right. Still need to install exhaust studs on the new one.
Image may have been reduced in size. Click image to view fullscreen.


Here's the #3 combustion chamber on the old head with the hammered seat on the right. It is BEAT in. The crack from the spark plug hole is hard to see between the Sharpie marks. The head had already been welded in that spot as well as several others sometime in the past. It's had a good run.
Image may have been reduced in size. Click image to view fullscreen.
Spent allot of time rebuilding these in my late teens and early twenties, good old #3 always causing problems.
 
  • Like
Reactions: slowlane

Kent R

OB Executive Director
Staff member
Mod Team
Moderator
Member

Pathfinder III

5,200
El Dorado, Ca
First Name
Kent
Last Name
Reynolds
Member #

1632

Ham/GMRS Callsign
K6KNT
Service Branch
Retired Firefighter
Not so much fun doing this by yourself. ;-)
Old bent one off to the axle shop tomorrow to get the "new to me housing" that we had trussed ready for re-install.
 

Attachments

roots66

Local Expert, Texas USA
Launch Member
Member

Off-Road Ranger I

3,507
Weir, TX, USA
First Name
Mike
Last Name
Roots
Member #

16968

Ham/GMRS Callsign
GMRS: WSGB862
Service Branch
USAF
Replaced the cheap, broken after 3 weeks, cross bars with this TMS set. Bad news is I can no longer use the bed cover. Good news is, static limit is 800lbs.

IMAG2707.jpgIMAG2708.jpg
 
  • Like
Reactions: Shahn