What Did You Do With Your Rig Today?

  • HTML tutorial

CR-Venturer

Rank VI
Launch Member

Traveler III

3,372
Ardrossan, AB, Canada
First Name
Jas
Last Name
Spr
Member #

16340

Finally finished the rockers and with them all the plastic cladding on my rig. SO happy with how it turned out. Next is to buff out the pinstriping with some toothpaste and a microfiber cloth lol
IMG_20181026_150053524_HDR.jpg
Please forgive the crappy spare tire on the right rear - the replacement AT2 is coming in early November.
 

Smileyshaun

Rank V
Launch Member

Member III

2,779
Happy Valley, OR, USA
First Name
Shaun
Last Name
Hoffman
Member #

4799

finally got to test fit the possible wheel/tire upgrade . It's tight but seems to clear everything. Time to order the other 3 wheels .20181026_133050.jpgnot a huge fan of the tire sticking out to the edge of the fender but the eventual plan is to drop to a 225/75r15 after these 235/75s wear out so that should tuck it in just enough . 20181026_133528.jpg
 

KDC

Rank V
Launch Member

Influencer II

2,373
Lawton, OK
Member #

14267

So I finally got all the grease and dirt off the driveshaft and found that my issue was not a bad u joint making all that racket. The slip yoke is cracked so I have a two wheel drive truck until I can fork out the money for a new one
 
  • Like
Reactions: HappyOurOverlanding

Ben Cleveland

Rank V
Launch Member

Advocate II

1,836
Nashville, TN, USA
First Name
Ben
Last Name
Cleveland
Member #

12148

Did a lot of work on the 4runner this weekend. Didn't really take pictures though. I had a feeling I had at least 1 frozen brake caliper, my fuel economy had recently dropped like 30%, and the vehicle wouldn't go forward when in drive unless I hit the gas. Found one of my rear wheels so completely seized that I couldn't even rotate it when it was lifted off the ground and in neutral.

So I rebuilt the brakes on that corner completely with new pads, rotor and caliper. Then did new pads and cleaned up the slide pins on the other side. Front brakes were fine.

Then I cut down the snorkel by about 1.5" so its below my roof line. This is an LC 80 snorkel that basically fits the 4runner, but over time I've just noticed the height and cocked head and they didn't look right. It looked odd and was bugging me. I also heated it up with the heat gun, and got the head perfectly straight instead of leaning over like it was. These pics are at odd angles, but the top of the head is now perfectly level with the top of my roof rack.
IMG_2347.JPG

IMG_2348.JPG


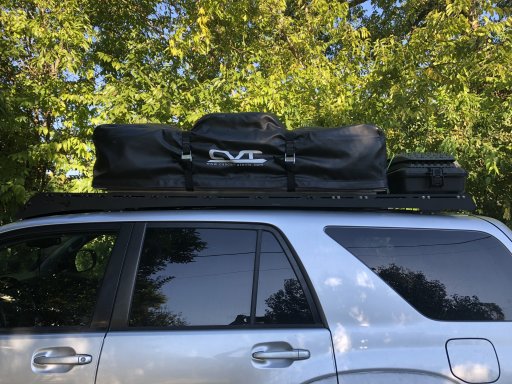
Then my wife helped me get the RTT back on the rack, in a slightly different configuration than before.
Before the RTT was all the way in the rear, tool box in the very front. Now, tool box is in the rear, RTT in the middle, with a tiny bit of space in the front for gas cans if we need them. I don't know if I like this new configuration, but we've got the first of 4 or 5 trips this fall happening next weekend, so I think we're going to realize pretty quickly if its not working.

IMG_2349.JPG
 

JCWages

Rank V
Launch Member

Pathfinder I

2,271
Grass Valley, CA, USA
First Name
Justin
Last Name
Wages
Member #

18693

The Gen2 Colorado/Canyon wheel wells can fit a 255/75/17 (32.1") tire with no problems but when stepping up the width you quickly run out of room when turning the wheel left and right. To fit larger tires like a 285/70/17 you need to trim back the pinch weld behind the tire in the front wheel wells as well as push the front fender liner forward. Those are the two areas that will contact a 33" tire on these trucks without a major lift. 33" is pretty much the standard "max size" we can do without more serious modifications.

Most people remove the "waffle" (large piece of plastic between the bumper cover and wheel well that the liner attaches to) and trim about an inch or so off it then ziptie the wheel well liner back on. I think that method looks a little janky so I loosely followed the technique another forum member used and simply drilled mounting new holes on the enderside of the bumper cover and pushed the waffle and liner forward. Still looks factory and I gained a little more than and inch or so of clearance in front of the tire which should do the trick.

I also caught the Discount Tire Direct eBay sale and picked up a set of Wildpeak A/T3W P285/70/17s for $592. If all goes well I'll be back in here tomorrow posting pics of the new tires. Yee!

Fender liner lifted exposing the "waffle". Most trim the back edge closest to the front of the tire then ziptie the liner in place because you've cut off the factory screw clips.


The liner is pushed inward and I retained all of the screws and factory mount points.


Viewed from underneath the front of the truck. You can see the original screw holes and the new ones. Don't mind the other clips. Those are for the factory air dam. I put it on for long trips. It's worth about 1mpg at high speed.


Ohh and my Off The Grid "Trailblazer 2.0" pants finally arrived. Super stoked!
 
Last edited: