SchwarttzyWhere did you find those?
Can't make it through the day? Back up, and get a run at it!
What Did You Do With Your Rig Today?
- Thread starter iamout
- Start date
-
Guest, UPDATE We went through the site migration runbook and completed all steps. We will need to complete the migration next week, but will leave the forums up for the weekend. A few days after maintenance, a major upgrade revision to the forum site will occur.

Enthusiast III
- 2,041
- First Name
- Ken
- Last Name
- Brown
- Member #
-
4979
- Ham/GMRS Callsign
- GMRS: WRHZ939
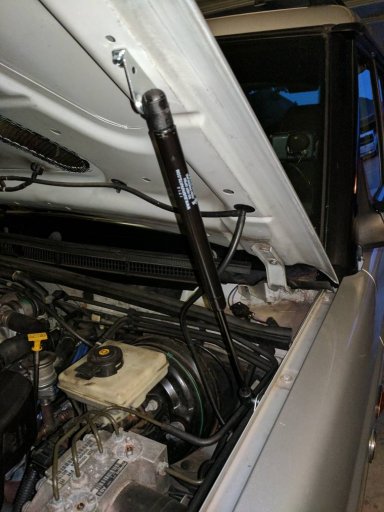
I added some necessary bling, which was easier than cleaning the mud off my engine:

- OB Member Badge (left of license plate)
- Decal explaining why my rig is always dirty (lower right hatch)
- Less than clean engine bay (should look better for a truck with < 5k miles)
- Tested my Viair 88p (excellent!)
- Organized my rescue gear


Traveler III
- 4,002
- First Name
- Kelly
- Last Name
- Herrin
- Member #
-
2032
- Ham/GMRS Callsign
- KFØDEX
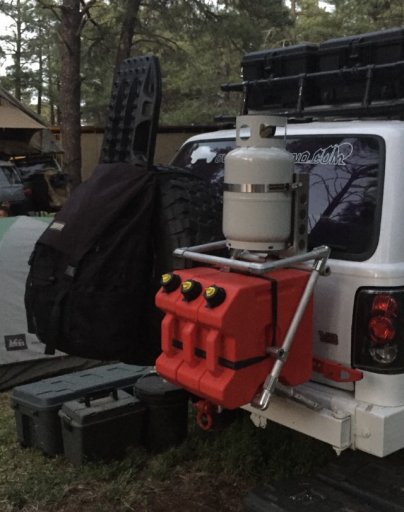
Nice propane tank and mount. I also sport a little tank (5lb on powertank bracket). Great looking setup Sir!

Influencer II
Today's job, chasing rust on the Cruiser. One of my least favourite jobs... basically because it usually looks worse when I've finished.

Sent from my iPhone using OB Talk

Sent from my iPhone using OB Talk
Mini Quick Fists & Gerber BG Hatchet
https://www.overlandbound.com/forums/threads/coreys-2007-toyota-fj-cruiser-build.2257/page-5#post-103467

https://www.overlandbound.com/forums/threads/coreys-2007-toyota-fj-cruiser-build.2257/page-5#post-103467

First project for the day is clean new ShrockWorks skid plates and coat inside faces with truck bed epoxy coating.

Sent from my SM-S906L using OB Talk mobile app

Sent from my SM-S906L using OB Talk mobile app
Whats with the middle skid? Is that the non shrock bumper radiator skid? Hard to see from the photo but it looks like you have an ARB bumper. I was just curious. But looks good. Before mounting the engine skid, do yourself a favor and get a Femco oil drain valve. Makes changing the oil possible without a mess with the skids installed, since the engine skid is the worst one to pull off after its installed. I had my gas tanks skid off this week to replace the leaf pack and only broke the carriage bolts, but looks good.First project for the day is clean new ShrockWorks skid plates and coat inside faces with truck bed epoxy coating.
Sent from my SM-S906L using OB Talk mobile app
Are these the first time mounting skids to your rig? If so, let me know for some tips. Im sure others can provide some as well.

Advocate II
Was thinking of updating some of my skids, along with swapping my steps for sliders
Also from what I can see that middle skid should protect the Oil Pan (has the filter access hole on it that XTerra's have on their OE plastic covers)
Also from what I can see that middle skid should protect the Oil Pan (has the filter access hole on it that XTerra's have on their OE plastic covers)
Awesome reply, thanks. So middle one is as you guessed arb bumper radiator skid plate. Thanks for heads up on Femco valve. Yes, first skid plates for me.[emoji15] so any tips would be cool.Whats with the middle skid? Is that the non shrock bumper radiator skid? Hard to see from the photo but it looks like you have an ARB bumper. I was just curious. But looks good. Before mounting the engine skid, do yourself a favor and get a Femco oil drain valve. Makes changing the oil possible without a mess with the skids installed, since the engine skid is the worst one to pull off after its installed. I had my gas tanks skid off this week to replace the leaf pack and only broke the carriage bolts, but looks good.
Are these the first time mounting skids to your rig? If so, let me know for some tips. Im sure others can provide some as well.
We're welding on my sliders tomorrow, I assume no conflicts?
Sent from my SM-S906L using OB Talk mobile app

Member II
Smart move. Many just bolt them on with no preventative prep. [emoji482]First project for the day is clean new ShrockWorks skid plates and coat inside faces with truck bed epoxy coating.
Sent from my SM-S906L using OB Talk mobile app
Shouldn't have any, They are all shrock, and while they cost money and there is a wait, they typically just fit. Hefty and shrock combos have interference on skids, but the sliders should be fine either way.
As for the skids, like mentioned get the femco valve sooner than later, you can search thenewx.org for others running them and what they say about them as well. It drains slower than just pulling the plug but there is 0 mess even with the skid on.
As for the skids. Antiseize the bolts, and there can be noise from some of them. I found that weather striping from home depot (not the sponge stuff as it traps moisture but the rubber stuff is good) works awesome. they come in a bunch of sizes, but something like this http://www.homedepot.com/p/Frost-King-E-O-3-4-in-x-7-16-in-x-10-ft-Black-High-Density-Rubber-Foam-Weatherstrip-Tape-R734H/100047977 notice the recommended uses, first one affects us. I place it anywhere there is large sections of metal on metal contact, IE, front edge of the transfer case skid, front and back edge of tranny skid, back edge of engine skid, and then a little near the holes you need to drill on the lower control arm bracket for the engine skid. I also use some on the long drivers edge of the gas tank skid since there is 18" of metal contact but only one bolt. Last places to use it vary, but I found that on the tranny skid, near the front, there is a 45* bracket on the truck that sometimes makes contact and makes a ringing sound. Place the stripping on the bracket and see if your skid hits it when pressing it up there.
Another trick is the stupid tube spacers on front of the engine skid. They will NOT stay in place when your dinking with this thing. I found corded weather striping works awesome to temp hold stuff. Its like silly putty that never gets hard. place some on the spacers and put them into place, then when you lift the skid into place they are still there. I also used it on my winch mounting nut since side the winch body since the winch fits horizontal on the shrockworks bumper. Its in a purple box at home depot, usually on the bottoms shelf in the weather striping area. http://www.homedepot.com/p/M-D-Building-Products-1-8-in-x-90-ft-Flexible-Caulking-Cord-Weatherstrip-71548/100353483
Last, has to do with the engine skid. You will see why you do not want to pull this and replace it to change your oil when you do this.
Temp mount it first, just this skid only. snug up the 2 front and 2 rear bolts, then mark the lower control arm places to drill, remove the skid and drill the hole out and hit is with some paint. Now mount the tranny skid, leaving the rear bolts loose, place a small jack under it and take tension off the hardware, and completely remove the front mounting bolts (these are the same that the engine skid use), then mount the engine skid, again leave all bolts loose but started, then tighten both skids. I place the engine skid over the tranny skid so it prevents a lip that can hang you up if something hits down there. The tranny and transfer case skid do not touch, the tranny it notched for the transfer case skid, like a puzzle.
You will need a 9/16 wrench, 9/16 socket and 13mm socket to install everything. But will need the drill and bit for the LCA mounting spot on the engine skid since it your first time doing this.


Last edited:
Ohh, and be prepared to curse the stupid bolts at the LCA mounts. You will not believe what a PITA can be to line up the flat washer, lock washer, and nut in a space where your fingers do not fit then start the nut on the bolt you just pushed up there hopefuly not knocking the hardware all over. This is why the Femco is so required on this skid. I have installed 4 of these engine skids, only once did it just go the first time. One time I about wanted to let the truck roll over my head I was so pissed. And don't try to jack the truck up and take the tire off to do it, if you do the LCA will swing down blocking all access to the area you need, you have to do this with the tire mounted and the truck on its own weight. Still its not fun.
Wow, thank you for the detailed information. You should write an install spec sheet for schrockworks. But just for fun have it translated to Chinese and back again lol. I'm actually going to print this out, thanks again.Ohh, and be prepared to curse the stupid bolts at the LCA mounts. You will not believe what a PITA can be to line up the flat washer, lock washer, and nut in a space where your fingers do not fit then start the nut on the bolt you just pushed up there hopefuly not knocking the hardware all over. This is why the Femco is so required on this skid. I have installed 4 of these engine skids, only once did it just go the first time. One time I about wanted to let the truck roll over my head I was so pissed. And don't try to jack the truck up and take the tire off to do it, if you do the LCA will swing down blocking all access to the area you need, you have to do this with the tire mounted and the truck on its own weight. Still its not fun.
Sent from my SM-S906L using OB Talk mobile app

Member II
Finally mounted my traction assists.


And found the best spot for the GoalZero 1400, when back seat is up daily driving. GZ continually charges off 12v day to day.


And found the best spot for the GoalZero 1400, when back seat is up daily driving. GZ continually charges off 12v day to day.

Last edited:
Truck looks great and I'm jealous of your shower and awning setup but need some help....what is the GZ 1400? And do i see a solar panel behind it?Finally mounted my traction assists.

And found the best spot for the GZ 1400, when back seat is up daily driving. GZ continually charges off 12v day to day.
Sent from my SM-S906L using OB Talk mobile app

Member II
Thanks [emoji482]Truck looks great and I'm jealous of your shower and awning setup but need some help....what is the GZ 1400? And do i see a solar panel behind it?
Sent from my SM-S906L using OB Talk mobile app
Updated post - GoalZero 1400 power pack. The black panel is a molle panel; blocked out both rear side windows. They are great for storage and prying eyes.
I do have a 100w solar panel as well.
Good looking work there. What's the connector block below with the blue cables running to it for. Don't see an output yetFinished my auxiliary fuse panel. Everything that works through this panel comes from the 2nd battery. All protected with a 150 amp fuse.
I will be using 2 of those relays for lights that I have now...I installed extra since I was there. I still have room to add 6 more circuits from that fuse panel. I will use 1 gauge wire from the batter to supply this panel..in case I want to add stuff later. Its in the place of my old glove box.View attachment 20954
Sent from my iPhone using OB Talk


