

Advocate I
Advocate I

Traveler II

Enthusiast III

Enthusiast III
Will do! I'll give them a closer look as well, thanks. Fortunately somebody before me replaced the front driveshaft with the aftermarket including grease fittings, I lubed these at the last oil change but will inspect them a bit closer.Check the front ujoints for the vibration noise. Otherwise, good on ya!
Advocate I
Creator III
Not guaranteed - some LR drive train (axle) bolts of that era were still imperial, especially if, say an axle, has been swapped out and an older one fitted.Kyle, isn't that vehicle all metric? I don't know anything about Discos.

Enthusiast II
Enthusiast III
For the most part that's a safe rule of thumb, but of course there are caveats. During teardown I've found a few imperial, or at least bolts that imperial fit a bit better than metric and I wouldn't be as concerned about rounding off a head. For example, the water pump uses primarily 10mm to hold the housing on but three of them are 7/16 head that run into the block.Kyle, isn't that vehicle all metric? I don't know anything about Discos.
Hit the nail on the head! I'm the seventh owner of this Disco, she's had... quite a few hands over the years. Missing bolts, mismatched bolts, etc. are abound. I'm slowly working through all that.Not guaranteed - some LR drive train (axle) bolts of that era were still imperial, especially if, say an axle, has been swapped out and an older one fitted.
Thanks! It's coming along, I've had it about six months now so we're making swift progress. I look forward to next year slowing the pace just a tad to enjoy the ride. I really appreciate the offer, I actually ended up finding a universal kit for under $20. Came with a pump and res. I can affix just about anywhere. I'll go that route for the time being and see how it lasts. Thanks though!Looks like great progress. Those pesky brake bolts!! I've always used a 13MM 12pt. Seems to pit perfect. Do you need a windshield wiper tank and pump? There's a few here in CO at the junkyards. Happy to harvest one for you.
On the A.C.E. system, they removed the pump, but not the tank and lines? You could delete all of it, and add a sway-bar kit instead and a single tank for the power steering. A new non A.C.E. ECU is only 250$ (still a lot of money but seems inexpensive for a 20 y/o computer).
Best of luck!
Enthusiast III


 . Of course the three-amigos are lit, hopefully hubs and some work on the pump will resolve those. ACE is gone so of course that system light is lit, I'll probably just pull that bulb. SRS is on because only the driver seat is in. I like my indicators to mean something, so we'll get there! At least my SES isn't on (knock on wood).
Enthusiast II
Shoot me a DM with a ship to and I'll send you a singe tank PSP reservoir. I have a few laying around.For the most part that's a safe rule of thumb, but of course there are caveats. During teardown I've found a few imperial, or at least bolts that imperial fit a bit better than metric and I wouldn't be as concerned about rounding off a head. For example, the water pump uses primarily 10mm to hold the housing on but three of them are 7/16 head that run into the block.
Hit the nail on the head! I'm the seventh owner of this Disco, she's had... quite a few hands over the years. Missing bolts, mismatched bolts, etc. are abound. I'm slowly working through all that.
Thanks! It's coming along, I've had it about six months now so we're making swift progress. I look forward to next year slowing the pace just a tad to enjoy the ride. I really appreciate the offer, I actually ended up finding a universal kit for under $20. Came with a pump and res. I can affix just about anywhere. I'll go that route for the time being and see how it lasts. Thanks though!
Yep correct. They left basically everything, except the ACE pump that sits atop the PSP. During this whole teardown I cut back a couple of the lines as a quick method to make some extra room, I have zero plans to re-engage the ACE at this stage. Certain OEM systems I want to return to operation, such as ABC/TCS but when they deleted they installed sway bars. A single PSP tank is indeed on the radar, when I come across one I'll be taking advantage of it.
Enthusiast II
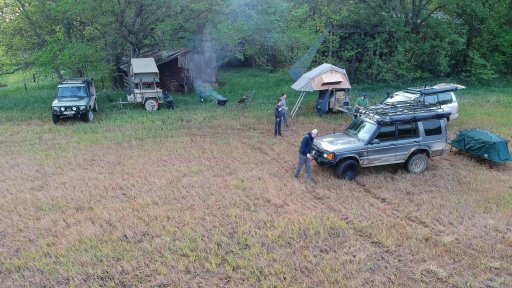
Amazing work. Well done.Update time! TLDR, we took a victory lap!
View attachment 260274
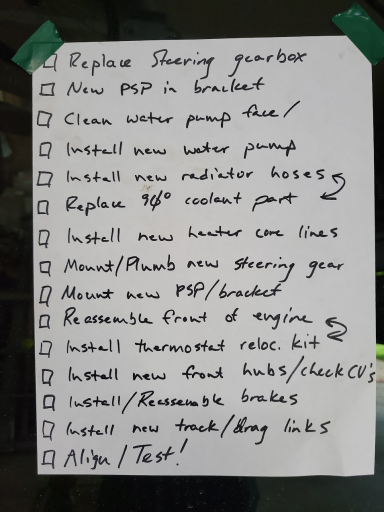
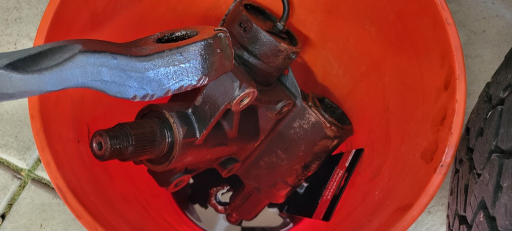
Reviewing back where I was in the prior post, we'll start with the steering gear removed. That was a 'fun' one man job.
View attachment 260275View attachment 260276
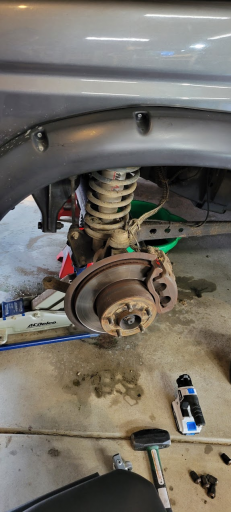
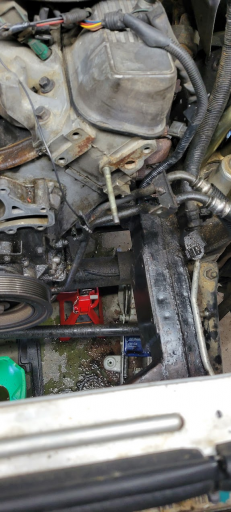
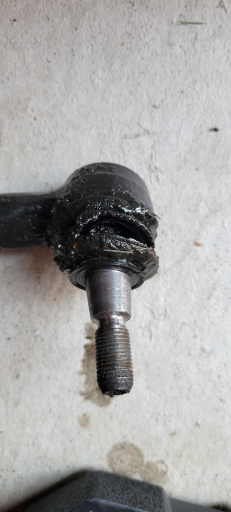
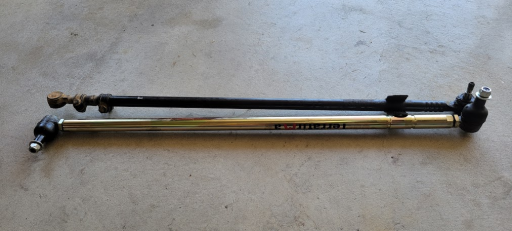
Track and drag link joints were very worn out, if the boots weren't entirely missing they were at least fully open. The passenger track linkage was very loose, I ended up having to cut it out as I wasn't able to get enough leverage any other way to hold the ball in place while the impact did its work. Vice-grips just shredded the metal of the link. Below L/R is the driver side linkage and then the passenger side cut, lots of play in that joint.
View attachment 260277View attachment 260278View attachment 260280
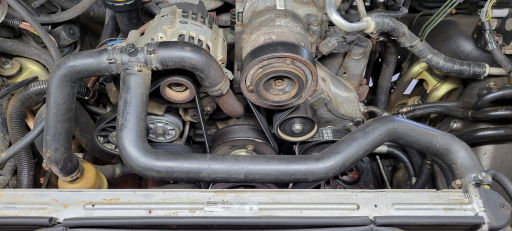
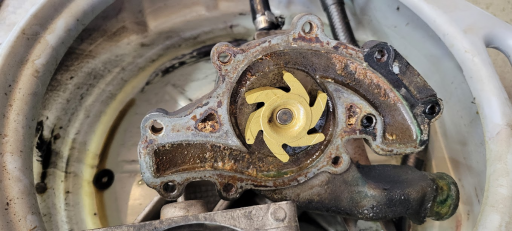
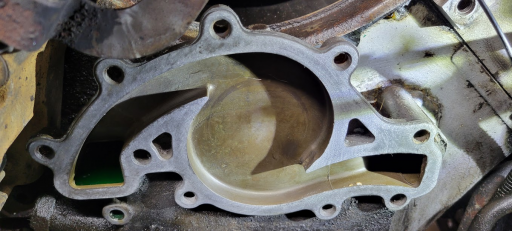
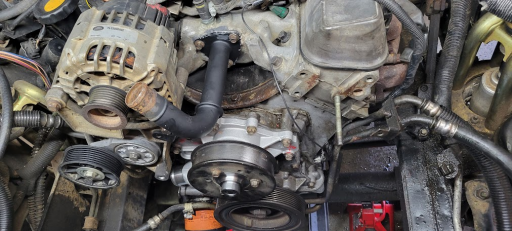
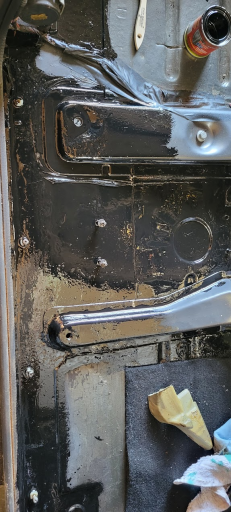
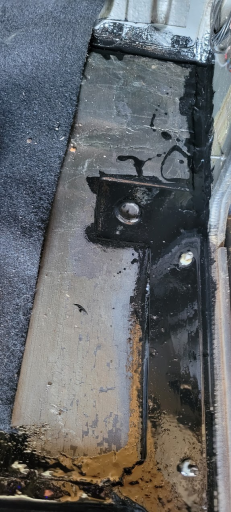
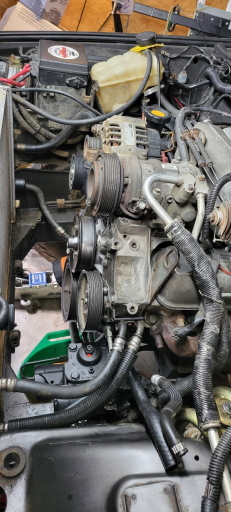
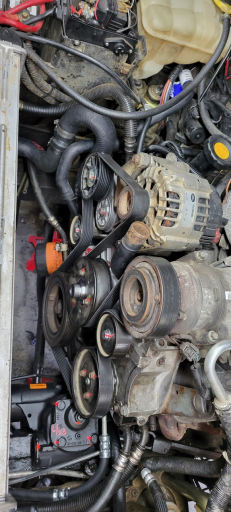
Took the opportunity to let some de-greaser sit on the front of the block and pressure washed a lot of the built-up oil/dirt caused by the front main leak, which was apparently ignored for quite some time. I started to clean this up manually and found the build-up to be over half an inch thick in some spots! While she isn't perfect, it's much improved and I can now monitor for new leaks a bit easier. New water pump installed alongside a replacement manifold coolant elbow thanks to Ron, that's a common phrase I use.
View attachment 260281
Steering box pitman was another story. I headed off to AutoZone and tried to use their puller in the parking lot with the help of one of their guys, we didn't have any luck. Moved it about a 1/4 inch. He recommended I try JiffyLube, they were successful with a bigger clamp and impact. Bought the gents drinks, saved me a lot of time/headache.
View attachment 260282
Needed a break from the awkward angles brought on by the engine bay, so I traded those for more awkward angles (albeit, different angles) in the passenger compartment. POR15 went down on the passenger side and now being dry I can reassemble the back seat for the kiddo and begin pontificating my life choices to build a sleeping platform. Front passenger is also now treated.
View attachment 260283View attachment 260284View attachment 260285
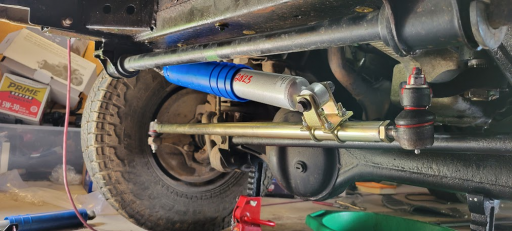
Old track bar vs new Terrafirma. Man is that an upgrade... holy smokes.
View attachment 260286
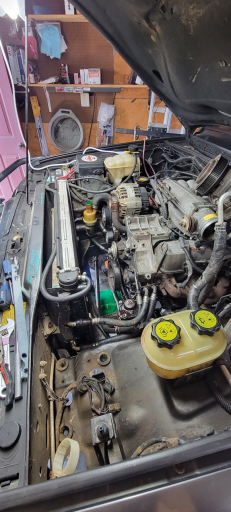
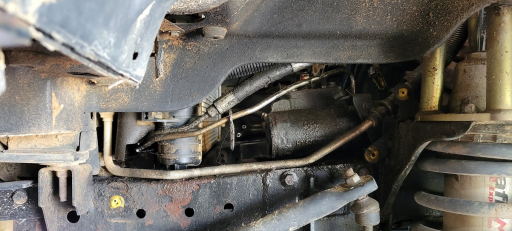
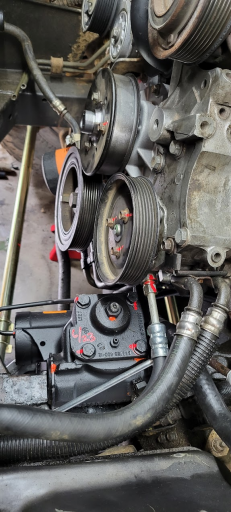
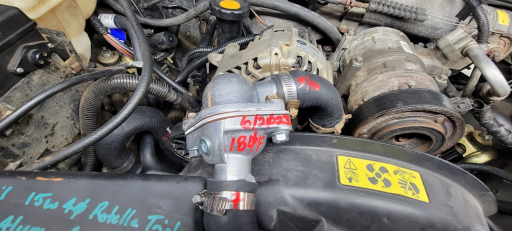
More reassembly. If taking the steering box out was 'fun', I'm not sure what to call installing the replacement. Perhaps, the most fun I've had thus far this year? Anyway, steering system is now plumbed, fresh PSP, A/C compressor is back in its rightful position. Over the years I've become a big fan of visual indicators, I use paint markers to mark the bolts of key items, date of the component being installed and sometimes the size of bolt heads. Now on the trail if I hear a weird noise I can make a quick visual pass to check for any loose pulleys, it's another easy inspection item during oil changes/fluid checks in hopes of catching something before it becomes a problem. Some people like clean engine bays... I like mine oil/dirt free as much as possible but with useful markings.
View attachment 260287View attachment 260288
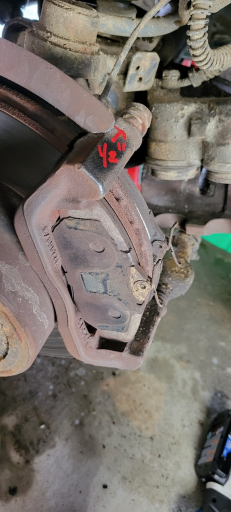
New drag link installed. I also found my brakes to be in much better condition than I expected, so I'm going to leave them be for now and keep my drilled/slotted items for a future job. This was also compounded by the fact I absolutely could not get the CV axle nut off. I tried up to 5-6 feet worth of breaker bar and it wouldn't budge... so, we'll engage that with another project. Hubs, new CV axles/joints, brakes will be a future item for now.
View attachment 260289
New track bar and stabilizer. I have some safety pins on the way for those joints, fortunately they're pre-drilled so that'll be handy. All the new joints are also greaseable which is a nice upgrade!
View attachment 260290
Power steering now fully plumbed.
View attachment 260292
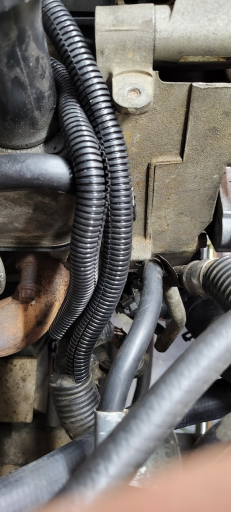
All new radiator hoses installed (man was that fun), idler pulleys reinstalled and belt back in. I didn't replace absolutely every coolant line, there's one behind the A/C compressor going to the reservoir which is in pretty good shape I'll monitor. It's been replaced already and didn't seem to warrant much attention. Note the split in the lower radiator hose where the factory thermostat would be.
View attachment 260293
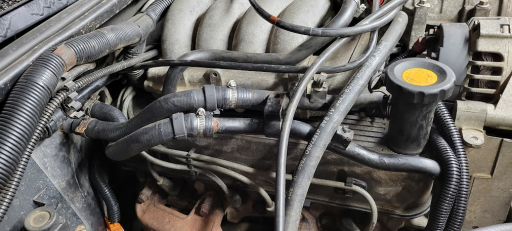
Fresh heater core rubber, old ones were showing seepage. Nobody likes seepage.
View attachment 260294
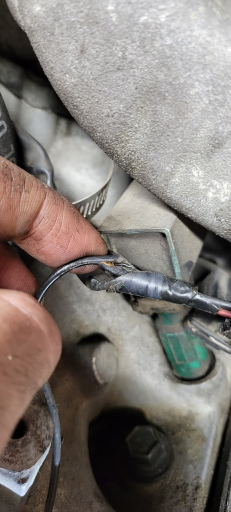
Bit hard to tell what I'm doing here... but that ground line was initially attached to the front of a bracket. I moved it to the side and incorporated the metal heater core line in the same bolt. Those metal heater core lines were missing bolts and didn't have anything attaching them, hopefully that'll reduce some rub and vibration for future issues. I also loomed up some wires there, much more of that to do in the coming months.
View attachment 260295
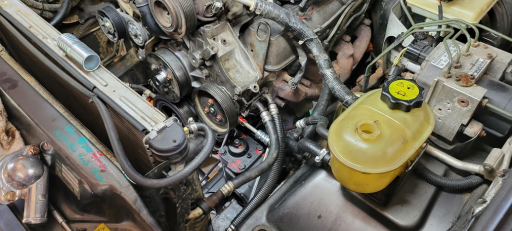
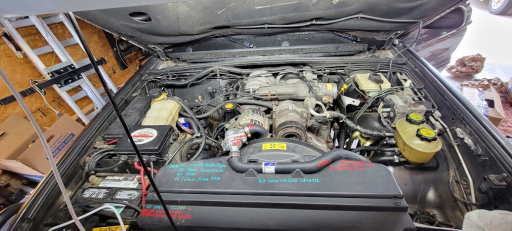
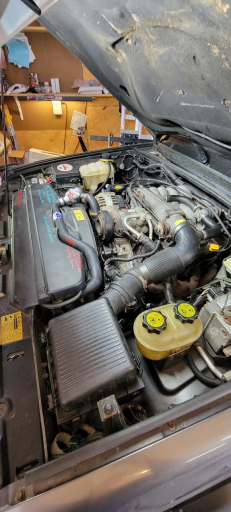
Annnnnd we're assembled! Note the thermostat up on the top-side there. I found a thermostat relocation kit which by all accounts, seems to be a very nice upgrade. Not only can I now source standard thermostats at any parts store, it's easier to service, change temps, reduced my temp to 180F and I now have an easy vent/monitoring port for future use. I plan to install a dedicated coolant temp sensor with dedicated gauge on the dash. OBD monitoring is neat and all, but I like redundancy on critical items. I'd love to figure out a true oil pressure monitor in the future as well...
View attachment 260297
View attachment 260298
View attachment 260300
Back to running like a top. I really am pleased with how smooth she runs now, a lot of the odd squeaks and bearing noises are gone. Nice and quiet.
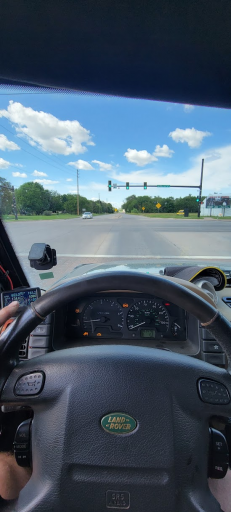
Nice to cross all this off finally! Even if we did pivot and not hit hubs. Off on our maiden voyage around the block with some new life. One day, I'll have a boring looking dash
Even with needing an alignment, she drives MUCH better. Steering is lighter, predictable and obviously tighter. It'll really be much more enjoyable to drive as a daily and on trips now.
View attachment 260301View attachment 260302
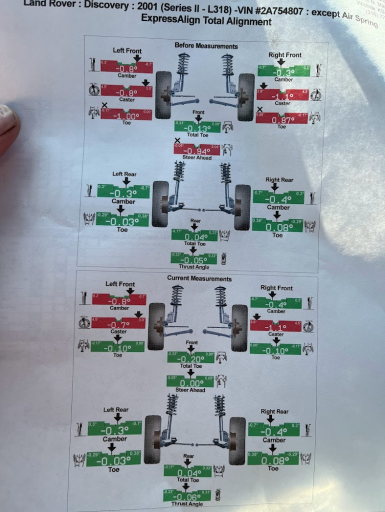
Next up we'll get an alignment done, balance the tires, seal up the six factory rack holes in the roof, patch the rust hole in the driver side floorboard and reassemble the interior.
Advocate I
Creator III

Enthusiast I
Enthusiast III

Protector III
20111
Enthusiast III
Enthusiast I
Enthusiast III
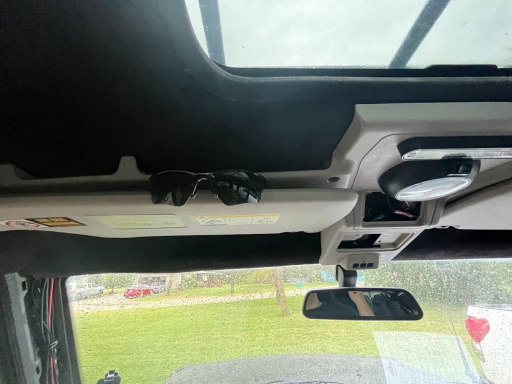
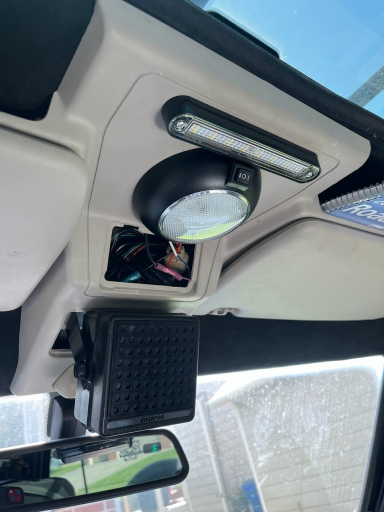
Can’t imagine where I acquired them!Nice lights!
Protector III
20111
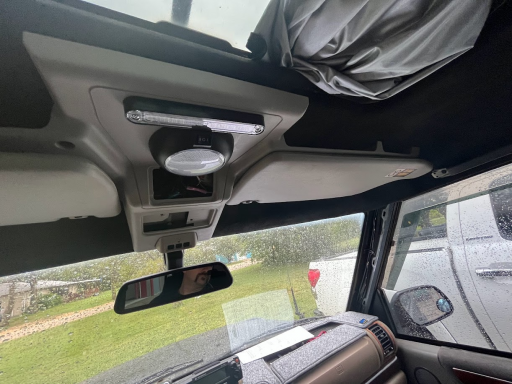
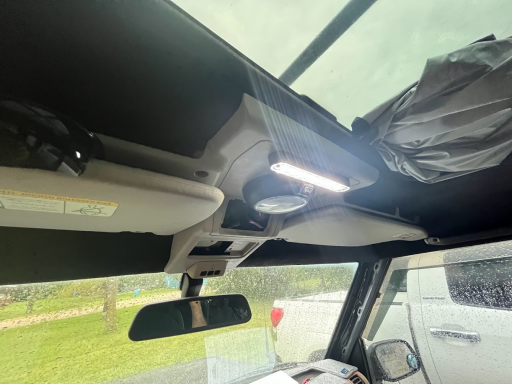
That´s a nice roof console. Looks good.Progress lately has been interior focused, continuing the push to daily driving conveniences.
Thanks to a local recycler (CKARR, LLC in Whitewater, KS) I was able to snag a front overhead console, sun visors and grab handles that hadn't all been spray painted. With that portion refreshed, it's a bit more pleasant on the eyes. I've made contact with a gent named Mark in Colorado, he's parting out a Disco and will hopefully be sending me some parts. We shall see if that transpires.
View attachment 262151View attachment 262152
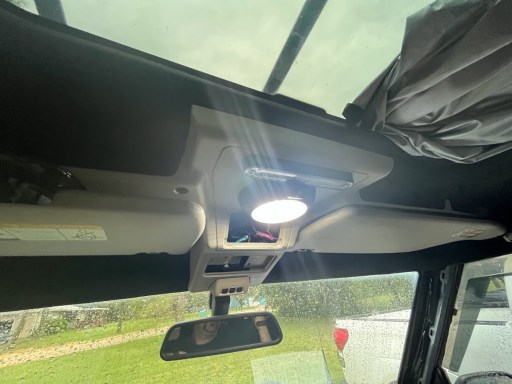
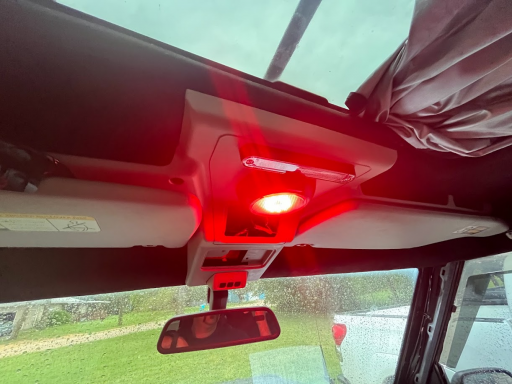
I was never impressed with the interior lighting on these, I like LOTS of light. I've replaced the factory with LED's that I mentioned in a previous post. The circular light is 'always hot' and can be used in white or red modes. Red will be handy for late night camping or HF POTA/SOTA work.
View attachment 262153View attachment 262154
The longer slim light acts as factory dome, no more switch on the factory light itself to select the mode which I frankly prefer. In the old position of the dome light is now a speaker which I'll show a couple pictures later.
View attachment 262155
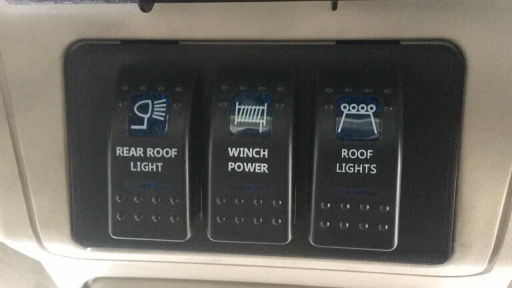
Here's a better look at my upgraded lighting, future home of some rocker switches and my larger speaker (runs off the FTM-400XDR). In the open section which used to house the sunroof controls will be a set of rocker switches. I intend to use these for lighting (I think), such as 'scene' or camp lighting, a chase light for dusty roads, etc.
View attachment 262156View attachment 262157
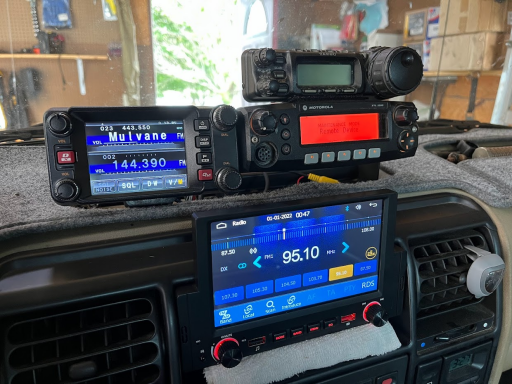
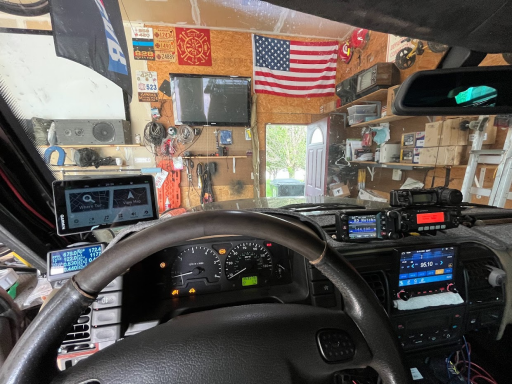
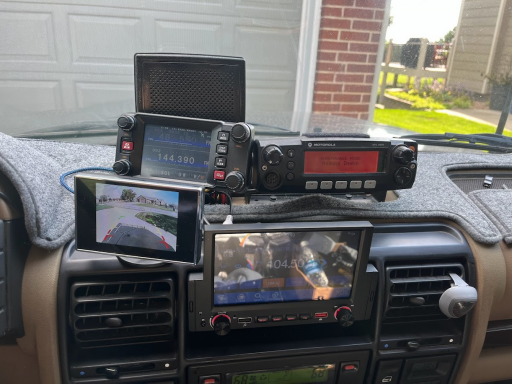
Pretty well finished up my wild dash stack. Bottom left is an always-on rear camera. With the spare tire mount, trying to watch mini-me in the back; I find the standard rear view mirror isn't super useful. Not to mention I want to be able to keep tabs on a trailer as I plan to tow the F800 behind this rig in the future. An el-cheapo headunit, which I think I posted about prior. Control heads for the FTM-400XDR on the left and a Motorola XTL2500 110W VHF, speaker in the back is for the XTL. I like nice crisp audio so the speaker is pretty prominent, it doesn't block my view up front despite what the picture may show. Not really pictured, but I did add four USB charging points. I use a magnetic charging mount for my phone just out of frame, it uses one of these. Three remaining are for whatever necessary, these are simple 12v to USB adapters hidden in the dash. I've also hardwired my Garmin GPS with a hidden power supply in the dash. I really like all my stuff hardwired and hidden as much as I can.
View attachment 262158
Just had my new CV axles arrive this past week, next up will be the front hubs, maybe ball joints (depending how much of a PITA they are), inspecting brakes closer, new CV axles. Hopefully that will get rid of my wild drone in the front end that disappears when I turn to the right at highway speeds!
