

Explorer I
- 3,680
- First Name
- Brian
- Last Name
- McGahuey
- Member #
-
23711
- Ham/GMRS Callsign
- GMRS WRMV941
Thanks man. It's an iterative (albeit expensive sometimes) process.@reaver i think you have some great ideas going.
Explorer I
23711
Thanks man. It's an iterative (albeit expensive sometimes) process.@reaver i think you have some great ideas going.
Explorer I
23711
Explorer I
23711

Traveler II
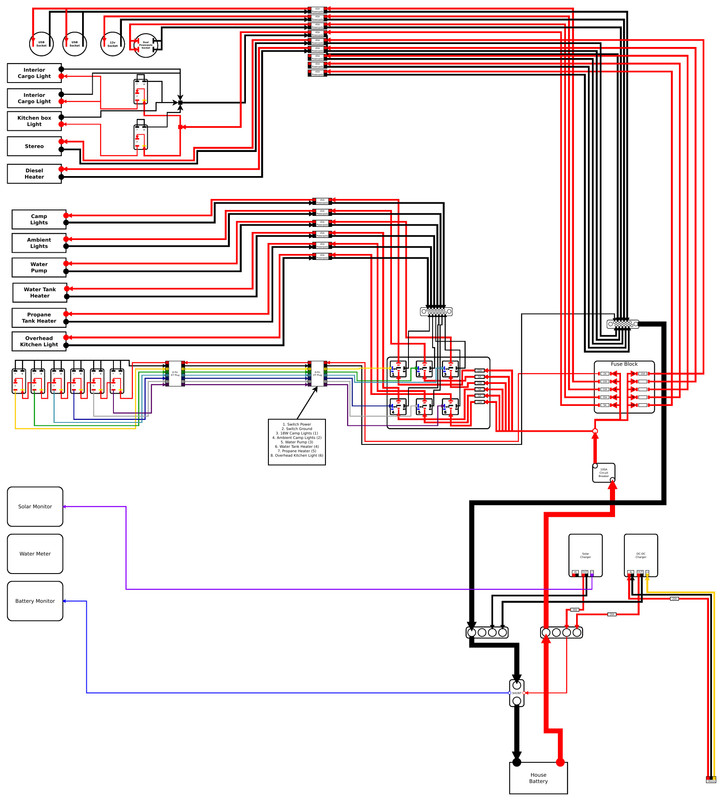
 What are the 4 round attributes at the top of the diagram? The image was down sampled too much to make the labels legible.
Explorer I
23711
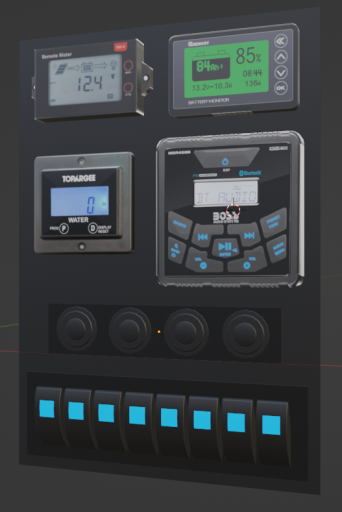
The four circles in the top left corner are two multi usb ports, one 12v plug, and two 15A powerpole plugs (for modularity).This is a neat build. Nice work using the materials you know how to work with.
Then you throw in a wiring diagram. I love it when folks include wiring diagrams with their builds
It looks like you have 6 light circuits. I added a lot of lighting options when I built my trailer too and I only use a couple. I definitely recognize everybody has different needs from their trailers, but I would suggest you really analyze how you will use lighting at camp. Could save you some work and expense that doesn't do anything for you.

Educator I
12989
Explorer I
23711
Connecting to the tow vehicle is handled by two plugs. A standard 4 pin plug for the lights, and a kickass USA 3 pin anderson plug charges my battery in the trailer. The anderson plug pumps 20A into my battery while the vehicle is running.Maybe I missed it but 2 questions, what type main plug you using, I assume a 7 pin or? Also what water pump/sys did you use and are you satisfied?
I thought the original build was beautiful but this new redo looks like it will be a dream! Please post picks and when done (are we ever done? LOL) maybe a walk around video.
Thank you for sharing, it really helps the rest of us not so talented folks. Awesome job!
Jim
Explorer I
23711
Educator I
12989
Explorer I
23711

Enthusiast III
Explorer I
23711
It's sort of a never-ending project. Using it from Memorial day of last year, all the way through November, I definitely thought of some modifications/improvements that need to be done to make it work even better.Nice! This looks like a fun little project. Looks solid.

 ironman4x4america.com
Explorer I
23711

Explorer I
23711
Explorer I
23711
Explorer I
23711
Explorer I
23711


Member III
Explorer I
23711
Funny story..... I went to put it on the tank after I finished working today..... And due to the clearance, I couldn't get the cap on. Looks like I'm going to have to pull the tank out and drill a hole to install the check valve into the tank itself. A bead of silicone around the edge of the hole should take care of any leaks. I may try the cap one more time, cutting the hose Barb off, before drilling a hole in the tank though.Good job on the check valve. I had the same situation and basically did the same thing.
Explorer I
23711

