Our van build

  • HTML tutorial

loper

Rank VI
Launch Member

Advocate II

3,743
Nampa, Idaho
First Name
Carl
Last Name
Hendricks
Member #

24055

And now with added side steps!

I modified a Brophy scissor step and welded some tabs to one of the side bars. Now we can just pin the steps on when we're camping, and fold them up and strap them on the cook box for travel/storage.step 1.jpgstep2.jpgstep3.jpg
 

loper

Rank VI
Launch Member

Advocate II

3,743
Nampa, Idaho
First Name
Carl
Last Name
Hendricks
Member #

24055

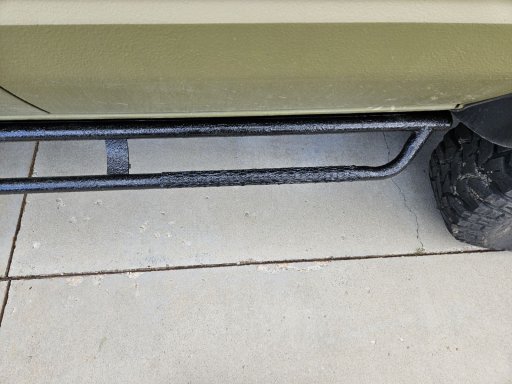
Been busy. Cleaned up the side bars and welded expanded metal in the step areas, painted them with POR 15 and Herculiner (really rough texture, like 36 grit!).

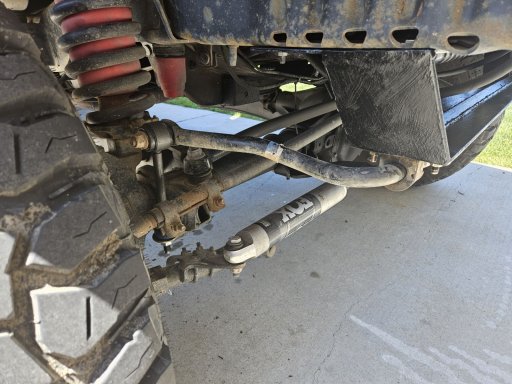
Installed front and rear sway bars from an F350. The back was easy, bolted right to the axle (I used F350 axles), just need to cut and flip the end links. The front was trickier, had to build a stand off mount.

Since I had the bumper off to get inside the front frame rails (to insert the tabbed bolts for the sway bar mount), HH6 "suggested" I clean up the bumper and paint it. So that happened.

And since I had the bumper off, and the horns are right there, and since the horn don't work, might as well fix that. Two new horns and I'm in business.

Put some pins on the roof rack to mount traction boards.

I'll put the bumper back on tomorrow, that will give the paint two days of drying time, setting in the sun out in front of the house.

June 13th I'll be at Alcan getting the new rear springs, and in July she's getting a workout in eastern Idaho!steps4.jpgfront bar.jpg
 

MSD

Rank V
Member
Investor

Advocate III

1,647
Colorado, USA
First Name
Mark
Last Name
Duff
Member #

30665

Been busy. Cleaned up the side bars and welded expanded metal in the step areas, painted them with POR 15 and Herculiner (really rough texture, like 36 grit!).

Installed front and rear sway bars from an F350. The back was easy, bolted right to the axle (I used F350 axles), just need to cut and flip the end links. The front was trickier, had to build a stand off mount.

Since I had the bumper off to get inside the front frame rails (to insert the tabbed bolts for the sway bar mount), HH6 "suggested" I clean up the bumper and paint it. So that happened.

And since I had the bumper off, and the horns are right there, and since the horn don't work, might as well fix that. Two new horns and I'm in business.

Put some pins on the roof rack to mount traction boards.

I'll put the bumper back on tomorrow, that will give the paint two days of drying time, setting in the sun out in front of the house.

June 13th I'll be at Alcan getting the new rear springs, and in July she's getting a workout in eastern Idaho!View attachment 279736View attachment 279737
Nice work looks great! What coil spring air bags are those? I could use a little help on the front of my van already did the drop bracket similar to yours for the front sway bar.
 

loper

Rank VI
Launch Member

Advocate II

3,743
Nampa, Idaho
First Name
Carl
Last Name
Hendricks
Member #

24055

Nice work looks great! What coil spring air bags are those? I could use a little help on the front of my van already did the drop bracket similar to yours for the front sway bar.
Airlift, I forget the number but they're the universal kit, by spring size.

Seriously woke up the front suspension for me.
 
  • Like
Reactions: MSD

loper

Rank VI
Launch Member

Advocate II

3,743
Nampa, Idaho
First Name
Carl
Last Name
Hendricks
Member #

24055

Heading for AlCan Springs in Grand Junction tomorrow. I finally have the build close enough to complete that I think the weight is established. Trip ready I'm at 4860 on the back axle, so they built me a set of 5000 pound springs, with 5" of lift (to eliminate the blocks that are in there now). Going to look everything over one last time today before I head out.

I could just blast down there and back, but you know, why? I'm retired. I'm going to make a trip out of this. Taking the camera and a fishing rod. Hopefully I end up using both of them quite a bit!
 

loper

Rank VI
Launch Member

Advocate II

3,743
Nampa, Idaho
First Name
Carl
Last Name
Hendricks
Member #

24055

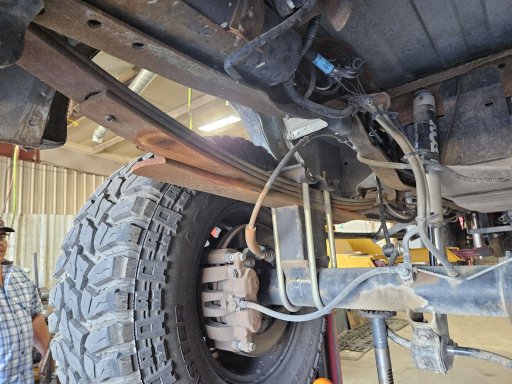
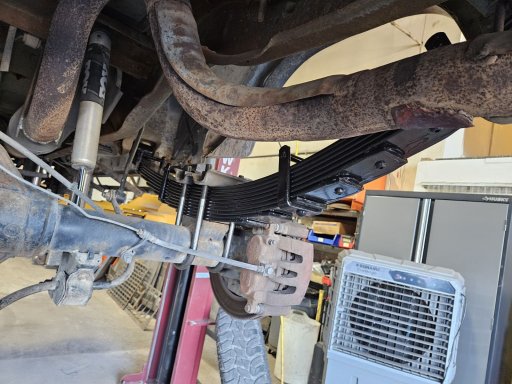
Got'em! Alcan springs are the way to go. Rides so much better, feels more solid, and it seems like I have better bite on washboard gravel roads.

The folks at Alcan are great to deal with. They kept me informed about everything involved in this deal and answered any questions I had. If you want good springs that fit your purposes, call Lew. The more information you give him (weight, lift, use, etc.), the better results you get.

I went from stock springs with lift blocks to 5" lift springs built to the weight of the van

.alcan trip11.jpgalcan trip10.jpg
 

Attachments

  • Like
  • Love
Reactions: GLOCKer and Blu12T

loper

Rank VI
Launch Member

Advocate II

3,743
Nampa, Idaho
First Name
Carl
Last Name
Hendricks
Member #

24055

And now I have a hole in my hood. Rodlouvers Jeep kit, fits pretty well in the spot over the air filter.
hood vent 2.jpghood vent 1.jpg
 
  • Like
Reactions: Sparksalot

wahoowad

Rank III

Enthusiast III

830
Virginia, USA
First Name
Wilbur
Last Name
McGee
Love to see any updates on the interior, particularly how you handled attaching to walls/supports, etc.
 

loper

Rank VI
Launch Member

Advocate II

3,743
Nampa, Idaho
First Name
Carl
Last Name
Hendricks
Member #

24055

Love to see any updates on the interior, particularly how you handled attaching to walls/supports, etc.
Back on the first page of this thread there are some pictures of how I dis the walls, etc. Pretty much just 1x 2s screwed to the metal, wood screwed to that, or 2 x 2 frames with wood screwed to that. The top is 1 x 2s screwed and glued into plywood reinforcement in the top, sheeted with 1/4 plywood, then tongue and groove screwed to that. All the insulation I could get in, everywhere I could.
 
  • Like
Reactions: wahoowad

wahoowad

Rank III

Enthusiast III

830
Virginia, USA
First Name
Wilbur
Last Name
McGee
Regarding tongue and groove flooring vs. paneling - Did you have to screw down each piece of tongue and groove? Did you go with tongue and groove flooring out of aesthetics or was there some other benefit I should consider for figuring out how to handle my walls/ceiling?
 

loper

Rank VI
Launch Member

Advocate II

3,743
Nampa, Idaho
First Name
Carl
Last Name
Hendricks
Member #

24055

Regarding tongue and groove flooring vs. paneling - Did you have to screw down each piece of tongue and groove? Did you go with tongue and groove flooring out of aesthetics or was there some other benefit I should consider for figuring out how to handle my walls/ceiling?
Didn't use flooring, it's too thick and heavy. I used some molding we got at Lowe's. It's in some metric dimension, roughly 1/4" thick. Maybe I didn't need to screw each board down, but I did to make sure everything stayed tight.

There's no structural reason we used tongue and groove, I just like the way it looks.

The shape of the van was my biggest struggle. There are no straight lines or square corners except the floor, and it's corrugated.