"Nanuuq" my Land Rover Discovery 2 diesel swap, ...forever a project!

  • HTML tutorial

Tinker

Rank V
Launch Member

Off-Road Ranger I

2,357
West Michigan
First Name
Mike
Last Name
Klemish
Member #

5606

Hey Tinker--you may already know this, but make sure the oil cooler is from a 4BT, as 6BT's and 4BT's are ported different, so you starve some galley's if you swap them. We did a Range Rover 4BT. ended up using a P38 steering box outboard of the frame to clear the front cover. Cool conversion when it's done though. Used a Diesel Conversions 4500 to t-case adapter to shorten the package--that dang shift is really close to the dash. Cool rig man, I'm anxious to see that thing up and running!!!
I very nearly made that mistake with the coolers when I swapped to a vertical-filter adapter plate. Ended up going with the same 5-fin cooler instead of the bigger 7-fin from the six cylinder engines.

I'll have to look into the P38 steering too, thanks for the heads up!

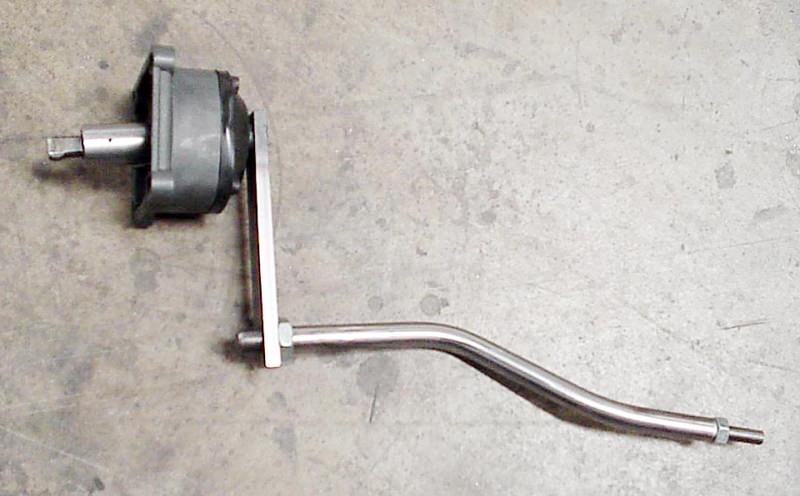
Yeah that shift tower on the NV just doesn't wanna line up where I want it... might end up slicing the shifter off at the base & weld a dogleg into it like this to fit under the dash:
 

Tinker

Rank V
Launch Member

Off-Road Ranger I

2,357
West Michigan
First Name
Mike
Last Name
Klemish
Member #

5606

The starter & mount mods were a success! Everything fits without too much drama, & only requires a slight fiddly install sequence. There's a lot of kit packed onto that side of the motor, but not so much that wrenching on it in the future would be a nightmare for me to deal with:


With this next photo's angle you can see how that larger radius previously cut clears the starter motor, right under that is the thru hole to clear the plunger cap. Taking that 1/2" out of the total width of the mount helps for fitting the starter as well, & still leaves a surface-area larger than the rubber isolator it will rest on. Also you can see the smaller radius I cut to get a wrench/socket onto the banjo fitting that I added to get the power steering pump's high-pressure output at a 90-degree angle. Before it gets paint I'll be sure to make up for all the metal I removed with plenty of solid bracing inside of the bracket.


Hoisted the whole thing back in & it looked great. Was about to grab the welder to start on the mounts... until I double checked my measurements underneath... realized I was ~1" short of fitting the transfer box between the transmission & the big step in the tunnel where the body flattens out for the rear cargo area.


DANGIT. Thought I was there! Ah well, all this figuring is what makes these big projects fun. Having to slide everything forward means the NV4500's shift tower will be out of the original opening in the tunnel & kinda under the dashboard. I wanted to save the trouble pulling out the dashboard for near the end of the project when I would focus on the wiring work. After what felt like hours of wrestling a giant octopus of a wire loom it was outta there.


Now I just need to notch the space I need for the shift tower out of the tunnel opening. In this next shot is the problem shifter, covered in blue tape, halfway obscured down there in the tunnel opening:


Chaentjens

Rank III
Launch Member

Advocate II

684
East Haddam CT
Member #

7097

Kind of hard to tell from angle of pic but can you make a z or s bend shift arm low enough to clear your dash?

Sent from my SM-N950U using Tapatalk
 

Tinker

Rank V
Launch Member

Off-Road Ranger I

2,357
West Michigan
First Name
Mike
Last Name
Klemish
Member #

5606

Kind of hard to tell from angle of pic but can you make a z or s bend shift arm low enough to clear your dash?

Sent from my SM-N950U using Tapatalk
I think so, yeah. Going to have to get creative so I'm not punching the radio every time I grab fifth.
 

Chaentjens

Rank III
Launch Member

Advocate II

684
East Haddam CT
Member #

7097

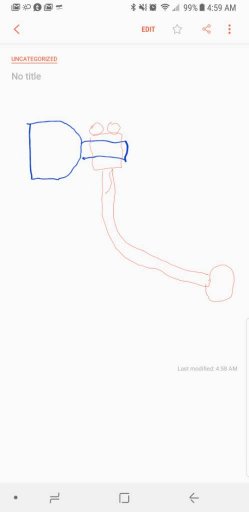
Excuse my crude phone drawing! Lol
You could make a split collar to clamp on the stub shaft of the trans and weld the shifter to the side.
Just a thought.Screenshot_20180123-045929.jpg

Sent from my SM-N950U using Tapatalk
 

Tinker

Rank V
Launch Member

Off-Road Ranger I

2,357
West Michigan
First Name
Mike
Last Name
Klemish
Member #

5606

Not a bad idea, & a bolt-on clamp like that (instead of welding) would let me adjust it around to get it in the perfect position.

And this time I'm not taking my friends offer to make a shift knob on his lathe for this custom job, last time I ended up with something a bit suggestive looking... I really should've expected that though hahaha!
 
Last edited:

Tinker

Rank V
Launch Member

Off-Road Ranger I

2,357
West Michigan
First Name
Mike
Last Name
Klemish
Member #

5606

Engine mounts are finally done! WOO!

Just a few wires... 50+lbs gutted out & chucked in the trash:


Nailed down the positioning of the powertrain: 1.5" to the drivers side (to match the tunnel & clear front diff), as rearward as I could manage (& still fit the transfer case), & between 3-5 degrees rake:


Made up some CAD templates (Cardboard Aided Design) in the shop that I could take home & translate to a computer model:


Transmission tunnel now clearanced fully for the 5-speed shifter:


While the engine was out I took the modified starter apart to grease up the internals, loctite fasteners, & bake the housing with header paint to protect the TIG welded parts from corroding:


Picked up 3/16" plate that I had sheared to width & then transferred my design from paper to metal:


I was a bit delirious from a plague that was going around, so thankfully a friend was lending a hand & kept me from taking a shortcut on the next step. Instead of just measuring & marking the frame to weld along... we pulled it all out & I bolted the rubber isolators to my modified engine brackets, then bolted the tack'd up face+side plates of the new frame brackets to the isolator. This way when I hung it back in the bay & leveled it out I could tack the plates to the frame just as it would sit when it's finished:


After it was tack'd I plucked the assembly back out to make space for burning in all the new plates & braces. Not all that pretty, but with the welder cranked right up it'll be strong... if not a touch overkill:


Wire wheel'd the snot out of the brackets & any surface rust along the frame rails, then a rub down in degreaser & brake clean. Preliminary coating of POR-15 etch primer to keep it neutral until I come back with their top coat rust preventative stuff:


Tinker

Rank V
Launch Member

Off-Road Ranger I

2,357
West Michigan
First Name
Mike
Last Name
Klemish
Member #

5606

Progress can be a little slow on the cold days, but I'm still chugging along!

Here's the last few weeks crammed into a short video as I fabricated the mounts:

 
  • Like
Reactions: Nick Lev

Nick Lev

Rank I

Contributor III

154
Israel
Fantastic videos! Keep them coming.
Definitely one of the best Disco 2 projects I've ever seen.
Your attention to details is a pleasure to watch.
 
  • Like
Reactions: Tinker

58-fc170

Rank IV

Pathfinder I

Did I just see calipers in use with actual prints and cad models?? Crazy detailed and excellent work.

I usually go cardboard template to outlined on steel and plasma cut it out.
 
  • Like
Reactions: Tinker

Tinker

Rank V
Launch Member

Off-Road Ranger I

2,357
West Michigan
First Name
Mike
Last Name
Klemish
Member #

5606

Fantastic videos! Keep them coming.
Definitely one of the best Disco 2 projects I've ever seen.
Your attention to details is a pleasure to watch.
Thanks & will do! I've gotta work harder keeping up with weekly uploads, been doing a crap job of that lately.
 
  • Like
Reactions: Nick Lev

Tinker

Rank V
Launch Member

Off-Road Ranger I

2,357
West Michigan
First Name
Mike
Last Name
Klemish
Member #

5606

Did I just see calipers in use with actual prints and cad models?? Crazy detailed and excellent work.

I usually go cardboard template to outlined on steel and plasma cut it out.
Guilty as charged. Normally I wouldn't bust out the callypears, but I have a funny idea that made drawing it up & building them to match worth the extra effort...

Maaaaaaybe if everything bolts up properly I'll make a few more sets of the "kit" it took to make it work (engine/trans/xfer mounts, modified starter, etc) & see if there's any other Disco owners out there that wanna replace their busted V8's :sunglasses:
 

Tinker

Rank V
Launch Member

Off-Road Ranger I

2,357
West Michigan
First Name
Mike
Last Name
Klemish
Member #

5606

I like to think a Rover engineer must've called in sick some day in the 90's when the marketing guys decided to "pretty up" the old 3.5L (from what I understand had rocked out since the 60's as the UK's equivalent of what the 350 was in the states) & increase the bore for the new 3.9/4.0/4.6L engines... putting the head-bolt threads so damn close to the bore that the aluminum cracks & loosens the iron liners aaaaaand *POP* :cry:
 
  • Like
Reactions: Nick Lev

58-fc170

Rank IV

Pathfinder I

Have you considered a bolt in cross member brace to go under the oil pan and keep the engine mounts from rotating down wards. 750l lb engine on a square tube frame wall is a bit of a load on a small area of the mount. Just thinking if (when) you get the thing a little air born the mounts might start to tare from the tubing wall. I have seen mounts on thin wall tubing trailers fail in that fashion (granted in a "slightly" over loaded situations).

Or possibly put a plate over the top of the frame to spread the stress concentration at the top of the mounts over a larger potion of the frame.
 

Tinker

Rank V
Launch Member

Off-Road Ranger I

2,357
West Michigan
First Name
Mike
Last Name
Klemish
Member #

5606

I had discussed adding a sort of "top wrapping" plate with a friend that's been helping out. Something that would go from the angled bit up and over the top of the frame. That way the forces would have to twist the whole cross section instead of just peeling the one side... kinda what you're thinking too yeah?

The frame box section does have a healthy thickness, that being said I would be surprised if I didn't modify/adjust the mounts in the future. Whether for mitigating vibration, adding strength, or adding lightness. That's why I'm going to leave the etch primer like that until near the end when it'll get thick brush-on coating. Just can't leave any exposed metal around here without growing rust within hours :pensive:

Don't think I'll go with anything under the pan due to the front axle's proximity when flexed out.