been right at year since my last post, and here is a bit of an update...
the modular design has proven to be perfect for us and how we do things. super easy to take out or add components depending on what our trip is going to be. for anyone doing their own build, i'll show some changes i made and explain why. this might be helpful to someone and save them some time and money...thats what this forum is all about, right?
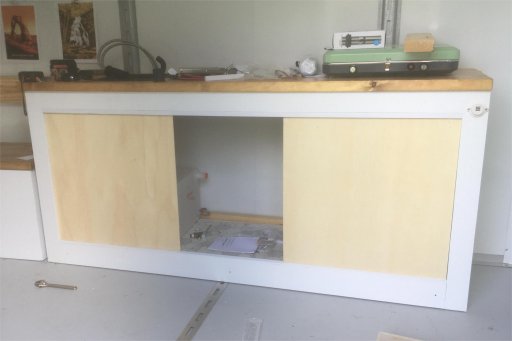
originally i had the kitchen component as a cabinet with a built in sink, built in 15 gal fresh water tank with 12v sureflow pump and sliding doors where i could access the interior without requiring space to open doors outward. the pump, 12v outlets and lights are wired so that the kitchen module has an extension cord that plugs into the battery box. easy to just unplug and remove the whole unit without undoing wiring.
we did a lot of trips with this set up and it was pretty good. had a few things we didnt like, but overall was good. the 15 gallon water tank i bought was crap and had a leak at one of the seams on the bottom that i didnt notice until i had mold and rot where the water collected between the vinyl underlayment and the wooden bottom. it was a very slow leak, so it went unnoticed for quite a while. i ended up scrapping the entire thing and just rebuilding a totally new and different set up...
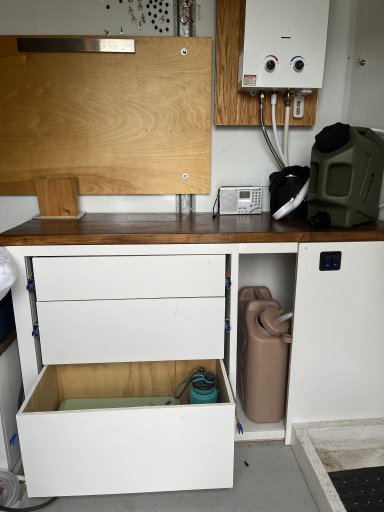
first, i got rid of the built in sink. we rarely use it and it turns into a catch-all where various items seem to collect in there no matter what. also, being self contained, i had a 5 gallon tote in there dedicated to holding the drain water. that took up a lot of space and could get sort of nasty if not sanitized constantly. i also got rid of the 15 gallon dedicated water tank. the tank was ok, but took up a lot of space and i had it plumbed so that it could get filled in place by city water (if hooked up at a campsite) but for boondocking, which we mainly do, i had to fill the tank by going out and filling a 5 gallon tote and then pour it into the tank. kind of messy at times and just plain redundant since i still needed 5 gallon totes to get and transport water. instead of the built in sink, we went with a simple plastic tote like the ones they use to bus tables in restaurants. works great and we can take it out and use it as needed and when not needed, i now have that extra counterspace available for other uses. instead of the dedicated water tank, i just built the cabinet to fit the 5 gallon secpter water totes. i still use the 12v sureflow pump, but now i have 3 five gallon totes on the right side of the cabinet with a hose to just drop in thru the spout. when one tote is empty, i swap the hose and then go refill the empty tote next time we are out and about. i have a portable hot water heater plumbed into the cabinet and since we no longer have a faucet, i just use the shower head to fill the tote for doing dishes. i have a 2.5 gallon tote on the counter for cooking and drinking water. easy to refill and easy to store anywhere while were driving and then just set back up on the counter when we make camp.
and instead of having the sliding doors like the old style medicine cabinet, i just went and made pull out drawers with latching slides. i didnt need to worry about having space right there, so a pull out drawer is fine and actually easy to deal with since i can pull out the drawer i need and easily access it rather than slide a door and then try to reach in and find something.
i have also plumbed in propane with a bulkhead cut off valve and a QD so i can hook up my shower or disconnect it and plug in my camp stove. with the shut off valve on the inside, i can shut off the propane without having to go outside and close the valve on the tank. i dont like trusting the one valve on the stove or heater with the line pressured up and us sleeping in there.
i also redid our solar and upped the battery to 280ah lifepo4 and a 60a controller and a 3kw pure sine wave inverter. too lazy to do pics of that right now, but it is an improvement over what i had and i am currently working on a way to use a regular window a/c unit inside the trailer. i basically will build a box for the unit to go in and then divide the box where the fresh air comes in one side and the hot exhaust goes outside without the unit sticking out past the wall. its going to work like the portable a'c units that have the two hoses...one for fresh air intake and the other to exhaust. its a lot more efficient that the units with just the one hose. if anyone is interested in knowing how to use a window a/c unit inside a trailer without having it stick out, stay tuned and i'll post my setup after i have it dialed in...
another thing that got changed was our food storage. right after my last post on here, i ended getting a couple freeze dryers and freeze drying pretty much everything. there is a thread on here with more details. that helped a lot with dealing with refridgerating food and making meals very quick and easy out on trips.
also working on a false floor cavity for when going thru customs and border crossings.
the modular design has proven to be perfect for us and how we do things. super easy to take out or add components depending on what our trip is going to be. for anyone doing their own build, i'll show some changes i made and explain why. this might be helpful to someone and save them some time and money...thats what this forum is all about, right?
originally i had the kitchen component as a cabinet with a built in sink, built in 15 gal fresh water tank with 12v sureflow pump and sliding doors where i could access the interior without requiring space to open doors outward. the pump, 12v outlets and lights are wired so that the kitchen module has an extension cord that plugs into the battery box. easy to just unplug and remove the whole unit without undoing wiring.
we did a lot of trips with this set up and it was pretty good. had a few things we didnt like, but overall was good. the 15 gallon water tank i bought was crap and had a leak at one of the seams on the bottom that i didnt notice until i had mold and rot where the water collected between the vinyl underlayment and the wooden bottom. it was a very slow leak, so it went unnoticed for quite a while. i ended up scrapping the entire thing and just rebuilding a totally new and different set up...
first, i got rid of the built in sink. we rarely use it and it turns into a catch-all where various items seem to collect in there no matter what. also, being self contained, i had a 5 gallon tote in there dedicated to holding the drain water. that took up a lot of space and could get sort of nasty if not sanitized constantly. i also got rid of the 15 gallon dedicated water tank. the tank was ok, but took up a lot of space and i had it plumbed so that it could get filled in place by city water (if hooked up at a campsite) but for boondocking, which we mainly do, i had to fill the tank by going out and filling a 5 gallon tote and then pour it into the tank. kind of messy at times and just plain redundant since i still needed 5 gallon totes to get and transport water. instead of the built in sink, we went with a simple plastic tote like the ones they use to bus tables in restaurants. works great and we can take it out and use it as needed and when not needed, i now have that extra counterspace available for other uses. instead of the dedicated water tank, i just built the cabinet to fit the 5 gallon secpter water totes. i still use the 12v sureflow pump, but now i have 3 five gallon totes on the right side of the cabinet with a hose to just drop in thru the spout. when one tote is empty, i swap the hose and then go refill the empty tote next time we are out and about. i have a portable hot water heater plumbed into the cabinet and since we no longer have a faucet, i just use the shower head to fill the tote for doing dishes. i have a 2.5 gallon tote on the counter for cooking and drinking water. easy to refill and easy to store anywhere while were driving and then just set back up on the counter when we make camp.
and instead of having the sliding doors like the old style medicine cabinet, i just went and made pull out drawers with latching slides. i didnt need to worry about having space right there, so a pull out drawer is fine and actually easy to deal with since i can pull out the drawer i need and easily access it rather than slide a door and then try to reach in and find something.
i have also plumbed in propane with a bulkhead cut off valve and a QD so i can hook up my shower or disconnect it and plug in my camp stove. with the shut off valve on the inside, i can shut off the propane without having to go outside and close the valve on the tank. i dont like trusting the one valve on the stove or heater with the line pressured up and us sleeping in there.
i also redid our solar and upped the battery to 280ah lifepo4 and a 60a controller and a 3kw pure sine wave inverter. too lazy to do pics of that right now, but it is an improvement over what i had and i am currently working on a way to use a regular window a/c unit inside the trailer. i basically will build a box for the unit to go in and then divide the box where the fresh air comes in one side and the hot exhaust goes outside without the unit sticking out past the wall. its going to work like the portable a'c units that have the two hoses...one for fresh air intake and the other to exhaust. its a lot more efficient that the units with just the one hose. if anyone is interested in knowing how to use a window a/c unit inside a trailer without having it stick out, stay tuned and i'll post my setup after i have it dialed in...
another thing that got changed was our food storage. right after my last post on here, i ended getting a couple freeze dryers and freeze drying pretty much everything. there is a thread on here with more details. that helped a lot with dealing with refridgerating food and making meals very quick and easy out on trips.
also working on a false floor cavity for when going thru customs and border crossings.
Last edited: