Just another WJ

  • HTML tutorial

MrWilsonWJ

Rank V
Launch Member

Member III

1,691
Kennewick, WA
First Name
Dustin
Last Name
Wilson
Member #

23384

Now that winter is closing in on us things are slowing down around the farm and snow in the mountains isn't far off, that means time to start planning winter projects for the WJ! For the most part I think the WJ did everything I wanted and the modifications I've made were on point, but there is always room for improvement and more things I'd like to do. So I'll run through some of the things I've done, how they've work and what I might change about them. Also I have a bit of a project list of things I'd like to do to make it a better "overlander"

Suspension- Current setup for those that don't want to go back and read is 3" IRO springs with 3/4" leveling spacer in front, adj. front upper and Lower CA's (short arms), Rubicon Express disco's, IRO TB, HD steering stabilizer, Pro Comp ES9000 shocks, Addco HD rear sway bar. For the most part this setup works and handles really well, plus it rides great which is always a bonus. After going up to the 33's I still have some rubbing in the front so I need to build some bump stop extensions. The rear HD sway bar, while great on road has definitely limited flex in the rear so I want to come up with a disco option back there. Once I disco the rear bump stop extension will be needed there as well. Another area I might make some changes are the springs, the IRO's ride great but sag a lot when I'm loaded with gear. The 3" I'm running has a spring rate of 175lbs/in, their 4" is 185lbs/in which would be a little better for the weight and give me another inch. But the other option I'm looking at is Clayton's 4.5" that has a spring rate of 225lbs/in, just not sure if that would be too stiff. Also going to the 4" or 4.5" I would want to switch to adj. arms in the rear to fix the pinion angle. For anyone out there that has experience with these springs or a 4" short arm lift I'd like to hear your thoughts. I know long arm is the better way to go but that'll happen down the road.

Bumpers- Really like what I got and would recommend the Trail Forged stubby bumper and high clearance Rad. support to anyone in the market. It involves a bit of cutting to make it go in but totally worth it, I still might redo the wings on mine and add an upper hoop to put some lights on but it's not high priority. I like how the rear tire carrier turned out, but I went a little light with the 2"x3" tube (1/8" wall is what I had and didn't want to go buy more) it flexes on rough trails/ roads under the weight of the tire and water jug. Even with the bounce and flex I think it is strong enough it wouldn't break on me, just annoying. Also I would put the tire on the driver side so I could see in the rearview mirror and maybe add a flip down table. So the rear will either get rebuilt this winter or a full bumper built.

Roof Rack- Solid, plenty strong for what I carry up there and doesn't rattle anymore! I don't really like the lights up top but I had them on the shelf and it was a place to mount them so that's where they went. Only down side to the rack is it's size, I sometimes want a little more room up there. If other projects get done this winter a new rack might happen, but again not high priority.

Fender trim- Everything seems to be holding up well, there is still a couple places I missed that make contact when the suspension flexes. Both places that still rub are in the inner fender area and not at the openings so it will involve a BFH and the cut off wheel to fix them.

Other than addressing some of those problems this winters projects will hopefully be geared more towards comfort and overland type things. I'd still like to remove the back seats and build boxes to go in there place, get my air compressor hard mounted with quick connects ran to the front and back, wire in a dual battery setup, install some lights in the rear hatch for at camp, possibly a deck in the back that would still leave access to the spare tire well and a few other things. As usual, any questions feel free to ask and here's some pictures of some of this summers adventures I never got around to posting.

20200829_060414.jpg20200829_120744.jpg20201010_143058.jpg20201106_094403.jpg20200828_200653 (2).jpg20200829_125204.jpg
 

MrWilsonWJ

Rank V
Launch Member

Member III

1,691
Kennewick, WA
First Name
Dustin
Last Name
Wilson
Member #

23384

Your WJ is probably one of the most capable rigs I’ve seen in our area
Thanks, for a rig that isn't totally built for the trail it does well. It has a looong way to go before the projects slow down but I'll keep plugging away at them as time and cash allow. One thing I forgot to put on my list of things to do this winter is some type of traction aids. I never had problems with the trails I had it on this summer but as the build progresses the trails I try will get harder so at least a rear locker will happen and maybe something up front.
 
  • Like
Reactions: M Rose

M Rose

Local Expert
Mod Team
Member

Advocate III

5,584
Northeast Oregon, United States
First Name
Michael
Last Name
Rose
Member #

20990

Ham/GMRS Callsign
W7FSB
Service Branch
US ARMY Retired
Thanks, for a rig that isn't totally built for the trail it does well. It has a looong way to go before the projects slow down but I'll keep plugging away at them as time and cash allow. One thing I forgot to put on my list of things to do this winter is some type of traction aids. I never had problems with the trails I had it on this summer but as the build progresses the trails I try will get harder so at least a rear locker will happen and maybe something up front.
Do you do any snow rides?
 

MrWilsonWJ

Rank V
Launch Member

Member III

1,691
Kennewick, WA
First Name
Dustin
Last Name
Wilson
Member #

23384

I really haven't yet with this rig, but I'm not opposed to it. There was some snow left on the trails this spring so it was all hard wet snow not fun early winter powder.
 
  • Like
Reactions: M Rose

M Rose

Local Expert
Mod Team
Member

Advocate III

5,584
Northeast Oregon, United States
First Name
Michael
Last Name
Rose
Member #

20990

Ham/GMRS Callsign
W7FSB
Service Branch
US ARMY Retired
My Bronco Build is going towards the winter wheeling. If I set it up for snow, not much else will stop me the rest of the year.
 

WJJEEPIN

Rank II

Enthusiast III

473
California, USA
First Name
William
Last Name
Mitchell
Also I would put the tire on the driver side so I could see in the rearview mirror and maybe add a flip down table. So the rear will either get rebuilt this winter or a full bumper built.
I recently installed one of the add on mirror's with front/rear cameras. Very cool and when I went camping recently allowed me to see traffic behind me with the cargo area filled to the brim. Would help you with your rear tire blockage issue.

 
  • Like
Reactions: MrWilsonWJ

MrWilsonWJ

Rank V
Launch Member

Member III

1,691
Kennewick, WA
First Name
Dustin
Last Name
Wilson
Member #

23384

I recently installed one of the add on mirror's with front/rear cameras. Very cool and when I went camping recently allowed me to see traffic behind me with the cargo area filled to the brim. Would help you with your rear tire blockage issue.

Something like that's not a bad idea, I hate not being able to check behind me in the mirror. And I won't admit to how many trees or stumps I've backed into when the cargo area has been full of gear.
 

WJJEEPIN

Rank II

Enthusiast III

473
California, USA
First Name
William
Last Name
Mitchell
Something like that's not a bad idea, I hate not being able to check behind me in the mirror. And I won't admit to how many trees or stumps I've backed into when the cargo area has been full of gear.
Ill add some pics of it in the next week to show it and features. I don't use the front camera but may when I go wheeling next time as it has a SD card constantly recording. The rear is a constant feed showing what is behind me. I tapped into the reverse light light so when I drop it into R it automatically lowers the angel of the camera to make sure there aren't any lowered civics back there to bump into. :tonguewink:
 

MrWilsonWJ

Rank V
Launch Member

Member III

1,691
Kennewick, WA
First Name
Dustin
Last Name
Wilson
Member #

23384

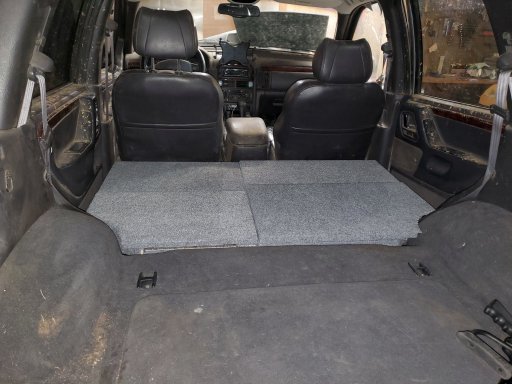
Here's the start of my rear seat delete/storage box setup. It will be two separate boxes so I can put one side of the the seat in if I ever need to. I plan to just leave the bottom open then have 2 lids per box. I'm mainly doing this for the extra storage and a good place for the dog to ride but it will also make for a nice sleeping platform for the times my wife stays home and I go out solo.
20201204_163807.jpg20201204_163732.jpg
 

MrWilsonWJ

Rank V
Launch Member

Member III

1,691
Kennewick, WA
First Name
Dustin
Last Name
Wilson
Member #

23384

Not totally finished yet but here is an update on my storage box setup. It's all made out of 3/4" MDF and then covered in outdoor carpet. These should gain me a fair amount of storage for things that usually stay in the Jeep like tools, recovery gear and some basic camp stuff. My plan for the box that has the bottom built into it is to add a locking latch so I have a somewhat secure place to lock things inside the Jeep. It won't be fort knox by any means but it will at least slow someone down form stealing my stuff. Don't mind the mud still on the interior in the pictures... She's no beauty queen or DD so it some times takes me a while to get around to cleaning after trips.
Box4.jpg
Box3.jpg
Box1.jpg
Box2.jpg

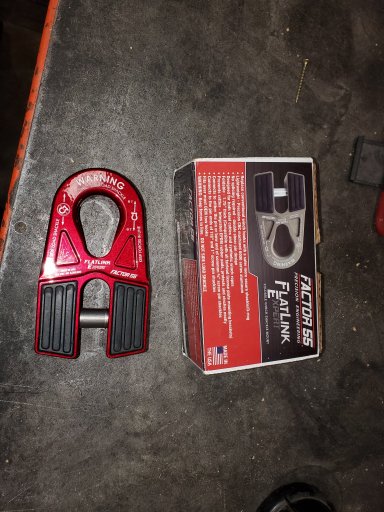
Also Santa was good to me this year! Got a Factor 55 flat link for my winch and 4.5" lift Clayton Off Road Coils.
F55.jpgCoils.jpg
With the addition of the coils I'm somewhat at a cross road of what direction I go with my suspension. At 4.5" of lift I will need to change out the rear control arms to something adjustable so instead of short arms do I just long arm it now and run the 4.5s until it is time for tires again and get 6" coils and 35's at that time... decisions, decisions. Pros for short arms is cost, the fact that I just put new short arms on the front, less work and less other mods I would need to make. Pros for long arms are ITS LONG ARMS! At the moment I'm leaning toward getting the IRO rear short arm setup so I can focus more time and money into other areas of the Grand. This was supposed to be the winter of mods geared more towards overland and not wheeling so the few thousand I would save going short arms can go a long way in other areas. While short arms aren't ideal for wheeling there are plenty of capable rigs out there running them. Decision made...maybe, there is always the chance I'll get a few beers in me and get click happy on the Trail Forged website.
 

MrWilsonWJ

Rank V
Launch Member

Member III

1,691
Kennewick, WA
First Name
Dustin
Last Name
Wilson
Member #

23384

BPL1.jpg
I made it out camping last weekend to test out my new boxes as a sleeping platform and they were a nice addition, also the extra storage was great. I don't have any pictures of the insulation I made, but I took some of that foil air gap material used for RV window insulation and cut them out to fit all of the windows. Between that and an electric blanket inside my sleeping bag I was nice and toasty, granted it was only in the low to mid 20's but I think I would be good into the low teens.
BPL4.jpgBPL2.jpgBPL3.jpg
 

MrWilsonWJ

Rank V
Launch Member

Member III

1,691
Kennewick, WA
First Name
Dustin
Last Name
Wilson
Member #

23384

Hasn't been too much to update on here lately, but that should be changing soon as parts are starting to roll in. For Christmas I got the 4.5" Clayton coils so after going back and forth on what to do I bought the IRO rear short arm set up. This wasn't what I really wanted, but was easier on the pocket book. To go along with the new springs and short arms I also picked up some Bilstein 5100's, bar pin eliminators, longer JKS discos and some new factory bump stops for when I build the extensions. Once I get everything installed I'll see what else I need to make this set up work, I'm thinking maybe extended brake lines and double cardine rear driveshaft with a hack and tap SYE. Now I just need to make some room in the shop and get to work!
 
  • Like
Reactions: M Rose

MrWilsonWJ

Rank V
Launch Member

Member III

1,691
Kennewick, WA
First Name
Dustin
Last Name
Wilson
Member #

23384

Haven't gotten started on the suspension yet but I did make a minor upgrade to the electrical system yesterday. Replaced the battery with an AGM deep cycle and changed the alternator out for one for an '02 Durango. Direct swap and an increase from 136A to 160A, not a huge improvement but a little more charging power for when I put a second battery in. Also a hell of a lot cheaper than a mean green alternator. Only thing I had to do to make it fit was drill out the eyelet for the battery cable, the stud on the new alternator was a bit bigger.
20210327_140144.jpg
Once it was finished we went out to a local area to play on the trails and do some hill climbing. Here's our poser pic flexing the suspension.
20210327_155854.jpg
 
  • Like
Reactions: SkunkedGorilla

MrWilsonWJ

Rank V
Launch Member

Member III

1,691
Kennewick, WA
First Name
Dustin
Last Name
Wilson
Member #

23384

Out with the old, in with the new!
20210404_110854.jpg
New exhaust consists of Magnaflow high flow car, Dynomax muffler, Dynomax tailpipe and a couple 18" pieces of pipe all 2.5". I also replaced the O2 sensors while I was at it.
20210404_152457.jpg20210404_152431.jpg
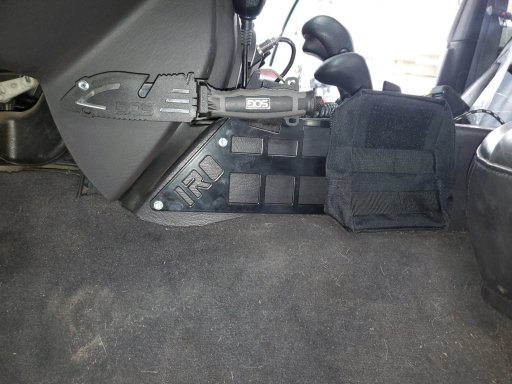
Also while at the shop I installed some Molle panels on the center console that I got from IRO.
Drivers side
20210404_145454.jpg20210404_150251.jpg
Passengers side
20210404_141810.jpg20210404_142753.jpg
 
  • Like
Reactions: SkunkedGorilla

tjZ06

Rank V
Launch Member

Advocate I

2,268
Las Vegas/Palo Alto
First Name
mynameisntallowed
Last Name
Adams
Member #

20043

Haven't gotten started on the suspension yet but I did make a minor upgrade to the electrical system yesterday. Replaced the battery with an AGM deep cycle and changed the alternator out for one for an '02 Durango. Direct swap and an increase from 136A to 160A, not a huge improvement but a little more charging power for when I put a second battery in. Also a hell of a lot cheaper than a mean green alternator. Only thing I had to do to make it fit was drill out the eyelet for the battery cable, the stud on the new alternator was a bit bigger.
View attachment 192880
Once it was finished we went out to a local area to play on the trails and do some hill climbing. Here's our poser pic flexing the suspension.
View attachment 192881
Good info on the alternator!

-TJ
 

MrWilsonWJ

Rank V
Launch Member

Member III

1,691
Kennewick, WA
First Name
Dustin
Last Name
Wilson
Member #

23384

Good info on the alternator!

-TJ
Not sure where I read about them being a direct swap, but it's an easy upgrade. If anyone is looking to do it make sure to get the 160A because there is a 136A for some of the Durangos. Here is the part number for the one I got from Napa.
20210328_140854.jpg
 
  • Like
Reactions: tjZ06 and JimBill

WJCampin

Rank I

Contributor III

154
Walla Walla, WA, USA
First Name
Zac
Last Name
Marangi
Good looking build man! We'll have to meet up some time and go wheeling! I'm in Walla Walla and have a WJ as well. If you're on FB look up "W2 Offroad Crew". It's a group I made for all the local wheelers! I just got done putting on my TF stubby and have had the radiator support for a few months. I love it. Gunna work on getting the which installed tomorrow and trimming what's left of the stock "bumper". Look me up on FB so we can meet up!