Enthusiast I
I'm sure I am not the only one around who wants his daily driver to be just that when he's in the city but turn it into sleeper when going on a week-end camping trip or a 10 days backcountry adventure. I wanted something that I can easily install when needed and can be just as easily removed and stored when not. After searching the internets for a solution I found a youtube video from this guy who built a sleeping platform for his jeep.
I found the concept interesting but I didn't like the hinges in top, I like a completely flat surface. Also, I'm a big guy and I didn't feel 1x6 boards would take my weight without bending when I sleep. And last, I wanted more height for the storage as a 1x6 really is only 5.5" which isn't that much. So I designed something based on his idea and came up with this. I know, it's not all painted yet, but it won't be for another few weeks as I am running out of time and I wanted to take pictures and do this write up while installing before hitting the road in a 4 days.
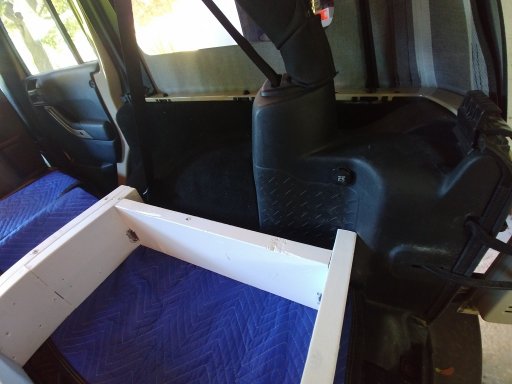
First I put a moving blanket in the Jeep to protect my sub-woofer and the back of the rear seats.

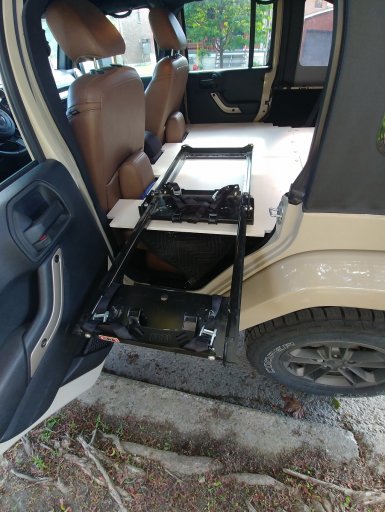
For the frame I used some 2x8 lumber. That gives me a storage height of 7.5" which is good. I doubled the front end boards which gave me two 1.5" surfaces to put 3/8 inserts to screw the covers on. You can see those inserts in the boards on the right hand side on this picture.

Here's the frame inside the Jeep. I only gave it two coats of primer, I saw no need for painting it.

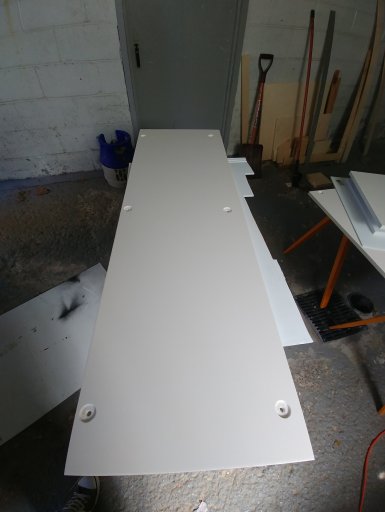
This board is screwed on top of the frame using those inserts I mentioned. I used machine screws because I happened to have a bunch of them, hex bolts would be just as good but the machine screws add a nice touch. The underside only has primer, like the frame. The top has two coats of 100% acrylic latex paint.

The rest of the frame has 2 removable covers to get access to the inside. Like I said, I want a flat top so I just put some braces inside to prevent them from sliding around. The only things that keeps them down is their own weight and whatever I put on top. Again, just primed inside and painted outside.


There is a 6" to 7" gap between the frame and rear door. I decided to build a small storage box to fill this gap. I use T-Nuts and hex bolts to bolt it on the frame. It does not look like much but it is actually quite usefull. It fits 3 bottles of propane, 1 gallon of anti-freeze, 1 litre of motor oil, a bottle of radiator stop leak and a bottle of break fuild.


Notice I left a gap on the right hand side. This is very important, that space is required for the door hinge to work properly.

There is about 1/2" space between the door and the storage box.

The front end side has two larger pieces that I trimmed to cover has much space as possible. They each have a 2x4 at the front underside to cover the space between the boards and the back of the seats so the whole platform is flat. They are bolted on that doubled 2x8 that I mentioned before, using the same machine bolts with flat washers.
They are identical, I made 2 of them and just flipped one over. The 2x4 on the underside fills the gap between the boards and the seats.


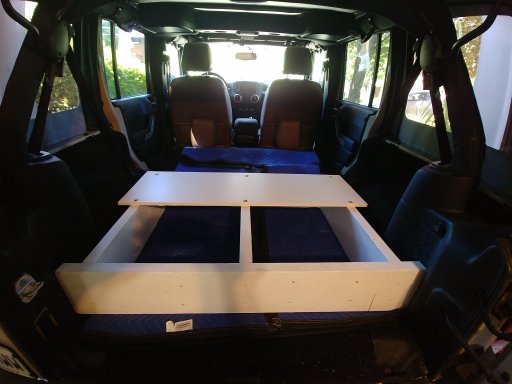
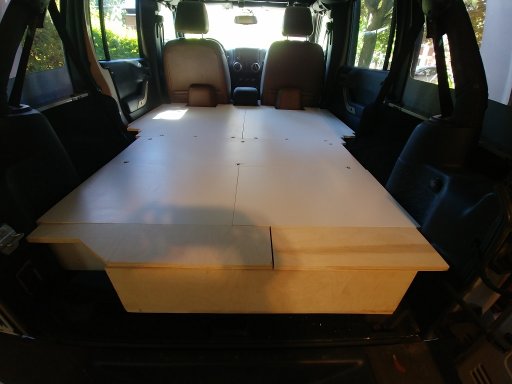
This shows one of the boards installed along with the two removable boards.

And here is the whole platform with the stuff in the storage box.

Now this small storage box has two purposes. When I set up for camp I will empty it, cover it with two boards that I cut just for that so the platform will now be flat all the way to the rear door. None of these bottles will be in the way and my feet won't fall in the gap that would have been there without that box.
You maybe wondering why the box does not extend all the way to the left and why there is a cutaway part on the top, it's simply to match the shape of the rear door
Using 2x8 for the frame also gives me a bit of storage between the top boards and the back of the rear seats. It can be used to put pillows, blankets, maybe a first aid kit or anything else I can fit in there.

Obviously this whole topic would be useless without measurements so here it is.
Frame

Frame cover - jeep front end

Frame cover - jeep rear end. They are both the exact same size.

Front board. Need 2 of them.

Front board bottom part to show dimensions.

I used 5/8" baltic birch plywood.
*** Note: Some of you may have noticed the front boards are resting against the doors on each side. They were not like that when I originally cut them. I think they've expanded a bit since the temperature has gone up in Montreal since I cut them. Do not compensate for this if you have noticed, I already did in the drawings.
*** Note 2: I did not post drawings and dimensions of the storage box. The reason for this is I think whoever builds this should measure it to make sure it clears the door.
*** Note 3: The attached zip file contains a copy of the sketchup design. Feel free to use, modify, distribute it any way you like.
Feel free to use, modify, distribute the sketchup file in the attached zip.
I found the concept interesting but I didn't like the hinges in top, I like a completely flat surface. Also, I'm a big guy and I didn't feel 1x6 boards would take my weight without bending when I sleep. And last, I wanted more height for the storage as a 1x6 really is only 5.5" which isn't that much. So I designed something based on his idea and came up with this. I know, it's not all painted yet, but it won't be for another few weeks as I am running out of time and I wanted to take pictures and do this write up while installing before hitting the road in a 4 days.
First I put a moving blanket in the Jeep to protect my sub-woofer and the back of the rear seats.
For the frame I used some 2x8 lumber. That gives me a storage height of 7.5" which is good. I doubled the front end boards which gave me two 1.5" surfaces to put 3/8 inserts to screw the covers on. You can see those inserts in the boards on the right hand side on this picture.
Here's the frame inside the Jeep. I only gave it two coats of primer, I saw no need for painting it.
This board is screwed on top of the frame using those inserts I mentioned. I used machine screws because I happened to have a bunch of them, hex bolts would be just as good but the machine screws add a nice touch. The underside only has primer, like the frame. The top has two coats of 100% acrylic latex paint.
The rest of the frame has 2 removable covers to get access to the inside. Like I said, I want a flat top so I just put some braces inside to prevent them from sliding around. The only things that keeps them down is their own weight and whatever I put on top. Again, just primed inside and painted outside.
There is a 6" to 7" gap between the frame and rear door. I decided to build a small storage box to fill this gap. I use T-Nuts and hex bolts to bolt it on the frame. It does not look like much but it is actually quite usefull. It fits 3 bottles of propane, 1 gallon of anti-freeze, 1 litre of motor oil, a bottle of radiator stop leak and a bottle of break fuild.
Notice I left a gap on the right hand side. This is very important, that space is required for the door hinge to work properly.
There is about 1/2" space between the door and the storage box.
The front end side has two larger pieces that I trimmed to cover has much space as possible. They each have a 2x4 at the front underside to cover the space between the boards and the back of the seats so the whole platform is flat. They are bolted on that doubled 2x8 that I mentioned before, using the same machine bolts with flat washers.
They are identical, I made 2 of them and just flipped one over. The 2x4 on the underside fills the gap between the boards and the seats.
This shows one of the boards installed along with the two removable boards.
And here is the whole platform with the stuff in the storage box.
Now this small storage box has two purposes. When I set up for camp I will empty it, cover it with two boards that I cut just for that so the platform will now be flat all the way to the rear door. None of these bottles will be in the way and my feet won't fall in the gap that would have been there without that box.
You maybe wondering why the box does not extend all the way to the left and why there is a cutaway part on the top, it's simply to match the shape of the rear door
Using 2x8 for the frame also gives me a bit of storage between the top boards and the back of the rear seats. It can be used to put pillows, blankets, maybe a first aid kit or anything else I can fit in there.
Obviously this whole topic would be useless without measurements so here it is.
Frame
Frame cover - jeep front end
Frame cover - jeep rear end. They are both the exact same size.
Front board. Need 2 of them.
Front board bottom part to show dimensions.
I used 5/8" baltic birch plywood.
*** Note: Some of you may have noticed the front boards are resting against the doors on each side. They were not like that when I originally cut them. I think they've expanded a bit since the temperature has gone up in Montreal since I cut them. Do not compensate for this if you have noticed, I already did in the drawings.
*** Note 2: I did not post drawings and dimensions of the storage box. The reason for this is I think whoever builds this should measure it to make sure it clears the door.
*** Note 3: The attached zip file contains a copy of the sketchup design. Feel free to use, modify, distribute it any way you like.
Feel free to use, modify, distribute the sketchup file in the attached zip.
Attachments
-
 316.8 KB Views: 23
 -
730.2 KB Views: 1
Last edited: