

Enthusiast III
This weekend I finished my installation of a hot water system on my Toyota FJ Cruiser. One person can do this by himself but a friend (who is much more knowledgeable about cars than me) helped me and that made it a lot easier. This system can be used for showering or to make hot water to wash dishes, among other things. You could make a good argument you can go out for a weekend without a shower, but if you like to go out for longer, or if you like to hike, ride a bicycle, or swim in the ocean, a nice hot shower is a beautiful thing…
The heart of the system is a heat exchanger made by an Australian company called Glind. They have been doing these things for a long time and they make a great quality product. Fortunately for us on this side of the ocean, they have a north American distributor called Overland Shower (glindhotshower.com) who sells a complete kit including the heat exchanger and everything else you need to get hot water out of your vehicle. That makes it very easy as you don’t have to figure out what you need or look for any component. They are also extremely helpful in providing installation diagrams and all sorts of help.
I took photos along the way as I was installing this, so if anyone wants to do the same this should be helpful.
First, here are all the components:
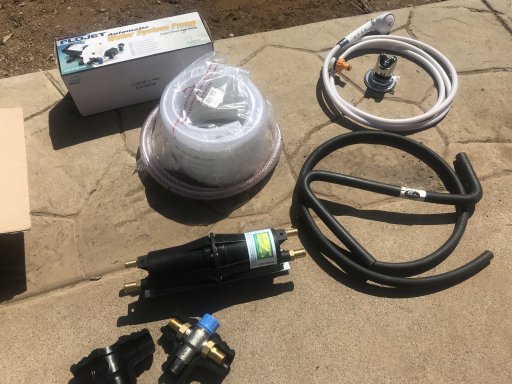
On the top you see the pressure-sensing pump. This starts to operate when you open the shower head. Below it the cylindrical piece is the Glind heat exchanger. Below that is the mixer valve. This is similar to what you use at home: rotate the faucet counterclockwise and you get more hot water; clockwise and it gets colder. Same concept except here you adjust it with a nut under that blue cap. The beauty of this is once you dial in the temperature you like you never need to touch it again. The water will always come at your preferred set temperature.
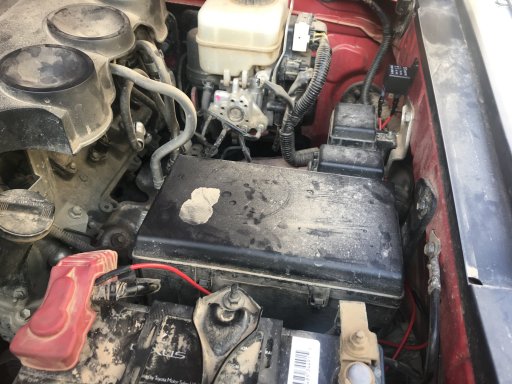
First step is to locate a suitable location for the components. Obviously every vehicle will be different. In the FJ there was a lot of empty space in the rear and front left of the engine bay.
The heat exchanger takes hot coolant from the heater block and circulates it through. Inside there’s a copper coil that circulates fresh water. As the fresh water flows through that coil, it gets heated by the surrounding hot coolant outside the coil. The two fluids never come into contact with each other, as they are two completely independent circuits. But the water in the serpentine tube inside the heat exchanger gets heated up as it flows through (thus the name “heat exchanger”, and there’s a transfer of heat from one fluid to the other).
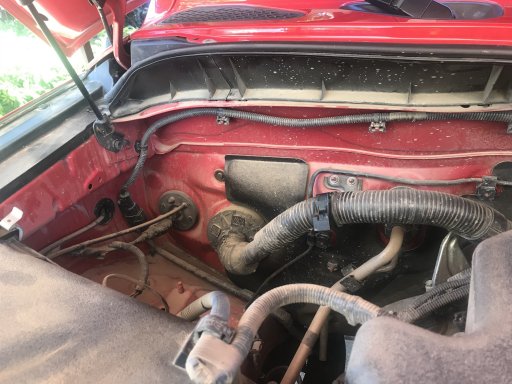
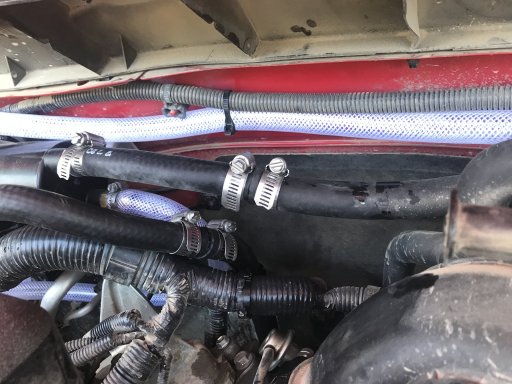
You need to locate the coolant hose that comes out of the car’s heater core. In the FJ that is the lower of the two hoses you see on the firewall:
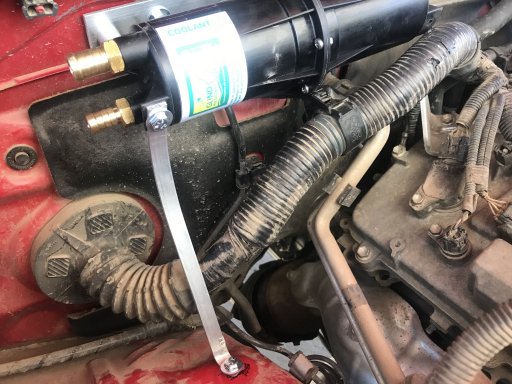
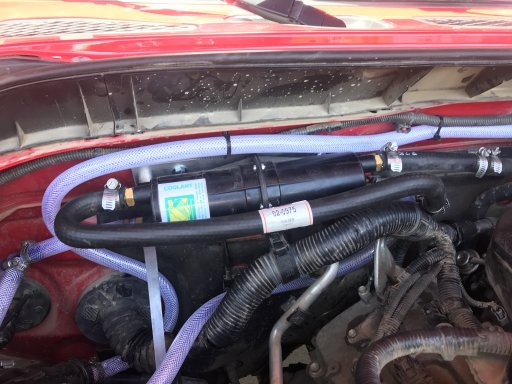
Where you install the heat exchanger will vary for each vehicle. You want to find a location in which it’s safe, and minimizes the length and bends of the hoses. In the FJ I mounted it to the firewall using two rivnuts.
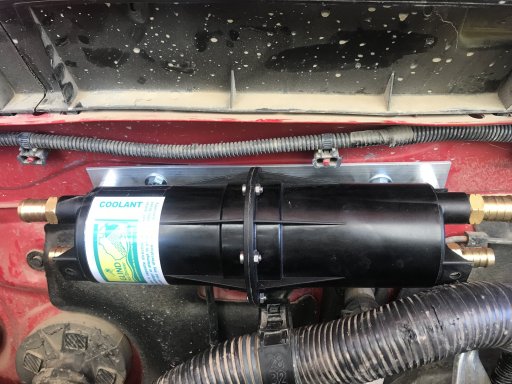
Because this car is going off-road I wanted to strengthen the heat exchanger mount, so I added a bracket for support just in case. It probably wasn’t necessary, but just to be sure.
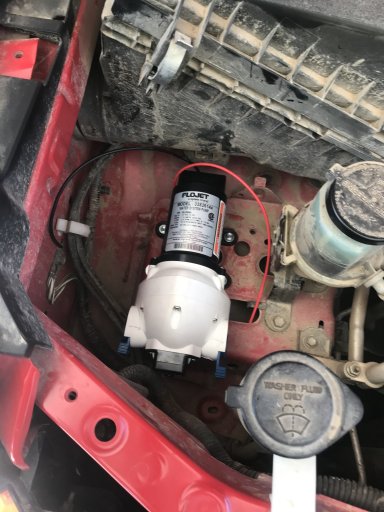
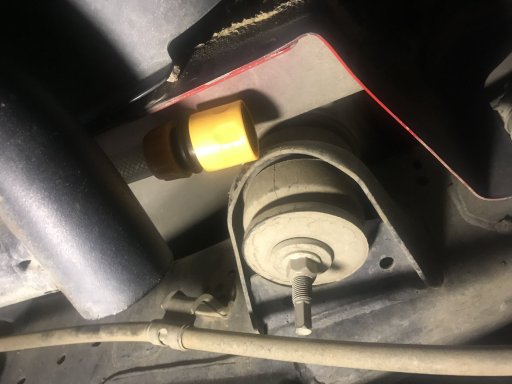
I put the water pump in an empty space in front of the engine bay. Again, your vehicle may be different. The pump can be mounted vertically or horizontally.
The mixer valve went close to the heat exchanger. This is a key component because without it the water can get too hot and could potentially scald you.

In terms of how everything is connected, here’s an overview diagram:
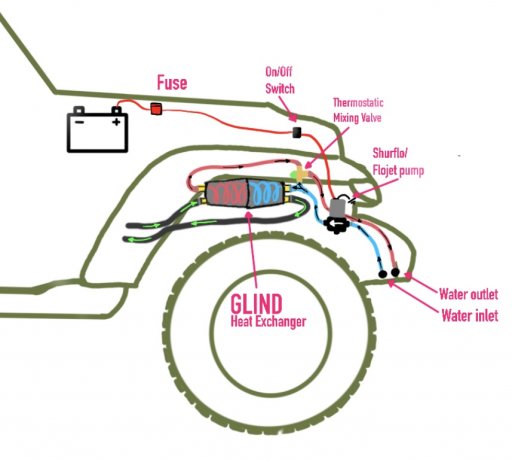
In essence, the way this works is:
1. Cold water is sucked in by the pump. The source can be a jerry can, a permanent on-board water tank, or even a river or lake if you carry a long hose. For the sake of simplicity I chose to use a jerry can. You can install the inlet anywhere in the vehicle. I am going straight into the pump.

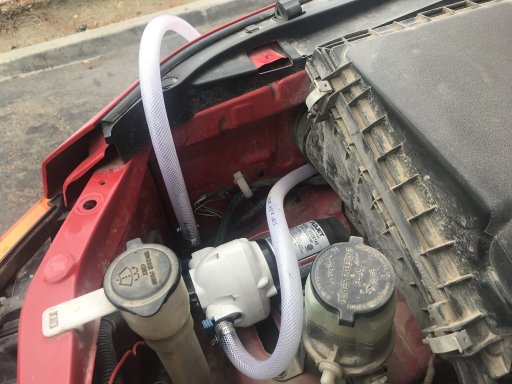
2. The pump pushes the cold water into both the cold water inlet in the mixer valve and the cold water inlet of the heat exchanger. You use a T connector to split that source into two. Pay attention when you install the mixer valve to see which of the two inlets is the cold water inlet, and which is the hot. In the heat exchanger photo earlier, the cold water inlet of the heat exchanger is the bottom one, in either end. It doesn’t matter which end you call “in” as long as you make the inlet above for coolant fluid be the opposite, I.e. “out”. This is because the two liquids must flow in opposite directions inside the heat exchanger.
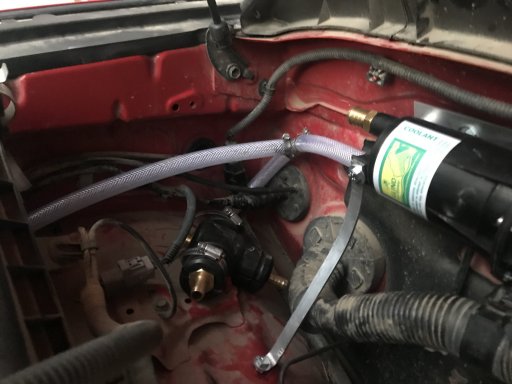
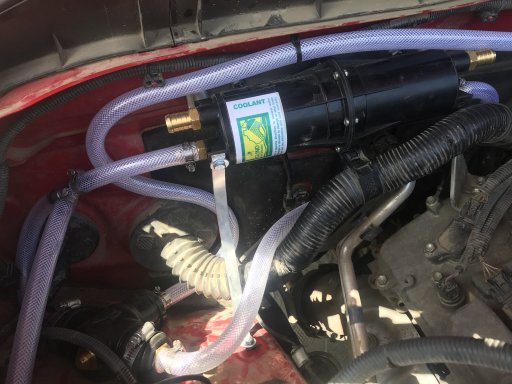
3. Next, connect the heat exchanger’s fresh water outlet (hot) to the mixer valve’s hot water inlet. Notice how I routed this hose to avoid being above the engine block and also to make it look neater.
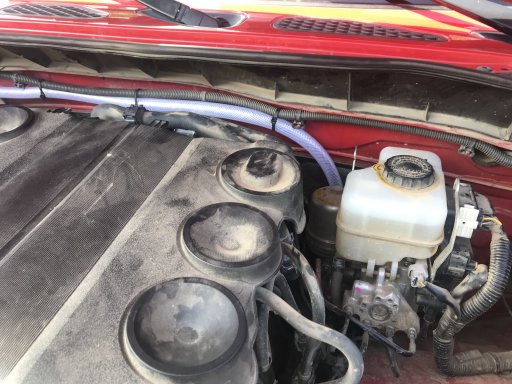
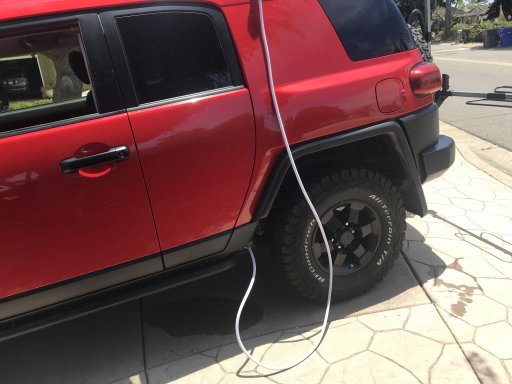
4. The last fresh water hose is the lukewarm (mixed) water coming out of the mixer valve (the bottom outlet) and that hose ends in whatever termination you want to connect the shower head to. I routed the hose out of the engine bay all the way below the driver side by the frame rail and terminated the hose with a quick connector. The hose is held in place with zip ties and some hose brackets along its path.
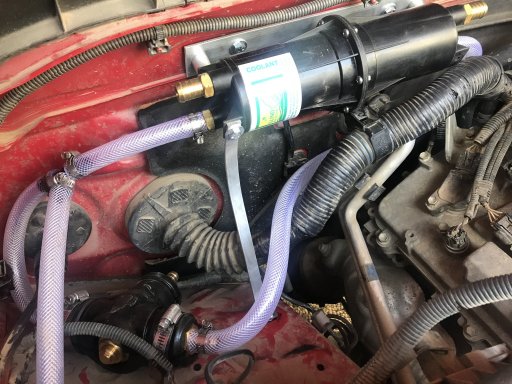
5. The other part of the plumbing is for radiator hot coolant. You want to tap into the hose that comes out of the heater core. Depending on how the hoses go in your vehicle and where you installed the heat exchanger you may want to disconnect the coolant hose from where it goes in back into the engine block. In my case it was easier to cut it close to the heat exchanger’s hot coolant input, and splice another hose from there (or directly if it’s long enough) into the heat exchanger’s hot coolant inlet. In the picture you’ll notice the splice on the hose above and how it goes into the heat exchanger.
6. Lastly, you need to go back out of the heat exchanger into the other piece of hose that goes back into the engine. The kit came with hoses with tight bends, so it was easy to connect it to the outlet and splice it in to the engine’s hose.
The other aspect of this installation are the electrical components. You need to install a switch to power the pump. I bought a switch designed to fit in the FJ’s dashboard, but of course you can put any switch you want. Just make sure you follow all the instructions for fuse amperage and wire gauge that come with the pump.
So, pump is grounded and then hot wire goes from the pump to a fuse and relay on the other side of engine bay:
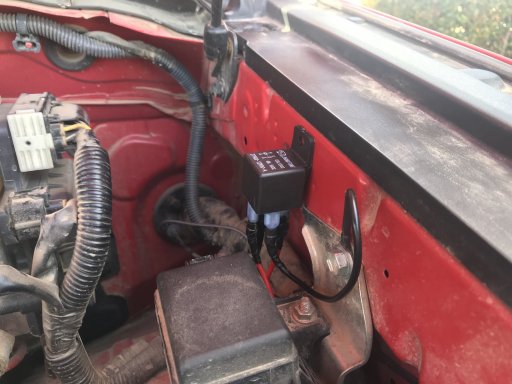
We connected the relay directly to the battery, but if you have a separate accessory relay box you would go into that.
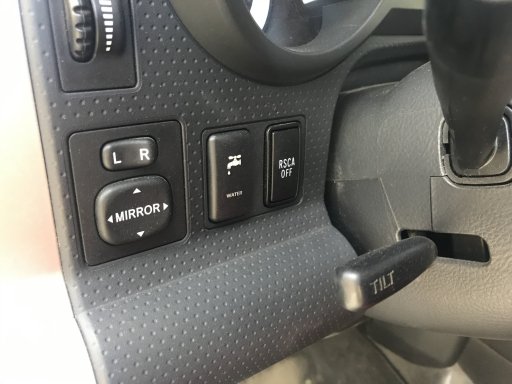
And from the relay you run a wire through the firewall into a switch in the dashboard. I got a fuse tap and connected it to an available unswitched port in the interior’s fuse box. We connected the switch’s wires so that the internal light would come on when pressed:
I carry the inlet and outlet hoses separately in a bag.

To use the system I connect the inlet hose (the one with the filter in the tip) to the inlet port in the pump, dip the other end into some water source, connect the shower hose to the quick connect under the car, press the pump switch and then when I open the shower head with the built-in button (others have a handle) the pressure-sensing pump is activated and hot water comes out. You can regulate the amount of hot water that comes out by depressing the shower head’s button more or less. If you use a jerry can as your water source you’ll want to be frugal. If you park by a river you can invite hundreds of friends to use your shower. :) You will need to have the engine on idle for that.
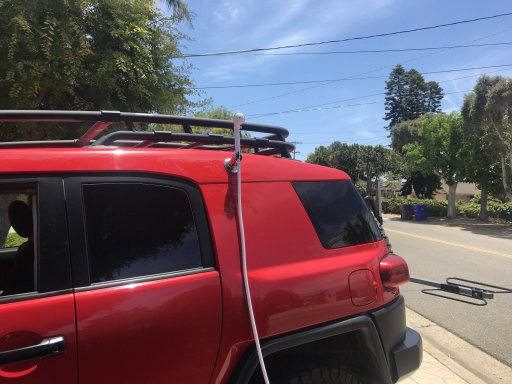
For now the shower head is mounted with a suction mount onto the car, so there’s no privacy. In the future I may get a shower cubicle of some kind.
I hope this was helpful! If you have any questions don’t hesitate to ask.
The heart of the system is a heat exchanger made by an Australian company called Glind. They have been doing these things for a long time and they make a great quality product. Fortunately for us on this side of the ocean, they have a north American distributor called Overland Shower (glindhotshower.com) who sells a complete kit including the heat exchanger and everything else you need to get hot water out of your vehicle. That makes it very easy as you don’t have to figure out what you need or look for any component. They are also extremely helpful in providing installation diagrams and all sorts of help.
I took photos along the way as I was installing this, so if anyone wants to do the same this should be helpful.
First, here are all the components:
On the top you see the pressure-sensing pump. This starts to operate when you open the shower head. Below it the cylindrical piece is the Glind heat exchanger. Below that is the mixer valve. This is similar to what you use at home: rotate the faucet counterclockwise and you get more hot water; clockwise and it gets colder. Same concept except here you adjust it with a nut under that blue cap. The beauty of this is once you dial in the temperature you like you never need to touch it again. The water will always come at your preferred set temperature.
First step is to locate a suitable location for the components. Obviously every vehicle will be different. In the FJ there was a lot of empty space in the rear and front left of the engine bay.
The heat exchanger takes hot coolant from the heater block and circulates it through. Inside there’s a copper coil that circulates fresh water. As the fresh water flows through that coil, it gets heated by the surrounding hot coolant outside the coil. The two fluids never come into contact with each other, as they are two completely independent circuits. But the water in the serpentine tube inside the heat exchanger gets heated up as it flows through (thus the name “heat exchanger”, and there’s a transfer of heat from one fluid to the other).
You need to locate the coolant hose that comes out of the car’s heater core. In the FJ that is the lower of the two hoses you see on the firewall:
Where you install the heat exchanger will vary for each vehicle. You want to find a location in which it’s safe, and minimizes the length and bends of the hoses. In the FJ I mounted it to the firewall using two rivnuts.
Because this car is going off-road I wanted to strengthen the heat exchanger mount, so I added a bracket for support just in case. It probably wasn’t necessary, but just to be sure.
I put the water pump in an empty space in front of the engine bay. Again, your vehicle may be different. The pump can be mounted vertically or horizontally.
The mixer valve went close to the heat exchanger. This is a key component because without it the water can get too hot and could potentially scald you.
In terms of how everything is connected, here’s an overview diagram:
In essence, the way this works is:
1. Cold water is sucked in by the pump. The source can be a jerry can, a permanent on-board water tank, or even a river or lake if you carry a long hose. For the sake of simplicity I chose to use a jerry can. You can install the inlet anywhere in the vehicle. I am going straight into the pump.
2. The pump pushes the cold water into both the cold water inlet in the mixer valve and the cold water inlet of the heat exchanger. You use a T connector to split that source into two. Pay attention when you install the mixer valve to see which of the two inlets is the cold water inlet, and which is the hot. In the heat exchanger photo earlier, the cold water inlet of the heat exchanger is the bottom one, in either end. It doesn’t matter which end you call “in” as long as you make the inlet above for coolant fluid be the opposite, I.e. “out”. This is because the two liquids must flow in opposite directions inside the heat exchanger.
3. Next, connect the heat exchanger’s fresh water outlet (hot) to the mixer valve’s hot water inlet. Notice how I routed this hose to avoid being above the engine block and also to make it look neater.
4. The last fresh water hose is the lukewarm (mixed) water coming out of the mixer valve (the bottom outlet) and that hose ends in whatever termination you want to connect the shower head to. I routed the hose out of the engine bay all the way below the driver side by the frame rail and terminated the hose with a quick connector. The hose is held in place with zip ties and some hose brackets along its path.
5. The other part of the plumbing is for radiator hot coolant. You want to tap into the hose that comes out of the heater core. Depending on how the hoses go in your vehicle and where you installed the heat exchanger you may want to disconnect the coolant hose from where it goes in back into the engine block. In my case it was easier to cut it close to the heat exchanger’s hot coolant input, and splice another hose from there (or directly if it’s long enough) into the heat exchanger’s hot coolant inlet. In the picture you’ll notice the splice on the hose above and how it goes into the heat exchanger.
6. Lastly, you need to go back out of the heat exchanger into the other piece of hose that goes back into the engine. The kit came with hoses with tight bends, so it was easy to connect it to the outlet and splice it in to the engine’s hose.
The other aspect of this installation are the electrical components. You need to install a switch to power the pump. I bought a switch designed to fit in the FJ’s dashboard, but of course you can put any switch you want. Just make sure you follow all the instructions for fuse amperage and wire gauge that come with the pump.
So, pump is grounded and then hot wire goes from the pump to a fuse and relay on the other side of engine bay:
We connected the relay directly to the battery, but if you have a separate accessory relay box you would go into that.
And from the relay you run a wire through the firewall into a switch in the dashboard. I got a fuse tap and connected it to an available unswitched port in the interior’s fuse box. We connected the switch’s wires so that the internal light would come on when pressed:
I carry the inlet and outlet hoses separately in a bag.
To use the system I connect the inlet hose (the one with the filter in the tip) to the inlet port in the pump, dip the other end into some water source, connect the shower hose to the quick connect under the car, press the pump switch and then when I open the shower head with the built-in button (others have a handle) the pressure-sensing pump is activated and hot water comes out. You can regulate the amount of hot water that comes out by depressing the shower head’s button more or less. If you use a jerry can as your water source you’ll want to be frugal. If you park by a river you can invite hundreds of friends to use your shower. :) You will need to have the engine on idle for that.
For now the shower head is mounted with a suction mount onto the car, so there’s no privacy. In the future I may get a shower cubicle of some kind.
I hope this was helpful! If you have any questions don’t hesitate to ask.


