Goal: simple day to day life, small(ish), offroad capable – a Jeep Gladiator build

  • HTML tutorial

cug

Rank II

Enthusiast III

473
San Jose, CA, USA
First Name
Guido
Last Name
GNE
To elaborate a bit on the weight thing:
  • We are using the lightest wood for the application, a lot of is 6mm Baltic birch, only structural parts are heavier.
  • We go to full length to replace heavy hardware with lighter parts
  • We’ve removed the rear seats
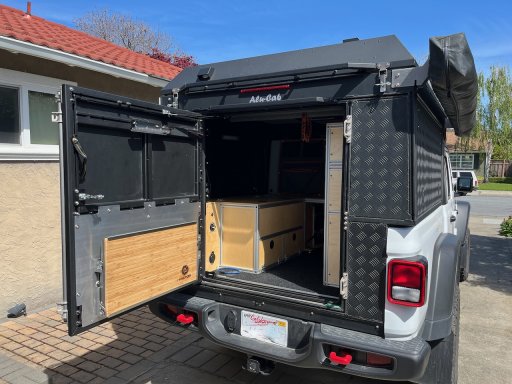
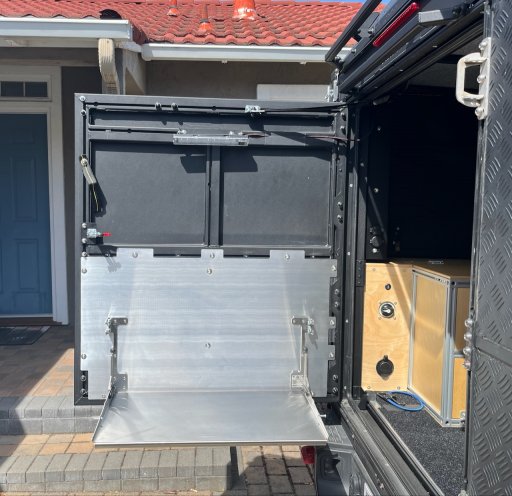
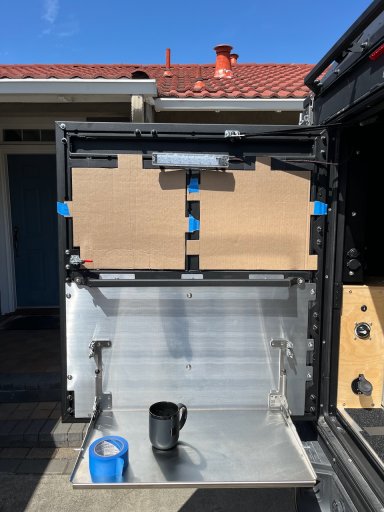
  • For the Canopy Camper, the tailgate is removed
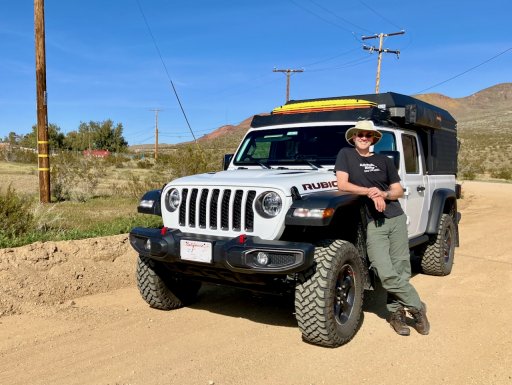
  • We are NOT using a steel bumper
  • We are NOT getting a winch
  • We are using OEM tires and not larger ones
  • We might remove some heavy parts we aren’t using like rock sliders etc.
Based on my calculation, we should be just within GVWR, although a full water and food loadout could push us over.
 
Last edited:

cug

Rank II

Enthusiast III

473
San Jose, CA, USA
First Name
Guido
Last Name
GNE
Photo impressions from the trip ...

Alabama Hills, yes, iPhone Night Mode can result in really whacky photos:

IMG_6287.jpeg

IMG_6282.jpeg

IMG_6176.jpeg

Camp in Southern Death Valley:

IMG_6195.jpeg

Mojave, waiting for the tires to deflate:

IMG_6203.jpeg
 
  • Love
Reactions: Dougnuts

cug

Rank II

Enthusiast III

473
San Jose, CA, USA
First Name
Guido
Last Name
GNE
Thoughts:
  • We really need to get the water system hooked up.
  • A heater is a comfort factor, even in California; it'll be crucial for Alaska.
  • The rear door table is overdue, it'll make life much easier.
  • Lights have become a higher priority during this trip. We got to the first campsite after dark and it wasn't nice having to navigate a slightly rougher trail with just the halogen headlights and foglights. Wife's comment: "That's all the light we have?"
  • Need to start working on content organization, moving stuff around all the time gets old on day two ...
More to come.
 
  • Like
Reactions: TheBestCow

cug

Rank II

Enthusiast III

473
San Jose, CA, USA
First Name
Guido
Last Name
GNE
This build really reminds me of work ... it's a looong project that is in an incredibly frustrating phase. We'll need to finish up all these custom things we wanted that aren't available ready to install ...

Currently I'm working on a way to mount the outside components of our diesel heater. We didn't want to drill through the truck bed, so we found a place to mount it next to our galley, basically the rear passenger side corner of the camper. The heater will be inside, recycling warm air for higher efficiency, we'll drill through the rear wall of the camper to get exhaust gas out and combustian air and fuel in. The outside components will live in a replacement "thingy", that we'll mount in place of the rear molle panel.

This is the current state:

Screenshot.jpg

I've never worked with 3D CAD software before and I'm not happy that I have to do it now. The software is rather frustrating ... But okay, I hope it'll work out in the end. The big hole on top will get a cover with a Rotopax mount pattern, so we can mount a Rotopax fuel container there for diesel for the heater. We decided not to tap into our main fuel tank and instead will refill from either at a gas station or from our spare fuel.

This box will need a few more mounting holes, so I'll have this cut, bent, and shipped, then we do the mounting, drill some more holes, make sure it all works, then have it powder coated here. What a damn project for a simple diesel heater. I wish someone would make a kit that actually works.
 

cug

Rank II

Enthusiast III

473
San Jose, CA, USA
First Name
Guido
Last Name
GNE
So, we finished an important step for our build, the difficult parts of the rear door are done:

IMG_6348 (1).jpeg

IMG_6350.jpeg

The differences we have in our own build compared to a standard install are:
  • The table is about 9cm lower, which brings it to pretty much exactly the height of our kitchen countertop.
  • The backing plate is made specifically for our door, which is flipped 180 degrees so that it opens to the other side (we wanted it this way), our awning is also on the passenger's side, Alu-Cab standard is on the other side (passenger side in countries that drive on the other side of the road, e.g. South Africa).
  • The door has three Rhinorack loadbars on the outside (pictures later), so we can mount "stuff" to it.
  • There is insulation between door and table back plate.
Very happy with how this all turned out.
 
Last edited:

cug

Rank II

Enthusiast III

473
San Jose, CA, USA
First Name
Guido
Last Name
GNE
our door, which is flipped 180 degrees so that it opens to the other side
This is causing us other difficulties now – we have to design our own panels for the other interior panel segments. One to carry a Last US Bag Half Caddy and one for a Redvision display and a paper towel holder. Available solutions are unlikely to work due to the flipped door, which means more sheetmetal design ... I was hoping to be done with that. Bummer.
 

cug

Rank II

Enthusiast III

473
San Jose, CA, USA
First Name
Guido
Last Name
GNE
It's been going slowly again these last few days. Not much to show, just stuff I'm working on and/or have on order.

A box for the outside components of our heater, this is on order and will replace the passenger side molle panel:

Screenshot 2024-04-14 at 18.02.53.png

This will come in raw aluminum, we'll get it powder coated locally once all the other mounting holes are drilled.

Mounting panel for the rear door between the upper and middle outside loadbars, ready for a Rotopax and mimicking the Alu-Cab molle pattern to a degree. This is awaiting some measurement confirmation, then I'll order two:

Screenshot 2024-04-14 at 18.03.22.png

Similar panel for between the lower and middle loadbars, also awaiting confirmation:

Screenshot 2024-04-14 at 18.03.39.png

Since they share the middle loadbar and if mounted above each other, the one mounted on top needs a spacer for the other loadbar, so I modeled that as well. Not worth showing. Just a fancy washer ... ;-)

And this is what I spend part of my afternoon creating. A Fusion 360 sketch for the Redvision display cutout. Actually, took me maybe 45 minutes or so, the rest was spend with coffee, food, and other Sunday afternoon activities:

Screenshot 2024-04-14 at 18.04.05.png

Luckily, Redarc provides all measurements in the manual, so it was reasonably easy to create. Need this since we are planning on mounting the display to the door, instead of the current location in the camper corner.

Still waiting for some parts, for example a paper towel holder, so I can create an overall layout and finalize the interior panels of the door. Fun ...
 

TheBestCow

Rank II
Launch Member

Enthusiast I

404
Knoxville, TN, USA
First Name
Kevin
Last Name
Mulligan
Member #

24333

What kind of tape and is that the permanent way to leave it in place or will you be adding something else? Just curious if there is long term risk of wind getting under the front lip and pulling it up, or if it is super taped down and not a risk for that? (I have zero experience here, clearly.)
 

cug

Rank II

Enthusiast III

473
San Jose, CA, USA
First Name
Guido
Last Name
GNE
What kind of tape and is that the permanent way to leave it in place or will you be adding something else? Just curious if there is long term risk of wind getting under the front lip and pulling it up, or if it is super taped down and not a risk for that? (I have zero experience here, clearly.)
The panel is fixed now. Here is what the seller says:

Want your solar panel to be ready to install, right out of the box? We will apply Heliobond, an incredibly durable and waterproof double-sided tape, to your panel before we ship it out. Using this option, you can pull the panel out, measure off your roof or tent, and stick our Sunflare panel directly to your roof without a hassle.

To install, just peel back the plastic, starting on the frontmost line, and pull it off underneath the panel as you work outwards. Be advised that this tape is insanely sticky, and you cannot back up once you get started. So measure many times before you commit.
They have an anecdote about testing it on a soft shell tent for a customer. It flew off, landed sticky side down on the hot California highway and how it was a chore to remove from there ... the lane was closed for a bit and they went at it with shovels.

I've also heard some other stories about this when early panels from a different manufacturer delaminated. It's a complete nightmare to remove, so I really hope it'll work out. The best (and in my opinion only way) to remove tape like this is to get between the surfaces with something sharp and cut through. Once the two parts are separated, the tape can be removed relatively easy. This experience is with 3M VHB, which seems to be similar.

We put a some silicone on the leading edge to prevent wind/water ingres, although GTFOverland mentioned that most people do this mostly for aesthetic reasons. Again, I just hope it'll work. We took the risk that this might have to be replaced at some point in time, but we wanted to save weight. The same output from a hard panel would have been about 10kg more weight on top of the roof (for the panel and loadbars needed to mount it) and I really wanted to avoid that. The truck is top-heavy as it is.

Oh, and for power output, it's a 140W panel, producing already around 60W at 9:30 in the morning (Northern California). Will check the output some more during the day and use the truck to make tea and coffee today so the batteries actually need to be recharged.
 
Last edited:
  • Like
Reactions: TheBestCow

cug

Rank II

Enthusiast III

473
San Jose, CA, USA
First Name
Guido
Last Name
GNE
Oh, and for power output, it's a 140W panel, producing already around 60W at 9:30 in the morning (Northern California). Will check the output some more during the day and use the truck to make tea and coffee today so the batteries actually need to be recharged.
Got a peak of 108W today, just before noon. The roof was not angled towards the sun, sun isn't super high up yet, given it's mid April. so very happy with this result from a 140W panel. Batteries are full, so no more charging today.
 

cug

Rank II

Enthusiast III

473
San Jose, CA, USA
First Name
Guido
Last Name
GNE
I’m using the free version of Fusion 360. It’s free for private use and a limited number of editable documents. So, other than time, no added cost.
And this is generally how I approach the designs:

IMG_6369.jpeg

Do some Cardboard Aided Design first, get exact measurements for everything, then transfer this into a Fusion 360 (free version) sheet metal component with the correct sheet metal rules for the material I want to use. I pick the material based on what it needs to support and then go by gut feeling. I have a little bit of material knowledge from what feels like a previous life, so that helps a bit.

The upper left will be only to hold insulation in place, we'll mount a Last US Bag Half Caddy over it, which will get attached to the extrusion, so all the plate needs to hold is thinsulate. 1.5mm aluminum should be good enough.

Upper right is planned for a paper towel holder and the Redvision display, so slightly strong material and more mounting tabs, maybe 2.5mm aluminum.

The table backing plate is 2.5mm aircraft grade (7075 T6) aluminum, it's much harder, much more expensive, but not bendable, since it tends to spring back. But it seemed perfect for the use case.

So, now the rest of the day will be spend in Fusion 360 again ...
 
  • Like
Reactions: SemperParatus

cug

Rank II

Enthusiast III

473
San Jose, CA, USA
First Name
Guido
Last Name
GNE
Small improvements, this time, seat cushions for inside the camper:

IMG_6370.jpeg

IMG_6371.jpeg

With anti-slip on the bottom, so they stay in place when driving:

IMG_6372.jpeg
 

cug

Rank II

Enthusiast III

473
San Jose, CA, USA
First Name
Guido
Last Name
GNE
Soooooo, a long awaited item arrived this morning, the "diesel heater component panel":

IMG_6374.jpeg

It'll get installed like this:

IMG_6267.jpeg

Basically the same way as the Alu-Cab molle panels.

The lid will be mounted with M6 cage nuts and some M6 bolts (like 99% of the stuff we've built for the camper), that's why there are square holes on the front:

IMG_6381.jpeg

On the lid is a Rotopax mount pattern, to mount a one or two gallon Rotopax container:

IMG_6379.jpeg
Stuiff we plan to put inside the "box" (it isn't really a box, lots of venting going on around the edges, bends, etc., more like a deep panel):
Then the Rotopax with a fuel line disconnect on the outside.

The actual diesel heater will sit inside the cabin, with the ports going through the camper wall underneath the above panel.

Once we have all components sorted, additional holes drilled and everything lines up properly, we'll get the thing powder coated black and can finally mount it. That'll happen at some point in June since I'm away from the truck for a few weeks.

But, so far so good ... one big ticket item worked out.
 

cug

Rank II

Enthusiast III

473
San Jose, CA, USA
First Name
Guido
Last Name
GNE
So, from this:

Screenshot 2024-04-20 at 11.36.51.png

To this:

IMG_6374.jpeg

And there's only one stupid mistake – one of the top flange mounting holes doesn't work out, the horizontal c-channel in the camper is just 5mm too short. Actually, I had to switch from slots to holes and didn't think to make sure there is c-channel all the way to the edge ... grmbl. ;-)
 

rtexpeditions

Rank V
Launch Member

Advocate I

1,958
Hobart, Tasmania, Australia
First Name
Randall
Last Name
Treloyn
Member #

5615

Ham/GMRS Callsign
VK7VWK
Great build. I was considering a Gladiator for my next vehicle and would install a canopy of this style if I go ahead.
Interesting, that this is considered a "small" vehicle in the US, but here in Australia they are considered a large vehicle.
 
  • Like
Reactions: cug

cug

Rank II

Enthusiast III

473
San Jose, CA, USA
First Name
Guido
Last Name
GNE
Great build. I was considering a Gladiator for my next vehicle and would install a canopy of this style if I go ahead.
Be careful with the Gladiator. The main problem is payload and I heard that Australia is much more strict about this than other jurisdictions.

It's one of the reasons we go to some length to keep things reasonably light. Still, I'd appreciate maybe 200 or 300kg more payload. In Australia, there's absolutely no way I'd personally get a Gladiator, I'd go with a Land Cruiser Troopy and roof conversion. But that might just be me.