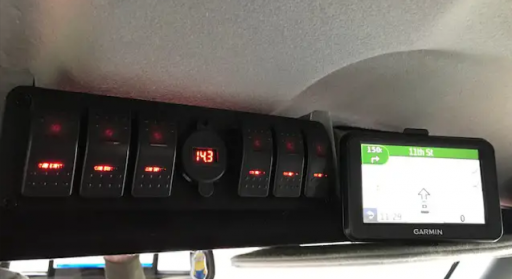
So let's get going on the little front parcel shelf, stealing the idea from Grit City Paul here on Overland Bound. He used a semi-off-the-shelf piece and linked me to one similar on Amazon, but didn't really love it, and didn't want to drop $120 or whatever, because making something myself is more fun. So started out with some cardboard template action, and then built some mount brackets:
So those go right here:
There are two more smaller ones in the middle, mounted to the sun visor inner "clamp" thing, since I'll go a different direction on sun visors (eventually).
Then I went to home depot and browsed around the wood. I wanted something about 5.5"-6" depth, and fairly thin. It doesn't have to be terribly strong, since not much weight will be on it, so I got some profiled wall baseboard, which isn't all that exciting but is about the right thickness/weight/price (cheap). I can always get something nicer if it doesn't hold up but I think it'll be fine. Then a bit of cutting and a test-fit:
I want a lip on the front so stuff doesn't slide off it into my face when the Raider's high-G acceleration kicks in (hah), so attached some quarter round to the front edge up top
I got one of the cheapo switch gangs off Amazon -similar to the one I have in the back for the aux lighting. I don't love these, and the look definitely doesn't go with the old Raider, but they'll be fine for the moment, maybe I'll upgrade them someday (or not, if they work fine).
I like having the USB plugs up there too, since I plan to stash things like my LED head light there, and it can charge without wires hanging all over the place like I currently have to deal with lol. Anyhow, spent the rest of the evening making a wiring loom. Because this gang box only has like a 20-30 amp max on the single power input, I cut that and put a second power input wire, so one for each of three switches. Most of these are just to relays anyhow, and few will be on at the same time so probably not an issue, but I like some backup.
Fast forward to today, with the glue dry I sanded the shelf and painted it (some beige rattle can that kinda-matches the headliner), notched the quarter-round to fit the nice aluminum surround that comes with this switch gang (actually, quite nice), and put a couple bolts through to secure it. Fit-wise it's almost perfect, like 2-3mm from the angled part of the forward inner roof, so exactly as planned (and a bit lucky)
I also put some outdoor carpet on the top with gorilla glue, to keep things from sliding/rattling as much as possible.
And installed. I have to get some better hardware, but used what I had sitting around for the moment. Those black bolts in particular are going to annoy me for sure if I leave them!
For the wiring, broke it down into two looms, one for each set of three switches and also so it's small enough to fit through the holes I drilled in the right-side support bracket
I underestimated the gap, though, and couldn't get the wires around the end/back of the shelf, so got the hole saw out and put a hole there. I'll get some kind of grommet to make it look better, eventually, but it works as needed.
And then combined the looms into one to run down the A-pillar. Still need to figure out routing to get behind the dash, and then spend a lot of time re-routing all the other wires I ran all over the place to the current switches, and move them to meet these, but it's supposed to be 60 degrees tomorrow, so maybe I can get some of that done.
Overall, a fun little project that wasn't too hard or expensive (maybe $60-70 into it all told).


