1999 Honda CR-V - "Ganbaru"

  • HTML tutorial

CR-Venturer

Rank VI
Launch Member

Traveler III

3,372
Ardrossan, AB, Canada
First Name
Jas
Last Name
Spr
Member #

16340

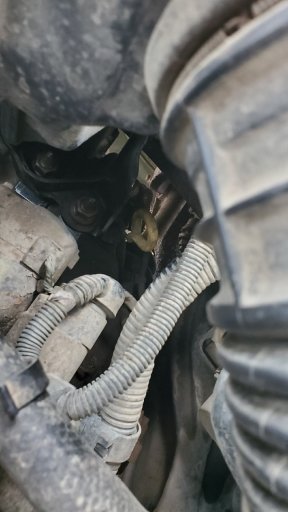
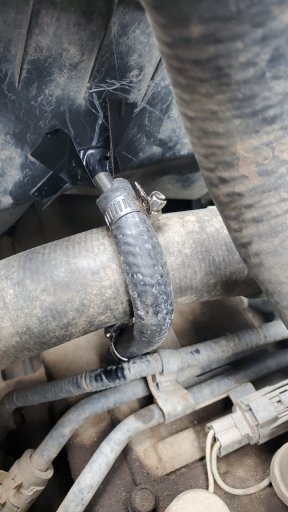
I forgot to answer your question about where it is, sorry. It's on top of the transmission housing more or less immediately below the lower rad hose, toward the front side. It's a little hose barb with a black rubber cap on it.

It's actually in a decent place from the factory, pretty high off the ground as it is, so if you don't plan on ever doing any significant water crossings, you're probably fine leaving it.

I've done some fairly deep water, so I thought I would just extend it and route into the side of the airbox.
 

CR-Venturer

Rank VI
Launch Member

Traveler III

3,372
Ardrossan, AB, Canada
First Name
Jas
Last Name
Spr
Member #

16340

I think this is one of my new favorite threads. Gotta love the older Hondas. I miss mine.
Thanks! Glad you're enjoying it :D I love my CR-V; definitely one of my favourite vehicles I've ever owned.

Ganbaru.jpg
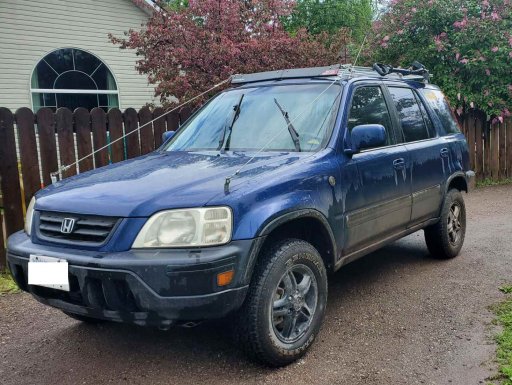
Here's how it looks currently. Getting new tires on the 17th that will give it another inch or so of lift.

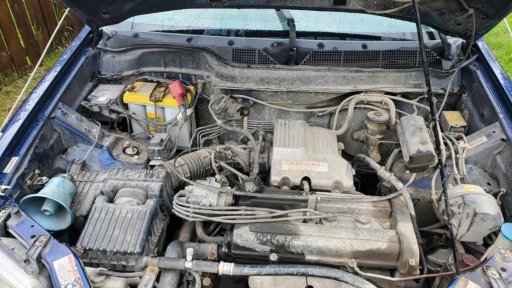
Overview of the engine, showing my loudspeaker on the left:
Engine.jpg
Driver side engine mount, showing the spacers:
Engine4.jpg
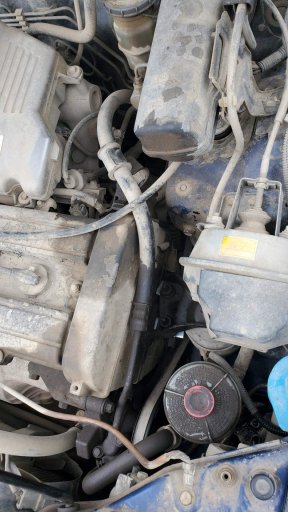
Passenger side mount, harder to see as it's buried down beside the transmission dip stick:
Engine2.jpg
Reroute of the tranny breather into the airbox. Super kludgy at the moment, but the electrical tape is only temporary until I have time to get in there and seal it nicely with epoxy:
Engine3.jpg
 

EastVanGuy

Rank I

Enthusiast I

231
British Columbia, Canada
First Name
Guy
Last Name
Moody
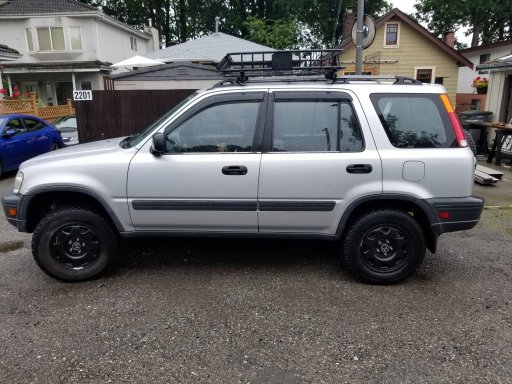
Ok, well I got the HRG spacers in and the 215/75r15 tires mounted on my now blacked-out rims and this is how it all looks now. Overall I think I got well over 2" on the front and about 2" on the rear. Some of the height is from the spacers, some is from new front struts, and some is from the tires. Hard to say what I actually got for height, but I have driven it and at over 100kph on the highway I felt good and didn't get any wobbles, shakes, rattles or other unpleasantness. I still have yet to get an alignment since I just did all this on Saturday.

20210613_102230.jpg

I started a few days before installing the lift kit by putting WD40 on every bolt I knew I had to remove. Thanks to CR-Venturer I had a healthy fear of shearing a bolt...and it paid off. I got every bolt out that I needed to.

It was not without a bit of drama though.

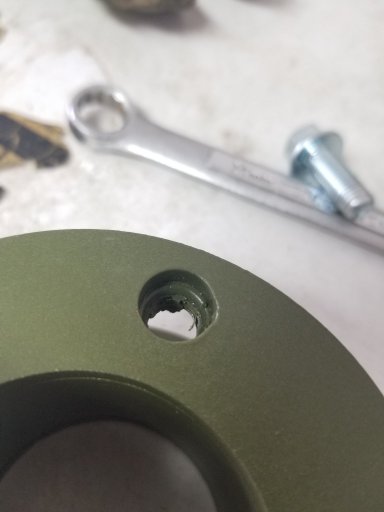
First, the spacers had too much paint in the threaded holes so the bolts had a tendency to cross-thread. I spent quite a bit of time cleaning that out and making sure that the bolts on all 4 spacers would go in easily. Having said that, they are pretty skookum spacers - I am happy with them for sure.
20210612_115459.jpg

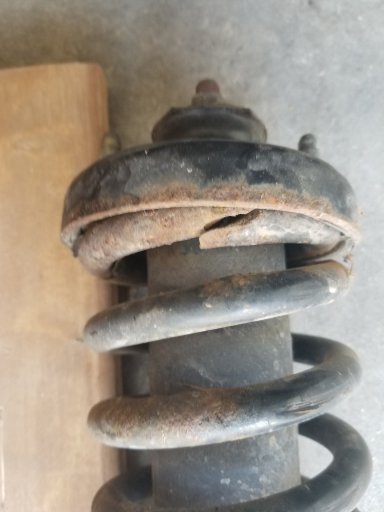
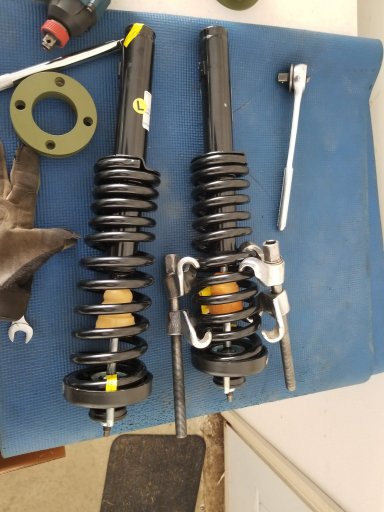
Then when I got the front strut out, I found that one had a broken coil.
20210612_112940.jpg

So I went off to Napa Auto and got front and rear struts. Munros. Not top quality I know, but better than a broken coil and the guy at Napa took pity on me and gave me a shop rate (I think) so is was $140 (vs $167) a side for the fronts. I also got two for the rear at $120 each (vs $155) just in case. Turns out I didn't need them since the rear struts looked much newer than the fronts. Probably they have been changed out in the past and the coils looked beefier on the ones already on the CR-V than the replacements so I didn't put the new ones in.

Then I messed up with the new struts when I went to rotate the top hat 90 degrees. It was hard to get spring compressors small enough to get into the coils, and I ended up using a rented set on an angle. I am sure that was not the safest idea and I don't recommend it. I compressed the springs and then removed the top nut - another bad idea because it was not necessary to remove the nut AND it was a real challenge to get it back together again. Also I was afraid the whole time I had the spring compressed because I know if it comes apart it is a really dangerous thing. For the other front strut I just compressed the springs and then pried the top hat around 90 degrees - no need to remove the nut at the top. Much safer for sure.
20210612_132113.jpg

Overall I am really happy. It drives well, the HRG spacers are good. I didn't follow the instructions completely - I found it easier to lift the entire end I was working on using jack stands, then drop the sway bar completely, then undo both sides. That gave me the room to for the strut + spacer in. In the HRG video he kicks the front strut to get it to drop into the forked yoke. That didn't work at all for me so I put the yoke on the strut and still had no trouble putting the bottom bolt through the yoke (or whatever it is called). Also in the video he puts the rear spacer on without removing the rear strut. Having found a broken front coil I decided to pull out the rear strut out and take a good look. I was going to swap them out so this made sense to me. I ended up putting them back in, but this is not quite how the instruction video says to do it. Having said that, the written instructions do say to remove the rear strut. It is easy to do anyway.

I am not a mechanic, I had to borrow quite a few tools (breaker bars, heavy duty impact driver, jack stands, spring compressors, and a garage to work in) but I still say that this is a job anyone can do. It took me probably 8 solid hours. And I took my time and was cautious. I could not have done it in a driveway without a lot more planning.

Overall I feel much better about bouncing down some FSRs and not hitting quite so many rocks with my resonator. Plus, I do not have a skid plate (yet). I think I need to get out camping and stop messing about with the CR-V.
 

EastVanGuy

Rank I

Enthusiast I

231
British Columbia, Canada
First Name
Guy
Last Name
Moody
Here's how it looks currently. Getting new tires on the 17th that will give it another inch or so of lift.

Overview of the engine, showing my loudspeaker on the left:

Driver side engine mount, showing the spacers:

Passenger side mount, harder to see as it's buried down beside the transmission dip stick:

Reroute of the tranny breather into the airbox. Super kludgy at the moment, but the electrical tape is only temporary until I have time to get in there and seal it nicely with epoxy:
Thanks for posting all of this. Super useful to see the pics for the transmission breather. Do you think I need the engine spacers too? So far the CR-V drives well and I get no unpleasantness like you did above 100kph.

What is the loud speaker for? Doesn't look stock :)
 

CR-Venturer

Rank VI
Launch Member

Traveler III

3,372
Ardrossan, AB, Canada
First Name
Jas
Last Name
Spr
Member #

16340

I
Ok, well I got the HRG spacers in and the 215/75r15 tires mounted on my now blacked-out rims and this is how it all looks now. Overall I think I got well over 2" on the front and about 2" on the rear. Some of the height is from the spacers, some is from new front struts, and some is from the tires. Hard to say what I actually got for height, but I have driven it and at over 100kph on the highway I felt good and didn't get any wobbles, shakes, rattles or other unpleasantness. I still have yet to get an alignment since I just did all this on Saturday.

View attachment 201594

I started a few days before installing the lift kit by putting WD40 on every bolt I knew I had to remove. Thanks to CR-Venturer I had a healthy fear of shearing a bolt...and it paid off. I got every bolt out that I needed to.

It was not without a bit of drama though.

First, the spacers had too much paint in the threaded holes so the bolts had a tendency to cross-thread. I spent quite a bit of time cleaning that out and making sure that the bolts on all 4 spacers would go in easily. Having said that, they are pretty skookum spacers - I am happy with them for sure.
View attachment 201595

Then when I got the front strut out, I found that one had a broken coil.
View attachment 201596

So I went off to Napa Auto and got front and rear struts. Munros. Not top quality I know, but better than a broken coil and the guy at Napa took pity on me and gave me a shop rate (I think) so is was $140 (vs $167) a side for the fronts. I also got two for the rear at $120 each (vs $155) just in case. Turns out I didn't need them since the rear struts looked much newer than the fronts. Probably they have been changed out in the past and the coils looked beefier on the ones already on the CR-V than the replacements so I didn't put the new ones in.

Then I messed up with the new struts when I went to rotate the top hat 90 degrees. It was hard to get spring compressors small enough to get into the coils, and I ended up using a rented set on an angle. I am sure that was not the safest idea and I don't recommend it. I compressed the springs and then removed the top nut - another bad idea because it was not necessary to remove the nut AND it was a real challenge to get it back together again. Also I was afraid the whole time I had the spring compressed because I know if it comes apart it is a really dangerous thing. For the other front strut I just compressed the springs and then pried the top hat around 90 degrees - no need to remove the nut at the top. Much safer for sure.
View attachment 201597

Overall I am really happy. It drives well, the HRG spacers are good. I didn't follow the instructions completely - I found it easier to lift the entire end I was working on using jack stands, then drop the sway bar completely, then undo both sides. That gave me the room to for the strut + spacer in. In the HRG video he kicks the front strut to get it to drop into the forked yoke. That didn't work at all for me so I put the yoke on the strut and still had no trouble putting the bottom bolt through the yoke (or whatever it is called). Also in the video he puts the rear spacer on without removing the rear strut. Having found a broken front coil I decided to pull out the rear strut out and take a good look. I was going to swap them out so this made sense to me. I ended up putting them back in, but this is not quite how the instruction video says to do it. Having said that, the written instructions do say to remove the rear strut. It is easy to do anyway.

I am not a mechanic, I had to borrow quite a few tools (breaker bars, heavy duty impact driver, jack stands, spring compressors, and a garage to work in) but I still say that this is a job anyone can do. It took me probably 8 solid hours. And I took my time and was cautious. I could not have done it in a driveway without a lot more planning.

Overall I feel much better about bouncing down some FSRs and not hitting quite so many rocks with my resonator. Plus, I do not have a skid plate (yet). I think I need to get out camping and stop messing about with the CR-V.
I hate to tell you this, but there's no need to mess with the top hats at all other than just bolting on the spacers when you buy the whole strut assembly. In the end, it all worked out though, and it looks awesome! I think you'll find that the new struts and the extra 2" makes a world of difference off road.

I noticed that the front struts you bought are indeed the type with the tacked on stopper blocks rather than a proper shoulder or collar. I have the same ones, and so far they've given me no trouble, but my advice is don't drive too fast off road.

Ben from HRG sheared one clean off and had the strut tube resting on the axle shaft, but then he was racing in a rally at the time probably doing 80-100kph off road, so as long as you're driving at sensible speeds it's probably fine lol Congrats on the upgrades, and glad to hear you have no wobbles!
 

CR-Venturer

Rank VI
Launch Member

Traveler III

3,372
Ardrossan, AB, Canada
First Name
Jas
Last Name
Spr
Member #

16340

Thanks for posting all of this. Super useful to see the pics for the transmission breather. Do you think I need the engine spacers too? So far the CR-V drives well and I get no unpleasantness like you did above 100kph.

What is the loud speaker for? Doesn't look stock :)
If you aren't getting axle wobble, you don't need the engine drop spacers, no worries on that.

Glad I could be of assistance :D Being an RD1 CR-V enthusiast can be a lonely thing at times lol

The CB radio I installed had a PA function, so when I found a cheap loudspeaker on Craigslist, I figured heck, why not? It isn't the loudest since it doesn't have independent amplification, but it's loud enough to be useful for communication with a spotter or other such situation when I crank the radio's volume to max. I think I paid $9 for the speaker.
 

EastVanGuy

Rank I

Enthusiast I

231
British Columbia, Canada
First Name
Guy
Last Name
Moody
I
Ok, well I got the HRG spacers in and the 215/75r15 tires mounted on my now blacked-out rims and this is how it all looks now. Overall I think I got well over 2" on the front and about 2" on the rear. Some of the height is from the spacers, some is from new front struts, and some is from the tires. Hard to say what I actually got for height, but I have driven it and at over 100kph on the highway I felt good and didn't get any wobbles, shakes, rattles or other unpleasantness. I still have yet to get an alignment since I just did all this on Saturday.

View attachment 201594

I started a few days before installing the lift kit by putting WD40 on every bolt I knew I had to remove. Thanks to CR-Venturer I had a healthy fear of shearing a bolt...and it paid off. I got every bolt out that I needed to.

It was not without a bit of drama though.

First, the spacers had too much paint in the threaded holes so the bolts had a tendency to cross-thread. I spent quite a bit of time cleaning that out and making sure that the bolts on all 4 spacers would go in easily. Having said that, they are pretty skookum spacers - I am happy with them for sure.
View attachment 201595

Then when I got the front strut out, I found that one had a broken coil.
View attachment 201596

So I went off to Napa Auto and got front and rear struts. Munros. Not top quality I know, but better than a broken coil and the guy at Napa took pity on me and gave me a shop rate (I think) so is was $140 (vs $167) a side for the fronts. I also got two for the rear at $120 each (vs $155) just in case. Turns out I didn't need them since the rear struts looked much newer than the fronts. Probably they have been changed out in the past and the coils looked beefier on the ones already on the CR-V than the replacements so I didn't put the new ones in.

Then I messed up with the new struts when I went to rotate the top hat 90 degrees. It was hard to get spring compressors small enough to get into the coils, and I ended up using a rented set on an angle. I am sure that was not the safest idea and I don't recommend it. I compressed the springs and then removed the top nut - another bad idea because it was not necessary to remove the nut AND it was a real challenge to get it back together again. Also I was afraid the whole time I had the spring compressed because I know if it comes apart it is a really dangerous thing. For the other front strut I just compressed the springs and then pried the top hat around 90 degrees - no need to remove the nut at the top. Much safer for sure.
View attachment 201597

Overall I am really happy. It drives well, the HRG spacers are good. I didn't follow the instructions completely - I found it easier to lift the entire end I was working on using jack stands, then drop the sway bar completely, then undo both sides. That gave me the room to for the strut + spacer in. In the HRG video he kicks the front strut to get it to drop into the forked yoke. That didn't work at all for me so I put the yoke on the strut and still had no trouble putting the bottom bolt through the yoke (or whatever it is called). Also in the video he puts the rear spacer on without removing the rear strut. Having found a broken front coil I decided to pull out the rear strut out and take a good look. I was going to swap them out so this made sense to me. I ended up putting them back in, but this is not quite how the instruction video says to do it. Having said that, the written instructions do say to remove the rear strut. It is easy to do anyway.

I am not a mechanic, I had to borrow quite a few tools (breaker bars, heavy duty impact driver, jack stands, spring compressors, and a garage to work in) but I still say that this is a job anyone can do. It took me probably 8 solid hours. And I took my time and was cautious. I could not have done it in a driveway without a lot more planning.

Overall I feel much better about bouncing down some FSRs and not hitting quite so many rocks with my resonator. Plus, I do not have a skid plate (yet). I think I need to get out camping and stop messing about with the CR-V.
I hate to tell you this, but there's no need to mess with the top hats at all other than just bolting on the spacers when you buy the whole strut assembly. In the end, it all worked out though, and it looks awesome! I think you'll find that the new struts and the extra 2" makes a world of difference off road.

I noticed that the front struts you bought are indeed the type with the tacked on stopper blocks rather than a proper shoulder or collar. I have the same ones, and so far they've given me no trouble, but my advice is don't drive too fast off road.

Ben from HRG sheared one clean off and had the strut tube resting on the axle shaft, but then he was racing in a rally at the time probably doing 80-100kph off road, so as long as you're driving at sensible speeds it's probably fine lol Congrats on the upgrades, and glad to hear you have no wobbles!
Sorry to say, but I found that I had to rotate the top hat because the spacer is only one inch high and there's not enough room for the bolts and that's according also to the hrg printed instructions that came with the order so unfortunately I did have to do the rotation of the top hat. I think in the video that Ben is installing a front spacer, he's installing a taller spacer where the bolts don't hit and so therefore you don't have to rotate the top hat like I did. I'm not sure I understand the weakness in the strut that I bought with the tacked on stopper block. I assume you are referring to the bottom end of the strut. Fortunately I am not an aggressive driver off-road - more of a rubbernecker enjoying the scenery rather than bashing through the bush and breaking things and stranding myself. Thanks for the head's up though should the urge to test the strength of that tack ever come over me :).
 

EastVanGuy

Rank I

Enthusiast I

231
British Columbia, Canada
First Name
Guy
Last Name
Moody
And now I get the loud speaker. Actually looks like a useful addition.

Tell me, with your platform in the back, can you fold the seats down for a bed? Or did you opt for more storage space and plan to sleep in a tent always?
 

CR-Venturer

Rank VI
Launch Member

Traveler III

3,372
Ardrossan, AB, Canada
First Name
Jas
Last Name
Spr
Member #

16340

And now I get the loud speaker. Actually looks like a useful addition.

Tell me, with your platform in the back, can you fold the seats down for a bed? Or did you opt for more storage space and plan to sleep in a tent always?
I can get them pretty close to flat, maybe not quite all the way, although I had some junk in the car that was maybe interfering. In any case, it's flat enough that I could for sure sleep in it in a pinch.

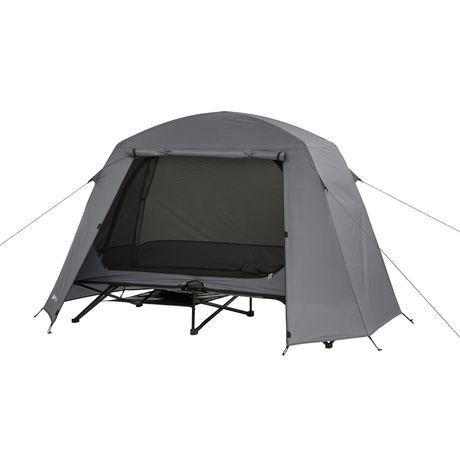
Having said that, I considered the option of sleeping in the car early on and looked at various options, but ultimately I decided that it would be a lot of work to address ventilation issues (would have to make bug screens of some sort to go in the windows) and I would need to get window visors to keep the rain out when the windows were open for ventilation, and then on top of that I would have to come up with a privacy solution, like window shades or curtains of some kind. Instead, I found an Ozark Trail cot tent on sale at WalMart for $50 and bought it.

I absolutely love it, and it's been subjected to fairly heavy rains over multiple days and shed the water like nothing, so I'm very happy with it.

I also considered a rooftop tent, and although I haven't ruled out that possibility forever, I decided that was not a great option either due partly to cost, but most importantly due to weight and space constraint. Being such a small vehicle, size and weight constraints on gear are critical.
 

CR-Venturer

Rank VI
Launch Member

Traveler III

3,372
Ardrossan, AB, Canada
First Name
Jas
Last Name
Spr
Member #

16340

Sorry to say, but I found that I had to rotate the top hat because the spacer is only one inch high and there's not enough room for the bolts and that's according also to the hrg printed instructions that came with the order so unfortunately I did have to do the rotation of the top hat. I think in the video that Ben is installing a front spacer, he's installing a taller spacer where the bolts don't hit and so therefore you don't have to rotate the top hat like I did. I'm not sure I understand the weakness in the strut that I bought with the tacked on stopper block. I assume you are referring to the bottom end of the strut. Fortunately I am not an aggressive driver off-road - more of a rubbernecker enjoying the scenery rather than bashing through the bush and breaking things and stranding myself. Thanks for the head's up though should the urge to test the strength of that tack ever come over me :).
I'm trying to remember, but I feel like I just cut the top hat mounting bolts a bit shorter on mine. I had the 2" kit from HRG and I didn't have to mess with the strut springs or top hats at all.

Yes, you are correct, the bottom of the strut where it plugs into the collar on the fork that bolts onto the lower control arm. A severe upward shock on that little welded stopper tab can shear it off. Like I said, pretty sure that it's a non-issue when you're not hitting a rock or a deep pot hole at 100+kph in a rally race lol just something to be aware of. I don't exactly drive like a granny, even off road, and I've never had an issue, so probably no big deal.

My tent, for reference:
OZTRail tent.jpg
 
Last edited:

MBDSRD1

Rank I

Enthusiast I

231
PNW
First Name
M
Last Name
B
I'm new here, but I wanted to tip my hat to you guys and introduce myself. I ended up joining OB due to your "Ganbaru" rig post(definitely jealous of the cool factor you guy have going). In the process of bringing my first gen CR-V back to working order and this thread has been huge in both knowledge base and inspiration. I'm also a dad so don't have the budget that other adventurers may have, thus your Ghettoverlanding is just my style haha. Thanks fellas. Looking forward to watching and continuing to learn from you guys!
 

CR-Venturer

Rank VI
Launch Member

Traveler III

3,372
Ardrossan, AB, Canada
First Name
Jas
Last Name
Spr
Member #

16340

I'm new here, but I wanted to tip my hat to you guys and introduce myself. I ended up joining OB due to your "Ganbaru" rig post(definitely jealous of the cool factor you guy have going). In the process of bringing my first gen CR-V back to working order and this thread has been huge in both knowledge base and inspiration. I'm also a dad so don't have the budget that other adventurers may have, thus your Ghettoverlanding is just my style haha. Thanks fellas. Looking forward to watching and continuing to learn from you guys!
Awesome! Welcome to CR-V Nation! :D I'm honored and thrilled I could be an inspiration to anyone with my rusty old Honda lol

In all honesty, I think that just as I did, you'll find yourself falling more in love with the old V as you take it out on adventures. It will surprise you at how capable it is at getting out there.

I've also got a surprise coming on the 17th, so stay tuned for that. :D
 

EastVanGuy

Rank I

Enthusiast I

231
British Columbia, Canada
First Name
Guy
Last Name
Moody
@EastVanGuy I forgot to mention, your rig looks sick. Looking forward to what else you have planned.
Awesome! Welcome to CR-V Nation! :D I'm honored and thrilled I could be an inspiration to anyone with my rusty old Honda lol

In all honesty, I think that just as I did, you'll find yourself falling more in love with the old V as you take it out on adventures. It will surprise you at how capable it is at getting out there.

I've also got a surprise coming on the 17th, so stay tuned for that. :D
I am a newbie on this forum too, and CR-Venturer was a definite big inspiration and help with these additions. Thanks for noticing how good looking I am too :)

These vehicles are really capable for back country camping - no need for me to crawl over rocks and so on (I have friends who do that - everything eventually breaks even on their new jeeps). Instead, anyone in my family can drive this CR-V over rough roads and down small trails and it is small and light and can go around a lot of things. And not having to panic about fuel is wonderful. I can go hunting for days and not have to waste a half day driving many kilometers to find the only gas station that is open in the remote part of the province I am in.

Also, I have bug screens that fit my windows and vents to keep out the rain so sleeping inside is great. Having said that, CR-Venturer's tent looks comfy too. Gotta be prepared for rain where we live - there is a lot of it at times.
 
  • Like
Reactions: MBDSRD1

MBDSRD1

Rank I

Enthusiast I

231
PNW
First Name
M
Last Name
B
It's actually a car that I've had for over 15 years now. The last few years, it had some starting issues that I was never able to get diagnosed, despite taking it to three different mechanics. She ended up sitting for about a year and a half in the driveway. Due to some recent lock down boredom, decided to check it and had a whiskey fueled "A-ha!" moment haha. It was the dang alarm immobilizer! Now that she's back to life, I'm making progress on squaring away to make it both my daily driver and my family adventure rig.

Can't wait to see what else you've got up your sleeve. I'll be posting up my rig in the Member Rides section hopefully soon and I'll get to do some show and tell. There are plenty of the 4Runner and Tacos in this hobby but I love seeing our Vs being brought out to work their magic.
 

EastVanGuy

Rank I

Enthusiast I

231
British Columbia, Canada
First Name
Guy
Last Name
Moody
Funny you should have had problems with the alarm. I had a parasitic leak that was hard to pinpoint and eventually left my daughter stranded in another city while she hunted for a battery replacement. She ended up yanking the entire alarm system out and that solved all our problems. Who needs an alarm anyway? It is not a rig that is likely to appeal to a car thief.
 

MBDSRD1

Rank I

Enthusiast I

231
PNW
First Name
M
Last Name
B
I am a newbie on this forum too, and CR-Venturer was a definite big inspiration and help with these additions. Thanks for noticing how good looking I am too :)

These vehicles are really capable for back country camping - no need for me to crawl over rocks and so on (I have friends who do that - everything eventually breaks even on their new jeeps). Instead, anyone in my family can drive this CR-V over rough roads and down small trails and it is small and light and can go around a lot of things. And not having to panic about fuel is wonderful. I can go hunting for days and not have to waste a half day driving many kilometers to find the only gas station that is open in the remote part of the province I am in.

Also, I have bug screens that fit my windows and vents to keep out the rain so sleeping inside is great. Having said that, CR-Venturer's tent looks comfy too. Gotta be prepared for rain where we live - there is a lot of it at times.
I'm definitely loving it for my family daily driver. Previously, I was stuck in a tiny sedan so more often that not, we took my wife's Crosstrek. Nowadays, I'm more than happy with the amount of room we have for all of our outdoor gear.

I see your in BC, just like CR-Venturer. Are as you as far north as he is? I'm in the Seattle area so only a stone's throw from your guys' border.... if it ever opens back up.
 

CR-Venturer

Rank VI
Launch Member

Traveler III

3,372
Ardrossan, AB, Canada
First Name
Jas
Last Name
Spr
Member #

16340

In skimming over this thread, I realized that I neglected to mention and show one of the most critical mods I've made to the CR-V!

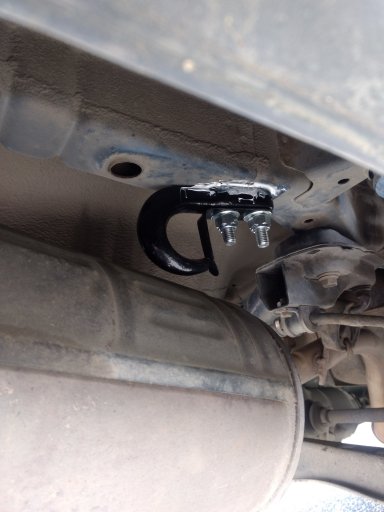
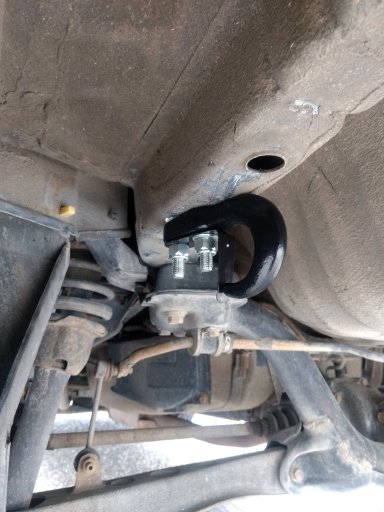
Namely, two 10,000lb rated recovery hooks bolted into the rear "frame rails" of the unibody:
Recovery2.jpg
Recovery1.jpg
These are bolted into the holes where a hitch receiver would be mounted. If I ever need recovery or need to tow or snatch someone, I use a bridle linked between them to attach the strap. This is to spread the load between the two points instead of relying on only one. The white goop is sealant i added to ensure it didn't rust. I also sprayed the holes with paint, as I had to widen them slightly to fit the bolts.

If you have a hitch receiver, you just need to get a shackle mount to insert into it. Never recover off a tow ball! In my opinion, a 2" hitch receiver would be preferable to what I have here, however once again the budget intervened. These were like $15 at princess auto for the pair, while the hitch receiver was a couple hundred at least.

I have used these recovery points before, and they have held up just fine, but as I mentioned, if you have the cash, the 2" hitch receiver with a shackle mount is a better option for ultility, and is probably marginally better overall, as it spreads between three points, since it bolts into the tiedown point in the middle under the tub.
 

EastVanGuy

Rank I

Enthusiast I

231
British Columbia, Canada
First Name
Guy
Last Name
Moody
CR-Venturer is a lot farther north. I am in Vancouver, so I can almost see your house from mine :)

Yeah, an open border would be nice. Getting back to normal would be nice. I can see the light at the end of the tunnel and when it is done I will happily be heading to the interior (currently we are supposed to limit travel in the province) and when it is clear, south too.