15 Taco Build

  • HTML tutorial

1000Taco0001

Rank IV
Launch Member

Enthusiast III

1,345
Colorado Springs, El Paso County, Colorado, United States
First Name
Josh
Last Name
Nalley
Member #

10711

Ham/GMRS Callsign
N0AFK
This is how my truck looked when I initially purchased it with only 8000 miles in 2016.

My chosen rig is a Generation 2, 2015 Toyota Tacoma Off-road (I wanted the rear locker)
Below the photo you will find all the additional things I have added to the truck.
(I used to have links to all of it, but unfortunately the post will not save with so many links)

1554781050406.png
  • Armor
    • Mobtown
      • IFS with reinforcement ribs (Aluminum) - Painted black
      • TC Skid (Aluminum) - Painted black
      • Transmission Skid with reinforcement ribs (Aluminum) - Painted black
    • RCI
      • Rear Diff Skid (Steel) - (Black PC)
      • A-Arm Skids (Aluminum) -Painted black
      • Aluminum gas tank skid (painted black)
      • Sliders with fill plates (Black PC)
    • Relentless
      • Singray Lo-pro bumper
    • Slee *coming in July*
      • Rear Bumper with swing-out, w/ backup camera and Rotopax Mount
  • Suspension
    • (SOLD) Icon Stage 3 suspension (2.5' lift)
      • Icon Tubular Uniball UCAs + cover caps
      • 2.5 IFP Extended Travel Coil-overs + Neoprene Coil-Over wraps
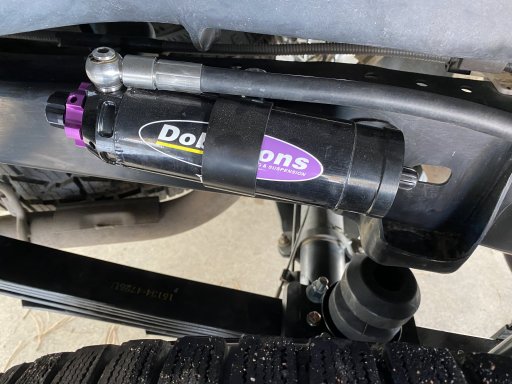
      • 2.0 Aluminum Rear Shocks w/ Res
      • Multi-Leaf Progressive Add A Leaf
    • (Upgraded) Dobinson's MRA adjustable setup for heavy load.
      • Black Coil Springs (just could not do the turquoise)
      • 2.1/4" Lift Selected the following:
        • 110-240LBS Front Coils (C59-352) (considered the MRA59-A220 but didn't want to end up pushing 3")
        • MRA59-A221 Front adjustable Struts
        • 213MM SEAT HEIGHT (Stock Seat Hight)
        • SC59-001 DOBINSONS STRUT TOP PLATES
        • BS59-560 DOBINSONS ADJUSTABLE FRONT BUMP-STOP KIT
        • MRA59-A940 Rear Shocks
        • L59-111-R DOBINSONS 2.1" LIFT 600LB CONSTANT LOAD HD
        • PB59-110K Bushing kit bundle
        • Greaseable Bolts for leaf bushings
      • SPC UPPER CONTROL ARMS (Considered the JBAs and almost went with Red Coils but the deal on SPC was too good)
      • Timbren Flipkit with new U-bolts and bumpstops
      • I'm had a BMC (Body Mount Chop) along with the install (no more rubbing!)
  • Wheels and tires
    • 17" Tacoma sport wheels (5)
      • 285 70 R 17 Blizzak Snowtires (Wider for better ice traction in winter. ) Spare is an off brand winter traction tire from LesSchwab
    • 17" TRD RockWarriorsin a 5 tire rotation (
      • 255/80 R 17 (Skinny for better summer trail running)
      • **17" Procomp Helldorado wheels and tires above were sold last summer.
  • Recovery
    • Warn 9.5xp-s (w/ contactor pack)
      • power interrupt kit and Mictuning internal switch on / off (great safety feature)
      • Tree Saver Straps
      • Tow Straps + Snatch Straps
      • Gator Jaw Shackles
      • Rear Hitch for D-Dring Shackles
      • Warn Winch Damper
  • Communications
    • Radio
      • AnyTone AT-778UV Dual Band Transceiver Mobile Radio VHF/Uhf Two Way Amateur Radio
    • Radio Antennas
      • Tram 140MHz-170MHz + 430MHz-470MHz Dual Band NMO Antenna
      • Youmei Dual Band NMO Antenna Small Cannon Style Antenna UHF/VHF 400-470/136-174MHz 50W for Car Radio
      • Diamond K400S-NMO Lip mount, 2-axis adjustable Antenna Vehicle Mount
    • WeBoost 471254
    • CB:
      • Uniden PRO505XL 40-Channel CB Radio. Pro-Series, Compact Design. Public Address (PA) Function. Instant Emergency Channel 9, External Speaker Jack, Large Easy to Read Display. - Black
    • CB Antenna
      • Firestik Fire-Flex Cable Assembly W/Low-Profile Fire-Ring and Stud (1) (will require you to solder the end, but makes it really nice to run it through the floor grommet.)
      • Firestik SS-3H Heavy Duty Stainless Steel Antenna Spring
      • FireStik FL3-B Three Foot FireFly Antenna With Tuneable Tip (Black)
      • Antenna/LED Pod Mount (Passenger Side) Fits 2005-2015 Toyota Tacoma
  • Wheels and tires
    • 17" Tacoma sport wheels (5)
      • 285 70 R 17 Blizzak Snowtires (Wider for better ice traction in winter. ) Spare is an off brand winter traction tire from LesSchwab
    • 17" TRD RockWarriorsin a 5 tire rotation
      • 255/80 R 17 (Skinny for better summer trail running)
      • **17" Procomp Helldorado wheels and tires above were sold last summer.
  • Recovery
    • Warn 9.5xp-s (w/ contactor pack)
      • power interrupt kit and Mictuning internal switch on / off (great safety feature)
      • Tree Saver Straps
      • Tow Straps + Snatch Straps
      • Gator Jaw Shackles
      • Rear Hitch for D-Dring Shackles
      • Warn Winch Damper
  • Communications
    • Radio
      • AnyTone AT-778UV Dual Band Transceiver Mobile Radio VHF/Uhf Two Way Amateur Radio
    • Radio Antennas
      • Tram 140MHz-170MHz + 430MHz-470MHz Dual Band NMO Antenna
      • Youmei Dual Band NMO Antenna Small Cannon Style Antenna UHF/VHF 400-470/136-174MHz 50W for Car Radio
      • Diamond K400S-NMO Lip mount, 2-axis adjustable Antenna Vehicle Mount
    • WeBoost 471254
    • CB:
      • Uniden PRO505XL 40-Channel CB Radio. Pro-Series, Compact Design. Public Address (PA) Function. Instant Emergency Channel 9, External Speaker Jack, Large Easy to Read Display. - Black
    • CB Antenna
      • Firestik Fire-Flex Cable Assembly W/Low-Profile Fire-Ring and Stud (1) (will require you to solder the end, but makes it really nice to run it through the floor grommet.)
      • Firestik SS-3H Heavy Duty Stainless Steel Antenna Spring
      • FireStik FL3-B Three Foot FireFly Antenna With Tuneable Tip (Black)
      • Antenna/LED Pod Mount (Passenger Side) Fits 2005-2015 Toyota Tacoma

Other than the original nerf bars that I put on, I have kept all original parts this way If I ever sell it the new owner can remove anything or return it to stock.


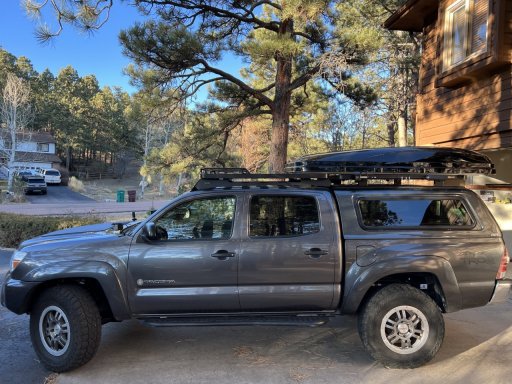
How she sits today:
IMG_8363.jpg


I have been keeping a build thread with various installations over on Tacoma World if you are interested in checking out installations etc.
@Instagram 1000.taco.0001 is where I post some photos of my adventures. I don't post everything I do, mainly because I forget and would rather just enjoy the time outdoors.
The posts below are mostly photos because I figured it would be better than a detailed install step by step. (and since most of has been done over the last 5 years it would be a long long write up) Feel free to ask questions or comments I will respond.
 
Last edited:

1000Taco0001

Rank IV
Launch Member

Enthusiast III

1,345
Colorado Springs, El Paso County, Colorado, United States
First Name
Josh
Last Name
Nalley
Member #

10711

Ham/GMRS Callsign
N0AFK
I decided I would edit a few previous posts since I had not had any input or comments from others...

Here are some photos of what it took to install my HAM and some USB ports.

Had to pull the radio and center console and run wires.


Z5. Putting it back.jpg

Z4.0. Running wires.jpg

Make a small cut in the center console to allow wiring for HAM.

ZZ3. -install radio in console 2.jpg

Then put it all back together

Z9. Radio Power On.jpg
Z9.1 USB power 1.jpg


I am unable to update my original post so if you want to see the mods and some of the progress I have it posted up on Tacoma World. :
 
Last edited:

1000Taco0001

Rank IV
Launch Member

Enthusiast III

1,345
Colorado Springs, El Paso County, Colorado, United States
First Name
Josh
Last Name
Nalley
Member #

10711

Ham/GMRS Callsign
N0AFK
Spod setup

pulled out the top console and ran the wires down passed the fuse box and out through the firewall.
1.remove console.jpg
2.run main wire.jpg
added an aluminum mount and installed the spod onto it and connected pos and neg to battery.
9.top without cover.jpg

010.alldone.jpg

installed the new switch panel into the center console (with MESO customs switch holder) and all done. :)

Spod Image 2.jpg
 

1000Taco0001

Rank IV
Launch Member

Enthusiast III

1,345
Colorado Springs, El Paso County, Colorado, United States
First Name
Josh
Last Name
Nalley
Member #

10711

Ham/GMRS Callsign
N0AFK
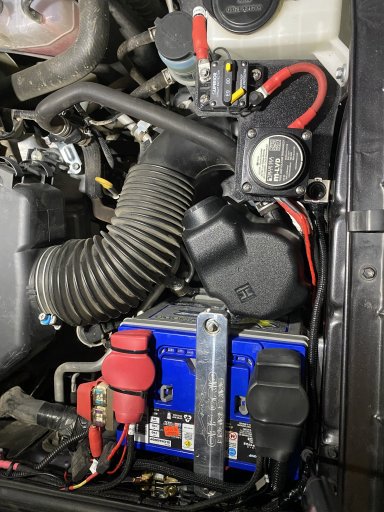
Dual Battery Setup with Redarc 1225D ...
I also purchased the dual battery kit from Offgrid Engineering.
Used two new Northstar batteries
IMG_20191214_192500.jpg

installed the mount over the wheel well on passenger side...
* note from lesson learned - the pop metal under the battery is not designed to hold the weight of a battery bouncing around and eventually the mount I used popped off I ended up bolting it down through the wheel well. Because the metal is light it may not hold over the long term, but it is mounted to the side wall so hopefully it works this time.

IMG_20190922_002839.jpg

IMG_20191220_155236 (1).jpg

added the new (prettier tiedown ;) ) to the main battery.

IMG_20191220_155230.jpg

All done

IMG_20191218_203302.jpg
 
  • Love
Reactions: REDARC_Ryan

1000Taco0001

Rank IV
Launch Member

Enthusiast III

1,345
Colorado Springs, El Paso County, Colorado, United States
First Name
Josh
Last Name
Nalley
Member #

10711

Ham/GMRS Callsign
N0AFK
Got tired of working under the hood with flashlights and added some KC lights!

I used some 15lb velcro. (overkill, but they don't come off no matter how much dirt they end up being coated in)

IMG_1448.jpg


IMG_1445.jpg

All done, Installed switch on the left side firewall.
60888131898__A1E1E468-FFD0-48FA-B9DB-4B485CAD88E8.jpg
 

1000Taco0001

Rank IV
Launch Member

Enthusiast III

1,345
Colorado Springs, El Paso County, Colorado, United States
First Name
Josh
Last Name
Nalley
Member #

10711

Ham/GMRS Callsign
N0AFK
Before I installed the cap and drawer system I had a trial and error/failure on fabricating (part me and part original guy that got the initial base setup)


Here are the design photos:
000doodie000 tacoma model thule.jpg000doodie000 tacoma model v20005.jpg000doodie000 tacoma model v20006.jpg000doodie000 tacoma model v20007.jpg

We did decide to remove the bars from the original design.
 

1000Taco0001

Rank IV
Launch Member

Enthusiast III

1,345
Colorado Springs, El Paso County, Colorado, United States
First Name
Josh
Last Name
Nalley
Member #

10711

Ham/GMRS Callsign
N0AFK
The initial outcome had several issues that I had to fix after receiving the "finished product"
  • The biggest problem, I paid for an all aluminum topper and received an all steel. (this thing is a beast/heavy)
  • The rear door was completely warped (from the way it was welded)
  • The door was not centered on the cap (it sat off center by 1/2 inch to the driver side)
  • the latches didn't fit right, and the hinges on the main door cam off.
  • The wrong handles were installed. (There were supposed to be t handles and a heavy duty latch system similar to what you would find on a truck cap)
  • It was also pretty beat up in shipping because the "crate" he built to ship it in was a 2 X 2 mounted underneath with a 2 by to screwed to the top and bottom diagonally from each other with a 2 by 2 cross member. (my 5th grader could have done better)
  • The latches were all rusted and bent in several places.
  • Because of the back and forth to just try to get him to ship it, he put pad locks on the doors and supplied no keys. (so I had to cut them off)
  • He did powder coat it (even though i asked him not to before shipping)
  • There were more issues, but sometimes you don't get what you paid for
Needless to say the guy who did it was in over his head and failed to deliver a quality product. I will state, fabrication takes talent and hard work so while the product was not as expected, nor on time, nor in budget. I was delivered something to work with and he did put some time into it. Just not to commercial expectations (even after many initial conversations about the end product and price)

I am an basic welder at best and definitely not great at fabrication, but my son and I gave it the old college try.

Here is a shot of it on my truck before I added the fixes. It does not look too bad from a distance.
whole truck.JPG
 
Last edited:

1000Taco0001

Rank IV
Launch Member

Enthusiast III

1,345
Colorado Springs, El Paso County, Colorado, United States
First Name
Josh
Last Name
Nalley
Member #

10711

Ham/GMRS Callsign
N0AFK
So I purchased the parts and went to town. Some of it is still a little off but it is way better than when I received it. The top opening door is also removable as well as the rear door is now removable. It still need some clean up, weather stripping, and a re-powder coat, but its heavy duty and once finished will be cool. I am just out of gas on it at the moment.

I mostly just set the pieces in place for the photos below to give a general idea of what the finished product should look like.
IMG_6312.jpg


IMG_6305.jpg


IMG_6306.jpg

this photo looks crooked, but its straighter than it was and its not as bad as it looks.


IMG_6309.jpg

Soo.. maybe not a failed project, but a work in progress that has run out of steam.
 

1000Taco0001

Rank IV
Launch Member

Enthusiast III

1,345
Colorado Springs, El Paso County, Colorado, United States
First Name
Josh
Last Name
Nalley
Member #

10711

Ham/GMRS Callsign
N0AFK
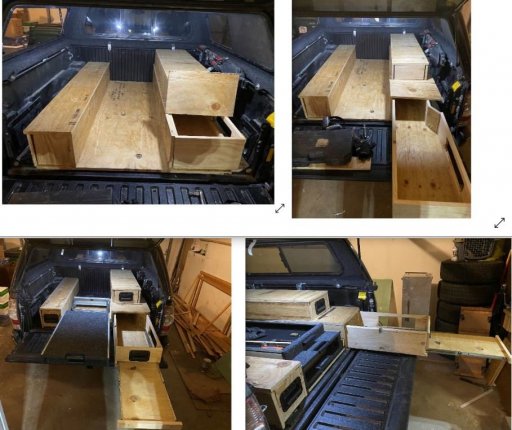
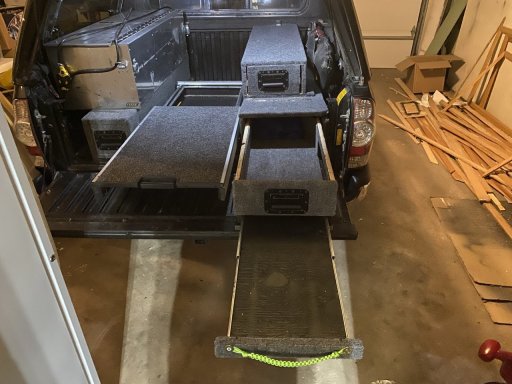
Sooo.. on to the cap and then drawer system... and added electrical setup to the rear of the truck (maybe add a diagram) ... then on to the small solar setup the truck now has as well as the Roof Racks and updated Suspension.

IMG_3171.jpg

whatsinbed.JPG
 
Last edited:

1000Taco0001

Rank IV
Launch Member

Enthusiast III

1,345
Colorado Springs, El Paso County, Colorado, United States
First Name
Josh
Last Name
Nalley
Member #

10711

Ham/GMRS Callsign
N0AFK
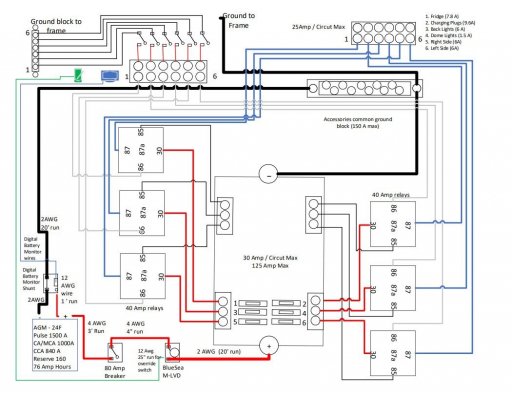
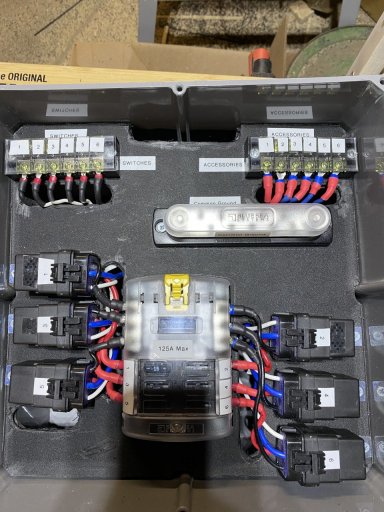
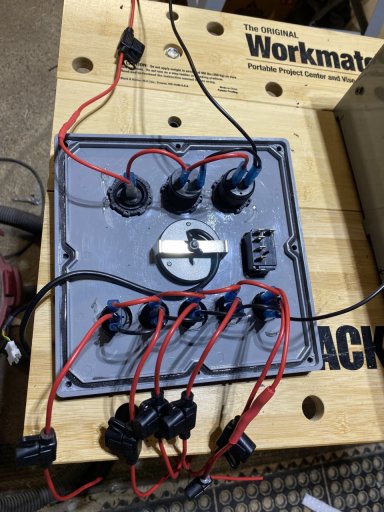
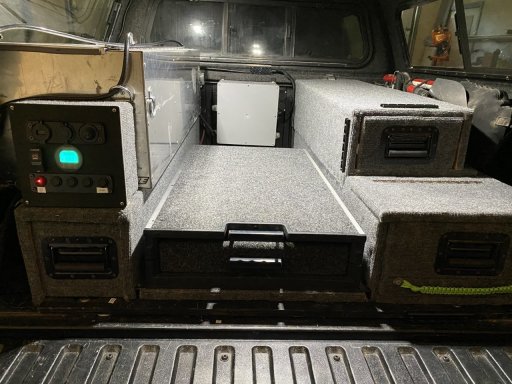
How I rand the wiring
Relay diagram.jpg
The top image here is the monitor and switches

This one here is the relay that is back in the bed.
IMG_5419.jpgIMG_5417.jpg

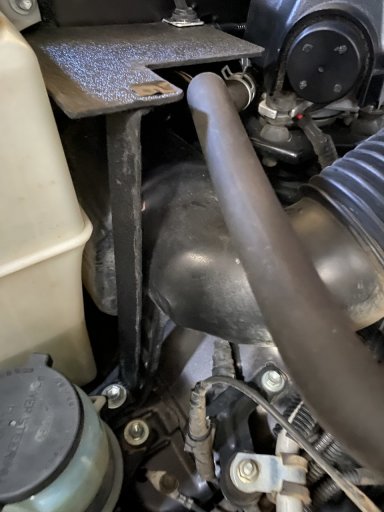
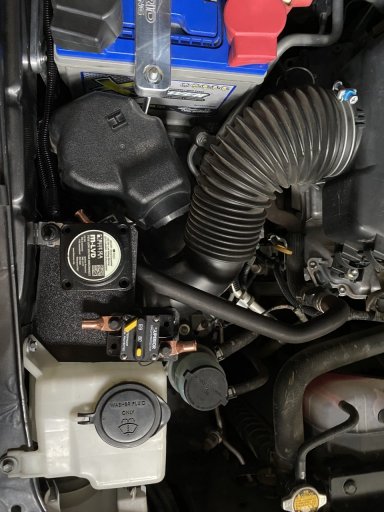
I have a dual battery setup in the front and had to mount the switch and cutoff under the hood.

IMG_5388.jpgIMG_5373.jpg
 
Last edited:

1000Taco0001

Rank IV
Launch Member

Enthusiast III

1,345
Colorado Springs, El Paso County, Colorado, United States
First Name
Josh
Last Name
Nalley
Member #

10711

Ham/GMRS Callsign
N0AFK
New suspension is now installed as well...

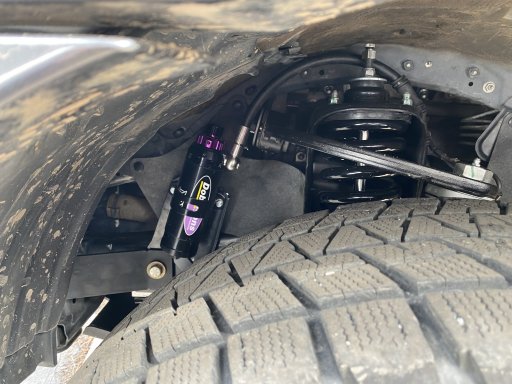
I upgraded from my original Icon setup. (Stage3). It was a great setup, but when my brother and I were out traveling I was overloading it and blew the seals on the rear driver side. (at just about 30 k miles) In checking out the rest of the shocks they were in need of a rebuild. So I figured I would sell the set and let someone else grab a great deal and get them rebuilt.

I changed over to a Dobinson MRA setup and I absolutely love it. ( I have about 5 k on them now )

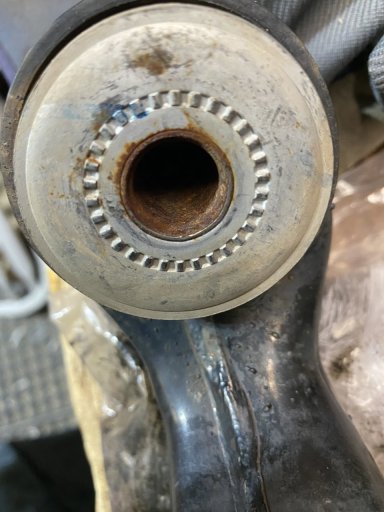
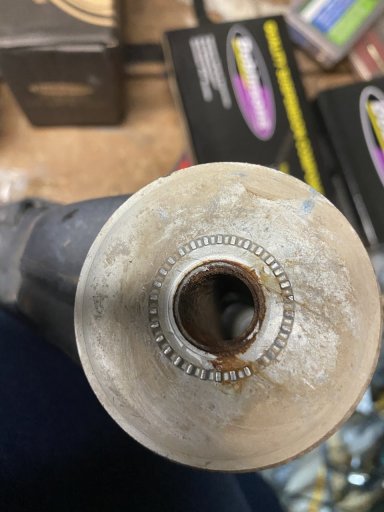
During the installation I learned a bit about our Tacoma UCAs as well. The bushings tend to rust and seize which makes it very difficult to align. My truck is only a little over 6 years and had just over 50k miles. The bolts came out (barely) the LCA ball bearing was also bad. (I could move it with my pinky) so I replaced the LCAs during the change as well. The shop I used recommended anti seize and I had them use it on the LCA and the rear bolts in the leaf springs rather than the greaseable bolts that came with the kit. I also used new bolts. (Why not while its all apart, if it’s worth doing, it’s worth doing it right.) I could have cleaned up the bolts but now I have a few spares.

I was a little disappointed in the Timbren flip kit as the U bolts were only 1/2 vs 5/8. In terms of time I went ahead and used them as it seems like a common size for the flip kits and not having a direct bend like the square 5/8 bolts it’s probably fine. (I will see about getting larger ones and replacing them since it’s an easy change to make now that it’s all back together.

here are a few photos of the LCA bushings.

497EA8C7-B2BE-4D10-A91B-6BE6D6468810.jpgE91F498B-4D2C-4E59-915F-3F5DB9DB2779.jpg

And a couple of shots installed
IMG-5879.JPGIMG-5884.JPG


How she sits as I'm loading up for travel...
IMG-8477.jpg

I am already a lot picture heavy.. so I will skip the photo of the cab mount chop and I will list the components I selected for my build in the next post.
 
Last edited:

1000Taco0001

Rank IV
Launch Member

Enthusiast III

1,345
Colorado Springs, El Paso County, Colorado, United States
First Name
Josh
Last Name
Nalley
Member #

10711

Ham/GMRS Callsign
N0AFK
Here is the parts list I chose...
  • Black Coil Springs (just could not do the turquoise)
  • Shooting for 2 - 2.5" Lift Selected the following:
    • 110-240LBS Front Coils (C59-352) (considered the MRA59-A220 but didn't want to end up pushing 3")
    • MRA59-A221 Front adjustable Struts
    • 213MM SEAT HEIGHT (Stock Seat Hight)
    • SC59-001 DOBINSONS STRUT TOP PLATES
    • BS59-560 DOBINSONS ADJUSTABLE FRONT BUMP-STOP KIT
    • MRA59-A940 Rear Shocks
    • L59-111-R DOBINSONS 2.1" LIFT 600LB CONSTANT LOAD HD
    • PB59-110K Bushing kit bundle
    • Greaseable Bolts for leaf bushings
  • SPC UPPER CONTROL ARMS (Considered the JBAs and almost went with Red Coils but the deal on SPC was too good)
  • Timbren Flipkit with new U-bolts and bumpstops
  • I'm also going to do a BMC along with the install (no more rubbing!)
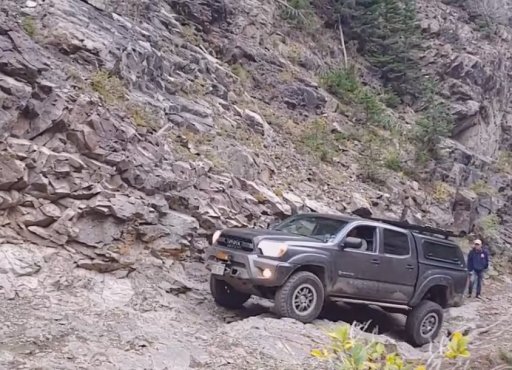
and a little flex on the trail...

flexin.jpg
 

1000Taco0001

Rank IV
Launch Member

Enthusiast III

1,345
Colorado Springs, El Paso County, Colorado, United States
First Name
Josh
Last Name
Nalley
Member #

10711

Ham/GMRS Callsign
N0AFK
Current task I am working on is a design for an internal topper support.
Probably overkill but I have been enjoying the design process. I'll post up some finished photos soon (maybe once I see if I can make a viable kit for folks so they have an easy diy kit)