WinterBus 1991 Mitsubishi Delica L300 Space Wagon Chamonix

  • HTML tutorial

feetforbrains

Rank IV
Launch Member

Advocate III

1,097
Vashon, WA 98070
First Name
MatthewAlan
Last Name
Thyer
Member #

10007

How do you like those BFG A/T's? Do they fit on the stock rims with stock height?

I've got a 94' L300 Exceed, was thinking of putting a set on there when it finally needs new shoes.
So, yeah, the best thing I could have put on this van turns out to be those BFG A/T KO2s. Quieter ride, no lift needed for that size (and I believe that my forward wheel wells are possibly more cluttered than yours), and about 2" of additional clearance relative to the tires that came on it from Japan. I've been running them at about 50 lbs pressure while they're rated for as much as 55. They're stiffer sidewalls are noticeable on potholes, but I'm pretty sure I can tweak that out (if I want to) by adjusting pressure.
 

feetforbrains

Rank IV
Launch Member

Advocate III

1,097
Vashon, WA 98070
First Name
MatthewAlan
Last Name
Thyer
Member #

10007

Ok, dumb question time...was that sold originally in the US? I don't remember the Mitsu ever coming with the shortened (non-US) bumper? I remember the bumper sticking out like 3 ft in front (ok, that's an exaggeration)!
Between 1986 and 1989 MMC sold in the USA a gas powered version of this rig called the Mitsubishi "Van." Mine currently has a 1989 windshield replacement seated in the front seal. It's an earlier generation than the L300s than mine. The bull bar extends about an inch and a half in front of the cladding on the bumper on my L300. The G2s had a big VW style bumper on their front that you could step on, but 3' seems hyperbolic.

All of that said, if you see a US licensed L300 on the road, you're looking at a vehicle that was either imported to Canada and then the US or directly from Japan. Mine came straight from Kyoto.
 

feetforbrains

Rank IV
Launch Member

Advocate III

1,097
Vashon, WA 98070
First Name
MatthewAlan
Last Name
Thyer
Member #

10007

This next big question: what to do about the spare?

The Problem: I bumped tire size to a respectable 30.5" diameter, which the van accommodates admirably, however I can no longer mount the spare in the rear cage located behind the rear axle. I can cram the wheel and tire in the cage, but the width of the new rubber (inflated) is greater than the space available. Basically, the rubber will rub on the sway bar.

Solutions:
  1. Deflate the spare and remount the cage. With some muscle I can get it in there, but the spare has to be deflated significantly to make this happen. Maybe I should be looking at an ARB pump installation?
  2. Adapt a rear bumper with swing-out storage. Long term this solution is what I favor. This keeps the weight of the wheel in the back and lower than the roof. While preserving the van's driving characteristics, I'd actually be expanding its storage. The challenge here is finding something that can be adapted (while looking good) and which doesn't break the bank.
  3. Bolt it to the roof. Okay, to a rack on the roof. I dislike this idea because its literally adding about 50 lbs plus the weight of the rack to the top of the van. I'm not too worried about raising the center of gravity this way, but increasing sway is another concern already. The advantage here is that I could have it done as early as next week for relatively less money.
  4. Bull bar replacement. MMC made a replacement bull bar for their classic wrap arounds back in the 90's centered around spare storage. I actually have a line on one should I decide to pull the trigger. Advantages here are that it's easy storage, out of the way, and designed for the van. Disadvantages are that I'd lose the stock bull bar, collect a bunch of junk between the tire and the front of the van, and potentially change the handling of the van.
 

feetforbrains

Rank IV
Launch Member

Advocate III

1,097
Vashon, WA 98070
First Name
MatthewAlan
Last Name
Thyer
Member #

10007

I'm fairly certain I've seen that thing b4 out on the gorge ( or it has a twin running around )
Not me, but yeah I've seen the guy. He likes to climb in Frenchman's Coulee. I believe he's got a 1990 Super Exceed with Crystal Lite roof, but I could be wrong. Mine is a hardtop Chamonix.
 

feetforbrains

Rank IV
Launch Member

Advocate III

1,097
Vashon, WA 98070
First Name
MatthewAlan
Last Name
Thyer
Member #

10007

Spent a bunch of time in guts today. I've made a decision to delete the EGR so some of that was poking around to size that project. Plus, I cleaned the top of the head and the area around the turbo since there's a crap load of oily gunk around there.

Finally, answered a question that's been bothering me. This little switch on the IP apparently turns off the AC when RPMs get high. When the weather warms up a tad I'm going to test it.


Sent from my Pixel 2 using Tapatalk
 

feetforbrains

Rank IV
Launch Member

Advocate III

1,097
Vashon, WA 98070
First Name
MatthewAlan
Last Name
Thyer
Member #

10007

It's especially rainy today, but the materials I bought to complete an EGR delete showed up late yesterday afternoon, so I'm going to look for a break in the downpour and hope for the best. Maybe tidy up the garage in the meantime.

Yeah, I do plan on removing the EGR on my 4D56t. I have a couple of reasons to do this. First, longevity. As we're all keenly aware a 26-year-old JDM vehicle can make it difficult to find parts. While the EGR is great for combusting otherwise inert NOx emissions it's otherwise a long-term murder tube for your engine. I've already got about 135k on the odometer and there's plenty of gunk on the intake, the sooner this happens the better.

Second, Felix at Dino EVO did this on his second transcontinental build to great effect. Once I've got the plates in I'm hoping to clear out carbon to replicate this aspect of his project.
 

feetforbrains

Rank IV
Launch Member

Advocate III

1,097
Vashon, WA 98070
First Name
MatthewAlan
Last Name
Thyer
Member #

10007

Okay, the EGR delete is done. It's a time-consuming thing, but not too difficult to make happen.

1) Remove driver's side seat.
2) Remove turbo bay cover
3) Remove air intake channel (including steel middle with 2x 12mm bolts)
4) Unplug all vacuum tubes
5) Detach two 12mm bolts from top of EGR which hold the EGR valve assembly to the turbo
6) Remove both 12mm nuts and washers which hold the lower end EGR to the exhaust manifold
7) Remove EGR assembly from engine bay
8) Use EGR assembly (the seals work really well for this) to template delete plates
9) Fabricate delete plates top and bottom
10) Install delete plates top and bottom
- I repurposed the 12mm bolts that hold the EGR valve to the EGR intake to mount the upper EGR delete plate to the turbo
- The lower nuts and washers will fit over the existing studs on the manifold
11) Reverse steps 4 to 1 and test the engine


nickburt

Rank VII
Launch Member

Creator III

5,613
Wallasey, Wirral. UK
First Name
Nick
Last Name
Burt
Member #

2714

Does yours have an EGR cooler too? If so, I would suggest removing it as well - they have been known to fail and allow exhaust gasses into the cooling water.
 

feetforbrains

Rank IV
Launch Member

Advocate III

1,097
Vashon, WA 98070
First Name
MatthewAlan
Last Name
Thyer
Member #

10007

Does yours have an EGR cooler too? If so, I would suggest removing it as well - they have been known to fail and allow exhaust gasses into the cooling water.
Nope, if it did then I'd be a lot happier to leave it in.

Sent from my Pixel 2 using Tapatalk
 

feetforbrains

Rank IV
Launch Member

Advocate III

1,097
Vashon, WA 98070
First Name
MatthewAlan
Last Name
Thyer
Member #

10007

Updates:

Turn Signal Relay: went bad late in February. I troubleshot this all on my own and ended up replacing the relay which is located behind the glovebox. Took about three weeks to get the new part in from Japan. The good news is that it was the relay (my diagnosis was spot on) and so not I have functioning two and four-ways. Completed the repair last Monday.

Torsion Bars: Hey guess what, these things can sag over time. Last Friday I spent some time at the shop with the van on the stand and tightened these (three turns each side). Raised the front-end to level and bonus, no more bottoming out on the bumps.

The bad news here is that the shocks, while not 27 years old, look and feel soft. The bushings are cracked too. I'll be replacing these front and back before too long.


feetforbrains

Rank IV
Launch Member

Advocate III

1,097
Vashon, WA 98070
First Name
MatthewAlan
Last Name
Thyer
Member #

10007

Oh yeah, one more thing.

The fuel lifter pump cable came loose from the IP throttle control arm. I was driving around wondering why it was such a gutless wonder until I realized this had happened. Simple fix, replace the nut and bolt that connects the two together and suddenly power.
 

HellsAngler

Rank V
Launch Member

Enthusiast III

Do you have a part # for your air filter? I put in a KN filter almost a year ago but it doesnt have the fins. neither did the stock filter i replaced. wondering if im missing out on any vortex/forced air not having them
 

nickburt

Rank VII
Launch Member

Creator III

5,613
Wallasey, Wirral. UK
First Name
Nick
Last Name
Burt
Member #

2714

My L200 (Triton) filter is a K&N Apollo, which is a pretty much a generic induction kit. Works well with a snorkel.

Assuming your air filter is the same as used on the 4D56 engine in the L200 (Triton) - K&N used to do one (without vortex fins), but I can't find it now - maybe they've discontinued them. They list the later models and the older 3.0 v6 petrol engines, but not the 4D56 engine.

I wouldn't worry too much about not having the fins. While it'll help circulate and distribute air evenly around the filter, it won't really have much bearing on the performance.
 
  • Like
Reactions: HellsAngler

feetforbrains

Rank IV
Launch Member

Advocate III

1,097
Vashon, WA 98070
First Name
MatthewAlan
Last Name
Thyer
Member #

10007

Guess it's been a while since I updated. Last month completed a 7,000 kilometer road trip into and then back out of the desert south west. The van did well while exposing a few failure points.

The tail pipe finished rusting off in southern Idaho. My solution was to customize it with a Dole fruit can. It's working (currently have 8k on the can). Suggestion: yell "In your face Mark Watney," when you make this repair in the desert after hot exhaust almost melts off the back of your van. You'll feel better.

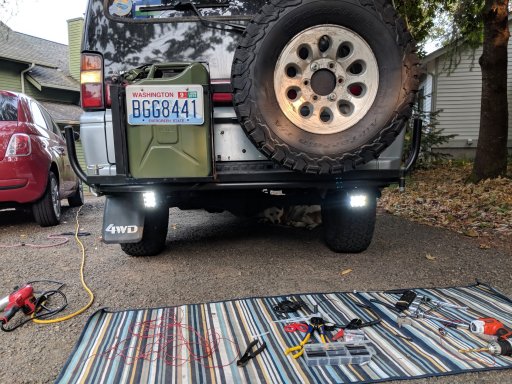
Added a spare tire and fuel can swing arm to the back that I'm still working kinks from. So far I've bent 2x 1/2" bolts trying to isolate wiggle from the joint. Otherwise it's solid and useful. Also nice to have a spare back there again.

Pics later when I'm at a computer.
 

feetforbrains

Rank IV
Launch Member

Advocate III

1,097
Vashon, WA 98070
First Name
MatthewAlan
Last Name
Thyer
Member #

10007

Do you have a part # for your air filter? I put in a KN filter almost a year ago but it doesnt have the fins. neither did the stock filter i replaced. wondering if im missing out on any vortex/forced air not having them

Sure thing, FRAM CAK253 Finned Vaned Air Filter. They get used in a lot of diesel applications and you can take that part number and find interchange on your favorite brand.


feetforbrains

Rank IV
Launch Member

Advocate III

1,097
Vashon, WA 98070
First Name
MatthewAlan
Last Name
Thyer
Member #

10007

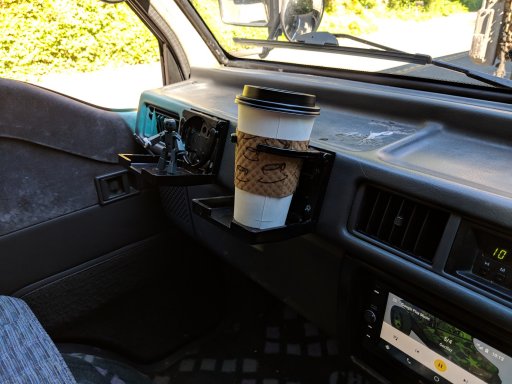
So quite a summer has just flown by. Back in June, I loaded my boys up and we meandered south and east to the Grand Canyon. I ran across the canyon and then we drove back.

My journal is about half full of fixes and work done, but some of the highlights are:
  1. Repaired the exhaust (although I still want to replace it).
  2. Replaced lost hub cover on the front right
  3. Added an oil catch can
  4. Added fire extinguisher
  5. Added tire custom tire carrier with swing out arm
  6. Added reverse floods
  7. Added cup holders :D


Attachments

  • Like
Reactions: Motohead1