rochmpr V4 Build - 2014 4Runner Trail

  • HTML tutorial

rochmpr

Rank V
Launch Member

Enthusiast III

1,798
Walnut Grove, CA 95690, USA
First Name
Krister
Last Name
Favareille
Member #

2560

  • Like
Reactions: mase001

rochmpr

Rank V
Launch Member

Enthusiast III

1,798
Walnut Grove, CA 95690, USA
First Name
Krister
Last Name
Favareille
Member #

2560

About a week later, I met up with some folks from Exposition Portal and T4R to run Slick Rock. We met up at the gas station at Bear Valley Village. From there, we headed up to Lake Alpine and turned in towards the trail head. We went back in and aired down. From there, we headed in. We stopped by the stream to meet a couple people and chat for a few.

View attachment 13587

From there, we continued the adventure.

View attachment 13588
View attachment 13589
View attachment 13590

And then things got interesting;

View attachment 13591
View attachment 13592
View attachment 13593
 
  • Like
Reactions: jrbechthold

rochmpr

Rank V
Launch Member

Enthusiast III

1,798
Walnut Grove, CA 95690, USA
First Name
Krister
Last Name
Favareille
Member #

2560

After some trails, I noticed that the rear drive shaft was hitting and rubbing on the fuel tank skid plate. After reviewing the conditions and axle movement, I determined that this was happening on full compression of the rear suspension, as the axle pushed to the drivers side due to the arc of the panhard bar.

I came up with a simple fix, cut out the section of skid plate and move back the attachment point to make enough clearance for this condition and weld it all back up.

View attachment 14082 View attachment 14083 View attachment 14084 View attachment 14085 View attachment 14086
 

rochmpr

Rank V
Launch Member

Enthusiast III

1,798
Walnut Grove, CA 95690, USA
First Name
Krister
Last Name
Favareille
Member #

2560

A little update. Over the Christmas holiday, decided to get a lot of items done, both maintenance as well as a a few small modifications. The list of work was;
  • Swap-out passenger CV as it was spitting grease from the boot
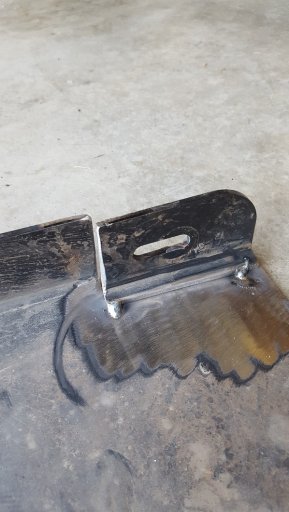
  • Weld-on spindle gusstes
  • Oil & filter change
  • Change front & rear diffs
Pretty straight forward.

I start with the CV swap and sindle gussets. Disassemble the passenger side and remove the CV. Then, fit up the gusset, tack up and the remove spindle for welding. Install new OEM CV and continue to stich weld the gusset to spindle in order to not overheat and warp the spindle.

Since there is some waiting during the welding process, move over to disassemble of the other side and repeat, minus the CV swap, and assemble. During this, I now move to draining the rear diff fluid and then fill.

OK, now front is fully assembled, rear diff changed, skid plates removed and begin the oil change. This is pretty straigt forward. Get this buttoned and and on to the final task, front diff and the train derails at this point!

Get the 10 mm hex head socket and go to remove the drain plug and nothing, could not budge it. OK, sleeve the ratched for some added leverage. Still no movement. DAMN IT! I was putting so much force of the tools, they were flexing and still nothing except, wait for it...... completely stripping the bolt out so the allen would not grab anything.

So the serious cursing, pacing and thinking begins. I come up with the idea of getting a ball end allen, hoping I can get it to bind up and catch as well as apply some heat to the diff housing at the drain plug. Nope, that did not work, actually stipped it out worse. (Insert cursing rant here!).

Well, OK, I do have the welder out. Hmmmm, maybe i will go for it and sacrifice a tool and drain plug (both relatively inexpensive) and weld in the allen socket and give it hell. So, I go for it and put several tacks onto it as best as I can. Grab the ratchet again and, BAM, that came out fairly easy. WTF??! Well, drain the fuild and of course no place is open or has the drain plug in stock just before Christmas. To hell with it, I decide to cut of the socket part, files the edges smooth and put a little more weld on it so now I can remove with a box end wrench, install the bastard and fill with oil and re-install all of the skids.

And time for a beer. That was one hell of a day. I guess I should order a new drain plug one of these days.

View attachment 16090 View attachment 16091 View attachment 16092 View attachment 16093 View attachment 16094 View attachment 16095 View attachment 16096
 

rochmpr

Rank V
Launch Member

Enthusiast III

1,798
Walnut Grove, CA 95690, USA
First Name
Krister
Last Name
Favareille
Member #

2560

A few updates of various things;

Since the install of the 4X4Labs front bumper, I have been without a washer bottle reservoir. I had bought the Shrockworks reservoir, but the ARB compressor is mounted there and I just am not able to make the Shrockworks bottle fit anywhere. I finally had an idea to use the same concept but have one built that I can fit. With relocating the airpump, power steering reservoir and AC fitting, I can get a bottle to fit in the that area. I had a new reservoir fabbed at a local metal shop based on the space available.

View attachment 18717

Now, after some measurements and re-measurements, started making the mounting bracket for all of the devices and water bottle. Still have more work, but this is the start.

View attachment 18718
View attachment 18719
 

rochmpr

Rank V
Launch Member

Enthusiast III

1,798
Walnut Grove, CA 95690, USA
First Name
Krister
Last Name
Favareille
Member #

2560