Portable battery box / parts list pricing

  • HTML tutorial

RoyB

Rank IV

Contributor II

1,010
Boston
First Name
Roy
Last Name
Bertalotto
On my web site I penned an article on building a battery box and adding an inverter and DC to DC charger. Folks are asking how much did all this cost. To be honest, I never added it up until now.....I added a list of parts, sources and prices to the article.....Hope this helps

Portable Battery Box Link


  • Like
Reactions: brian0128

Bob (Fishingbob)

Rank V
Launch Member

Enthusiast III

1,934
Aransas Pass, Texas
First Name
Bob
Last Name
Burton
Member #

11515

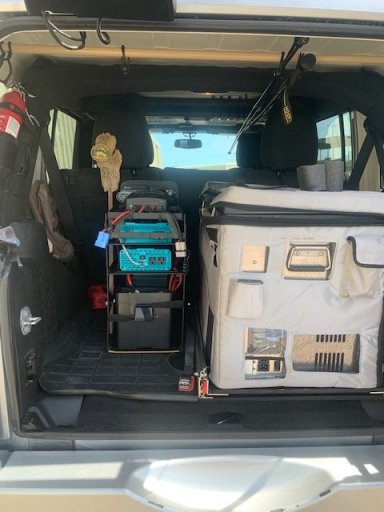
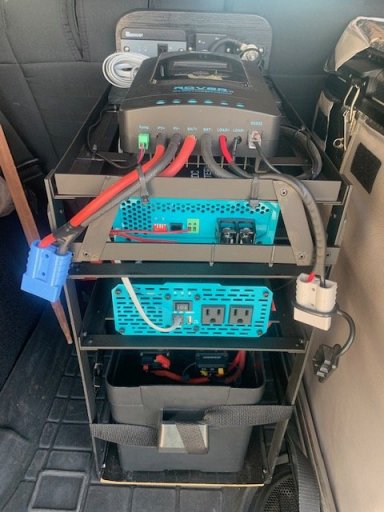
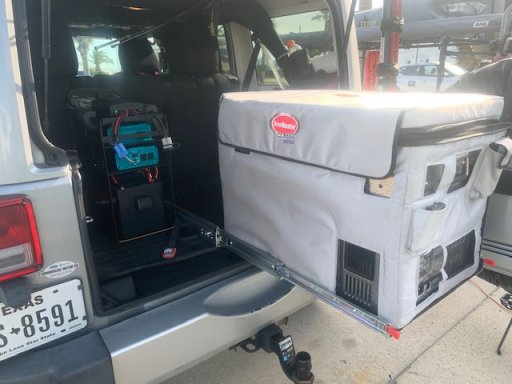
I built a rack out of Alum 3/4" angle and flat Alum stock (3/4" and 1") using pop rivets. Spray painted everything black. Everything is Renogy-100 AH Li FE battery. 700 Watt Inverter, DCDC 20 Amp charger, 20 Amp MPPT Rover charge controller and a 100 Watt Mono Folding Solar panel. Works fantastic!

30 Amp and 100 Amp breakers are located inside the front of the Atwood Battery Box, mounted to an "L" shape piece of plywood, battery is pushed to the rear of the box.
All wiring is welders wire (easy to bend), All components have Anderson plugs for ease of connecting and disconnecting and removing, red, black, blue (for Solar) gray for refrig/freezer.
DCDC charger is wired to Jeep battery along with a trip wire to activate the system.
Negative Bus is mounted to a "L" shape plywood panel on top with the Bluetooth module.

I remove the Battery set up and Snomaster 56L freezer/frig when not needed.

I wired the system so I could upgrade to a larger inverter down the road.
Some ideas if nothing else-enjoy
Bob
 

Attachments

brian0128

Rank III
Launch Member

Enthusiast III

646
Glen Burnie, Maryland
First Name
Brian
Last Name
Ogle
Member #

9453

Where did you mount the DC/DC charger? Did you just run cable from the alternator and leave an Anderson Connector in a spot to connect to the DC/DC charger? I'm setting up a similar system in my overland trailer and read that I should mount the DC/DC charger as close to the aux battery as possible.
D
 

Bob (Fishingbob)

Rank V
Launch Member

Enthusiast III

1,934
Aransas Pass, Texas
First Name
Bob
Last Name
Burton
Member #

11515

Where did you mount the DC/DC charger? Did you just run cable from the alternator and leave an Anderson Connector in a spot to connect to the DC/DC charger? I'm setting up a similar system in my overland trailer and read that I should mount the DC/DC charger as close to the aux battery as possible.
D
Good Questions-
The DC/DC charger is mounted directly above the inverter/below the Rover charger. I mounted these on a little angle hopefully to allow heat to raise off the back on the unit. I also do not store anything behind the battery box unit itself allowing improved air circulation. Adding the DC/DC charger has been a game changer. In the past I would pre-chill everything to be added to the freezer,/refrig, run the refrig/freezer while I was in route, but many times I would get there late in the afternoon-no Sun-couldn't set up the solar panel to top off the battery, Sometimes the battery would power the refrig/freezer through the night, but I wanted to go fishing in the morning and didn't want to just set out the solar panel and the Snomaster would cut off from the battery at 10.6 volts. This now allows me to arrive with a fully charged battery---

I ran two separate 10 ga wires from the battery (not the Alternator), the ground was directly attached to the negative of the battery, live to the positive (fused with an inline 30 amp fuse). I called Renogy specifically to ask if the ground could be a solid chassis ground, they said it had to be the battery. The complete unit components are all connected to a negative bus, mentioned above, then to the LiFe battery. I also added a separate chassis ground (single Anderson plug) to one the seat belt anchoring points secured to the chassis ( I used parts of a replacement battery terminal) directly behind the overall unit.

DC/DC charger Anderson plug and wiring enters the rear storage area behind the Snomaster unit. I left enough wire length to allow me access. The trip wire is tapped into the cigarette lighter wiring-when the ignition is turned on, 12V is sent to the DC/DC charger to activate the charger. Without this trip the system will not turn on and you will not get a green light on the front of the DC/DC charger signifying it is charging the batter.

I removed my battery from my overland trailer. I had a 27 series battery in it. What lighting I had in the rear of the overland trailer I now use my Jackery Titan to operate-via USB ports, this includes my USB operated fan.
Hope this helps
Bob
 
  • Like
Reactions: brian0128