Finally got my material for my cap, and began construction last weekend. Ended up not feeling the best so didn't get much done, but here's the update all the same. I'll put it in sections so people can skip to the part they are most interested in. This is a partial update - this stage of the project isn't done - and I considered saving this post for when it was finished but I like to show the mistakes along the way to benefit others so if I capture it while it's fresh I have a better chance of doing that.
You write too much, what's the short summary?
I'm about half-way done building a custom truck cap out of 1.5" aluminum extrusions. Skip down to the photos to see it coming together.
Background
It’s a bit of a long story, but I originally built my truck cap by welding aluminum tube, with the goal of eventually boxing it in/waterproofing it. However, as I got back into welding for the first time since starting the original rack a few years back, I was having all kinds of problems. I spent hours trying to figure out why my welder wasn’t working right, before finally ruling out everything except bad shielding gas. And thanks to some…lacking customer service from my welding gas supplier, I was in a bit of a pickle. Time is my most valuable commodity, and so I did a bit of a “reset” on my plan to still do this project affordably, but do so with a bit less of a time commitment than welding from scratch.
The Solution
After a lot of back and forth, I considered my three options.
1) Spend around ~$1100 and finish the rack as I intended, with a risk of needing to invest in a whole new welder if I am wrong about the gas and unable to get mine working ($$$$); that risks doubling or tripling the price of this project. If everything went well, this was by far the most affordable option, but it was also the option with the most cost-volatility with the unknowns on the welder. Plus, this approach would be the most significant investment of my time; getting good fit up and running beads takes a lot of hours. The end result would give me something that was plenty strong but only about 5/10 of what I really wanted because of my limited skills. I’d want to be consistently “stacking dimes” a lot more before committing to this approach.
2) Look to commercial options. I looked at several fibreglass canopies, but they did not have the robustness I wanted and were quite expensive for what they were. I looked to metal ones, but they were very expensive and not the most available items here in Canada. The RSI Smartcap caught my eye as I think that's the best Overland-ready cap on the market, but at nearly $5k that was a bit expensive. However, based on the "time saved" argument alone, I seriously considered the RSI because it had next-day delivery and could be assembled in a few hours. Part of me still wishes I went this route, but the $5k price tag meant missing out on a lot of summer adventures. Similar offerings from Alucab and others were priced similarly.
3) Look to a different material to build the cap. The solution I decided on was in the form of aluminum extrusion. It was the perfect mix of cost, versatility, strength, and speed of construction. I spent a lot of time designing & measuring on my iPad and learning about extrusion construction before pulling the trigger, but eventually I placed my order with a company called
Faztek. This is the exact same product as 80/20 extrusions, which is the more popular extrusion company in the USA. As you can see below, I opted for the black anodized material; my thinking at the time was that by ordering black material I would save time and energy on painting and get a more "finished" look.
I will say that Extrusion is an absolute joy to work with, but it requires a different approach to fabrication than I've used in the past. Normally, I have a rough design in mind with a few very rough sketches, but I kind of build it organically -- measure, cut a piece, make sure it fits, repeat until done -- it's very much an iterative "build as you go" approach. Extrusion doesn't lend itself to that. You really do want to have your project fully designed on paper before diving in, down to every single fastener OR have a lot of extra fasteners and extrusions ($$) if you want to build as you go. It's easy to get into the zone of "build as you go", but then you find you've blocked off an extrusion channel that you need a T-slot nut in. Only happened a few times to me :) There are specialized nuts to do this but they just cost more and when I made my initial order, I was so confident that I could take my time and avoid these errors so I didn't buy any. I was wrong about that! I also estimated my fastener counts instead of figuring it out precisely, and so I was short on some other fasteners too.
The biggest barrier to working with extrusion is the shipping costs -- it's not the kind of thing you can run to the local Home Depot if you forgot a nut or a length of extrusion, so getting everything you need all at once will save you money and time. My $100 in extra fasteners has cost me an additional $100 in shipping (so double the price); that would have been easy to include in my initial order and come under the same shipping costs had I done this a bit differently.
 Assembly
When researching this build, I didn't find many people who have made truck caps out of 80/20 or similar extrusions.
I did see Ripcord's excellent wedge-camper build that utilized extrusion for the camper, but not for the frame. So, I recognize I was doing things a bit differently on Pac yet again. From what I could glean from our comrades in the Vanlife movement, the downsides of extrusion are primarily making sure you pick a profile that is strong enough for the application, that the cuts are precise, and that there is something that prevents vibration from rattling the fasteners loose.
I'm certain my design is strong enough; I used some engineering calculators to ensure the load-bearing material could support a 1000 lbs point load with less than 1/16th inch of deflection. For extra strength, every piece of extrusion is supported by another piece of extrusion beneath it - in other words, instead of being supported only by a fastener, any load-bearing surface is supported by another solid surface (i.e. a vertical extrusion support) so the weight goes into the truck tub. The fasteners are all 5/16 bolts which have a shear strength north of 2000 lbs, but this gives an extra bit of support. Each fastener is secured with red thread locker, and each fastener and tapped hole is thoroughly cleaned with brake cleaner to make sure the thread locker works. I'm using the JB weld brand of red thread locker, and I'm confident these fasteners will not be coming out -- I realized I made an error (missed a T-nut) about an hour after one assembly and tried to take it apart to put the nut in, and the end result was a broken hex key. The Red JB Weld holds very strongly.
Here's some photos of the canopy coming together:

Every joint is sealed with gasket maker to enhance waterproofness (more on this another day as I have a whole solution for this problem of water/dustproofing).

I had to manually tap the extrusion ends. This was a fair bit of work. If you dial in your design and know the exact lengths of the spans you need, you can get Faztek to tap these ends for you for $1.00 each. That's well worth it if you can swing it, because the majority of my time was spent tapping these holes; I decided against having Faztek do the machining because I wanted to trim the spans to a precise length myself (more of that "build as you go" approach, which as I've said, doesn't work well with this material). It's not hard to tap these ends - just takes time! I've also ordered a tool called a
"Drill Tap" which is supposed to make this go quicker, but it arrives Saturday so I'll report back then if it's any good.
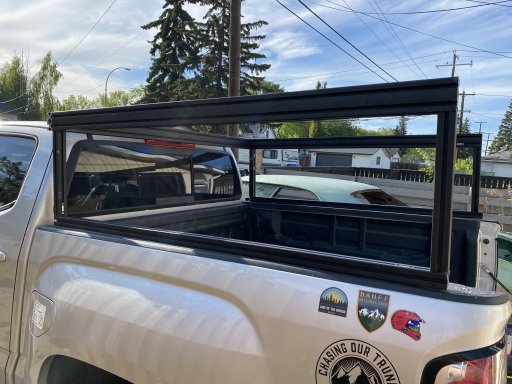
Testing to see if it fits.
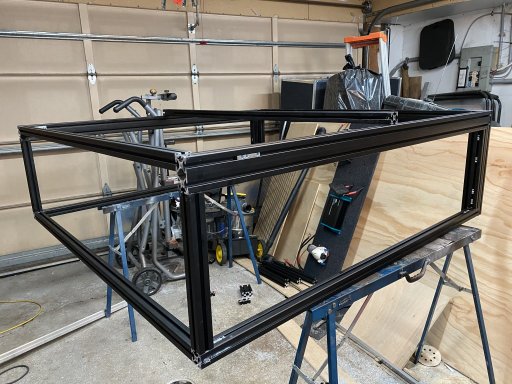
This went together fast - from a bundle of extrusion to the assembled frame in the above photo was only about a solid day of work in the garage, and I was going slowly as I've never worked with this material before. I made a few mistakes -- in one case I cut a piece too short, and as I mentioned there are a few extrusion channels that I need to wait for my "drop in" t-nuts to arrive because I blocked them off before installing all the nuts, but overall it was very easy. If I were to build another one, I think I can go from parts to full canopy in a day or less. Now, however, I'm just waiting on parts to arrive in the mail. My roof panels arrive next week, and once Faztek gets me my new order of T-nuts I should be able to finish this up. Stay tuned in about two more weeks for another update.


