This is my SH Subaru Forester Limited. So far I've taken it up to Mt. Shasta, all over the Sierra Nevadas, Death Valley, the Grand Canyon, Zion Nat'l Park, the Mohave Desert, Big Sur, and more. I try to post at least a couple photos from every trip I take on Instagram, my username is offroad.foz
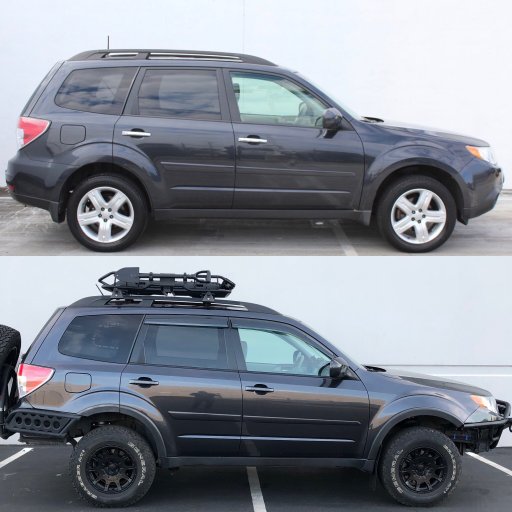
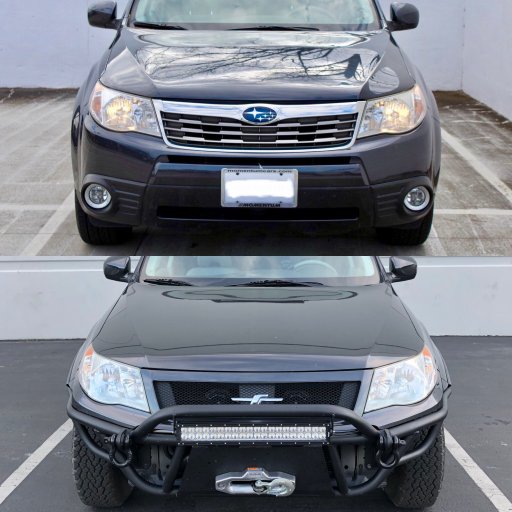
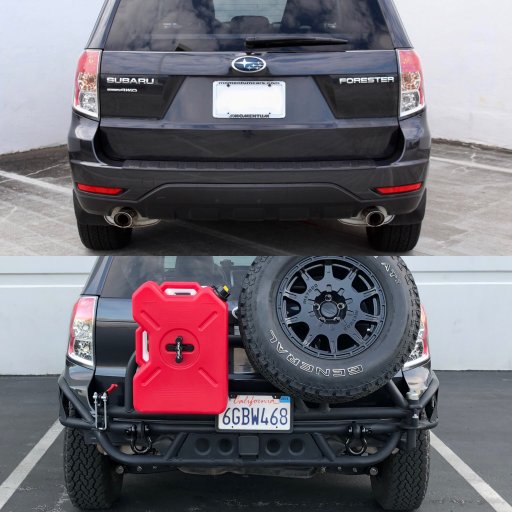
Here are some before and after photos:


Suspension:
SubieLiftOZ 2/2.5" lift kit
Method 502 VT-Spec wheels 15x7 ET15
General Grabber AT2 tires 215/75-15
KYB Excel-G struts
SPC adjustable rear control arms
STi aluminum front lower control arms
Rallitek adjustable sway bar end links
Kartboy diff lockout bushings
SPT front strut brace
rear sway bar removed
Engine/Drivetrain:
Torqmasters rear locker
Custom intake snorkel
Magnaflow mufflers
Rear diff breather extension
Exterior/Protection:
Stellar Built Trailerblazer front bumper with full size winch mount
Stellar Built Cascade rear bumper with spare tire carrier and Rotopax mount
Primitive engine skid plate
Primitive diff skid plate
Rotopax 2.5gal fuel can & 2gal water can
ARB awning
OEM fender flares
Suma Performance wide angle heated mirrors with integrated LED turn signals
OEM Sport mesh grill
JDM 'F' grill badge
Rally Armor UR mud flaps
WellVisors window visors
Yakima roof rack
Tyger cargo basket
'F' rear badge overlay
Color-matched door handles from GR WRX
Hella Supertone horns (painted black)
Lighting:
Morimoto D2S 5.0 HID retrofit
Profile Prism demon eyes
Nilight 22" LED light bar
LED front and rear turn signals, reverse lights, license plate lights & parking lights
OEM red footwell illumination kit
Turn signals integrated in door mirrors
Custom LED glove box light
LED dome, cargo, and door lights
Changed blue overhead, cupholder & cubby LEDs to red
Communications:
Midland 75-822 4w CB radio
Midland MXT115 Micromobile 15w GMRS/FRS radio
Midland X-Talker T71 GMRS/FRS 2-way radios (pair)
Baofeng UV-82HP ham radio
Tools & Recovery Gear:
Warn VR8-S winch
Factor55 1.0 Fairlead
Factor55 Flat Splicer
USActionTrax recovery tracks
ARB 30' 17k snatch strap, 8' 30k tree saver, 30' 30k tow strap
Rhino 18k D-ring shackles & 18k snatch block
Hand tool kits (sockets, drivers, wrenches, pliers, mallet, etc.)
Boulder Tools rapid tire deflator
Viair 88P portable air compressor
Fiskars 28" axe
Bully Tools D-grip shovel
First-aid kit
Tire repair kit
Interior & Electronics:
Touring gauge cluster
Pioneer AVIC headunit with Bluetooth, CarPlay, nav, etc.
Pioneer 10" 300w subwoofer/amp combo
Axxess steering wheel control interface
OEM console USB/Aux hub
Homelink/autodim/compass display rear view mirror
ADF Molle storage rack (Fire extinguisher, first aid kit & tire repair kit mounted to rack)
C&C Car Worx sun visors with illuminated vanity mirrors
Ventel aluminum pedals
Weathertech front & rear floor mats
Weathertech cargo mat
OEM cargo cover
Custom bed platform (rear seats removed for more storage)
Custom hatch release button in cab
To Do:
Viper alarm & remote start
Rallitek sport rear springs
SubiWorks aluminum transmission pan
Hayden transmission cooler
'12-'13 passenger seat (height adjustable)
Center diff lock switch
Firestik bumper mounted antenna
Torque Solutions rear diff insert kit
Here are some before and after photos:


Suspension:
SubieLiftOZ 2/2.5" lift kit
Method 502 VT-Spec wheels 15x7 ET15
General Grabber AT2 tires 215/75-15
KYB Excel-G struts
SPC adjustable rear control arms
STi aluminum front lower control arms
Rallitek adjustable sway bar end links
Kartboy diff lockout bushings
SPT front strut brace
rear sway bar removed
Engine/Drivetrain:
Torqmasters rear locker
Custom intake snorkel
Magnaflow mufflers
Rear diff breather extension
Exterior/Protection:
Stellar Built Trailerblazer front bumper with full size winch mount
Stellar Built Cascade rear bumper with spare tire carrier and Rotopax mount
Primitive engine skid plate
Primitive diff skid plate
Rotopax 2.5gal fuel can & 2gal water can
ARB awning
OEM fender flares
Suma Performance wide angle heated mirrors with integrated LED turn signals
OEM Sport mesh grill
JDM 'F' grill badge
Rally Armor UR mud flaps
WellVisors window visors
Yakima roof rack
Tyger cargo basket
'F' rear badge overlay
Color-matched door handles from GR WRX
Hella Supertone horns (painted black)
Lighting:
Morimoto D2S 5.0 HID retrofit
Profile Prism demon eyes
Nilight 22" LED light bar
LED front and rear turn signals, reverse lights, license plate lights & parking lights
OEM red footwell illumination kit
Turn signals integrated in door mirrors
Custom LED glove box light
LED dome, cargo, and door lights
Changed blue overhead, cupholder & cubby LEDs to red
Communications:
Midland 75-822 4w CB radio
Midland MXT115 Micromobile 15w GMRS/FRS radio
Midland X-Talker T71 GMRS/FRS 2-way radios (pair)
Baofeng UV-82HP ham radio
Tools & Recovery Gear:
Warn VR8-S winch
Factor55 1.0 Fairlead
Factor55 Flat Splicer
USActionTrax recovery tracks
ARB 30' 17k snatch strap, 8' 30k tree saver, 30' 30k tow strap
Rhino 18k D-ring shackles & 18k snatch block
Hand tool kits (sockets, drivers, wrenches, pliers, mallet, etc.)
Boulder Tools rapid tire deflator
Viair 88P portable air compressor
Fiskars 28" axe
Bully Tools D-grip shovel
First-aid kit
Tire repair kit
Interior & Electronics:
Touring gauge cluster
Pioneer AVIC headunit with Bluetooth, CarPlay, nav, etc.
Pioneer 10" 300w subwoofer/amp combo
Axxess steering wheel control interface
OEM console USB/Aux hub
Homelink/autodim/compass display rear view mirror
ADF Molle storage rack (Fire extinguisher, first aid kit & tire repair kit mounted to rack)
C&C Car Worx sun visors with illuminated vanity mirrors
Ventel aluminum pedals
Weathertech front & rear floor mats
Weathertech cargo mat
OEM cargo cover
Custom bed platform (rear seats removed for more storage)
Custom hatch release button in cab
To Do:
Viper alarm & remote start
Rallitek sport rear springs
SubiWorks aluminum transmission pan
Hayden transmission cooler
'12-'13 passenger seat (height adjustable)
Center diff lock switch
Firestik bumper mounted antenna
Torque Solutions rear diff insert kit
Attachments
-
1 MB Views: 347
-
341.3 KB Views: 277
-
2.3 MB Views: 214
-
2.9 MB Views: 218
Last edited:


