

Off-Road Ranger I
I bought this bad boy back in February 2017, bone stock. The only thing that had been added to the Jeep was a Lulu Lemon and a University of Utah sticker... which are essentially the same sticker!
My brother also owns a 2000 XJ that he has lifted and modified for overlanding and offroading. Luckily, I was able to get a few secondhand parts from him, such as sway bar quick disconnects and 3.5" lift coil springs.
So, here it is from the start.
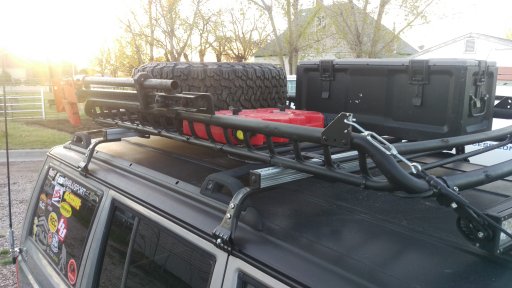
I added a decent Rola Roof Rack with the 18" extension, using Surco Gutter Mounts and some 8020 extrusion, attached two one-gallon Rotopax, Hi-Lift, shovel, axe and spare up there.

Next, as far as lighting, I added a 32" curved light bar mounted using the tubular mounts in the front of the rack, and two LED floods in the rear of the rack...


All my electrical components are run through a single Power Panel I built. It is now located on the inside of the firewall, up behind the brake pedal. All switches are mounted to a switch panel I designed and 3D printed to utilize that nice flat spot under the E-brake.


The USB charge port is a good addition for charging my phone and table for nav's on trips.
More electronics in the hatch, also wired to the switch panel; my air compressor. I found this little guy on Amazon with about 800 reviews and a very good rating. I was impressed with it during our Moab trip. I aired up from 18 psi to about 32 psi with about 5 minutes per tire (31x10.5x15). I ran the chuck to the fuel cap to keep it out of the dirt and dust as much as possible. I love the location so far.


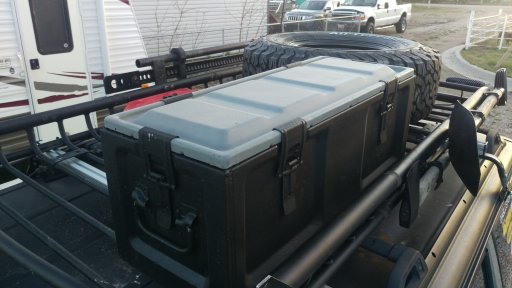
Up on the rack, I have a Rocket Box courtesy of Smith and Edwards here in Farr West, Utah! It's a military surplus container with a watertight seal, mounted by u-bolts to the bars of the rack. In there I keep all my tools and some lubricants and cleaners. You can also see my DIY rotopax mounts using some Home Depot threaded knobs.

I've added Limb Risers using turnbuckles, cable crimps, .25" coated cable and some durable heat-shrink to clean things up.

Comms consist of a CB system, using a DIY antenna bracket, mounted to a spring. The actual CB is a handheld unit that clips to a 3D printed part, attached to dash panel behind the wiper lever.


I'm in the process of painting all of my plastic trim using Rustoleum Bed Liner, so far the fenders are done, soon to be all.

The latest mod is of course the OB Emblem, #4688! I'm stoked to be a part of this awesome community of 'landers!

My brother also owns a 2000 XJ that he has lifted and modified for overlanding and offroading. Luckily, I was able to get a few secondhand parts from him, such as sway bar quick disconnects and 3.5" lift coil springs.
So, here it is from the start.
I added a decent Rola Roof Rack with the 18" extension, using Surco Gutter Mounts and some 8020 extrusion, attached two one-gallon Rotopax, Hi-Lift, shovel, axe and spare up there.
Next, as far as lighting, I added a 32" curved light bar mounted using the tubular mounts in the front of the rack, and two LED floods in the rear of the rack...
All my electrical components are run through a single Power Panel I built. It is now located on the inside of the firewall, up behind the brake pedal. All switches are mounted to a switch panel I designed and 3D printed to utilize that nice flat spot under the E-brake.
The USB charge port is a good addition for charging my phone and table for nav's on trips.
More electronics in the hatch, also wired to the switch panel; my air compressor. I found this little guy on Amazon with about 800 reviews and a very good rating. I was impressed with it during our Moab trip. I aired up from 18 psi to about 32 psi with about 5 minutes per tire (31x10.5x15). I ran the chuck to the fuel cap to keep it out of the dirt and dust as much as possible. I love the location so far.
Up on the rack, I have a Rocket Box courtesy of Smith and Edwards here in Farr West, Utah! It's a military surplus container with a watertight seal, mounted by u-bolts to the bars of the rack. In there I keep all my tools and some lubricants and cleaners. You can also see my DIY rotopax mounts using some Home Depot threaded knobs.
I've added Limb Risers using turnbuckles, cable crimps, .25" coated cable and some durable heat-shrink to clean things up.
Comms consist of a CB system, using a DIY antenna bracket, mounted to a spring. The actual CB is a handheld unit that clips to a 3D printed part, attached to dash panel behind the wiper lever.
I'm in the process of painting all of my plastic trim using Rustoleum Bed Liner, so far the fenders are done, soon to be all.
The latest mod is of course the OB Emblem, #4688! I'm stoked to be a part of this awesome community of 'landers!
Last edited:


