DIY Breather Extension

  • HTML tutorial

adventure_is_necessary

Rocky Mountain Region Local Expert Kansas
Member

Traveler III

4,007
Bonner Springs, Kansas, United States
First Name
Lucas
Last Name
Antes
Member #

7082

Ham/GMRS Callsign
KE0ZXA
Hey all, I am beginning my breather extension project. This process is borrowed from a local overland group member given the simplicity and low cost. This is based around a simple pencil air manifold off of Amazon. This is basically the heart of the ARB breather manifold but with the ability to run all 4 breather lines to it in different configurations. For a filter, I have chosen to use sintered bronze breather vents, and I will use three of these on the three single ports, one either end and on the opposite side of the four ports. These will be higher than the intake and nearly to the firewall. Once the bracket to hold this manifold is fabricated and in place, I will run rubber fuel lines from both diffs, tcase, and transmission to the manifold. I plan to attach these to the manifold using the push to connect fittings like the ARB does. I like how clean they are, and the fact that it's one part versus a threaded bung and hose clamp. I will need to double-check the ID of the stock breather lines to be certain I have the correct fuel line and fittings, but I believe 5/16th is the correct one for the WJ. I'll know more once I get out the caliper and pull the line to check. I believe 25ft of line is needed. I will post pictures as I get the bracket built and lines ran. So far with the vents and manifold, I have spent maybe $21. Fuel line, fittings, and some hose clamps will probably run me close to $30. Not bad considering an ARB kit goes for about $75 and it should be better quality.
 
Last edited:

adventure_is_necessary

Rocky Mountain Region Local Expert Kansas
Member

Traveler III

4,007
Bonner Springs, Kansas, United States
First Name
Lucas
Last Name
Antes
Member #

7082

Ham/GMRS Callsign
KE0ZXA
I look forward to seeing your setup. I like your plan to use push to connect fittings :sunglasses:
You're the inspiration. Not sure if either a clamp or the push to connect is better. It's different and less parts equals less of a chance of forgetting something, which I have been know to do.
 

adventure_is_necessary

Rocky Mountain Region Local Expert Kansas
Member

Traveler III

4,007
Bonner Springs, Kansas, United States
First Name
Lucas
Last Name
Antes
Member #

7082

Ham/GMRS Callsign
KE0ZXA
This is what I have. I toyed around with about 4 or 5 different mounting locations, but this one offers the easiest access and is as far back as I can get it without drilling into the firewall. I initially wanted to not use this spot for a possible future mod of the washer reservoir, but with the bumper and tire combo I plan on ending up with, it shouldn't be an issue. If anything, I'll build a reinforcement plate to keep the tire from contacting the washer bottle.
unnamed (1).jpg

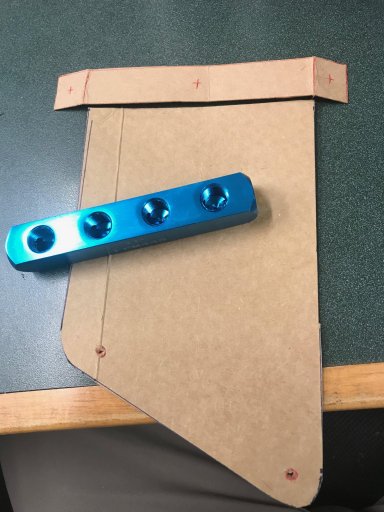
2 pieces of cardboard. The larger is the plate to mount to the vehicle utilizing existing welded bolts, and the other is how I plan on mounting the manifold to the plate. When I cut the sheet metal, it'll all be one piece with bends to accommodate the second piece. The two squares on either end will be a bend to wrap around the ends. The "+" are my drill centers where I will drill out to match the OD of the sintered vents on both ends and the single port on the other side. I might have to shim with washers to get a good tension between the manifold and my mount. I plan on utilizing some rubber between the plate and the vehicle to reduce vibration.
 

adventure_is_necessary

Rocky Mountain Region Local Expert Kansas
Member

Traveler III

4,007
Bonner Springs, Kansas, United States
First Name
Lucas
Last Name
Antes
Member #

7082

Ham/GMRS Callsign
KE0ZXA
The breather vents only need to be as high as your intake box, if your sucking water into the intake diff breathers arent gonna help much. If worried about water crossings that much snorkel and plumb the vents into the air box.
I should have been more clear. This mounting location is probably the easiest one to get to without it being in the way. The WJ in general seems to lack under the hood real estate without getting too creative. Not so much concerned with having water that high in the rig so much as keeping things clean and simple without being in the way should I choose to add in an sPOD or equivalent as there is a good amount of free real estate in this location since I don't need to do the washer fluid reservoir relocation with the ARB bumper. I plan on adding a snorkel in the future, but that's more for clean air than fording water. Deepest water I'd go through wouldn't be that high.
 
  • Like
Reactions: DoggMan1163

adventure_is_necessary

Rocky Mountain Region Local Expert Kansas
Member

Traveler III

4,007
Bonner Springs, Kansas, United States
First Name
Lucas
Last Name
Antes
Member #

7082

Ham/GMRS Callsign
KE0ZXA
Well, I took a stab at making the mount last night. The steel wasn't cooperating and it didn't come out as clean as I'd like. Back to the drawing board perhaps. Considering another material to mount the manifold up to. Possibly Kydex or something similar? I have no idea if that material is suited for this type of application given the under-hood temps and Kydex being a thermodynamic material. Regardless of material type, I will also be simplifying my idea with no bends and mount up using some adhesive, as well as some heavy duty zip ties. I have heard about some sort of metal cored zip ties, so I might go that route if I can find them.
 
  • Like
Reactions: DoggMan1163

adventure_is_necessary

Rocky Mountain Region Local Expert Kansas
Member

Traveler III

4,007
Bonner Springs, Kansas, United States
First Name
Lucas
Last Name
Antes
Member #

7082

Ham/GMRS Callsign
KE0ZXA
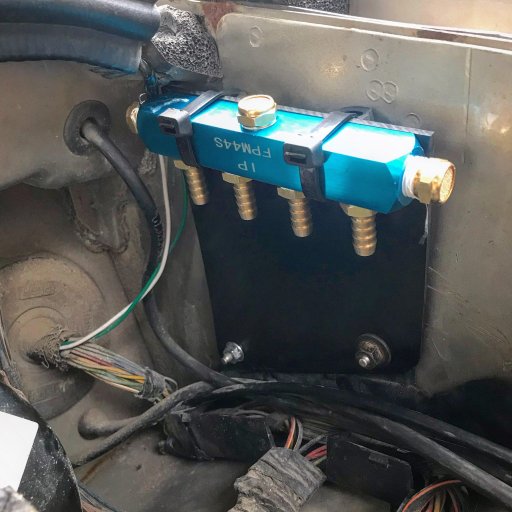
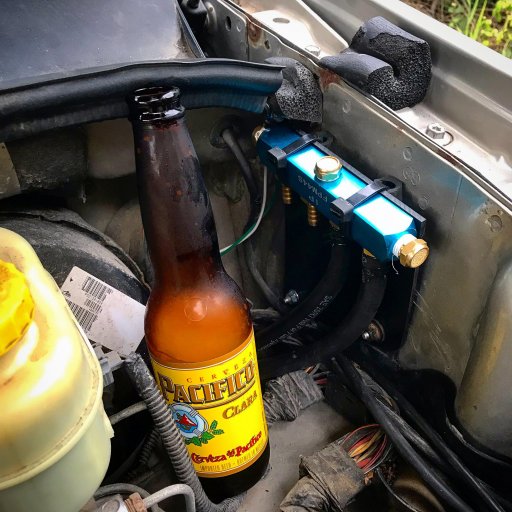
While I waited on the remaining bits to finish up the breather, I mounted up the manifold with the fittings and vents in place to the Kydex mount using 200lb test zip ties. Utilized some rubber washers between the back of the Kydex and the body, as well as used some old rubber tubing on the zip ties against the body as well. Should help with vibrations. I have a 25ft spool of 5/16" fuel line and spring clamps ready to finish this out.

As you can see, I scrapped the idea of using the push to connect fittings for the barb fittings. I did this for a few reasons. #1 I could not find the push to connect fittings for the OD of the 5/16" line. #2 if I converted the barbs on the diffs, trans, and tcase from the 5/16", that would be a little more of a pain to either change out the barbs on them or to have a 5/16" to maybe 1/4" to get the correct OD. #3 if for any reason there should be a failure of the push to connect fittings on the trail, it'd be a more of a headache. The current setup makes the most sense to me so I don't have to put in any more time that need and the cost was less since I already had a need for a pack of spring clamps to replace the existing ones on the factory lines, so the barbs were only around $1 a piece versus the push to connect fittings being $3-$4 a piece. I think I have maybe $50 into this and I think the quality surpasses the ARB equivalent to an extent. I wish my mounting wasn't based on zip ties, but it should work well with the HD zip ties. More pics once I run the lines and it's all said and done.
unnamed (2).jpg
 

adventure_is_necessary

Rocky Mountain Region Local Expert Kansas
Member

Traveler III

4,007
Bonner Springs, Kansas, United States
First Name
Lucas
Last Name
Antes
Member #

7082

Ham/GMRS Callsign
KE0ZXA
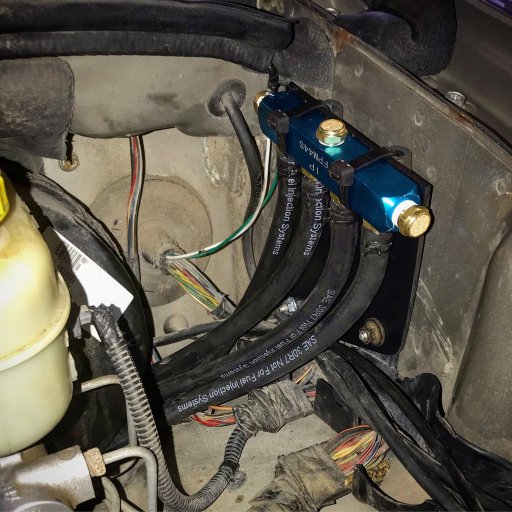
Finished up the breather extension mod. FINALLY! I gave each diff some slack for flexing, but everything is secured with 200lb test zips. OEM vents on the rear diff and trans seem to have been clogged or just rather dirty give a little fluid buildup on the vent and around the barb. Cleaned all of the barbs up before installing the hose. Could not get a clamp on the trans barb due to the location and lack of space. I had to set the rig on jack stands and droop the front axle completely to fit my arm between the floor and driveshaft to get to the trans vent. Rear diff line spans the length of the vehicle and is secured to the fuel and brake lines. Front diff is secured on the driver side LCA via the factory clip. trans and tcase lines are zipped together following existing lines/wires. I wrapped the lines in a heat reflective tape at the spot near the engine block and header to avoid any potential issues. Might be overkill. Might not. At least this project is done and I am pleasantly surprised at how easy it was to do all of this once the mount was made and the supplies were all purchased. For reference, I used almost all of the 25ft spool of 5/16th's fuel line, 7 spring action hose clamps, 4 1/4NPT 5/16" barbs, 3 1/4NPT sintered bronze vents, a 7 port pencil air manifold, about 1/3 of a 12"x12" sheet of kydex, half a package of 200lb test zips, some of the old breather line, and heat reflective tape. I still have enough kydex to build an electrical mount for cleaning and simplifying my lighting, and I have enough vents for 1-2 more to do this, and I have a ton of high quality zips.


unnamed (4).jpgunnamed (3).jpg