Build/overland/4x4 stuff: 1989 Raider, 2010 Sequoia, and other projects

  • HTML tutorial

irish44j

Rank II

Enthusiast III

443
Fairfax County, VA, USA
First Name
Joshua
Last Name
Hickey
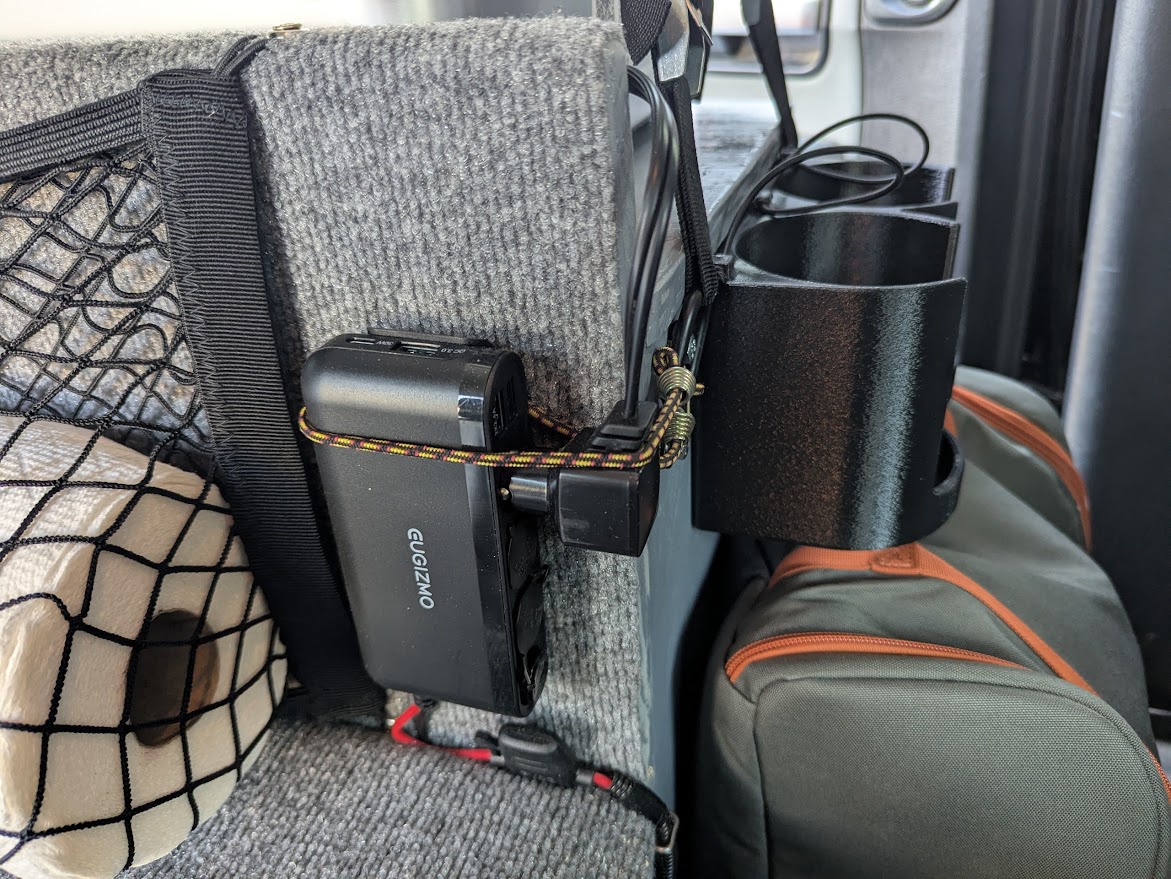
A couple add-ons for the kitchen module thing. After trying out a bit more, I moved the cupholder to the other end so I could put in a multi-outlet power bank back there. This has multiple lighter-style power outlets, and multiple USBs (at my daughters' request so they can plug in all their electronic stuff). I ran a dedicated wire to the battery (fused and switched), so it can handle the fridge and as much power as needed. The little bungee is just there to make sure the fridge plug stays in well.


Also in that pic you can see the other addition, a twin holder for 1lb propane bottles. I have 5lb and 10lb bottles as well, and for any long trip I'd bring one of those, but 1lb are nice to have and quick/easy if I'm just using the Jetboil or something to make coffee and don't want to set up a larger tank/hose. I got this 3D-printed one off ebay or Amazon or something for the Raider, and like it, so figured I'd get another one for this.


Also did some roof work. I have the Yaki box up there for camping gear, but wanted a couple smaller boxes for my shower stuff, tiedown/stuff for tents/ARB room, and recovery gear (which gets transferred from the Raider, depending on which vehicle I'm taking). I like Pelican cases, but not worth the scratch for just putting basic stuff in, so I hit up Harbor Freight and grabbed a second Apache box to match the one I already had from a different application. I cut the handles off (no point in having them) and used U-bolts to put them up on the roof. I previously had moved the Yaki box about 6" further forward on the rack to make space to do this, incidentally

[Imgur](https://imgur.com/O63s3io)


this will get more organized. Also, this stuff used to be under the rearmost "hatch" in the inside platform. With it cleared out, now there's room for a couple folding camp chairs there in a more convenient location, so that's an added benefit.


  • Like
Reactions: Dougnuts

The Deputy

Rank II

Enthusiast III

443
Michigan
First Name
Brian
Last Name
Allison
Really enjoying your build on the Raider. Reminds me of my 01 LR Discovery build. Made just about everything myself.

My build...had an old red car too...if you find yourself bored.


irish44j

Rank II

Enthusiast III

443
Fairfax County, VA, USA
First Name
Joshua
Last Name
Hickey
Really enjoying your build on the Raider. Reminds me of my 01 LR Discovery build. Made just about everything myself.

My build...had an old red car too...if you find yourself bored.

ah nice - man, I do not envy you working on rusty stuff underneath - I did that with my first Sequoia and my old XJ (and some old BMWs) - I've now sworn I don't care HOW crappy condition a project car that I buy is, but I refuse to buy one that has any significant rust - which the Raider has almost zero of somehow (though the blue parts Raider I got had terminal frame rot, from the same state!)

btw, I dig that simple front bumper!

Love the 928s - the car I always wanted when I was a teenager!

At one point I had matching black and red ones too (the engine from the black '88 is currently in the red '87)

1742092756088.png
 
  • Like
Reactions: The Deputy

The Deputy

Rank II

Enthusiast III

443
Michigan
First Name
Brian
Last Name
Allison
Yes, rust is a battle ground up here.

About the only vehicles you can buy in the north, that aren't eaten away, are sports/muscle cars. Typically, they are only driven five or six months out of the year, so low mileage, and are garage kept all winter.

Old Red (78) was under 100K and Old Blacky (84) had 78K.

20160623_201049.jpg

Out of the nearly 70 vehicles l've owned in my lifetime of driving...the black car is the only one that l regret selling.

Sorry about the high-jack.
 

irish44j

Rank II

Enthusiast III

443
Fairfax County, VA, USA
First Name
Joshua
Last Name
Hickey
So, this post will be "hey I did a simple thing" along with "I am apparently an idiot," so bear with me.

At the forward end of the Sequoia's roof rack, it's just an open rectangle over the moonroof area. Not sure why I left this open, guess I thought I may want to climb out the moonroof onto the roof? Who knows. In any case, decided I want to use that space to mount traction boards. Now I'll note right offhand that I have no plan to carry traction boards on the Sequoia regularly. First of all, I don't go many place I'd need them. Second of all, I'm not a fan of just driving around with bright red traction boards on the roof. Looks even more poser-ish than all the other crap I already have on the roof (haha...). And I only have one pair, and they live inside one of the roof boxes on the Raider, where they'd be more likely to get used - since that truck is actually off-road more. But still, would like to have the option to carry them externally if needed, so might as well make some easy mounts in the available space.

So basically, just need to add two crossbars running longitudinal to the car, and then put a couple posts on each to hold the traction boards. I considered just putting a couple tiedown eyes and just use straps, but I already have some threaded mounts from when I bought these things, so might as well use them. But I'm going to modify them somewhat.

For bars, I chopped up two steel "arms" from an elliptical my neighbor disassembled and left with me to take to the scrapyard. It's strong, low-profile, and already powdercoated. And free. Once cut to length, I drilled through and inserted some steel tube I had sitting around, then drilled/tapped it, and threaded in some stainless all-thread. These are my posts, and they fit the knobs I have.


So, that was pretty easy.

Then need to weld them up to the front two crossbars on the rack - again, not too difficult since it's a steel rack with square tube. Just need to get them aligned, tack them, and weld in. I threw down a doubled-up welding blanket on the roof/windshield specifically to avoid any spatter, of course. All in all, they went in fine, laid down some beads, and was done (right?) well, as I'm taking my stuff down off the roof, my angle grinder slips off the thing I set it on and falls on the glass moonroof. Phew, didn't break it. About 30 seconds later, as I'm climbing off the ladder I hear a "pop" noise....and know exactly what it is...

It's followed by about 5 minutes of slow crackling sounds......


Expletives were yelled. Now, I'm not sure the grinder caused this though. I suppose it's possible heat from the welding (about 4-5" from the glass, with the welding blanket between) did it? I didn't weld the bottom of the bars, so shouldn't have had any direct spark. These Toyota SUV sunroofs already have a reputation for shattering "for no reason" apparently, so maybe it just takes a little too much heat, or a mild impact. IDK. Guess it doesn't matter one way or the other.

So, knocked all the glass off into the internal sunroof cover, and then collected/shop-vacced it up...


Then took the sunroof tilting/sliding frame out. Wasn't sure what the plan was at this point - new sunroof glass from Toyota is like $500, looks like you can find new panels in unknown condition at scrappers/junkyards for $300-400. But I need to have something by this weekend anyhow, so would at least need a temp fix. I don't ever use the moonroof anyhow. There's a rack above it, and when it's open it's a lot of wind noise from the rack. So maybe a "delete" of sorts. Hm.

First thing I had to do was get the residual glass off the frame - it's mounted with a ton of windshield adhesive or something equally strong. Not silocone or anything easily scraped off (especially when embedded with broken glass shards). I ended up spending about 20 minutes with my heat gun and a big windshield scraper with a long handle, and eventually got it back down to mostly bare metal.

This is before I got the glass off...


After doing some thinking, figured I'd just cut a patch panel and attach it to the frame and probably tape the edges (since all the rubber seals were ruined as well with broken glass and they're not cheap either). The idea is to do a semi-permanent fix here, but leave open the option to replace the whole panel if I can find one cheap at a junkyard at some point. So headed to Lowe's to look at materials. Obvious choice is sheet metal, but it would be way thinner than the glass and sit below the roofline (collecting water), unless I propped it up somehow. Plus making it match the curvature of the frame in both directions could be iffy. Also thought of using some HDPE or simlar, or Lexan. All of those have the same thickness issue as well (also hard to find locally in 4' lengths.....just 36" or 8-foot sheets that cost $200 lol. Then I saw these other sheets near acrylic/lexan rack. This is also Lexan, but it's similar in construct to coroplast - so it's double-walled with vertical internal. It's apparently used mostly for outdoor greenhouse builds, since it's lightweight and pretty strong (and shatterproof). And it's reasonable in price, about $60 for a 6x2 sheet (which was a challenge to get into my GTI, I might add....)

Anyhow, after a lot of measuring and a cardboard template, I cut the patch panel.


Once cut right and the frame re-instaled and adjusted, I laid down some marine-grade adhesive that works for polycarbonate, and set it in place. Not pictured: some heavy 8x8 scrap pieces to hold it down flat.


After it was where I wanted it, I first taped the entire seam around with Tyvek tape, since that stuff sticks well and is weatherproof/waterproof. And then over that I used some 4" Gorilla patch and seal tape. This stuff is pretty thick, super-sticky, waterproof, and UV-resistant apparently. So I expect it'll do just fine. PLus it's black so it blends in to the roof.

So, that seems to have worked pretty well, and actually looks decent to boot.


I suspect this won't be nearly as soundproof as the glass, so I will probably put some kind of insulation between the panel iself and the sliding under-cover . At the moment I just have a foam sheet (from Pelican Case) in between, which should insulate a bit, and get rid of any kind of resonance. The panel is behind the fairing/LED light bar anyhow, so shouldn't get much direct wind.

Now, swinging back to the orignal project.....that came out fine as well. Here's some pics, nothing too exciting


  • Like
Reactions: OG_Zuninja