Build/activities thread: 1989 Raider, 2010 Sequoia, and my other stuff.

  • HTML tutorial

irish44j

Rank II

Enthusiast III

443
Fairfax County, VA, USA
First Name
Joshua
Last Name
Hickey
With no trips planned for a few weeks, still goofing around with little convenience items and other minor projects, as there's no end to trying to "find places to make things fit" in a truck this small. As with most 80s vehicles, there's very little OEM storage in them. The center console box on this is about big enough to fit a soda can, so not very useful, and the little under-radio pocket can fit a wallet (maybe). I like to have various things handy when I'm road-tripping....pack up gum, some handi-wipes, etc. At first I was just gonna put a pouch on the door, but not much space for that without blocking the window roll handle or stereo speaker (which is weak-sounding enough as it is). I picked up this two-zipper pouch thing at walmart (it was in the sporting goods section, with all the weights, and had a single shoulder strap so not sure what it's purpose it). In any case, it was a good size so I got it for 12 bucks, cut off the shoulder strap, and used some screws to mount it to the side of my armrest (which you may recall is actually hardwood under the upholstery). So that's a little convenience just for me.


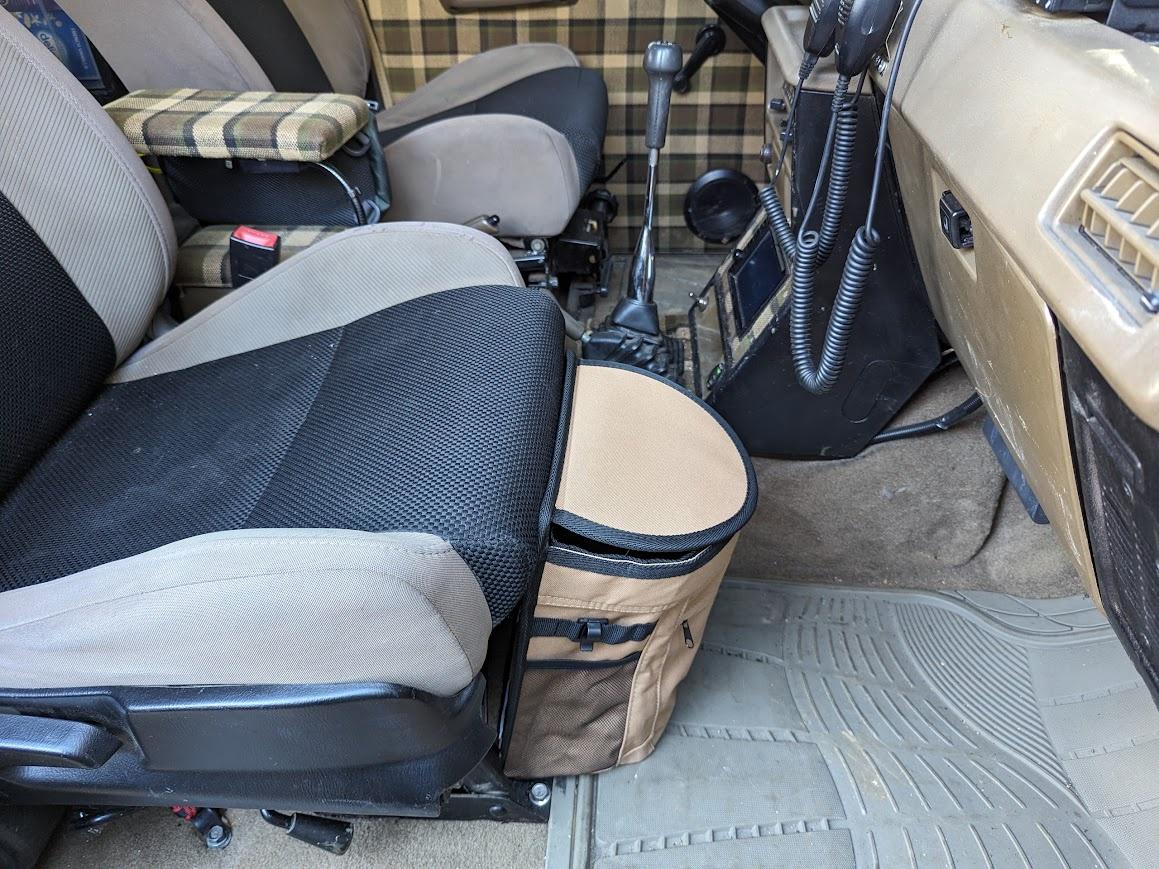
Another issue I always have (in all my vehicles) on road trips is trash. Not big "campsite" trash loads, just the crap that ends up sitting on the passenger seat, or tossed behind the seat when traveling a lot....soda can, or fast food bag, or gum wrappers or whatever. Usually I just tie up a small plastic bag someplace and use that, but that's annoying and janky. Back to Amazon searching, and found this one for 25 bucks or something, figured it looked pretty neat and has the "Lusso" brand on it (not far off from Luso Overland, which builds Mitsubishi 4x4 stuff). I like that it has a little frame inside it to hold its shape, the canvas material feels surprisingly tough and looks good, and it has a separate waterproof linter that velcros out, so you can just rinse it in the sink or whatever. On a big SUV wuld just hang this from the back of a seat or something. On this little thing, found a different place for it (with the strap holding it in position nicely using the seat frame bar). Plus a passenger can sit there fine without it being in the way (not that I usually have passengers in this truck). Anyhow, it's a fancy trash bin lol...



irish44j

Rank II

Enthusiast III

443
Fairfax County, VA, USA
First Name
Joshua
Last Name
Hickey
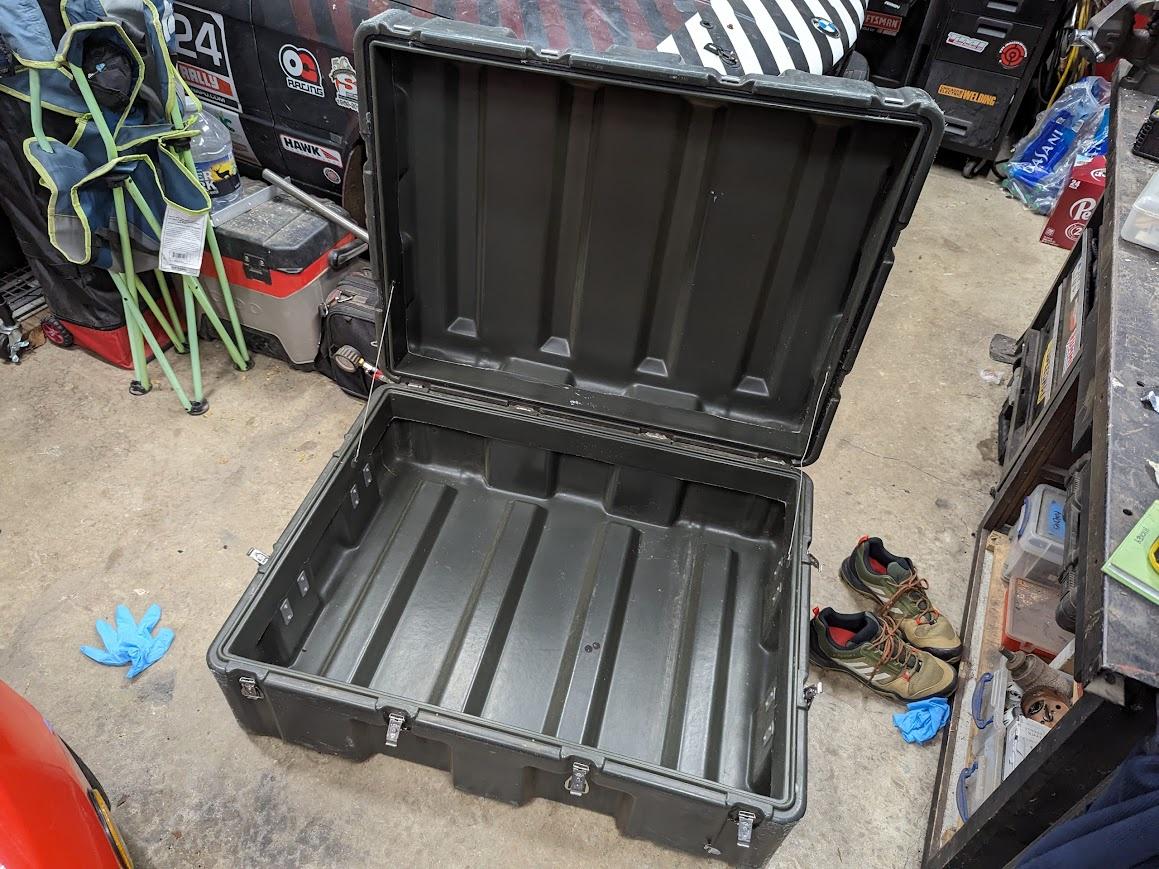
Not specific to a particular vehicle, but I'll probably use it on both the Raider and the Sequoia depending on the trip. Anyhow, tonight I picked up a secondhand Hardigg Case off marketplace for a couple of Jacksons. Not bad, since it's probably military surplus and I'm sure DoD paid like $800 for it based on prices I've seen, lol. Anyhow, these cases are basically indestructible and totally weatherproof. I found this one after a lot of searching for a specific size that would fit: my ARB/Ironman awning room (bulky), my car-camping roll-up mattress (bulky), as well as my camping cot, sleeping bag, and tent. Right now I just pile all this stuff inside the truck but it takes up a lot of space (especially in the little Raider). I have a couple Thule roof boxes, but while they have high volume they're not really tall enough to easily (or at all) get the Room and mattress inside (and neither of them fit the Raider roof anyhow). So I knew my measurements needed and searched around until I came upon this box.


The twist-lock latches are pretty trick and really cinch the lid down to seal it from any water intrusion


And it fits all the required stuff with ease and closes without having to smush any of it down


I'm probably going to try to paint it, though I know HPDE is pretty tough to paint, so I'll do some research on what might work. I'd prefer it to be a lighter color to keep heat down (and for looks). Unsure if I'll do drill-through rack mounts or just use straps so I can switch it between the trucks more easily.
 

DintDobbs

Rank V

Advocate III

1,412
First Name
Daniel &
Last Name
the Vulture
Personally, I'd use straps. The top of that box is perfect for straps, and you can stow some extra straps inside with the other items, in case you should ever happen to need them.
 

irish44j

Rank II

Enthusiast III

443
Fairfax County, VA, USA
First Name
Joshua
Last Name
Hickey
Yeah, that's what I 'm thinking as well. Though after putting it on the Raider, it's probably too big for my weekend camping trips, so I switched the smaller Pelican boxes off the Sequoia onto the Raider today and will probably use it on the bigger truck for family trips only (and will build a fairing for it since it's a huge air-brake lol...
 

DintDobbs

Rank V

Advocate III

1,412
First Name
Daniel &
Last Name
the Vulture
Oh, tell me about that one. I used to keep my spare tire on the roof (when this was my only truck), I'm sure that box is even worse.

Getting boxes that are big enough to store what you need, plus a little extra, and small enough so that it's not all rattling around loose in there, is the key.
 

irish44j

Rank II

Enthusiast III

443
Fairfax County, VA, USA
First Name
Joshua
Last Name
Hickey
I have the 7-gallon Yakima Road Shower on the Sequoia, which has been very useful for camping, racing, and cleaning up messy kids. My plan had been to swap it onto the Raider for camping, but after some checking it's just too big to really fit on the rack easily - plus it's overkill in terms of weight and amount of water when it's just me by myself for a night or two (plus I carry 2 gallons in the rotopax). Since I work for a Yakima dealer I looked into getting the 4-gallon road shower, but as it turns out that one is almost as long as the 7-gallon, it's just a lot narrower. I could make it work but really not what I wanted. So dug around a bit on Amazon and found a 4-gallon (well, 3.8 I think) aluminum tank with a similar setup, for about half the price. What the hell, let's see if it's decent.

So after two days it came in, so here's a quick review of what it comes with: The tank, which has a nice metal cap, pressure release valve, and a Shrader valve for pressurizing it. The tank has a bracket on the bottom with twin rails (like the ARB awnings and the Yaki tank as well), with mounting bolts that slide in. It has two handles on it - one on top for carrying and one on the side that holds two brackets for storing the hose/nozzle and for holding the handset in a "shower" setup. Kinda strange, but whatever. It also comes with nice mounting hardware -actually much more than is needed, and it comes with locknuts (8) and also 8 spin-on nuts (in case you want to make it quicker to remove). It also comes with a hitch-receiver with a mount bracket as well, if you want to mount it down there. Plus a box-end wrench for the bolts. Aaaand, it comes with a decent little bike-style pump for pressurizing it, which is a nice addition. All told, $180 with a coupon on Amazon. The tank itself is decent, though the welding isn't beautiful, but whatever. Nothing on this truck is beautiful. Here it is:


Let me jump back for a second. The big Hardigg case in the previous post turned out to be just TOO big for the Raider. I'll use it in my offroad trailer and for race stuff with the Sequoia. Instead, I moved the Pelican Vault off the Sequoia onto the Raider. It's the right size for a couple camp chairs, my cot, and my big tarp. I mounted it up last week, and then I moved it over to fit the water tank.

So here's where I mounted it. The Pelican box opens to the center of the truck , but that's better anyhow since the other way it falls open into the GMRS antenna. The tank goes outside of it.


But, to fit it I cut off the "side handle" thing. FIrst, it's kind of dumb (IMO) plus it's on the wrong side...would be fine for a driver's side mount, but the awning is there. So chop chop:


The black bracket I don't really need. And the silver bracket would be used to hold the handset on the tank when on the road - but I'll just take the hose off the tank when driving and toss it inside. So I turned the bracket 90 degrees at a down angle and bolted it to the rack like so:


Which lets me use it as a shower mount


Oh, the handset is plastic, but has a nice on-off button and 3 spray settings that are decent, so I'll use it until I invariably break it somehow lol


After it was all set up, I put a couple gallons of water in and put about 15psi of air in it. No leaks, no issues, held the pressure fine, and even with that low air still had a nice shower stream


So yeah, not bad for an Amazon cheapie. Works fine, is nice and compact, and looks decent up there. Mounted up easily with the provided brackets.
 

DintDobbs

Rank V

Advocate III

1,412
First Name
Daniel &
Last Name
the Vulture
Seems like it pretty much does what it needs to do. Let us know how it holds up in the long run!
 

irish44j

Rank II

Enthusiast III

443
Fairfax County, VA, USA
First Name
Joshua
Last Name
Hickey
Mini project. SInce I added the wheel spacers, this thing gets really, really dirty when we're in muddy areas (and it always seems to rain when we go wheeling/camping). Now yeah, it looks cool all muddy and stuff, but I especially dislike having mud flinging into the open windows and on my shoulder and stuff on trail lol. I've been looking at various fender flares, but didn't want fiberglass (to easy to damage on trail) and the only ABS ones I found that looked good were like $400 from Europe. Not worth it. Let's do this the cheap and just as effective way, and try to make it look decent.

If I was a Jeep guy, I could just buy pre-molded fender extensions or whatever, but this is a Raider....so I went back to my cheap source of tough but flexible material: Amazon. Specifically, these big-ass truck mudflaps (24x30") for 21 bucks:


These are pretty easy to cut, but not too floppy so they still hold their form and don't sag or get wavy or whatever. So off to cutting. The idea here is to just add 1-inch extensions at the top of the wheel wells (more as the fenders taper in):


So after some measuring and cutting and sanding (so the edges are rounded, not sharp), I installed them into the fender lip using stainless self-tapping metal screws. Not the most bougie way, but it will work fine and hold well. So here's the finished product (sorry, hard to take good pics of stuff this low-key)


Also in the mail today finally got one of the few kinda fancy and not really necessary things that I occasionally buy. This is a canvas case for my 5lb propane tank made up in Canada by Northbound Expeditions (they have some other cool stuff as well like nice tailgate/trash bags, air compressor bags, and so on...https://www.nbexpeditions.com/ ). Not that I really need to put my tank in a case, but it's convenient to be able to keep my gas line/hose with it and some other associated gear. I looked at the cheapo ones on Amazon and elsewhere but didn't really like any of them. This one has carry handles, cinch straps, and a bunch of mounting straps as well. The upper zipper is nice and has a velcro cover for it, and there's room inside for my 6-foot gas line and some other stuff. All in all, a nice little bag that's really nice quality. Sometimes you just want to buy something nice, you know? lol


Not strapped in, but you get the picture.


irish44j

Rank II

Enthusiast III

443
Fairfax County, VA, USA
First Name
Joshua
Last Name
Hickey
Packing up for a couple days camping and wheeling this weekend. Always a bit of Tetris in this little thing, especially when I'm brining the ARB room, chainsaw, kitchen, and full toolkit with me


Since I have a tendency to not be able to find my lighting at night, figured I'd make a little box for it with some picking foam so it doesn't rattle around


Also, since i put the new suspension on I feel like there's more drivetrain vibration at higher speeds. One possibility is the extra angle on the driveshaft U-joints is causing it, so cut out some steel to make a 6-7mm spacer. IDK if it will do anything, but we'll see. Probably should go a bit thicker than this but it's all I had sitting around at the moment.


Will be heading out to PA/Western MD with some of the guys you've seen in this thread already for a couple nights. Hopefully it's not raining this time like it always seems to lol.
 

irish44j

Rank II

Enthusiast III

443
Fairfax County, VA, USA
First Name
Joshua
Last Name
Hickey
Let's have a camping weekend. Friday afternoon I headed up through West Va. into southern PA to meet up with some of the camping/wheeling group for a couple days. The meetup for the first night of camping was in Buchanon State Forest, up on a mountain in a Primitive site that took some driving (thanks Google Maps) via some questionable roads littered with places that looked much like meth labs, or junk-collector old houses with "No Trespassing" signs everywhere. I'll admit that driving solo into this area at dusk made me just a bit nervous lol.....I may or may not have had my 6" hunting knife stuck in the gap next to my seat haha. Anyhow, finally arrived and met a few of the guys who got there early.


Unremarkable evening, just some food and beers and campfire, and set up the Ironman Room for the first time onthe Raider, which proved to be a nice comfortable sleep....until about 2 am when loud, repetitive bird started making a racket, for about 2 hours. It was so loud I swear it was sitting on top of my awning lol. We ID'd it as a Whip-poor-will, and it woke everyone up lol. Extra loud in an area where there was no other noise to speak of.

IN the morning Andy cooked up some breakfast sandwiches and I had plenty of coffee.....


....and we headed to La Vale Maryland about 45 minutes away to meet the rest of the group that came up that morning. While we were fueling up this Earth Roamer rolled in...with a middle-aged couple and seemingly their parents. So that's what a vehicle that costs almost as much as my house looked like lol. IDK if they were going off-road anywhere, this area's trails would be mostly too tight for something that size!


So we then headed further south to Wolf Den Run MD (right on the border with W.Va.) one of our favorite places in this area for it's large trail selection and conditions, great views, cheap entry ($10-12 for the day), and not many people there (kind of a new/secret-ish place) . It's a nice mix of rocky terrain, gravel trail, muddy areas, and can always be counted on to have a lot of water on the trails even if it hasn't been raining....


Anyhow, nice weather all day along with Andy in his lightly-modified Montero Sport, Josh and Yvette in their stock-ish Rubicon, a couple guys in decently-modded Tacomas, Denise in her Sequoia, and some of Andy's friends in a Dodge Ram pickup. Mike joined up later with us XJ as well.


At a deep water hole the Ram guys sliced open the side of their tire and didn't have a sufficient jack (or an all-terrain spare) for some reason, so it took a while to dig out another jack and then find some wood to prop it higher to change their spare. They went and dropped the truck off at the parking lot and proceeded as riders for the rest of the day


I was running caboose to help out the new guys and took an outside line in the puddle and hit probably the same rock, but with my front control arm. It wasn't comfortable, at all.....


I took a few other hard hits over the day - that's the part about flooded areas in a rocky park, a few of which have step-downs unseen, and I also dropped onto the gas tank skid pretty hard at one point. More on that later.

During the day several times we ran into a couple in their brand-new Ranger Raptor, who were trying it out. They joined us for a while and the truck looks plenty capable in stock form, but they were taking it slow and eventually bailed out to do their own thing, after everyone (including them) hit the big vertical hillclimbs on the coal hill at the top, which are somewhat scary, but fun. The Raptor clearly has a ton of power and made nice turbo noises going up lol...


Otherwise, good wheeling and nobody else did any significant damage, though it was pretty overgrown in some areas and everyone got plenty of pinstripes.


One part has a long "canal" that's nice for pics and not rocky. I've done it plenty, and it wasn't as full as usual today, so I went across the field next to it to get ahead and take pics. The field was very, very muddy and I had to carry some speed to not get stuck. Didn't see a drainage canal and did a hard up-and-down (thanks short wheelbase), and the rest of the group informed me I had both rear wheels in the air.....so that was ill-advised. But I got out to take some pics of the rest. Usually it's about a foot deeper....


At the end, I followed andy down a side area that was pretty rutted, and ended up high-centered on my diff...oops.


so had to get a quick pull back so I could climb the banks a bit lol


Here's some other pics from the day


Headed down to the lot and aired up. Look, we all match now...


From there we headed back toward camp, but stopped off at Dan's Rock on the way. Dan's Rock is a big outcropping on top of a mountain, with lots of communciations towers, but it's best known for being totally covered in graffiti and is quite a sight - both the rocks and the 360-degree view of three states!


Then back to camp....with some nice sky


....and set up again in the dark. Since rain was expected (but ended up being minimal) everyone went extra-heavy with the shelters, and I set up my "full camp" just to have more dry space


There was more food, more beer, more campfire, more late-night, and everyone crashed out by 1am......aaand the damn bird piped up once again about an hour later, but this time he must have been a ways away because it was much quieter :)

The rest of the group was going for a cruise up into PA, but I headed south to home. I'll note that the transfer case slight drop seems to have gotten rid of the highway vibration, since I was cruising at 70+ with no vibration (or, no more than any other 80s 4x4 on A/Ts....)

Made it home, and opened up all the gear to dry it out.


Guess I need to wash stuff....


So after all was washed, did a quick damage assessment. The control arm you already saw. Front skid lower section took a few good hits but it's pretty beefy


Gas tank took a heavy hit on the corner, just outside the skidplate area I had previously reinforced (I KNEW I'd regret not going the full width, dammit.....)


Yep, that's mashed, but no leaks or anything at least. oh well...the price of having a shorty truck where the gas tank has to hang out in the back :/


I also had noticed my coolant overflow bottle looked pretty brown so did a drain/flush of the coolant system. It's been a while since I did a coolant change and clearly the old gunk in the engine has freed itself up and it looked like muddy water (I'll note that my operating temps have been excellent, even with plenty of 5+ mile highway uphill pulls at full throttle and a lot of wheeling on a warm day)

ew


So that's about it, until some of the others post up some pics of *me* that I can steal haha...As always, a learning experience and I have a few things on my list to improve, fix, or buy to make things work better (primarily regarding packing, cooking, and sleeping).
 

irish44j

Rank II

Enthusiast III

443
Fairfax County, VA, USA
First Name
Joshua
Last Name
Hickey
Got the welder and some scrap metal out today to beef up the gas tank skid once again, this time on the sides and the mount brackets, the areas that bent on the last trip. Eventually I'll just buy some 1/8" sheet and make an actual nice one, but for the time being patching together with more metal will be sufficient. I have a few dozen metal ski boot display shelves that are 1/16" or slightly more, powdercoated, and a good size for metal projects. So grabbed a couple of those and cut off the slot-wall tabs, and them bent over the front lip to give extra rigidity. Then just prepped and welded them over the wimpy stock plate edges (after banging them flat). Unfortunately I ran out of welding gas about 1/4 of the way through and only have .035 flux core...but I have no patience, and nobody will really see this so just did it with the .35 flux. So it really looks janky lol


cut off some other tabs from shelves to make some reinforcement pieces for the rear mounts, since those also got bent


Then painted it black, because it hides the ugliness better than the beige :)


Anyhow, it's back on there and hopefully will be a bit better protection against rear drops onto the tank.


Also, took a load of junk and old furniture to the dump. Is this overlanding?


irish44j

Rank II

Enthusiast III

443
Fairfax County, VA, USA
First Name
Joshua
Last Name
Hickey
I like taking a shower in the morning. A morning without a shower first thing (and a coffee) is a lousy morning, in general. Usually I'll just spray my hair or something, but time to go the whole way and get a shower enclosure. Got this OVS one for a reasonable price (with a coupon) and it came in today. Mounts up just like any awning, with the twin-track captive bolts, but it's a lot lighter than even my 48" awning (actually surprisingly light). This thing is 44" long so mounted up nicely just outiside my water tank. Didn't feel like welding so just bolted it on using the supplied L-brackets. Seems to be good quality, takes about 10 seconds to set up and about 30 seconds to put away entirely so should be pretty convenient. Also has a couple little baggy/pockets inside to put toiletries in, and the inside zips down partway in case you want to reach into your vehicle through the window to get your stuff, I guess. All in all, pretty pleased with it and will update once I've used it. Some pics, as usual:

(side note, I think this is the last thing to go on the roof. This thing is super-light, but less weight is better up top, of course).

Now I totally have three non-matching awning-type things on 3 sides of the truck. Am I doing "overland matching style" wrong? :)


irish44j

Rank II

Enthusiast III

443
Fairfax County, VA, USA
First Name
Joshua
Last Name
Hickey
I've been traveling for work so not much doing during June, and now it's hot AF out there so not doing much either haha....but a little project tonight. The original windshield wiper arms have the "tab" style end...just a flat slot that fits into the blade bracket. It's flimsy....I've had one wiper just fly right off on the road. And even when not flying off, the blade is able to twist with each up/down stroke. Maybe the design works if the blade has a metal bracket, but aftermarket blades these days have plastic brackets and exacerbate this lame design.


So, got a couple spare e30 (bmw) wipers, which have the more common (and more functional) J-hook end:


Some cutting and welding and now the Raider has J-hooks


So, it's something small and nobody would ever even notice, but I think it will make a legitimate difference in....er...wiper performance haha


irish44j

Rank II

Enthusiast III

443
Fairfax County, VA, USA
First Name
Joshua
Last Name
Hickey
Yessir - I was also surprised at how nice quality it was!

So, since I"ve added all the crap on the back (in addition to the spare tire) the rear visibility on this thing kind of sucks, especially backing out in a parking lot or basically anyplace offroad where reversing is needed. There's pretty much no view of anything lower than 4-5' tall behind me with the teeny factory rearview and this truck being way too old to have a rearview cam. So figured I'd try out one of the camera-based rearview mirrors and see how it is. After reading various reviews, I got one of the low-mid Amazon models from Wolfbox, which also has a dash-cam and memory card (not that I really need those). It came overnight (thanks Prime):


The mirror itself has a reflective screen (so you can just use it as a regular mirror if you need to), but otherwise is full video. It basically straps to the OEM mirror using some well-thought-out rubber ladder straps. It is kind of heavy, so I might worry a bit if an offroad truck has a windshield-mounted mirror. The Raider has an OEM bolt-in mirror arm, so weight isn't an issue. This thing also comes with a GPS receiver (for speed/direction), the rear camera, plenty long wiring, and various other nice little details like stick-on wire holders. Overall a well-thought-out kit for under $150.


So after a bench test to make sure everything worked, got to install. The mirror install itself is easy peasy, just have to run three wires from it (power, GPS, and the wire to the rear cam). On this truck that's pretty easy, just slip it under the plastic front headliner thing and run it behind the janky plastic panels. So, pretty clean - though the plugs could be hidden a bit better on top of the assembly. Then to figure out where to mount the camera. Can't do it easily down low, and I tried out about a dozen spots, from the back of the roof, on top of the gear box, etc. In the end, decided to mount it inside the glass, since this is an outdoors truck and I have a feeling it would constantly be dirty or wet and not have good vision. So I mounted it right at the top of the back door glass, making sure the rear wiper covers this area so I can clean the glass whenever needed. It came with some 3M tape, but I also used some small screws since I'm not confident it would stay in place offroad.


I mounted the GPS receiver on the dash near the A-pillar and ran all the wiring. So this comes with a cigarette-lighter-style power dongle. You can buy a "hardwire" dongle separately for pretty cheap, but I didn't do that and then realized that this is a 5V/3A device so I can't just snip the cig-plug off and wire to 12v. Luckily, I just happened to have a 12v > 5v converter module from some past project (I forget what), so I used that and just wired it to the cig lighter wiring, since it's right there under the dash and I don't use it.


Anyhow, all set up and tested it out. It's supposedly 4k quality, and it looks really good - though my old-ass can't really see the image in 4k without my reading glasses on...smh.

Here's the main view (e.g. "when driving"). It has adjustable brightness, and one-tough on/off in case you just want to use it like a normal mirror (which is a bit darker than an OEM one, but still gives good regular mirror vision). Also has clock, date, direction, and speed on it...which is mildly distracting but I'm sure I"ll get used to it.


Front cam (not aimed right at the time)


or you can split-screen it, though not sure why I'd want to


I neglected to take a photo of the unit itself in detail, which I'll add later.

Went for a drive, seems to work fine. Unfortunately, on my drive two other intermittent (unrelated) issues popped up. Occasionally my headlights just won't turn on with the switch unless I stop, turn the car off, and back on (and then they work fine). Need to figure that out. So of course on the other side of my neighborhood, I stopped to do just that....and then the truck wouldn't start. I actually noticed this weekend it did this once as well (in my driveway) but then fired right up so figured maybe I just didn't turn the key enough. But nope, this is back to the issue I had last year where the starter relay clicks but nothign happens. Then if you wait 30 seconds or a minute, it just starts up normally. If you recall, I added a second relay, which fixed the problem 100% from the moment I did it. Until now. So need to check what's up - maybe my secondary relay is bad or a connection is loose. Something to check out. Always something with 80s vehicles!
 

irish44j

Rank II

Enthusiast III

443
Fairfax County, VA, USA
First Name
Joshua
Last Name
Hickey
So back to electrical, the bane of any 80s car. The last two evenings (and this one) I basically ripped apart and troubleshooted the entire headlight system. Basically, everything works as it should EXCEPT low beams, which don't work at all now. Checked the main relay (which just provides power to both so can't actually cause this problem). Tested a bunch of wiring and plugs, suspecting a short or bad connection. Checked grounds. Finally made it up to the column switch itself as the only remaining thing (short of two broken wires somewhere deep in the harness), so took it apart.


Everything looked fine until I noticed the little plastic "rocker" piece way inside the high/low beam switch.....broken and missing a chunk. Welp, that's the cause for sure - when in low beam it wasn't pressing on the contacts to ground out the wire to activate the lows. Unfortunately, this isn't a piece I can buy, and spending a couple hundred on a new (or used) working switch assembly isn't something I really want to do. So in the end, I got out some solder and bridged the two connections for low beam permanantly.

This is the before, basically I bridged the red/white and white wires but didn't take a post-solder pic because at this point I just wanted to be done. Forgot to take a pic of the broken plastic piece too (which is on the opposite side of the board)


So what does this mean? Now my low-beams work fine (important for road driving), but the high beams only work on the pull-back "flash" function. So I can't run with high beam ON constant now. That's really not an issue for me, I really never use them on the road - and on the trail I have a big-ass light bar up top (plus the two big Hella floods) for lighting. So no high beams isn't really much of a loss. At some point if I run across a parting-out Montero/Raider or in a junkyard I'll pick up a replacement assembly if I can for cheap....or I won't bother.

Side note: more successful test-drive this time, lights worked, car started fine. Adjusted the mirror camera a bit and I think it's going to be really useful overall - much better view, especially in the (considerable) blind spots on this truck with all the gear in it.


irish44j

Rank II

Enthusiast III

443
Fairfax County, VA, USA
First Name
Joshua
Last Name
Hickey
Ok, time for some more camping and stuff. This trip was down to George Washington National Forest. Just a smallish group, and no particularly difficult terrain - mostly just going to camp, run some scenic fire roads, and such. We've been down here before and it's pretty easy cruising but this one would prove to be a bit more interesting thanks to a few factors: First, Andy our regular trail leader had somehow broken BOTH of his overland rigs - his moderately-built Montero Sport and his also-built GMC pickup. The GMC fuel pump died on the way down, so he towed it home and picked up his last remaining working vehicle - his daily driver Celica (which is lifted 2" and on larger A/T tires, for what it's worth). Because nothing stops Andy from camping. Normally this would be fine, as 80% of the trails we'd be on can be done by a 2WD vehicle with a bit of clearance (and there are bypasses for tougher areas). But last weekend the area had just gotten the remnants of the hurricane that wrecked NC/Tennessee and elsewhere. It pretty much ran out of steam by the time it got to W.Va., but still caused some issues. We met up in the northern area near Harrisonburg and hit the trails.


Almost immediately, the first issue came up - trees down. Lots of them. So out came the chainsaws. A couple of us had smaller 12" electrics (but only 2 batteries each), plus a larger electric, and a compact gas saw. These would prove to be JUST enough to get us through the weekend.


Also used some of the rigs to pull some out of the way


Soon after, we ran into another issue - water. This trail usually has pretty shallow streams, but the runoff from the storm made that a bit sketch. The first couple usually a trickle, were just shallow enough to let Andy ford it


But the next one was around 2 feet deep. WIth the other guys already across, we decided I'd dead-tow Andy (with his engine off) to avoid hydrolock. So the mightly 160hp V6 got to work, no problem


Then more trees. and Jim vamping


so we cleared those out too, with more effort


then the next river. This one I also dragged Any across, it was pretty scenic but a VERY rocky bottom and we partly ripped his bumper off this time


on the other side a couple moto guys/girls were there, turns out they were locals but didn't expect it so deep, and the rocks couldnt' be seen, and they laid both (?) bikes down and were trying to blow water out of the carbs. We tried to help out but they had a pickup coming to get them.


We passed the pickup (a big old lifted Ford) and they looked pretty confused about how Andy's Celica had gotten there lol...

The next crossing was even deeper, close to 3 ft in spots - pretty close to the max depth I'll take the Raider at the moment without a snorkel. So once again we hooked up and I dragged the Celica. This time I got water on the hood, and he had it on the windshield. Amazingly, none into his car and just a bit in the airbox (he checked/dried it after each crossing)


Still a few little stream though :)


So there was more of that all day, and we finally made camp at around 4200ft. up top of one of the mountains (no comment from Rockies guys, lol...). This time I didn't get the Room out, just threw out a tent under my awning, with more rain expected....


Andy always camps light, which is good since the Celica doesn't fit much!


Marwan had his new setup on the Land Cruiser, and it was pretty sweet.


And Jim just got back from a cross-country trip with his wife where he picked up a new setup out in Idaho where they're made - also a very trick setup


So we cooked (well, mostly Andy cooked) and we had some beers by the fire and eventually crashed.


There was some rain overnight, and int he morning we all woke up in a cloud


The road down was smooth, and several of us are competition rally drivers, so we may or may not have had a fairly high-speed "rally raid" going on for a while, once we cleared the cloud...


Andy bailed for a bit while we took on some slightly tougher terrain and took a bypass (or was that the first day?) whatever...


All in all, a good trip with no issues other than Andy's truck and some minor damage to his Celica (and lots of down trees and water). Cleaned up and trucked home Sunday.

With project time coming up, the Porsche came out of the garage and the Raider went in. I had to air down to 15psi and take one of the roof boxes off to clear the garage lol.....the joys of getting taller.


More on the project stuff later!
 

Cypress

Rank V
Member

Off-Road Ranger I

1,451
Goose Creek, SC, USA
First Name
Allen
Last Name
Murray
Member #

27152

Ham/GMRS Callsign
WRJY639
That looks like a great trip.

I was in Creston, NC through yesterday checking in on my parents. It's a mess up there right now.
 
  • Like
Reactions: DintDobbs

irish44j

Rank II

Enthusiast III

443
Fairfax County, VA, USA
First Name
Joshua
Last Name
Hickey
So, let's get going on the next project. Incidentally, I used the MightyMax trailer last weekend to haul a hundred cones for our rallycross program. So it's nice to get some use out of it (I have other plans for that trailer, but those will come later)


Anyhow, back to the Raider. I've been meanign to build a second swing-out in the back to better accommodate gear and be able to put the water tank in back instead of the roof, plus some other ideas. I had enough square bar left from the other swing-out, so only had to order a few parts to do this (like a second spindle and latch). Otherwise, pretty much just using scrap metal and stuff from the garage.

Btw, it's hard to fit the Raider in the garage, between it getting taller and adding the overhead storage on the garage ceiling. I had to air down the tires to 10psi and take off one roof box, and then it squeezed in. So, time for work.


First, had to chop the extended corners of the other swing-out to "fit" my expected gear arrangement.


Then take apart the bumper corner and do what I did on the other side - weld in some square tube to the frame horns and reinforce some of the area to take the load


Then hole-saw for the pivot/spindle, and weld all that stuff in where I wanted it


And chop-chop some steel (the HF band saw works great, incidentally) and start welding

mocking up stuff. For this plan I doubled the vertical support since it won't have much side-to-side bracing, you'll see why later.


checking clearance on things with the rear wiper. I also need to make a new bracket for the CB antenna and 3rd brake light, that will come later.


Had a hitch reciever that was beefy, so I chopped it to length and welded on a plate (bought) for the tire mount. Studs on the way


And placed it where I wanted it, added a few gussets, etc. Just tacked at this point


Built a couple new fake-Rotopax mount things that look janky but work great for basically free (and you can't see them anyhow, so who cares if they look bad. These will go here


Supported by a bar on the front that doubles as a back-brace for the spare tire


So that's where I am at the moment, but it's coming together nicely. I spent a ton of time trying to figure out how to make things fit well and maximize ease of use, etc. This was about the 5th setup I sketched out and it seems like it will work out well. More to come later