BRX Expedition Trailer Roof Replacement

  • HTML tutorial

Enthusiast I

201
GA
First Name
Colby
Last Name
Green
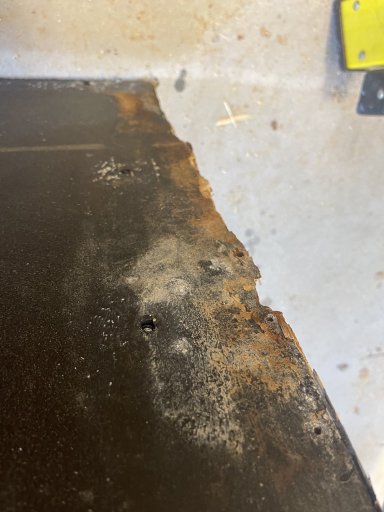
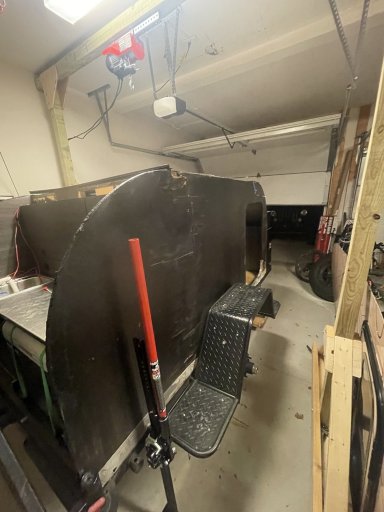
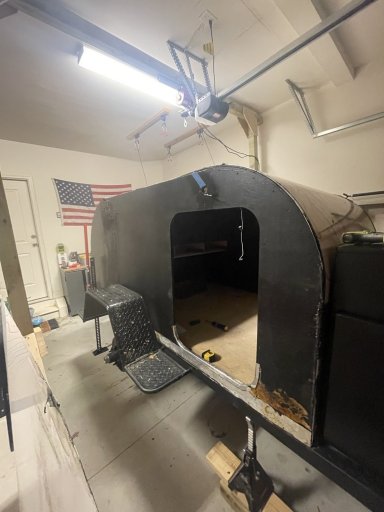
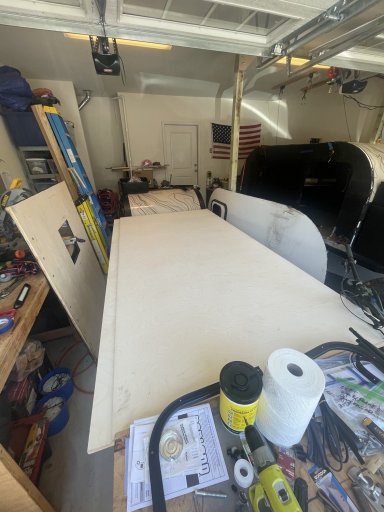
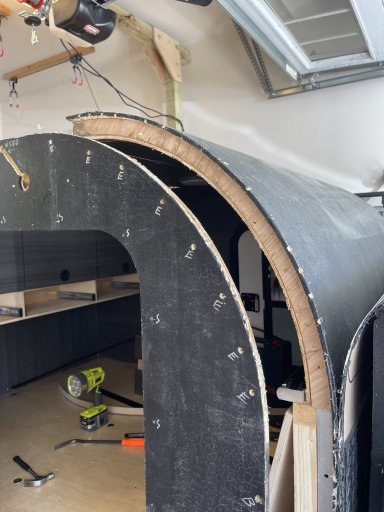
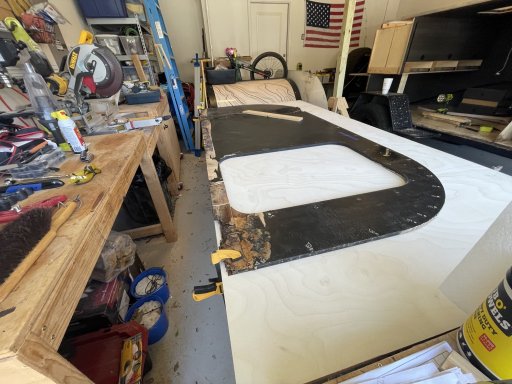
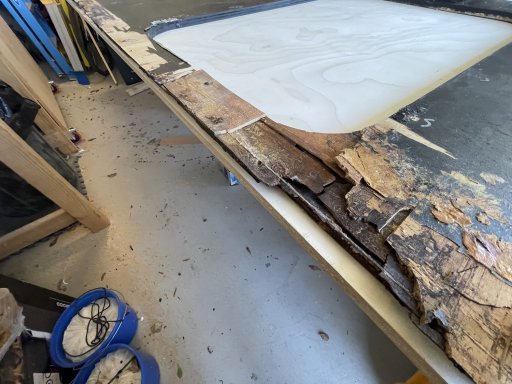
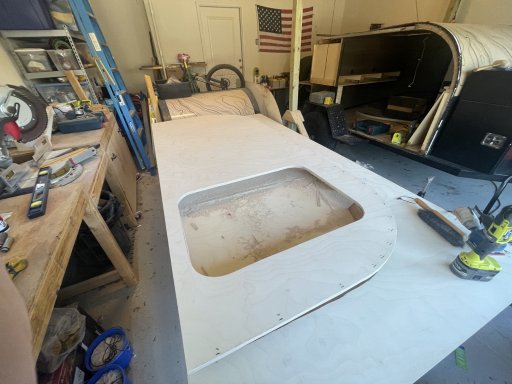
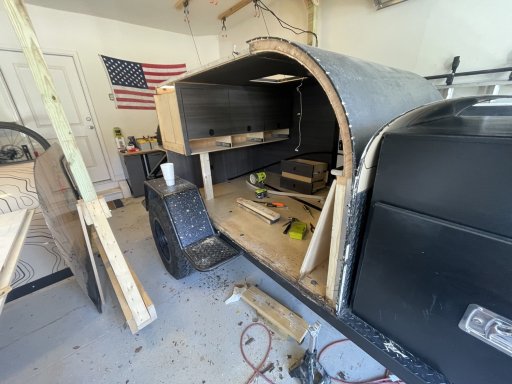
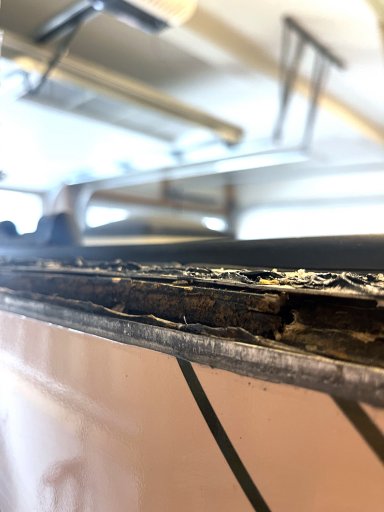
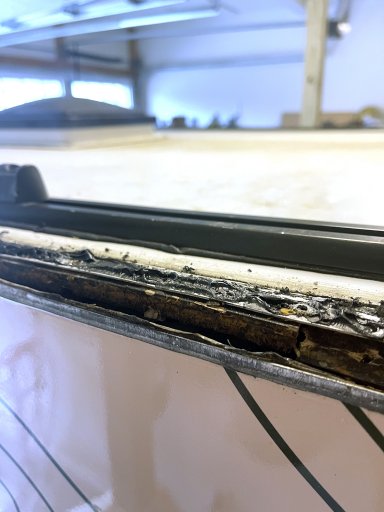
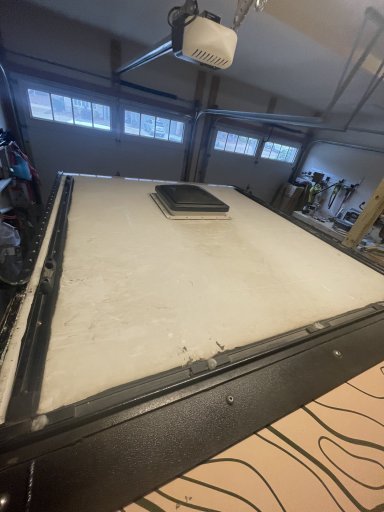
I have a 2018 BRX Expedition trailer and the plywood sheet that is underneath the exterior of the roof is rotting out and needs to be replaced.

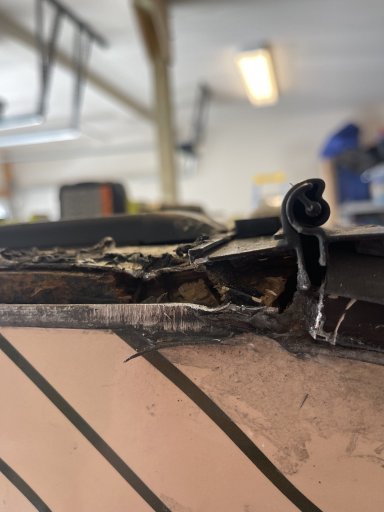
I am trying to decide if I want to do this repair job myself so I pulled back a section of the exterior molding to try and determine if the roof just consists of an exterior thin sheet of aluminum and the plywood sheet. That is what it looks like, but I'm not sure.

I have searched this forum and several others and so far have not been able to find any threads or info about replacing the roof on an expedition or teardrop (factory built, not homemade/DIY) style trailer.

If anyone has done repairs or a replacement to a trailer roof your insight and experience would be greatly appreciated. I would like to have at least some idea of what I am getting into if I try to do this repair myself.
 

Attachments

smritte

Rank V
Launch Member

Member III

2,827
Ontario California
First Name
Scott
Last Name
SMR
Member #

8846

Ham/GMRS Callsign
KO6BI
How was the side molding held on and did the rot extend into the walls?
Seeing damage like that makes me sad. The trailer company didn't seal it properly to begin with. You have a few choices when it comes to the roof. You can do plywood/aluminum or plywood/PVC. I would do PVC.

If the rot went into the walls, your in for a bit of work. At that point your building a new box.

Start with outdoor plywood and waterproof that. It would be stronger and seal better if you used fiberglass resin. Look up Poor mans fiberglass. Lot's of videos on it. If you choose just regular waterproofing, you just make sure your new roof material is sealed.
Seal down the sheet (s) with screws and construction adhesive. I like sikaflex
For your roof, I would do PVCRubber. Coat the roof with the adhesive and smooth it down. Make it go over the edge and on top of the sides. This will be hidden with the moldings. I used too much adhesive because I misread the instructions. Go thin.

Aluminum sheeting for the roof is either going to be expensive or not. It depends on the sheet size and whether or not you want a seam.

Reattach your moldings using more construction adhesive and screws.

Going with PVC for the roofing gets you a very good seal as well as heat reflecting and you can walk on it. It also comes in light colors. When I built my trailer I found the pricing on the rubber roof kits to be around $1000 and more for my 6X9 roof. The link I put in is where I got mine. I initially priced PVC roofing at my local trailer shop. They wanted $1200 for the same kit I payed $250 for with RecPro. I looked at what they had and what I got from RecPro was exactly the same. I was afraid RecPro would be a cheap copy.
I use RecPro for quite a few trailer parts.
 

OTH Overland

Local Expert Washington, USA
Member
Investor

Trail Blazer III

4,847
Camano Island, WA, USA
First Name
Dave
Last Name
Ballard
Member #

20527

Ham/GMRS Callsign
N7XQP
Service Branch
Fire/EMS/SAR
I have replaced several RV roofs over the years, with the latest being an entire roof on my old class C motorhome. unfortunately water damage can be a real bear to repair, and is usually worse than it appears on the outside. Trying to determine what went wrong and where the water got in prior to ripping off the existing roof can be a helpful tool in prevention of the new roof / repair doing the same thing. On our class C they did a poor job in the factory of sealing the roof to wall joint and water wicked into both roof and walls. What we thought was going to be a remove and replace of the roofing, with potential for some new plywood, ended up with removal of the entire roof assembly and then the top plate of the wall framing from within the inner and outer skin all replaced with new lumber and insulation. Was a pretty involved job and if we had a shop do it would have cost far more than the coach was worth. Along with labor savings, we purchased materials from non RV suppliers which saves a lot as @smritte mentions above. I am sure there was damage remaining in the walls that we could not access, but we allowed everything to dry up well before sealing it in with new roof and ran with it.

For the roof structure we replaced the factory fiberglass batts with rigid insulation sheets covered with 1/4" luan plywood. For the roofing itself we used a white EPDM membrane and glued it down to the plywood. again as mentioned above use the glue sparingly! the membrane and the plywood do not breathe and the glue will not dry fully if to thick causing areas to release from the plywood and create bubbles. Also make sure to use the roofing manufactures recommended adhesive, following all application directions carefully. One thing we did differently than the way the factory applied their roofing was we did not extend it over the edge, rather trimmed it flush and then ran around the perimeter of the roof with 2" wide Eternabond tape that lapped over the roofing, and down over the wall to just above the level where the trim will be. This tape sticks like hell to anything it comes near in almost any temp or moisture condition and created a far better seal from the roof to the wall then possible with just the membrane and some glue. The factory trim was reapplied over the roof to wall joint. (We had a new top plate with no rot or existing screw holes so we could use the factory screw locations, if you have a damaged wall, you may need to drill some new holes in the trim offset from the original ones or the screw may not hold.) in our case the factory trim had a rubber insert that covered the screws so we purchased a new insert as the old one had hardened. Finally we went back and added Eterna bond tape at all roof penetrations and a narrow strip from the roof to the top face of the edge trim. As the tape bonds so well with the membrane there is no where for water to get in, and there are two levels of protection where it goes over the roof edge and can not get into the wall cavity.

Once repaired make sure you check the walls to make sure sealant and gaskets are good at any doors/windows/cabinets/fittings as water pouring off the roof and running down the wall will find its way in anywhere it can. We had our motorhome for 10 years after the repair before we sold it and had no roof leaks even with it living outside. Best of luck on your project.
 

Enthusiast I

201
GA
First Name
Colby
Last Name
Green
@smritte @OTH Overland Thanks to both of you for the detailed responses. They are very helpful and I am sure I will have some follow-up questions as I dig into the details.

The side molding was attached with screws that run along the roof and down to the end of the molding the front. The molding started pulling up so where it looked like it was separating from the side wall panel, so I removed some of the screws towards the rear of the trailer and pulled the molding up and found the rotted plywood.

A couple of things happened on Sunday after I posted this. I have been in contact with someone at BRX about the issue and one of their reps is supposed to contact me this week. Hopefully, I can work with them to do the necessary repairs.

I bought the trailer used, and I also found out that it was submerged in pretty deep water a couple of times while the previous owner had it. None of that was disclosed to me when I bought it, but that makes me think that the rot probably has extended into the walls as well.

More details to come - either way it sounds like there is a lot of work to be done to get it back in good condition.
 

Enthusiast I

201
GA
First Name
Colby
Last Name
Green
@smritte @OTH Overland

The roof currently has a sheet of aluminum over the plywood. Would you recommend using the PVC Rubber instead of using the sheet of aluminum as the exterior surface or use both the PVC Rubber and re-using the sheet of aluminum?

I pulled back some more of the exterior molding on the left side and the wood on the wall is rotted also. I assume the same has happened on the right wall.

I got a ballpark quote from a local RV repair shop to replace the room and it is $2,000 - $2,500. Now that the walls are rotted it looks like I will be doing the repairs myself.
 

smritte

Rank V
Launch Member

Member III

2,827
Ontario California
First Name
Scott
Last Name
SMR
Member #

8846

Ham/GMRS Callsign
KO6BI
UGH.
My roof is just PVC over plywood. You honestly don't need aluminum. I can walk on mine and it has great UV reflection. If the roof was originally done with PVC, it would have overlapped the sides some. Mine overlaps the sides about 1.5 inch. I have 2X2 90 degree aluminum over the corners to hide it.
 

Enthusiast I

201
GA
First Name
Colby
Last Name
Green
UGH.
My roof is just PVC over plywood. You honestly don't need aluminum. I can walk on mine and it has great UV reflection. If the roof was originally done with PVC, it would have overlapped the sides some. Mine overlaps the sides about 1.5 inch. I have 2X2 90 degree aluminum over the corners to hide it.
Got it, thanks. I see on the RecPro site that the PVCRubber kit doesn't come with install instructions. Are there any others steps to be aware of in addition to what is in the posts above?
 

smritte

Rank V
Launch Member

Member III

2,827
Ontario California
First Name
Scott
Last Name
SMR
Member #

8846

Ham/GMRS Callsign
KO6BI
yea. Put it down like a contact adhesive. I misread the instructions and thought of it more as a thick coating that also sealed. I used way too much and had to squeeze it out. Nice thin even coat. Remove any vents and cover them, cutting the hole when your done. Pull the sheet snug and smooth as you go. It will shrink back some and loose wrinkles. It will come folded in a box. I was afraid of the creases. I left it in the sun for a while and it somewhat smoothed out. The rest of the ceases disappeared when the glue was dry.
 

Enthusiast I

201
GA
First Name
Colby
Last Name
Green
Latest update - so it's been over 2 weeks since I talked to the guy at BRX. Despite following up a week later, he has not called back or replied to my e-mail. So that's that, time to move on.

I removed the roof last weekend and the left side panel. The left side wall is totally rotted out and the right side wall will probably be about the same. I'm going to replace the roof and both side walls.

The roof panel measures 5' x 5' and the side walls are 9' x 4'. I called about 12 lumber suppliers in the Metro Atlanta area and none of them stock plywood panels larger than the standard 4' x 8' size. I found a supplier in NC (The Hardware Store of North Carolina) that had 5' x 10' marine grade baltic birch plywood in stock and drove up there yesterday and got 3 sheets.

Here are some photos - I'll post more as I progress through the project.

Roof Panel Rot

IMG_5222.jpg

Left Side Wall Rot

IMG_5210.jpg

IMG_5209.jpg

IMG_5208.jpg

IMG_5207.jpg

5' x 10' Marine Grade Baltic Bitch Plywood

IMG_5221.jpg
 
  • Like
Reactions: KonzaLander

smritte

Rank V
Launch Member

Member III

2,827
Ontario California
First Name
Scott
Last Name
SMR
Member #

8846

Ham/GMRS Callsign
KO6BI
Its nice that you have the old pieces for a template. The challenge is bending the wood for the round front. There's a number of "how to's" out there and is the reason the front of mine is squared off. If you end up with a seam, bevel the edges so they fit and use Bondo.
You also have the opportunity to make a few changes. Add an outlet or do a diffrent light setup.
Have you decided on what your going to put on the outside of the wood?
 

Enthusiast I

201
GA
First Name
Colby
Last Name
Green
Its nice that you have the old pieces for a template. The challenge is bending the wood for the round front. There's a number of "how to's" out there and is the reason the front of mine is squared off. If you end up with a seam, bevel the edges so they fit and use Bondo.
You also have the opportunity to make a few changes. Add an outlet or do a diffrent light setup.
Have you decided on what your going to put on the outside of the wood?
It is for sure. I'm going to have to add a brace on the rear of the old piece (before I take it off) so it doesn't fall apart into 2 pieces when removed.

So on the front curved piece - the wrap is actually applied to the thin metal sheet that covers the top, so I am going to have re-use it instead of doing the rubber roof. When I removed the roof panel I considered replacing the curved piece too, but it doesn't have any rot that I can find. The plan for now is to not replace it. To remove the curved piece I would have to remove the front storage box which contains all the electrical gear. That basically means pull the wiring part which I really don't want to do.

I have a friend that owns a wood boat manufacturing company and he is going to show me the process that they use to waterproof the plywood. I don't know what all that entails yet, but I'll post the details when I treat the new boards.
 
  • Like
Reactions: smritte

Enthusiast I

201
GA
First Name
Colby
Last Name
Green
Here are a couple of progress pics. I removed the left side wall and cut the new piece this weekend.

All of the bolts and screws were fairly easy to remove, but the front of the wall was secured by staples. It took a while to pry off the front and expose the staples so I could cut and pull them out.

Lining up the bottom of the wall piece on the plywood was a bit tricky too since a lot of it is rotted out.

Next step is to waterproof the new piece then replace the wood veneer on the wall.

IMG_5300.jpg

IMG_5326.jpg

IMG_5327.jpg

IMG_5349.jpg

IMG_5332.jpg
 
  • Like
Reactions: smritte

Enthusiast I

201
GA
First Name
Colby
Last Name
Green
@smritte

Which Sikaflex sealant did you use? The local Home Depot has the All Purpose Non-Sag Construction Sealant and the Self-Leveling Horizontal Joint Elastic Polyurethane Sealant (or is it a different type)?

Sika 10.1 fl. oz. Sikaflex All Purpose Non-Sag Construction Sealant Polyurethane in White 7116045 - The Home Depot

Sika 10.1 fl. oz. Sikaflex Self-Leveling Horizontal Joint Elastic Polyurethane Sealant in Gray 7116070 - The Home Depot

I caught up with my buddy that owns the wood boat business and they use epoxy resin on their boats. I'm going to use the same brand they use which is from US Composites. I got a gallon of the epoxy below. From what I understand so far it's basically the same type of epoxy resin as the West System epoxy that is popular in the marine market.

635 Thin Epoxy Resin System - 3:1 Medium Epoxy Hardener

Epoxy : Epoxy Resins and Hardeners
 
Last edited:

smritte

Rank V
Launch Member

Member III

2,827
Ontario California
First Name
Scott
Last Name
SMR
Member #

8846

Ham/GMRS Callsign
KO6BI
Sikaflex 221
Sikaflex 291

I've used both. the 291 has stronger bonding but the 221 worked well also. Both come in white, black and clear and you can paint them. I chose them because of their strength and flexibility.
Just because I don't trust anything, I also used screws. I was also bonding to metal and very few adhesives did that and were flexible.
 

Enthusiast I

201
GA
First Name
Colby
Last Name
Green
Sikaflex 221
Sikaflex 291

I've used both. the 291 has stronger bonding but the 221 worked well also. Both come in white, black and clear and you can paint them. I chose them because of their strength and flexibility.
Just because I don't trust anything, I also used screws. I was also bonding to metal and very few adhesives did that and were flexible.
Awesome, I'll go with the 291. Thanks for the quick reply!