Influencer II
Sorry for getting to this so late. A lot of changes/business over the last couple weeks and the judging ended up on the back burner. As mentioned there are prizes for 1st, 2nd and 3rd place.
1st Prize = $75 gift certificate to the overlandbound.com store.
2nd Prize = Adventure is Necessary Sticker & OverlandAF Patch (patch donated by me, so don't go looking for it in the store)
3rd Prize = Sticker assortment
Thank you everyone who submitted a project!
On to the results!
First Place
@Glenn with his Trailer Build.
This is quite an involved project, and a well thought out one at that. We are really impressed with the level craftsmanship and attention to detail. Having a trailer that is built to your own specs and suits your exact needs on trail is the essence of DIY. Great job Glenn!
Cost: $1500 in materials
Build Notes:


2nd Place
@Scout with his Bed Cap build.
This was a very close second. Great custom build for the bed of his Tundra
Build Notes: I had to come up with my own design. Figure what material to use. And start cutting and welding. I decided on changes during the process. Made modular frames for mounting RotoPax containers. I also came up with the idea of making the Amish made canvas cover. I can roll up the rear side panels and the back window panel. I made framework for the top to mount a roof basket and modified the frame (bigger) to add an awning(s) and shower accessories at a later date. We can hang battery operated fans for better air flow if the screened windows aren't enough and battery operated lights as well.
Pictures:


3rd Place
@Boucher with his On Board Air/Shower build
This one is a good clean execution. And very useful.
Build Notes: First I created a visi diagram to ensure I covered all steps. Then after gathering all
My parts I found where the best place to
Mount items. The project was hit or miss over the a few years while
I continued to improve my designs. Hardest part of the install
Was cutting my FJ40 for the control panel which allows for an air point a water inlet port and a hot water outlet. Air can be monitored by the gauge . The panel is inset and was made from an old toolbox. Water is able to be retrieved from jerry cans, a stream, or from my Fleetwood Neon off-road trailer.
Pictures:


Once again. Thanks to everyone who participated. This was a great little contest. We got to see some really cool projects. I'd encourage all of you who submitted to post your projects in the DIY section so others can see them and get inspired to build their own.
And if you didn't get your project submitted during this one, no worries. We will definitely be doing this again.
1st Prize = $75 gift certificate to the overlandbound.com store.
2nd Prize = Adventure is Necessary Sticker & OverlandAF Patch (patch donated by me, so don't go looking for it in the store)
3rd Prize = Sticker assortment
Thank you everyone who submitted a project!
On to the results!
First Place
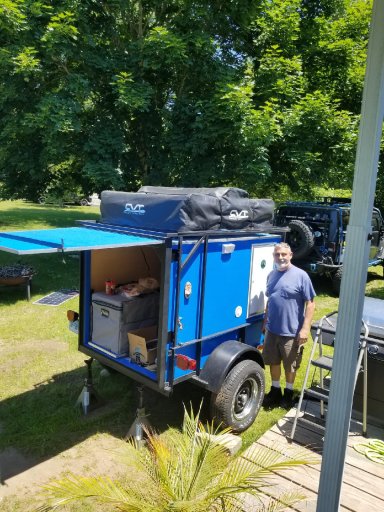
@Glenn with his Trailer Build.
This is quite an involved project, and a well thought out one at that. We are really impressed with the level craftsmanship and attention to detail. Having a trailer that is built to your own specs and suits your exact needs on trail is the essence of DIY. Great job Glenn!
Cost: $1500 in materials
Build Notes:
- I bought a used utility trailer for $250 then stripped it and put in new axle/tires.
- Then I welded together a lightweight square tube exoskeleton for tent support.
- Next we built a 4'x4'x6' box into it with 3/4" plywood.
- We added a 2x100AH Battery Solar Power Generator which is sufficient to power our charging system for devices, water pump, interior/exterior lighting and a Whynter 65DZ fridge/freezer.
- We installed a 26 gallon water tank that supplies water to 2 exterior faucets. One is dedicated to our Ecotemp Hot Water Heater and the other is at the rear of the trailer for rinsing and extra fire protection while in camp.
- [The build went] better than expected. We bought this old trailer in February and we first camped in it 4 months later and entire project was built outdoors in lawn.
- If I were to change anything about the build, I’d do an aluminum box instead of wood for weight. Trailer loaded weighs 1700 but still pulls easily on trails.


2nd Place
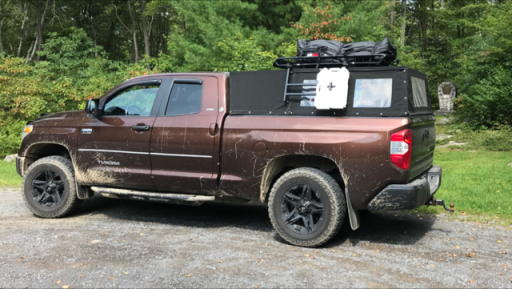
@Scout with his Bed Cap build.
This was a very close second. Great custom build for the bed of his Tundra
Build Notes: I had to come up with my own design. Figure what material to use. And start cutting and welding. I decided on changes during the process. Made modular frames for mounting RotoPax containers. I also came up with the idea of making the Amish made canvas cover. I can roll up the rear side panels and the back window panel. I made framework for the top to mount a roof basket and modified the frame (bigger) to add an awning(s) and shower accessories at a later date. We can hang battery operated fans for better air flow if the screened windows aren't enough and battery operated lights as well.
Pictures:


3rd Place
@Boucher with his On Board Air/Shower build
This one is a good clean execution. And very useful.
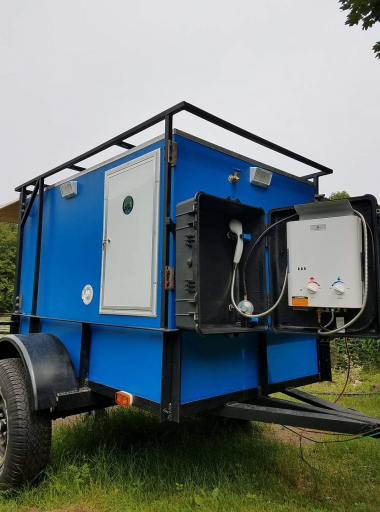
Build Notes: First I created a visi diagram to ensure I covered all steps. Then after gathering all
My parts I found where the best place to
Mount items. The project was hit or miss over the a few years while
I continued to improve my designs. Hardest part of the install
Was cutting my FJ40 for the control panel which allows for an air point a water inlet port and a hot water outlet. Air can be monitored by the gauge . The panel is inset and was made from an old toolbox. Water is able to be retrieved from jerry cans, a stream, or from my Fleetwood Neon off-road trailer.
Pictures:


Once again. Thanks to everyone who participated. This was a great little contest. We got to see some really cool projects. I'd encourage all of you who submitted to post your projects in the DIY section so others can see them and get inspired to build their own.
And if you didn't get your project submitted during this one, no worries. We will definitely be doing this again.


