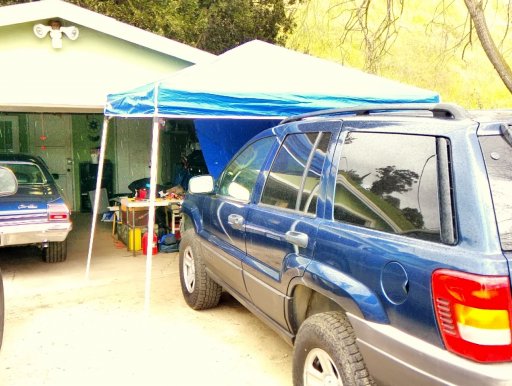
2003 Grand Cherokee Laredo

  • HTML tutorial

JimBill

Rank V
Member
Investor

Advocate I

2,268
San Benito County, CA, USA
First Name
James
Last Name
Madison
Member #

18747

Upcoming trip to Utah dictates overstuffing the Jeep, pulling a trailer, or using a roof rack. I will be hauling just a little too much gear and fuel to put on the roof sheet metal, which is my usual. I'm not a fan of empty roof racks on a daily driver, but I have the roofrack ......... To how I like to do things, i figured a mounting system that I can take on and off at will would be the ticket.

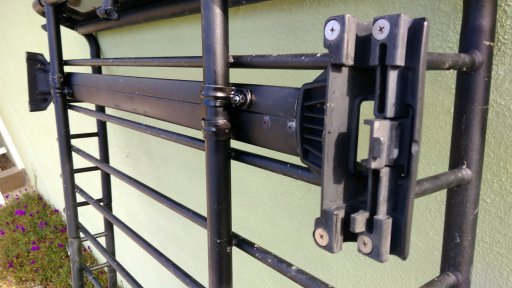
Although this is possible with the Yakima mounts, the rack sits too high for my taste. Also there is no room below the cross bar to do the Toyota mount flip but that gave me an idea. I decided to hang the roof rack off the cross bars anyhow. Used EMT routing clamps and 1/4 inch hardware and mounted directly to the cross bar underside. The cross bars are now part of the rack, I'll grab another set from the junkyard at some point. Simple to install, just snap off the end trim and slide the rack on. Easy enough I can do it alone.

It was a nice day, so spent the time to paint the exposed metal from drilling, trim the bolts, and paint all the new hardware. Also locktighted the nuts. The weak point remains the factory plastic ends. If I see any cracking or have a failure, I have plan B already laid out. But for now, it sits right and will work for the upcoming trip.
P_20200216_150401.jpg

P_20200216_151441.jpg
 

JimBill

Rank V
Member
Investor

Advocate I

2,268
San Benito County, CA, USA
First Name
James
Last Name
Madison
Member #

18747

I really like how that came out! I might have to copy you.

-TJ
Thanks! If it survives Utah in a few months, then the idea is a winner. I'll let you know. But be warned, you cant pivot up the the sunroof, it hits before it is fully open.
Jeep goes in tomorrow for oil pan gasket R&R. Maybe a few other things depending on how the budget goes. Then I need to get serious on the cooling mod stuff! Calling it a productive weekend... got taxes figured and the roof rack done. Worth it, a little more budget opened up for the WJ!
 

JimBill

Rank V
Member
Investor

Advocate I

2,268
San Benito County, CA, USA
First Name
James
Last Name
Madison
Member #

18747

I dig the rack mod. Makes me wish I had done that to my Yakima originally. Wonder how much weight the clamps will support versus the other design...
Thanks! A fair bit of thinking did go into this seemingly simplistic approach.

The EMT clamps are pretty stout, my belief is the plastic ends on the cross bars will give out first. That holds true if the cross bars are used with the Yakima mount system attached to the factory cross bars as well.
Also, where I placed the back cross bar is on center (more or less) of where the line of gas cans will sit. This was intentional, and also happened to be a great spot to keep the rack reasonably level.
With the cross bar a little proud above the rack bars, the weight of the cans will mainly be on the cross bar and not on the basket and clamps.
I intend to use the rest of the rack for bulky but relatively light items.
One thing I did not mention yet, once I clean up the rack (it has sat outside in the dirt for a long while), I will run rubber strips down the bottom side of each of the rack's front to back tubes. This way if something collapses, the rack won't be on the roof metal to metal.
Lastly, I do need to disassemble the rack, dry out the insides, and reassemble with RTV on the joints. Or just drill a few drain holes......
Plan B (if needed) is to scrap the factory cross bars and use pipe mounted to the rails with Unistrut clamps, but that will raise the rack a few inches.

gas cans and rack.PNG
 
Last edited:

JimBill

Rank V
Member
Investor

Advocate I

2,268
San Benito County, CA, USA
First Name
James
Last Name
Madison
Member #

18747

Another learning experience (I knew, but now I KNOW):

A budget boost may be all we need for what we want to do, or may be the best bang for the buck for the budget. Many of us have (or will be adding) mild lifts with either spacers or longer springs and keeping the factory control arms. Saves a lot of money over going to a full house high lift kit that replaces all the suspension components with new adjustable or short or long arms. But with older vehicles, there are hidden costs that may help justify purchasing a complete higher level kit.

Out of sight, out of mind factory suspension bushings may work great for a short time when you first hit the trails. However... the aged, cracking, and dry bushings will quickly tear apart when you flex the vehicle way past where it has flexed for the last 15 or so years. This is exponentially true when you disconnect the sway bars! My advice is to plan on a suspension rebuild anytime you lift or repurpose an older rig for hard use, or go for the complete lift kit and replace bushings/control arms from the start.

My learning experience:

When I bought the 03 WJ with approx 121k miles, it had a budget boost on it that appeared to have been installed for years. However the vehicle showed absolutely no signs of off road abuse. Suspension was solid and felt like a lower mile vehicle. Over the last two years I have tweaked the bump stops, added quick disconnect end links, correct length shocks for full droop, and generally maximized the budget boost flex potential. And I used the vehicle off road as I intended. The mild lifted WJ has proven pretty dam capable, and at one point teetered back and forth on one front wheel and the opposite back wheel going down a step in Dedeckera Canyon (Death valley) - completely flexing the suspension to max. After the trip, the only thing I really found was the old Bilstein shocks gave up thanks to a couple hundred miles of washboard. But over time and after a number of other trips, the WJ is experiencing progressively worse bump steer and wandering.

I installed a JKS adjustable track bar. No improvement (but not a loss, the front axle is now centered). Then after OB Sierra Rally Bald Mountain Trail loop, I could feel a lot of play between the track bar mounting bolts and bushing sleeves. Maybe the bracket holes wallowed out. So added 9/16 inch track bar hardware torqued to 135 ft-lbs, and there is now absolutely zero play on either end of that dam track bar. No improvement, almost a detriment, as there is no give at all!. I replaced the steering drag link ends (seals blown out and showed some wear) and had an alignment check. No improvement.

Then finally I noticed the rear pinion angle is visibly off. How can that be with no changes to the rear suspension? Once I actually LOOKED, I discovered the rear lower control arm bushings are visibly collapsed and shredded. Enough to significantly alter the pinion angle at rest. This makes sense now, as the bump steer and wandering actually feels like it is coming from the back end. With normal street driving, these bushings may have lasted the life of the WJ. With me driving... they died quick.

I do intend to lift the WJ further and replace the front with a long arm setup and the rear lower arms with adjustables. Only now I am doing it in phases...…. starting way sooner than expected. Presently the WJ is in the shop for an oil pan gasket and motor mount replacement, and if they have time and budget allows, installing IRO adjustable rear control arms. Otherwise, I'll be doing it on my next free weekend.

By the way the cooling mod is still on, just delayed. This rounds budget is now spoken for, the same shop doing the oil pan now will eventually be assembling the custom AC suction line needed for mechanical fan clearance.

James
 

tjZ06

Rank V
Launch Member

Advocate I

2,268
Las Vegas/Palo Alto
First Name
mynameisntallowed
Last Name
Adams
Member #

20043

Another learning experience (I knew, but now I KNOW):

A budget boost may be all we need for what we want to do, or may be the best bang for the buck for the budget. Many of us have (or will be adding) mild lifts with either spacers or longer springs and keeping the factory control arms. Saves a lot of money over going to a full house high lift kit that replaces all the suspension components with new adjustable or short or long arms. But with older vehicles, there are hidden costs that may help justify purchasing a complete higher level kit.

Out of sight, out of mind factory suspension bushings may work great for a short time when you first hit the trails. However... the aged, cracking, and dry bushings will quickly tear apart when you flex the vehicle way past where it has flexed for the last 15 or so years. This is exponentially true when you disconnect the sway bars! My advice is to plan on a suspension rebuild anytime you lift or repurpose an older rig for hard use, or go for the complete lift kit and replace bushings/control arms from the start.

My learning experience:

When I bought the 03 WJ with approx 121k miles, it had a budget boost on it that appeared to have been installed for years. However the vehicle showed absolutely no signs of off road abuse. Suspension was solid and felt like a lower mile vehicle. Over the last two years I have tweaked the bump stops, added quick disconnect end links, correct length shocks for full droop, and generally maximized the budget boost flex potential. And I used the vehicle off road as I intended. The mild lifted WJ has proven pretty dam capable, and at one point teetered back and forth on one front wheel and the opposite back wheel going down a step in Dedeckera Canyon (Death valley) - completely flexing the suspension to max. After the trip, the only thing I really found was the old Bilstein shocks gave up thanks to a couple hundred miles of washboard. But over time and after a number of other trips, the WJ is experiencing progressively worse bump steer and wandering.

I installed a JKS adjustable track bar. No improvement (but not a loss, the front axle is now centered). Then after OB Sierra Rally Bald Mountain Trail loop, I could feel a lot of play between the track bar mounting bolts and bushing sleeves. Maybe the bracket holes wallowed out. So added 9/16 inch track bar hardware torqued to 135 ft-lbs, and there is now absolutely zero play on either end of that dam track bar. No improvement, almost a detriment, as there is no give at all!. I replaced the steering drag link ends (seals blown out and showed some wear) and had an alignment check. No improvement.

Then finally I noticed the rear pinion angle is visibly off. How can that be with no changes to the rear suspension? Once I actually LOOKED, I discovered the rear lower control arm bushings are visibly collapsed and shredded. Enough to significantly alter the pinion angle at rest. This makes sense now, as the bump steer and wandering actually feels like it is coming from the back end. With normal street driving, these bushings may have lasted the life of the WJ. With me driving... they died quick.

I do intend to lift the WJ further and replace the front with a long arm setup and the rear lower arms with adjustables. Only now I am doing it in phases...…. starting way sooner than expected. Presently the WJ is in the shop for an oil pan gasket and motor mount replacement, and if they have time and budget allows, installing IRO adjustable rear control arms. Otherwise, I'll be doing it on my next free weekend.

By the way the cooling mod is still on, just delayed. This rounds budget is now spoken for, the same shop doing the oil pan now will eventually be assembling the custom AC suction line needed for mechanical fan clearance.

James
Good update, and a great point about the BB and stock bushings in general once you actually start using these things. I intend to long-arm convert the rear of mine ASAP. The front is LA and everything up front is fresh (including the over-the-knuckle steering stuff). However, the rear is just the wishbone spacer, springs and shocks and what I can only assume are the original control arms and wishbone. Once I'm done with the motor swap, I think the rear long arm will be next vs. updating the bushings in the stock stuff.

-TJ
 

JimBill

Rank V
Member
Investor

Advocate I

2,268
San Benito County, CA, USA
First Name
James
Last Name
Madison
Member #

18747

Good update, and a great point about the BB and stock bushings in general once you actually start using these things. I intend to long-arm convert the rear of mine ASAP. The front is LA and everything up front is fresh (including the over-the-knuckle steering stuff). However, the rear is just the wishbone spacer, springs and shocks and what I can only assume are the original control arms and wishbone. Once I'm done with the motor swap, I think the rear long arm will be next vs. updating the bushings in the stock stuff.

-TJ
If you don't have plans for it, I'll be interested in the wishbone spacer when it gets pulled. At 99 bucks new for a block of aluminum with 3 holes, I'm willing to deal. When I ever finish the D44A differential mod I'd like to install the spacer when the diff goes in. Yeah it's still planned, after the cooling mod. Stuck on ARB or lunchbox locker...… now that ARB has a D44A air locker available (sigh.....).
 

tjZ06

Rank V
Launch Member

Advocate I

2,268
Las Vegas/Palo Alto
First Name
mynameisntallowed
Last Name
Adams
Member #

20043

If you don't have plans for it, I'll be interested in the wishbone spacer when it gets pulled. At 99 bucks new for a block of aluminum with 3 holes, I'm willing to deal. When I ever finish the D44A differential mod I'd like to install the spacer when the diff goes in. Yeah it's still planned, after the cooling mod. Stuck on ARB or lunchbox locker...… now that ARB has a D44A air locker available (sigh.....).
It'll be yours if you want it, no cost. As you probably saw in my thread, if you go with the spacer keep an eye on the bolts, I had mine loosen up and eventually shear. Looking forward to what you do with the D44A - I'm still so on the fence on building the D30/44A vs. the expense of building or buying D44s front and back (non-AL obv). Really, for overlanding and a 33-35" tire I *think* I'll be fine with properly the 30/44A if properly built. Still, I'm not a fan of "should be okay" for things. My dream are the ECGS Dana "489" as they call them (JK R&P sized D44s) at 65" WMS and with the front big brakes. That can easily get to ~9k by the time I spec out a pair... more money than I could even sell my WJ for, even with the brand new motor. I know that's not the real metric to measure by, since I have no intention of selling it. But still, at some point it starts to get to "man should I just get a good used JKUR" or "you know I could save a whole lot of cash and finance a JLUR" type money.

-TJ
 

JimBill

Rank V
Member
Investor

Advocate I

2,268
San Benito County, CA, USA
First Name
James
Last Name
Madison
Member #

18747

It'll be yours if you want it, no cost. As you probably saw in my thread, if you go with the spacer keep an eye on the bolts, I had mine loosen up and eventually shear. Looking forward to what you do with the D44A - I'm still so on the fence on building the D30/44A vs. the expense of building or buying D44s front and back (non-AL obv). Really, for overlanding and a 33-35" tire I *think* I'll be fine with properly the 30/44A if properly built. Still, I'm not a fan of "should be okay" for things. My dream are the ECGS Dana "489" as they call them (JK R&P sized D44s) at 65" WMS and with the front big brakes. That can easily get to ~9k by the time I spec out a pair... more money than I could even sell my WJ for, even with the brand new motor. I know that's not the real metric to measure by, since I have no intention of selling it. But still, at some point it starts to get to "man should I just get a good used JKUR" or "you know I could save a whole lot of cash and finance a JLUR" type money.

-TJ
Great, thanks! If you can push a 35 inch tire I think you will not be able to hold back to just "overlanding". I wouldn't anyway. The D44A is actually very beefy, with a truss and skid I believe it to be formattable. Now for the D30 that's another story for 35s. I think you should cry once and upgrade to an iron D44.... and sell me the D30 with the Vari-Loc. I don't expect to go over 32's. OK, it is biased advice I'm dishing out. In all seriousness, consider a D30HP. The high pinion is considered quite a bit stronger and helps with driveline angle.
 

adventure_is_necessary

Rocky Mountain Region Local Expert Kansas
Member

Traveler III

4,007
Bonner Springs, Kansas, United States
First Name
Lucas
Last Name
Antes
Member #

7082

Ham/GMRS Callsign
KE0ZXA
Thanks! A fair bit of thinking did go into this seemingly simplistic approach.

The EMT clamps are pretty stout, my belief is the plastic ends on the cross bars will give out first. That holds true if the cross bars are used with the Yakima mount system attached to the factory cross bars as well.
Also, where I placed the back cross bar is on center (more or less) of where the line of gas cans will sit. This was intentional, and also happened to be a great spot to keep the rack reasonably level.
With the cross bar a little proud above the rack bars, the weight of the cans will mainly be on the cross bar and not on the basket and clamps.
I intend to use the rest of the rack for bulky but relatively light items.
One thing I did not mention yet, once I clean up the rack (it has sat outside in the dirt for a long while), I will run rubber strips down the bottom side of each of the rack's front to back tubes. This way if something collapses, the rack won't be on the roof metal to metal.
Lastly, I do need to disassemble the rack, dry out the insides, and reassemble with RTV on the joints. Or just drill a few drain holes......
Plan B (if needed) is to scrap the factory cross bars and use pipe mounted to the rails with Unistrut clamps, but that will raise the rack a few inches.

View attachment 140691
I have found that the rattle can Rust-oleum black bed liner is pretty close to the factory color and texture, should you decide to freshen up the paint.
 
  • Like
Reactions: JimBill

JimBill

Rank V
Member
Investor

Advocate I

2,268
San Benito County, CA, USA
First Name
James
Last Name
Madison
Member #

18747

Todays fun- The shop doing the oil pan work was also tasked with R&R of the motor mounts. Might as well, much easier to get to since the exhaust Y pipe was coming out anyway. If you are going to do this work, prepare for frustration with Omix-Ada 4.7 motor mounts. The bolt holes do not align with the holes on the engine block. Guaranteed you will need to elongate one of the upper holes on each mount about 1/8 inch. Shout out to MartinBuilt on YouTube, he showed the same problem on one of his videos, so I was at least waiting for it (only I neglected to tell the mechanic). If anyone knows of an alternate manufacturer with correctly manufactured mounts, post it up so others do not have to deal with this BS.

The good news is the shop reported the exhaust flange bolts came loose ok, no broken hardware to deal with. The weird news is the oil pan appeared glued to the block, and they had to chip it loose inch by inch (and dollar by dollar for me...).
 

tjZ06

Rank V
Launch Member

Advocate I

2,268
Las Vegas/Palo Alto
First Name
mynameisntallowed
Last Name
Adams
Member #

20043

Great, thanks! If you can push a 35 inch tire I think you will not be able to hold back to just "overlanding". I wouldn't anyway. The D44A is actually very beefy, with a truss and skid I believe it to be formattable. Now for the D30 that's another story for 35s. I think you should cry once and upgrade to an iron D44.... and sell me the D30 with the Vari-Loc. I don't expect to go over 32's. OK, it is biased advice I'm dishing out. In all seriousness, consider a D30HP. The high pinion is considered quite a bit stronger and helps with driveline angle.
Thanks. 35"s are really not needed for what I want to do with the Jeep... and like you said having 35"s and the proper running gear will make apt to try things beyond "just overlanding." That said, I have a few friends running 35"s on properly built D30s without issue, they just treat them "right." If you want to truly rock crawl, and you plan to hop it on the throttle the D30 just won't do the job no matter how built. If you just want to be able to get to more remote places and aren't too proud to break out the winch when the going gets tough, a "built" D30 can survive a lot.

In reality, I think I *should* stick to a 33" though. I just don't see putting $10k of axles in this platform, and I don't see needing much beyond say a 33x11.5". I think I can clear 33x1.5"s at the current lift with a little additional trimming and moving the axles fore/aft about .5" respectively. I think I'd prefer that route to adding lift (especially for "just" 33"s) for the overall ride, stability and look of the package. It could be money down the tube, but I'm very tempted to order what I need to setup my current D30/44As with real lockers and get my 242HD t-case rebuilt (with SYE) and into the Jeep now.

Anyway, I don't want to make this too much about my setup in your thread! If I ever change the front axle you'e welcome to this one as well... but honestly I think it's developing a slight bend (the tires seem to have negative camber, to my eye) already. It truly hasn't been wheeled hard so I'm worried that even light use is too much for the 30. Of course, C-gussets, axle sleeves and a truss would help all of that (and hopefully the housing could be straightened while installing all of that).

-TJ
 

JimBill

Rank V
Member
Investor

Advocate I

2,268
San Benito County, CA, USA
First Name
James
Last Name
Madison
Member #

18747

This round of shop work complete. Oil pan gasket, motor mounts, IRO lower rear control arms, and custom AC suction hose all done. Still on the lookout for more leaks, and I see valve cover gaskets likely in my future. Drives considerably better with the new control arms, much less bump steer and far better tracking, feels more like it should. Over 60mph it rolls a lot more free (for lack of better words), the pinion angle correction helped quite a bit (now -1/2 a degree from transfer case, close enough to perfect for now). Time to take it on a 500+ mile road trip and see how it does.

AC Suction hose mod. Needed to make room for a mechanical fan which will come right up almost against the AC clutch. This was accomplished by purchasing the '99 hose, cutting the compressor end off of both, and crimping the new end onto the old hose.

1584819662698.png AC Hose Mod.JPG
 

Attachments

Last edited:

MrWilsonWJ

Rank V
Launch Member

Member III

1,691
Kennewick, WA
First Name
Dustin
Last Name
Wilson
Member #

23384

Todays fun- The shop doing the oil pan work was also tasked with R&R of the motor mounts. Might as well, much easier to get to since the exhaust Y pipe was coming out anyway. If you are going to do this work, prepare for frustration with Omix-Ada 4.7 motor mounts. The bolt holes do not align with the holes on the engine block. Guaranteed you will need to elongate one of the upper holes on each mount about 1/8 inch. Shout out to MartinBuilt on YouTube, he showed the same problem on one of his videos, so I was at least waiting for it (only I neglected to tell the mechanic). If anyone knows of an alternate manufacturer with correctly manufactured mounts, post it up so others do not have to deal with this BS.

The good news is the shop reported the exhaust flange bolts came loose ok, no broken hardware to deal with. The weird news is the oil pan appeared glued to the block, and they had to chip it loose inch by inch (and dollar by dollar for me...).
I just did the motor mounts on my WJ w/4.7L using mounts I got from Napa, didn't see any brand name on them but they went on without having to open up any of the holes. I did have the frame side mount loose while I put the new mounts on the block so maybe that got me a little wiggle room to line up the holes but all in all they fit pretty good. Glad I decided to do them while the rad is still out and the grill off, there was plenty of room to get to all the bolts and slide the mounts out toward the front.
 
  • Like
Reactions: JimBill

JimBill

Rank V
Member
Investor

Advocate I

2,268
San Benito County, CA, USA
First Name
James
Last Name
Madison
Member #

18747

Finally started digging in for the cooling mod.

First the bumper, grill , air filter box, washer fluid reservoir, headlights, and headlight support panel were pulled out. The ZJ reservoir location was worked out and then the front and rear pump locations. Very tight fit but it it can be puzzled in. Next it felt like hours of pulling wiring harness tape off to expose the wiring for the three connections. I did buy the reservoir with 2 ports, so I could either leave out the low level sensor or have a choice to relocate it. Ohming out the sensor, it shows infinity when opened and less than 1 ohm when closed. I figured it was very crowded so I simple left it out and made a jumper for the connector. Not sure if I should put in a 1 ohm resistor?? Anyhow the wiring is straightforward but tactically a mess to deal with. At one point I uncovered a ground junction with 7 grounds tied to it. I cut that all out and ran new ground leads, and upped the wire gauge leading to each of the new ground gangs I made. This was also very intentional, in the future I intend to use the fog light circuit for Rigid LED pods so it was time to shore the grounding system up.

Ground pigtail.jpg

Once the wiring was complete, the reservoir was mounted. A 90 degree for drilling helps a lot here. Next, the evap valve needed to be relocated. It took a little work making and mounting a new bracket, and then extending the electrical connector, but it now sits completely out of the way. Rather than run to the hardware store, I found a very suitable shelf bracket to fab the evap valve bracket from. Throughout this process, all new holes that were drilled were deburred and new bare metal painted with a paint pen. All new hardware used is metric to not confuse me later. All wire slices were crimped, soldered, and sealed with heat shrink. I really do not want to ever have to go back into this particular part of the harness. On completion of this part of the mod, the Jeep was fired up and the windshield washers tested. All works, no alarm codes, and no genie smoke came from the wiring harnesses.

Lastly (for this weekend anyway) it was time to dig into the heart of it. The coolant and power steering fluid was drained, hoses came off, and the hydraulic fan system and radiator came out. I can't say this was straightforward and I would hate to do it on the trail, but with a little patience out it all came. I then broke free the harmonic balancer bolt, and got started on removing the accessories from the front of the engine. Then I was rained out for now, so took the opportunity to wash down the mess I made and clean the bugs out of the AC condenser. I did leave the support bracket and hood latch, as the Jeep sits outside and it is peace of mind to keep it locked up for the workweek. So unless the rain stops, that's it for this weekend!

Washer and Purge Valve.jpg Bracket.jpg

Washer complete.jpg Rained Out.jpg

And the rain petered out, so had another hour and a half before dusk to get what I could done. Now its ready for timing cover R&R next weekend.

timing cover ready.jpg
 
Last edited:

JimBill

Rank V
Member
Investor

Advocate I

2,268
San Benito County, CA, USA
First Name
James
Last Name
Madison
Member #

18747

Had just enough daylight this eve to pull the timing cover and inspect the chain system. The gasket was in too good of condition for 135K, I think someone has been there before for whatever that means. But....the right cam chain tensioner isn't locking, and the left tensioner is frozen collapsed and the chain loose. Main chain tensioner looks AOK. Can't believe I didn't hear a chain slap around. Very glad I took a look. All else looks fine, the guide plastic is all there and everything else looks serviceable so maybe I got lucky and found it in time. A right and left tensioner now on order.

Timing Chains.jpg

Update 3/5/20: I have been buying for this project over a 5 month period, mainly so I could stay off the credit cards and still afford quality parts. But the current state of commerce has foiled this plan. Buyer beware rules right now.

In attempting to get this thing back together at just the timing cover level I have run into parts problems. First, one of the Cloyes tensioners had a wrong part in the box, second the "Mopar" thermostat I paid premium for isn't a Mopar part but a swapped in budget part, and lastly the new AC Delco water pump housing is too warped to trust sealing or risking the housing cracking on install.

I didn't use Amazon for hard parts. I mostly ordered through Rock Auto, and appreciate having the choice of brands (and perceived quality levels) and also since I am swapping parts between years, the parts information on the site is invaluable. But what is showing up in the boxes is at times very disappointing and forcing emergency buying so I can keep this project moving.

It's a good thing I am stubborn, and I have the Tahoe for a daily driver.
 
Last edited:

JimBill

Rank V
Member
Investor

Advocate I

2,268
San Benito County, CA, USA
First Name
James
Last Name
Madison
Member #

18747

I was able to source a correct timing chain tensioner and replacement water pump this week, and progress nicely on the project. Installed the new tensioners and reassembled the front of the engine from there. Installed the '99 power steering pump and junk yard '99 cooler. Using a cordless drill to drive the pump, flushed and bled the power steering system. Went a little overboard and used fuel injection hose clamps on the power steering return lines, but I don't want to have to go back in there again for a long while. The cooler hard lines took a bit of persuading but eventually fit well. I did have to borrow a 1 1/4 open end wrench for the harmonic balancer installer nut, and also a power steering pulley installation tool. But all-in-all the engine came back together without incident.

serpentine.jpg Power Steering.jpg

In the morning before the rain started I used a wire wheel to remove a couple rust spots on the lower radiator support and sprayed with Rustoleum I had laying around. Then hooked the battery back up and went searching for the right circuits to tie in for the fan control. After quickly pulling out the pop up due to the rain starting, removed the battery tray for inspection (no rust underneath it) and zip tied the hydraulic fan solenoid tucked up tight so when the battery tray was reinstalled it was out of sight and mind.

Rain Pop Up.jpg

Lastly, I tied into all the electric fan connections needed from the underside of the fuse panel. This included installing a spade and fuse in the electric fan position for battery power, tying in to the AC relay for switched power on and AC clutch on signals. I tied into a ground and buttoned everything up, and ran the wiring under the battery tray to up front.

Electrical Box.jpg Ready for fan.jpg

The only glitch in all this is when I installed the battery to verify all the signals, I had no power. No dome lights, the ignition switch did nothing, nothing anywhere. Everything was dead, but power checked out going to the fuse box. Sorting it back out, I removed the ground from where I had attached it, and noticed the factory ground went to a painted surface. The factory ground connectors have serrations (for lack of knowing the proper word) that bite in through paint when bolted down. These flatten out, and if you do not replace the ground connector in the exact position, it tightens over paint. I bent the serrations so they will bite again and with a Dremel and wire wheel removed the paint. I installed the factory ground without the fan ground and found another bolt to tie the fan ground to (I cleaned these surfaces with a wire wheel as well). I hope this was the issue, on reassembly I had normal electrical again.

The cooling system now remains to be installed. I am delayed waiting on two things. The mechanical fan that was supposed to arrive a few days ago shows it left Georgia only yesterday, so I cannot install the radiator and fan shroud until I test fit the fan and so on. Second, I am repurposing the original hydraulic cooler to a transmission fluid cooler. Friday I figured out the fittings and ordered Russel 1.5 x 16 power steering type x 3/8 push lock 180 deg fittings. Summit showed the fittings in stock but at checkout noted they will not ship until the 28th. I cut the fittings of the end of the old cooler lines and will use these until the new ones come.

Sunday I will sleep in for a change and then maybe start playing with the front plastic (wheel wells and bumper). Also I will unbox the radiator and install the shroud and transmission cooler lines, and then hurry up and wait for the long delayed mechanical fan.

What I am pleased about is, other than a few new shiny parts, so far it looks like I did nothing to molest the engine compartment. That may sound strange, but the plan was to use as many stock parts as possible and very intentionally and deliberately execute the mods, so the engine bay looks factory. The only planned item that will look aftermarket will be the fan controller, just because I have not figured out a good place to hide it yet!

James
 

Attachments

Last edited:

JimBill

Rank V
Member
Investor

Advocate I

2,268
San Benito County, CA, USA
First Name
James
Last Name
Madison
Member #

18747

Decided to pull out the cooling parts and start test fitting them together. Assembled the 99 radiator, transmission cooler lines, electric fan, fan shroud, and fan controller temperature probe. I can see why WJs occasionally break radiators, the weight becomes significant. (Now for someone who just wants to run the mechanical fan, removing the electric or hydraulic fans saves considerable weight.) One note to pass along is the fan shroud fits the 99 radiator perfectly, if you use a later model radiator it will be 1 inch shorter and there will be a large gap between the top of the radiator and shround. This could be filled with foam. Second, the 99 shroud mounting tabs only line up with the later model radiators top mounts, and not the bottom 2 mounts. Using the matching 99 radiator is the way to go.

Three things to consider when installing a temperature probe of this kind. First, the internet of things likes to say this style of probe does not work well with aluminum radiators, or works fine, or works ok. Who knows, I will find out. Provided was just a bare probe, so I made rubber tabs to sandwich it on either side of the radiator (a 17 caliber empty shell case works great as a hole punch on the rubber). the idea is to both keep the probe from moving and provide a pocket of insulation for full heat sinking. I also installed shrink tubing to shore up the delicate wiring and wiring to probe connection. Second, the depth of the probe is very important, as the AC condensor is very close the to the radiator when everything is mounted up. since the end it tapered, and I only had about 1/4 inch exposed, the tapered tip of the probe is insulated with marine grade shrink tubing (with adhesive). Not sure if this will work as I do not know the melting piont of the adhesive.

Temp probe.jpg probe in radiator.jpg Radiator assy.jpg

Lastly, it doesn't matter if it is a probe or a temperature sensor, there are two theories of where to mount it. Most kits call for mounting at the heat source, either near the water outlet of the engine or in the radiator right by the hot water inlet. When mounted in this location it is all about reading and reacting to what the engine temp is doing. Some kits (usually the high end PWM stuff) call to mount the sensor or probe on the cool side of the radiator or on the engine water inlet hose. When mounted in this location it is about reading and reacting to how well the radiator is cooling the water. Do your own research and decide on which theory or logic appeals to you I prefer the feedback loop of the cool side mount and thus mounted the probe in the lower left corner of the radiator.

After test fitting the assembly, it appeared there is enough room to install the overdue mechanical fan from the underside of the vehicle with the radiator and shroud mounted. So I decided to start putting things together. Once the radiator assembly was in and the ac condenser mounted, the hydraulic cooler was mounted. The bolts on either end center line mounted fine, but the 99 radiator mount for the top bolt is about 3 inches different than the later model radiator. Since the mounts are on the same plane, I'll just make a bracket to tie the mounts together (on another day!)

Trans cooler line help.jpg Bracket needed.jpg

I began figuring out the plumbing to the transmission cooler lines. Since the Russel 180 degree fittings are still on order, I attempted to hook the lines up using cut off fittings from the old hydraulic cooler lines. With everything disconnected, I was distracted by a shiny object and took time to run heat shielding over the lines where they pass very close to the passenger exhaust pipe. I think I will try and source the Russel connectors for faster delivery and hold off. I do not like how much cooler hose I will need to make the temporary setup work. Test fitting the headlight support revealed I will need to do a tad of trimming where it meets the '99 power steering cooler. And somewhere in the mix, I think I punctured the ac condenser. Oh well, its pretty ratty, beat up, and warped anyway.

test fit 1.jpg test fit 2.jpg

And the last unseen progress is I found a spot I can live with to mount the fan controller, and is at the same height as the engine air filter inlet. This way I don't have to worry about it only being water resistant. If it gets submerged, the engine is ingesting water so I will have more important things to worry about.

James
 
Last edited: