12v Basics

  • HTML tutorial

reaver

Rank VI
Member

Explorer I

3,680
Caldwell, ID, USA
First Name
Brian
Last Name
McGahuey
Member #

23711

Ham/GMRS Callsign
GMRS WRMV941
This is the way.

I've not installed my DC-DC charger yet. I'm not going to bother with solar in my rig. I'll save that for the trailer.

I'd rather use a lifepo4 battery in the rig, but may end up going agm just to save cost. At least to start.
 

HYRYSC

Rank III

Enthusiast III

676
Southwest Missouri
First Name
Robert
Last Name
Conn
Member #

29868

Ham/GMRS Callsign
KD0YIN
This is the way.

I've not installed my DC-DC charger yet. I'm not going to bother with solar in my rig. I'll save that for the trailer.

I'd rather use a lifepo4 battery in the rig, but may end up going agm just to save cost. At least to start.
LifePo4 is awesome technology and I have a solar generator (Bluetti EB70) that uses that technology. I see that you are in Idaho, so one thing that you will need to consider (and one reason that I have decided to use a 2nd battery setup in addition to the LifePo) is that they don't react well to being charged with the internal temp is below freezing. From what I have read it will basically brick your battery. There are some new ones that are coming out that reduce the input charge down to a level that they will tolerate when the temperature is low so that is good.

I think that I will relegate my EB70 to a role as backup and remote camp power and use my 2nd AGM battery as main vehicle power for refrigerator, lights etc while I am at camp.
 
  • Like
Reactions: reaver

K12

Rank VII
Member

Pathfinder I

5,863
Idaho, United States
First Name
Beau
Last Name
K12
Member #

28559

Service Branch
Air Force
cold weather can brick the battery and a lot of technology is out to prevent this. battle born batteries have a heated battery to prevent low temperatures and keep batteries warm enough to be able to charge at a full rate. they also have an amazing warranty and customer service from everyone I know who has ordered anything from them.


reaver

Rank VI
Member

Explorer I

3,680
Caldwell, ID, USA
First Name
Brian
Last Name
McGahuey
Member #

23711

Ham/GMRS Callsign
GMRS WRMV941
LifePo4 is awesome technology and I have a solar generator (Bluetti EB70) that uses that technology. I see that you are in Idaho, so one thing that you will need to consider (and one reason that I have decided to use a 2nd battery setup in addition to the LifePo) is that they don't react well to being charged with the internal temp is below freezing. From what I have read it will basically brick your battery. There are some new ones that are coming out that reduce the input charge down to a level that they will tolerate when the temperature is low so that is good.

I think that I will relegate my EB70 to a role as backup and remote camp power and use my 2nd AGM battery as main vehicle power for refrigerator, lights etc while I am at camp.
I'm well aware of the cold charging limitations of lifepo4 batteries. That's part of the reason I'm contemplating going agm as well. While I love the idea of lifepo4, and the charging cycles, to get a good quality 50ah lifepo4 battery (what I want inside the truck), I'm looking at 600-750 bucks. I can get a 100ah agm for 200. Yes, it's heavier, but that's not a huge deal for me. So, for my needs, the cost/performance ratio just isn't there yet.
 

jmcgilroy

Rank III

Enthusiast III

808
Central California, CA, USA
First Name
Jim
Last Name
Callahan
Ham/GMRS Callsign
KJ6KAV
I'd like to add a second battery in my 2019 Silverado (just because there's room and a second battery tray already there). I intended to just use a battery isolator and an AGM deep cycle for the "house" battery. Now I read about "smart alternators" and I'm befuddled and unsure if this will work.
 

reaver

Rank VI
Member

Explorer I

3,680
Caldwell, ID, USA
First Name
Brian
Last Name
McGahuey
Member #

23711

Ham/GMRS Callsign
GMRS WRMV941
I'd like to add a second battery in my 2019 Silverado (just because there's room and a second battery tray already there). I intended to just use a battery isolator and an AGM deep cycle for the "house" battery. Now I read about "smart alternators" and I'm befuddled and unsure if this will work.
It will not. The reason why is because the computer is constantly adjusting the voltage to maintain the required systems, and improve fuel economy and reduce engine load.

Standard alternators attempt to maintain a constant voltage, and can reasonably charge an AGM or deep cycle battery.

For charging with smart alternators, you need to use a DC-DC charger. You can pick up a renogy 20a charger for 120.not really that much more than a cheap isolator system.
 

jmcgilroy

Rank III

Enthusiast III

808
Central California, CA, USA
First Name
Jim
Last Name
Callahan
Ham/GMRS Callsign
KJ6KAV
It will not. The reason why is because the computer is constantly adjusting the voltage to maintain the required systems, and improve fuel economy and reduce engine load.

Standard alternators attempt to maintain a constant voltage, and can reasonably charge an AGM or deep cycle battery.

For charging with smart alternators, you need to use a DC-DC charger. You can pick up a renogy 20a charger for 120.not really that much more than a cheap isolator system.
Thanks....my education continues....
 
  • Like
Reactions: reaver

reaver

Rank VI
Member

Explorer I

3,680
Caldwell, ID, USA
First Name
Brian
Last Name
McGahuey
Member #

23711

Ham/GMRS Callsign
GMRS WRMV941
Well, you don't want debris blocking the vent fan, as it could overheat and burn up the electronics, but I would refer to the manual of whatever dc charger you buy.

The advantage to dc chargers though, is that you can run a smaller fused line to the charger. I have a 20a dc charger. I'm going to use my existing 4ga wires to hook it up, but easily could swap it for 8 gauge due to it only pulling 25 or so amps at the battery.
 

jmcgilroy

Rank III

Enthusiast III

808
Central California, CA, USA
First Name
Jim
Last Name
Callahan
Ham/GMRS Callsign
KJ6KAV
OK, thanks guys. Looking at options now. I understand there are brands with a solar charge controller and MPPT input...if I'm going to spend money, I might as well do it right.
 

reaver

Rank VI
Member

Explorer I

3,680
Caldwell, ID, USA
First Name
Brian
Last Name
McGahuey
Member #

23711

Ham/GMRS Callsign
GMRS WRMV941
Redarc, and renogy have really good ones. Victron is also really good, but I think each module is separate.

I'm planning on running this in my trailer once it's built.


This is what I have for my Xterra


leeloo

Rank V
Launch Member

Advocate I

1,778
Luxembourg
First Name
Mihai
Last Name
Doros
Member #

19403

Anyone with thoughts on mounting these DC-DC chargers inside the engine compartment? Heat issues?
Redarc is rated for use in the engine bay. Some others are not. At the very least, even for the ones rated for engine bay use, they will be less efficient in heat, so might a a bit longer to get a full charge.
Just something to be aware.
 

Tim Barrett

Rank II
Launch Member

Enthusiast I

404
Phoenix, AZ, USA
First Name
TIM
Last Name
BARRETT
Member #

22517

Thanks for posting, this thread is great!

Ok, go easy but please tell me if I’m about to blow up my Jeep…

I have a Victron Orion 12-24v 15amp DC to DC charge controller wired directly to my starter battery under the seat of my Jeep. I think it’s 8 awg wire. It charges my Goal Zero Yeti 1000 core (Lithium) Solar Generator, and the cable splits to also charge my teardrop trailer battery when it’s plugged in which is a Goal Zero 1250 (old AGM).

Question 1) what size fuse should I put between the starter battery and the DC/DC charge controller? I’m assuming it should be fused. I see in their manual the 30 amp Orion calls for 60amp fuse. No info online for the smaller 15amp Orion. Does that mean 30amp for my 15?

Question 2) is it bad to charge both batteries at the same time? Seems like at some point I exhaust the capacity of my alternator maybe?

Sorry if any of this is elementary. I’ll probably do a dual battery set up at some point but I already had the GoalZeros.
 

reaver

Rank VI
Member

Explorer I

3,680
Caldwell, ID, USA
First Name
Brian
Last Name
McGahuey
Member #

23711

Ham/GMRS Callsign
GMRS WRMV941
Thanks for posting, this thread is great!

Ok, go easy but please tell me if I’m about to blow up my Jeep…

I have a Victron Orion 12-24v 15amp DC to DC charge controller wired directly to my starter battery under the seat of my Jeep. I think it’s 8 awg wire. It charges my Goal Zero Yeti 1000 core (Lithium) Solar Generator, and the cable splits to also charge my teardrop trailer battery when it’s plugged in which is a Goal Zero 1250 (old AGM).

Question 1) what size fuse should I put between the starter battery and the DC/DC charge controller? I’m assuming it should be fused. I see in their manual the 30 amp Orion calls for 60amp fuse. No info online for the smaller 15amp Orion. Does that mean 30amp for my 15?

Question 2) is it bad to charge both batteries at the same time? Seems like at some point I exhaust the capacity of my alternator maybe?

Sorry if any of this is elementary. I’ll probably do a dual battery set up at some point but I already had the GoalZeros.
If it's a 15A charger, the output will only be 15A on the battery. It current6draw at the source will depend on how far of a run you have, and Voltage drop. So if they call for a 60A fuse on the 30A charger, I'd say it's also reasonable to put a 30A fuse on the 15A charger.

Also, your 8 GA wire will be more than enough to handle the load.

You could go with a circuit breaker as well, instead of a fuse.
 

Enthusiast III

443
West Yorkshire, UK
First Name
Mick
Last Name
Thresh
Hi, I enjoyed reading that I get the basics I've got a 110amp cable to the rear protected at both ends with a 100amp fuse and the same size wire bolted to the frame work of the car. Then I fused down again to 40amp(but looking at your diagram I didn't need the extra 40amp) into a multi fuse holder with some smaller fuses just to run the cooler box and some chargers for phones and head touches ect.
The set up your making is great, for some one like me to follow but mine wont be as large.
Thanks for taking the time to post that when you did.
If I get time later, jobs to get done for the wife I might start drawing out what I need fresh start on this car.

Mick.
 

Leeaekdb

Rank IV
Member

Enthusiast II

922
Opelousas, LA, USA
First Name
Lee
Last Name
Ritter
Member #

30936

Wow.

This is most helpful! I knew that I didn't know a lot, but wow! This will surely help, thanks for all the posts and feedback!
 

KF0APA

Rank VI
Member

Trail Mechanic I

3,356
Lebanon, MO, USA
First Name
Greg
Last Name
Bryson
Member #

26589

Ham/GMRS Callsign
KF0APA
The intent of this post is to help those who aren't very familiar with how 12v systems work, or where to start whe the it comes to building and wiring a 12v system.

12v basics


Automotive electronics work on a 12 volt system. This is different than the 120v system in your house.


12v is what's referred to as DC, or direct current. Dc current is different than the 120v ac current coming into your home.


If you would like to understand the technical differences between 12v and 120v,id recommend the following article:


Electrical Voltage Explained - What Is It and How Does It Work ?


12v is generally simple to work with. Power comes in (positive or +) and goes out to ground (usually the battery negative or -) to complete a circuit.


That is a dc circuit in its simplest form.


There are lots of things to consider with dc circuits.


There are different gauges of wire that is capable of carrying different amounts of current different distances. This is because wires have resistance as the current passes through them. This resistance translates to heat. The wires need to be large enough to handle the heat generated by the resistance of the wire.


Basically remember this one simple rule.


Current (A) + Distance = gauge


The more current you need, and the farther it needs to go, the larger the wire needs to be.


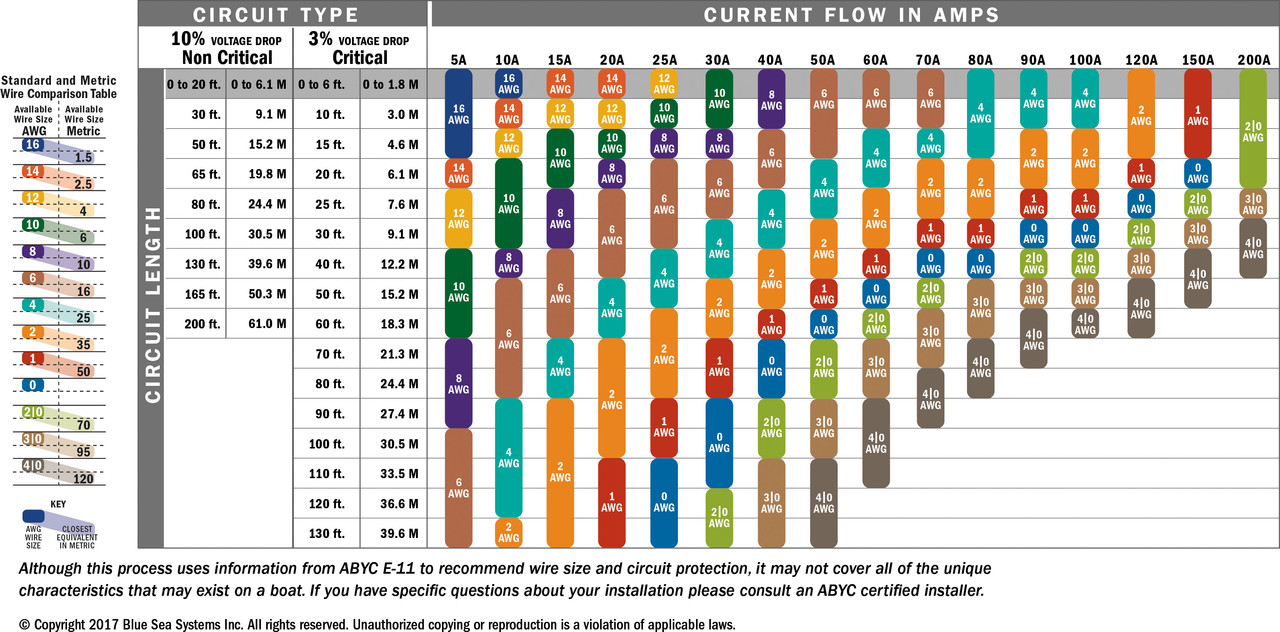
The following chart shows what gauge of wire you need to use based on the amperage draw for a given circuit and how far it needs to run.


One thing to remember about wire gauge. The higher the number, the smaller the wire. 8 gauge is larger wire than 18 gauge.


Let's use a DC-DC charger for example.


I have a 20a DC-DC charger. This charger is fed directly from my battery. The charger will pull as much current as it can, up to 20A. Over a distance of 15ft, 12v circuits have a voltage drop. Based on the chart linked above, I would need to use a minimum gauge wire that is 12 gauge. Using 12 gauge wire though, there would be a 10% drop in amps available at the charger. Because of this, at the battery, the charger would pull 22A. 20A over a 15 foot run of wire would be a lot, so in that instance, it would be better to minimize both heat, and voltage drop by using 10gauge wire. This means that at the battery, the charger would only pull 20.6A instead of 22,and the wire would get as warm, minimizing fire risk.


Could you feed a 20A draw using 18 gauge wire? Sure, but that wire would get rather hot, melt the insulation, and likely start a fire. This is why wire gauge is important.


Fuses.


Fuses are critical for safe operation of 12v circuits. You always want to have a fuse that corresponds to the amperage draw of a given circuit, and place that fuse as close to the power source as possible.


Let's take our previous example using 18gauge wire.


If we placed a 20a fuse close to the battery, as the wire heated up, and the insulation melted, that wire would contact something metal, causing a short. A short would draw as much current as it can. In this case, let's say 60A. 60A would be more than our 20A fuse could handle, causing the fuse to pop. This would break the circuit, and cut the flow of current to the wire, preventing a fire.


Obviously, this is an extreme example, but it illustrates the importance of using fuses. By placing the fuse close to the battery though, the current draw would be considerably more than 20A at the battery. Because we put a 20A fuse there, that fuse would pop before the wire got hot, preventing the wire from getting hot, melting the insulation, and causing a short in the first place.


Relays and switches


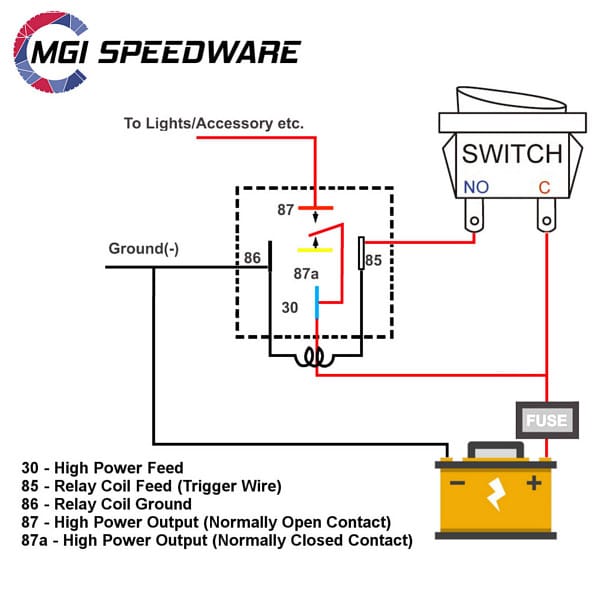
Relays are used to turn a high amperage circuit on and off using a low amperage circuit.


A common application to this is turning offroad lights on and off.


Your high amperage draw (lights) draw 20A. You can use a switch that draws 1a to turn the lights on and off. If you only have one light, this might be overkill, but switches have the ability to turn on multiple Relays with a single switch.


For example, I have multiple accessory ports at the back of my drawer system, as well as a voltage gauge. These ports run off two Relays, each powered by a 20A fuse. These are turned on by a single switch. This way, I'm able to run separate wires to each side, minimizing both heat, and voltage drop. A single wire would need both a 40A fuse, and need to be much larger to accommodate the heat generated by a 40A draw.


Most Relays are 5pin,and wired in this fashion (though you can also do switched ground using a relay, but that's a different and less common way of doing it).


Types of switches.


There are three main types of switches you'll find.


Small 3 pin switches like these:


These switches have a positive, negative and accessory circuit, or are 3 position switches power in-acc1-acc2-ground)


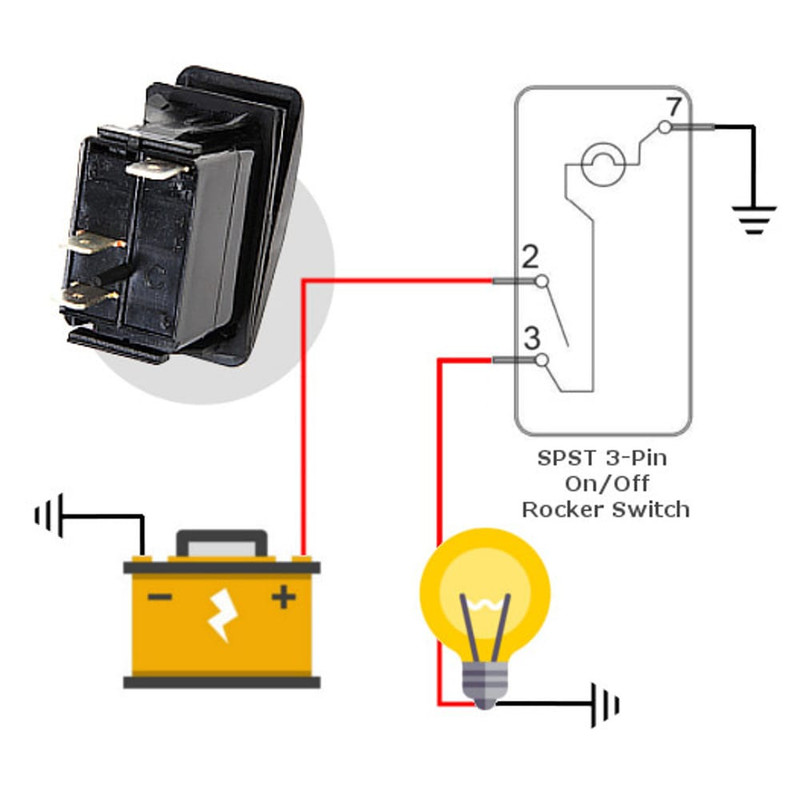
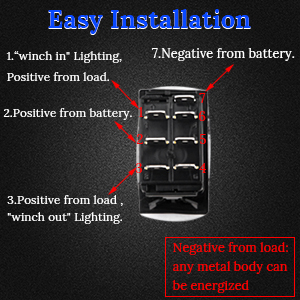
The most common type of switch you'll see looks like this:


These switches are available in 3 pin, 5 pin and 7 pin.


3 pin switches are the same as the small 3 pin switches.


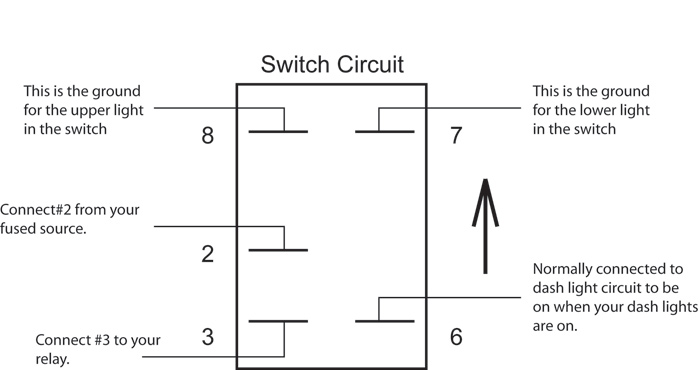
5 pin switches have an added illumination circuit with separate ground,


and 7 pin switches work like 3 position small switches, with an added illumination circuit.


With all these switches, the positive out can run to the low voltage input of a relay to switch a higher amperage circuit.


Fuseblocks

Most auxiliary electrical systems use fuseblocks. This makes wiring things simpler, as you can run one large wire to s single location, and add circuits to the fuseblocks as needed.

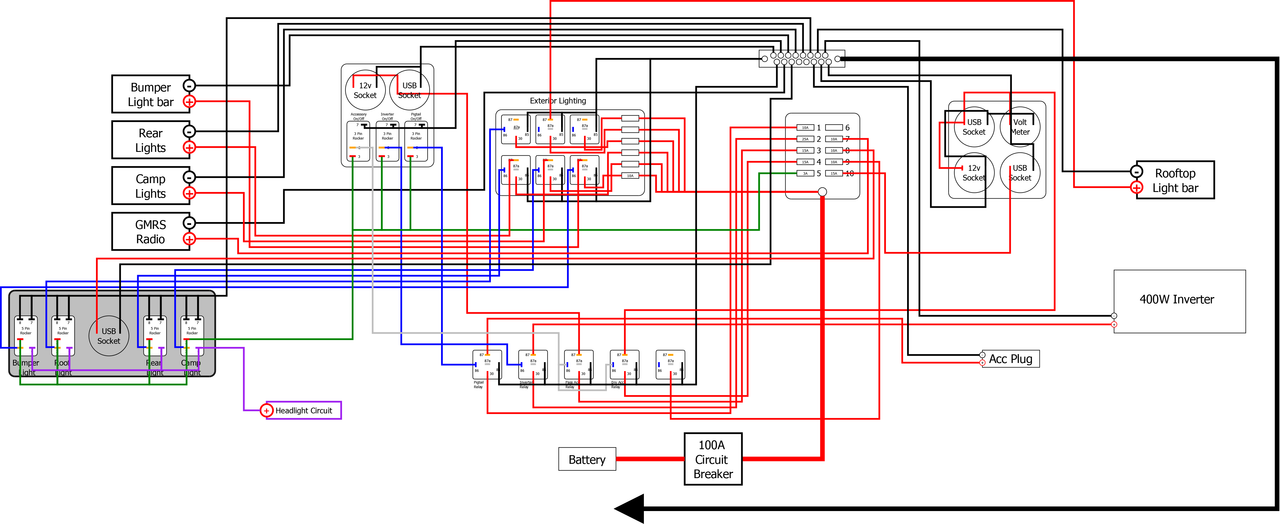
To give you an example, once you grasp the basics of a 12v system, and how Relays, fuses, switches work, and how to size your wire based on the load you need to pull, it becomes easy to build a system that looks like this from the ground up.


Hope that helps. Feel free to ask questions in this section of the forum, and we'll try and get them answered for you!
Thanks for this!! It's helped to plan my electrical upgrades.
 
  • Like
Reactions: reaver