Member III
For those folks running a Chevy / Sierra setup, I did a little write up on how I installed a Front facing camera on my 2017 Silverado. Anybody that's been off in the sticks knows a front facing camera is golden to see where you are going and avoid those titanic sharp rocks...
Rostra

 www.rostra.com
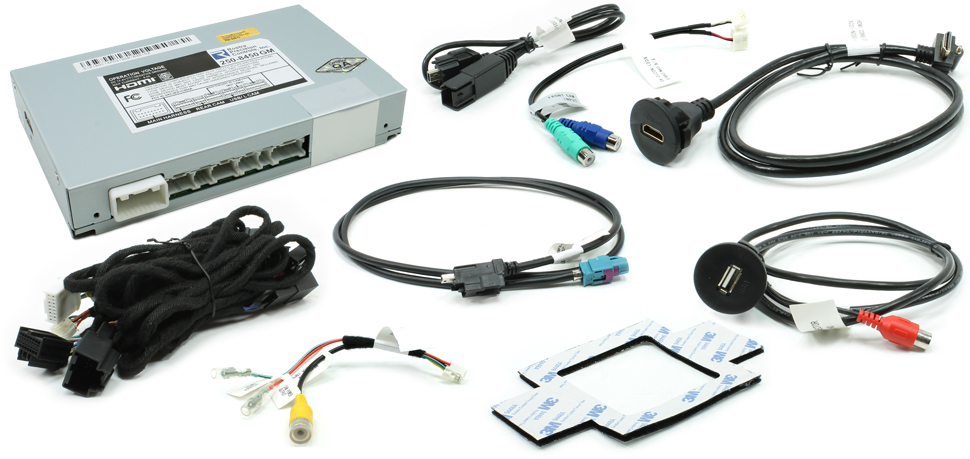
Wanted to give some info on getting a Rostra 250-8456 Camera Interface installed on my 2017 Silverado 4x4.
The primary reason for a front camera is to see what the heck you're driving up on when out on the trail. And, it comes in handy when you are trying to squeeze your full size into those sub-compact parking spaces.

This wiring harness provided by Rostra does NOT come with information related to what the heck these wires are for. I assumed a person could use them to power the cameras, provide signals, etc. However, setting up a camera system based on assumptions is not the best idea. So, I emailed Rostra support, and was told that indeed, we can use the provided wires for ground, and camera power. I did just that, and it's working great.

I choose to mount the NATIKA Backup/Front View Camera as high as possible, and as far out as possible, and of course, centered. Getting it centered, as you will see later, was a challenge due to the front grill mounting bracket. Despite this, it seems to have worked out.


The front grill has a mounting tab that helps hold the grill to the inner bracket. I notched out this bracket so that I could get a nut in there, and a provide access for a wrench to turn the nut.


I chose to run the wire into the Passenger-side front fender, through an access hole, and then into the cab through a grommet. I triple wrapped the wire in electrical tape to help reduce chaffing on the wires during movement.


When running the cables on the inside it's best to keep the cable management clean so that you don't have some Stealership-monkey, wanna-be-mechanic roughly pulling things apart just to change a cabin filter.

The HDMI cable was routed into the upper glove box for connection to a phone or other media device. This HDMI will allow media to be played on the device through the Rostra interface.

When you start running the wires, you're going to need to pull it all apart to gain access to the mount spot for the Rostra computer. Don't even attempt to mount the Rostra unit above the CD player, it will not fit. The Rostra wiring harness and USB plug will interfere with radio display.


A few more pics:


AND, here is the fully functioning front view camera in action.
Hope this can help anybody else wanting to install a front, side or bed camera.
Rostra

Chevrolet and GMC Multi-Camera System for Factory LCD Screen
This all-new video interface allows for the installation of multiple cameras around the vehicle providing unparalleled safety through added driver awareness. Covering a wide variety of the most popular cars and trucks including the Chevrolet Silverado and Colorado, as well as the GMC Sierra and...
Wanted to give some info on getting a Rostra 250-8456 Camera Interface installed on my 2017 Silverado 4x4.
The primary reason for a front camera is to see what the heck you're driving up on when out on the trail. And, it comes in handy when you are trying to squeeze your full size into those sub-compact parking spaces.

This wiring harness provided by Rostra does NOT come with information related to what the heck these wires are for. I assumed a person could use them to power the cameras, provide signals, etc. However, setting up a camera system based on assumptions is not the best idea. So, I emailed Rostra support, and was told that indeed, we can use the provided wires for ground, and camera power. I did just that, and it's working great.

I choose to mount the NATIKA Backup/Front View Camera as high as possible, and as far out as possible, and of course, centered. Getting it centered, as you will see later, was a challenge due to the front grill mounting bracket. Despite this, it seems to have worked out.


The front grill has a mounting tab that helps hold the grill to the inner bracket. I notched out this bracket so that I could get a nut in there, and a provide access for a wrench to turn the nut.


I chose to run the wire into the Passenger-side front fender, through an access hole, and then into the cab through a grommet. I triple wrapped the wire in electrical tape to help reduce chaffing on the wires during movement.


When running the cables on the inside it's best to keep the cable management clean so that you don't have some Stealership-monkey, wanna-be-mechanic roughly pulling things apart just to change a cabin filter.

The HDMI cable was routed into the upper glove box for connection to a phone or other media device. This HDMI will allow media to be played on the device through the Rostra interface.

When you start running the wires, you're going to need to pull it all apart to gain access to the mount spot for the Rostra computer. Don't even attempt to mount the Rostra unit above the CD player, it will not fit. The Rostra wiring harness and USB plug will interfere with radio display.


A few more pics:


AND, here is the fully functioning front view camera in action.
Hope this can help anybody else wanting to install a front, side or bed camera.
Last edited:

