Project 'Yeller' Trailer Build

  • HTML tutorial

KonzaLander

Rank VI
Member

Traveler II

3,402
Junction City, Kansas, USA
Member #

15814

Ham/GMRS Callsign
KE0EBF
It has been one year since I started buying parts to install a water system on Yeller and I had made no progress on the project.. After experiencing no water and bad water at planned refill sites in 2021 I knew I had to come up with a versatile water solution. My initial plan was to have a permanently installed tank that could be filled from the outside of the trailer. The benefit to this was I could build a shelf over the square tank for more interior storage and it would have kept the water weight as low as possible. The glaring issues with this plan were maintenance, refilling the tank in the field and how to access water if the pump fails.

I have used tan (military style) LCI water cans for years and even installed a hand pump on one cap. In my mind these water cans were the 'answer' to my water storage problem in Yeller, but I hadn't come up with a solution for pumping and filtering water. I have read about and watched video of every water storage solution online and came up with my plan.

  • Three water cans positioned between the frame rails of the trailer
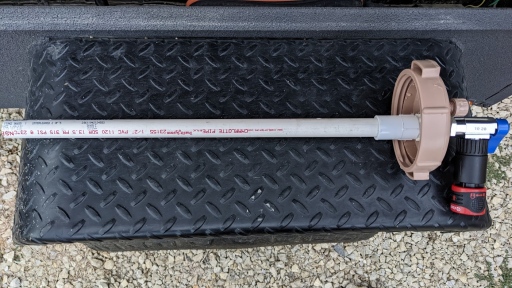
    • Each can is plumbed with a suction system through the cap
    • Quick disconnect at each can
    • Water can cap is minimally altered and air relief screw still opens for fresh air intake
    • Isolated water cans reduce the chance of contaminating all of the water with bad water (even though filtration should 'fix' it)
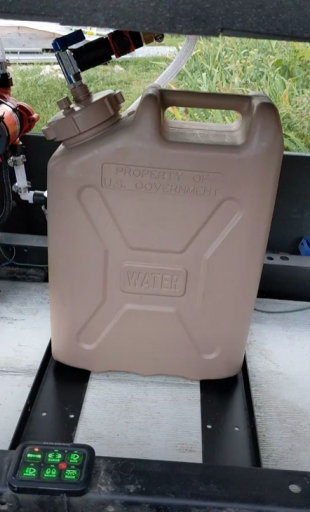
    • Water can can quickly be removed to refill
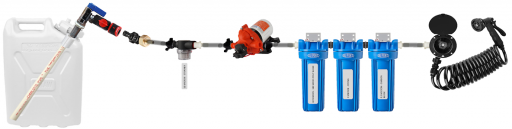
  • 50 micron strainer to protect pump
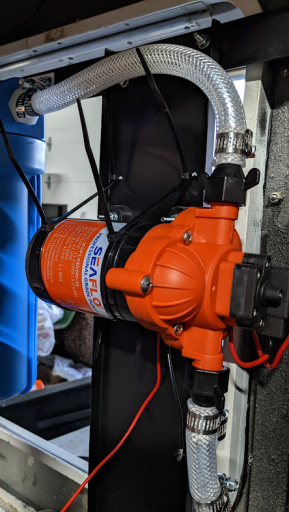
  • 45 PSI Pump to push water through filters
    • Self Priming
    • Can run dry without damaging the pump
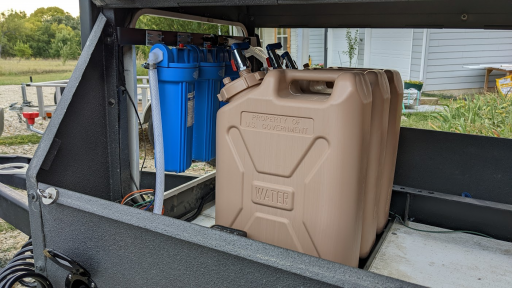
  • 30 Micron Poly Block Filter
  • 5 Micron String Filter
  • 0.5 Micron Carbon Block filter
  • RV shower attachment
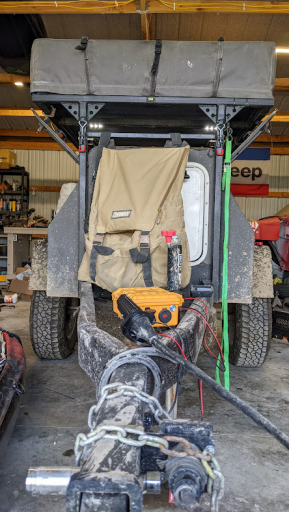
    • Mounted on side of trailer body
1663858479414.png

The first thing I did was modify the three water can caps.
1663859380493.png

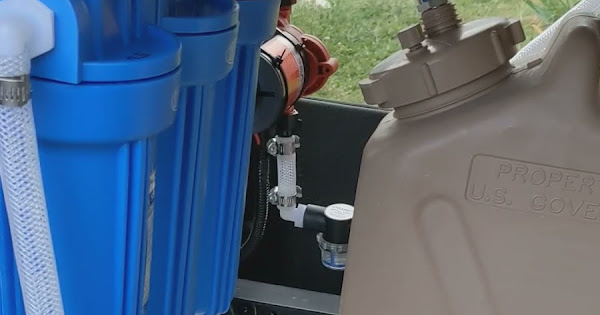
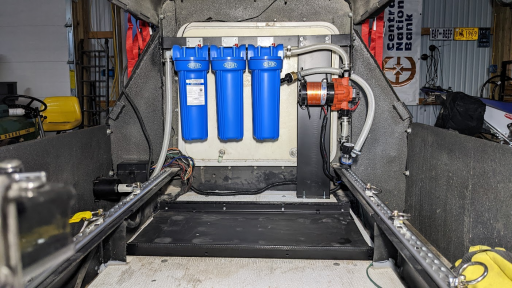
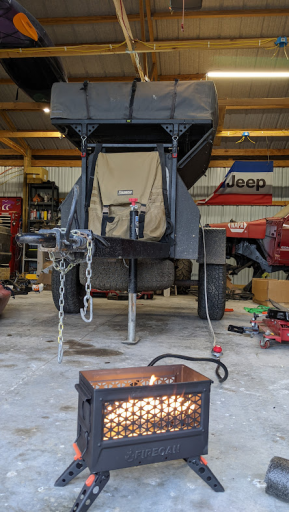
Built a bracket to support the filters. They are easy to access through the front door of the trailer. In the last year of using the trailer, I never used the front door while on a trip.
1663859491835.png

Built another bracket to install the pump. I added the zip ties to help support the pump on its rubber mount then started test fitting the plumbing.
1663859607728.png

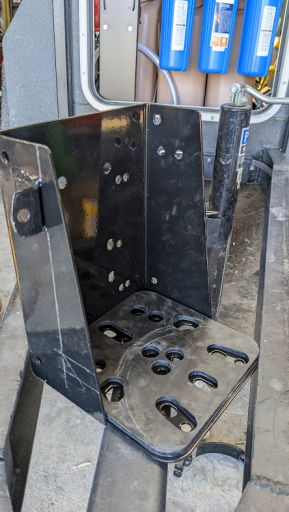
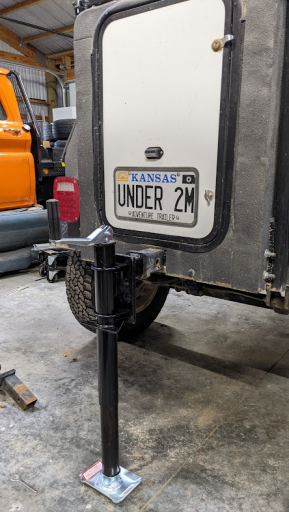
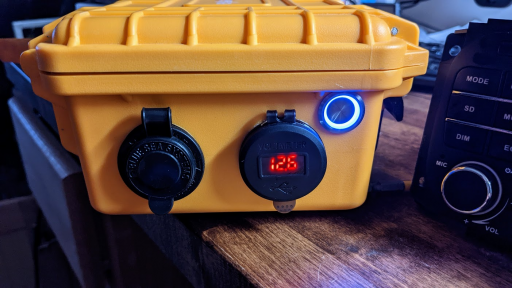
I added floor brackets that are bolted to the frame to support the weight of the water cans and prevent them from sliding forward and backward. I also wired the pump to the remaining circuit on the Auxbeam fuse box. Since there was not a "water pump" label with the Auxbeam, I used 'power' for the pump switch.
1663859850193.png

Fit and ready to go!
1663860128835.png

Here is a video of the system operating.

The pump is remarkably quiet. You will notice there is air in the system in the video. This is caused by water draining back into the can after the pump shuts off. When the pump comes back on it has to draw air before water. I hope to remedy this by installing "PVC Check Sockets" at the bottom of the intake pipe in the bottom of the can. A check valve should keep water in the suction line at all times.

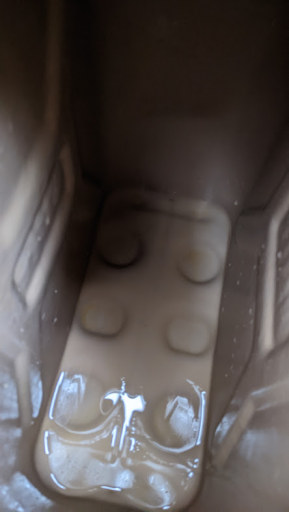
As it sits, the pump will draw all but three cups of water out of the water can. I call that a win!
1663860775892.png
 

KonzaLander

Rank VI
Member

Traveler II

3,402
Junction City, Kansas, USA
Member #

15814

Ham/GMRS Callsign
KE0EBF
I tried using a PVC check valve at the bottom of the suction line in the water can. Ultimately it proved to have too much restriction and simply made the pump work harder to draw water from the bottom of the water can.

I continue to wrap up loose ends with the trailer. Propane (used for cooking and a buddy heater) storage proved to be a challenge, partly due to the small size of the trailer and my inability to spend $150 on a mount that is nothing other than a big L bracket with a clasp... I am looking at you Powertank....

The Kiddie 20lb fire extinguisher mount has been used for mounting small propane tanks. I was hopeful my new Flameking 11lb tank would fit snugly in the Kiddie mount. Unfortunately, the Flameking tank is a bit porkier than others on the market and did not fir the Kiddie fire extinguisher mount. I decided to modify the Kiddie mount to fit my propane tank.
1664811462570.png

1664811493582.png

My initial plan was to mount the tank on the outside of the trailer. After all, this is how most off road trailer propane tank mounts are implemented. I was unable to find a spot on the outside of the trailer I liked due to road grime, security and space. I turned my attention to the cargo area and found a great solution that protects the tank from road grime, mounts to the frame and is out of site from folks with sticky fingers.
1664812193629.png

I also mounted a 5lb ABC fire extinguisher in an easy to reach location. The propane tank mount worked great as a base for this.
1664812343998.png

Trying out the old Trasharoo on the front of the trailer. It's a little big and will be pelted with road grime. It would be useful...
1664812829871.png

Lastly, I finally have a good cargo control system inside the trailer! I utilized L track and ring adapters.
1664812919177.png

Please excuse the mess of wiring, I need to tape that up again.
 

OcoeeG

Rank II

Enthusiast III

443
SE TN
First Name
Chris
Last Name
Gee
I am not sure if I missed it, but does your tent rack extend up at camp? Or does it stay in the lower position all the time?
I built a trailer that has an extendable rack system, that works amazing. Right now I just use a scissor jack to get it up, one of these days I will put some struts or actuators on it.

How does the trailer sleep in the up position? I noticed you do not have any jacks on the trailer. Mine was way to wobbly without the jacks. I might even make some rigid support on the rack upright to take the last bit of rack slop out of it.

Awesome trailer build! Keep up the good work!
 

KonzaLander

Rank VI
Member

Traveler II

3,402
Junction City, Kansas, USA
Member #

15814

Ham/GMRS Callsign
KE0EBF
I am not sure if I missed it, but does your tent rack extend up at camp? Or does it stay in the lower position all the time?
I built a trailer that has an extendable rack system, that works amazing. Right now I just use a scissor jack to get it up, one of these days I will put some struts or actuators on it.

How does the trailer sleep in the up position? I noticed you do not have any jacks on the trailer. Mine was way to wobbly without the jacks. I might even make some rigid support on the rack upright to take the last bit of rack slop out of it.

Awesome trailer build! Keep up the good work!
Thanks for the compliment!

I don't really plan to raise the rack at camp, but it could be raised at camp using a scissor jack or the tow vehicle's bottle jack. In the garage I used an old Jeep bottle jack to raise the rack. That said, outside of raising the rack to fit kayaks I don't see myself having a need to raise it. In the "low" position the rack is still high enough for the RTT. I haven't tried to sleep on the rack in the "up" position since modifying the rack. The nesting poles fit pretty tight together, plus I have lynch pins through the nesting poles and a piece of threaded rod/coupler to extend the latches so that they snug the rack tight when up. It should be pretty solid.

Prior to modifying the rack I slept on the trailer with the tall fixed rack. Even with the rack way up in the clouds the trailer was pretty stable when hitched to the tow rig. No adult actives going on in the RTT.... There is a little wiggle/sway, similar to how the RTT felt when it was bolted to the Land Cruiser.
 

KonzaLander

Rank VI
Member

Traveler II

3,402
Junction City, Kansas, USA
Member #

15814

Ham/GMRS Callsign
KE0EBF
My wife and I just completed an almost 4,000 mile trip with the trailer. We concentrated most our exploring around Utah and the numerous National Parks and Monuments. The trailer endured long stretches of interstate, hundreds of miles of washboard, temperatures from 80 to 8 and some paved roads that made me miss washboard dirt roads.
1668441729801.png

1668441895289.png

1668442044556.png

Yeller survived the torture test, but a few items do need attention.
  • I need to pack a small grease gun. The spring bushings still squeak a lot when they get dusty or cold.
  • Water filter drains. With below freezing temperatures, I wanted to drain the water pump and filters to prevent cracking. The pump is easily drained through the strainer bowl below it, but the filters require removing the housing and dumping the water. A valve at the bottom of each filter housing would make draining these very easy.
  • Trasharoo on the front of the trailer was very convenient but it did interfere with swinging the jack around. This was quiet frustrating on those cold mornings.
  • The 7 pin wiring is very stiff when cold. I never lost an electrical connection, but I could see it happening during a tight turn or articulation.
 

KonzaLander

Rank VI
Member

Traveler II

3,402
Junction City, Kansas, USA
Member #

15814

Ham/GMRS Callsign
KE0EBF
I had decent REI rewards earlier this year and managed to grab a propane Firecan with no out of cost expense during their sale. This was definitely the "easy button" and saved me time from trying to build my own!
1682518315515.png

The trailer has never been able to be used without being hitched to the vehicle. This is generally not a problem, but has caused some annoyances when camping at the same place for a few days. I talked with my engineer friend about my conundrum and he suggested a simple single jack fit into the rear receiver. I cobbled together a support made up of a jack, my old pintle hitch mount and pipe clamps.
1682518984393.png

When used in conjunction with the front jack, the trailer is extremely stable when unhitched from the vehicle.
1682519092931.png

Now that the trailer doesn't need to be hitched to the cruiser to be used I ran into another problem. Power. I designed the trailer to be powered by the cruiser's house battery. Since my power needs are quite minuscule compared to most, I elected to experiment with a DIY power box I made for on the river overnight kayak trips. The kayak power box is made of a 5ah AGM battery with USB and 12v socket tucked in a small case.
1682520105246.png
1682520135495.png

I used a spare 7pin trailer socket and tie it to a 12v plug. The small battery powers what I need on the trailer without a problem. However, the setup isn't the most efficient, so I will explore better alternatives in the future.
1682519951279.png
 
Last edited: