Educator I
- 10,890
- First Name
- Jim
- Last Name
- Bro
- Member #
-
12989
- Service Branch
- USAF DAV
So I am fourth owner of this 2009 DIY greatly built trailer, Here is it's original history from Henry J the builder:

 sites.google.com
I am going to copy paste it here and continue the history as I go.....
Here ya go:
BLT OFFROAD TRAILER
For quite some time now I have been researching the best way to expand the gear and accommodations for the growing family. I have been watching camp trailers and different methods. I need the room added by a topper to carry gear enough for all of us. This does mean that we pack it all up each morning and carry it all with us when we explore. Not a bad way to go , but I have been watching for better solutions. I would really like to haul some bikes with us and lighten the load on the truck.
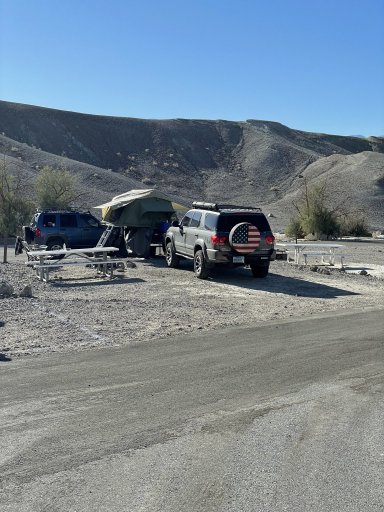
I think a good base camp for exploring is what we want. I do not want to be limited on where I can drag it though.
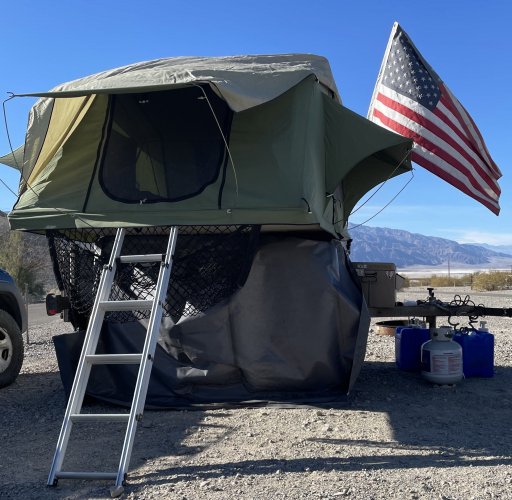
A Roof Top Tent has the attraction of a quick easy set up with out having ground preparations. This also gets us up off the ground away from the rock you missed under the tent and the creepy crawlies visiting during the night. I considered adding one to the back of my truck , but the length is an issue as well as the added weight.
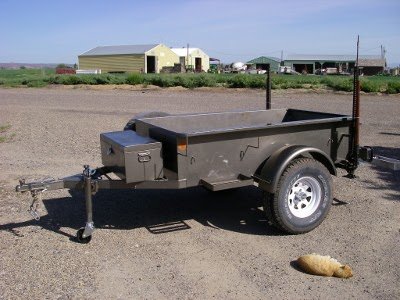
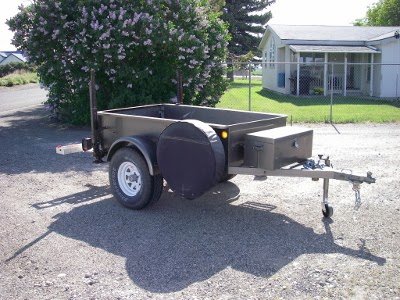
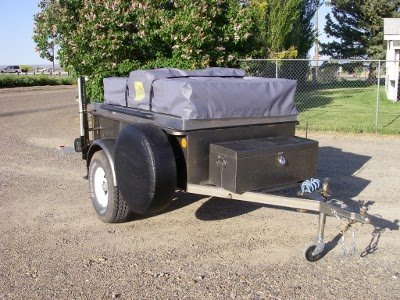
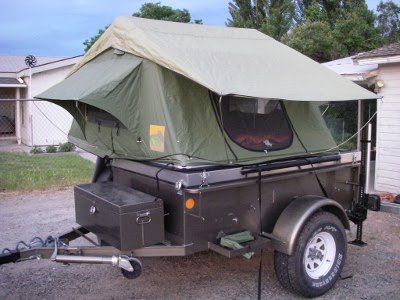
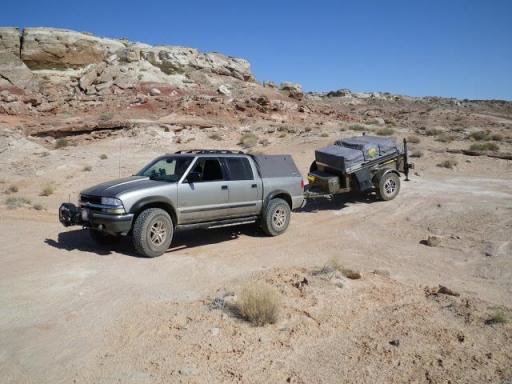
As I posted above, last week I mentioned to a friend that I had been looking for a trailer and he suggested I come up and check out his old "Jeep" trailer. It was built for a person who hauled a Tee Pee. It has some racks on the sides for poles, that may need to be removed eventually. After some consideration I decided it was a good start and I could eventually take it where I wanted to to go. The investment would not be a loss. The thing that got me was that it was painted just slightly darker than my truck. Other than that a pretty good match. I bought it and towed it home.
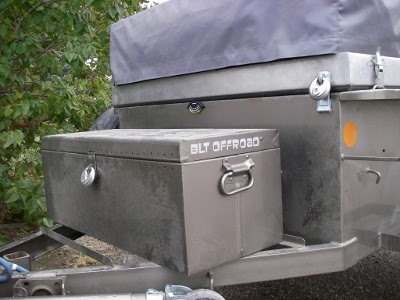
The bed is made from heavy gauge steel. It looks to be 10 ga, or 1/8". The axle is sprung over and the hitch is set high for a good breakover. There is a nice big box on the front. It is shod with 31x10.5-15 rubber to give it pretty good ground clearance.
There are some things I don't like, but those can be corrected eventually.
It is a little longer than I would have liked. The bed is 7' long. A foot shorter would have been more to my liking. The tongue/drawbar is integrated into the front and the heavy gauge steel of the bed is the rear structure. This does save weight and increases clearance, but I may need to add a rear half frame eventually.
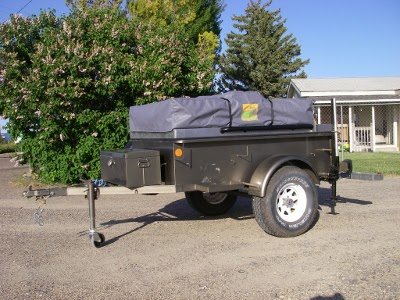
For now I am concentrating getting it functional. First I wired it for my truck and found a hitch to get up up high enough to sit right. Then off to email Fernando and get a tent coming. I ordered the big one from Campinglab.com A pretty good chunk of change for a tent, but I have seen these first hand and they are much more. It arrives day after tomorrow.
I have been working on it pretty steady. The tailgate chains had to go. I installed a buckle latch for the closure and hinged straps to hold it while it is down. The old hook and chain holes are now for padlocks.
The front jack was too low so I added a removable wheel. Now it raises high enough for raising off the hitch and I can roll it around. A grab handle was added to the top of the hitch to help when rolling it around.
Next some conversation with my welder guru and I decided upon a lid made of .100 aluminum. He will form and weld the lid for me as I do not have a brake big enough or a welder set up for aluminum. The lid will be hinged to one side and be 3" thick formed with lips for placing a seal around the top of the trailer. The seal for the lid was ordered from McMaster-Carr and arrived a couple days ago.
I picked up some gas struts and hardware from the salvage yard. These will hold the lid open and allow it to close gently.
I have scoped out some latches at the hardware store that I think will work. I am going to wait for the lid before buying those.
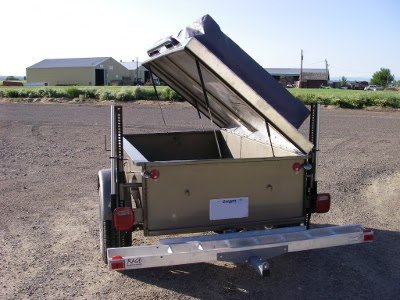
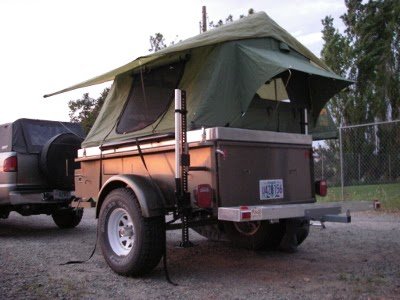
Last night I put together a 2" rear receiver that incorporates twin Highlift jacks to act as stabilizers. That really turned out great. Pull a pin and slide a collar and they are off to be used for other things. They work great for leveling the trailer and really provide a stable platform.
I took most of the day cleaning and re=painting the pair of old High-lifts. They look presentable now. I didn't have handle keepers, so I ordered them this evening.
The receiver can be used as a rear recovery point, or as a way to haul the Yamaha TW200. The hitch carrier does limit the declination angle, but once unloaded the carrier can be moved forward to a vertically mounted receiver on the front of the trailer for transport.
Today I bought a horse trailer mat. It is a heavy rubber mat for the bottom. 4'x7' fit perfectly. A nice tight fit. I like it.

Once the lid is done and the RTT arrives things will start really taking shape.
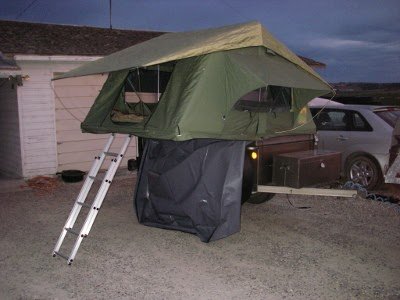
I attached rails , a hinge, mounted the lid to the trailer and then the tent on top of it. Today I mounted the gas charged lift struts, applied the lid seal and attached the ladder.
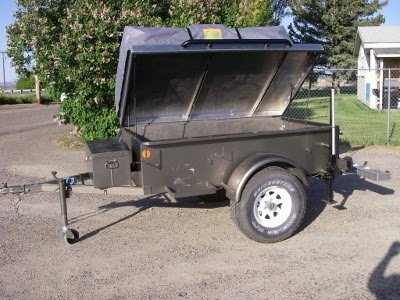
Boy there is lots of room in that coffin. It could easily sleep two. With a tightly sealed lid, it would be a long nap.
Here are some pictures of the coupler:
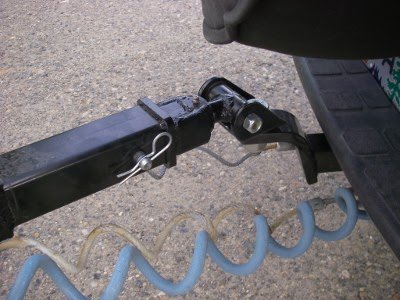
It can rotate on three axis. Vertically it will move just over 180°, horizontally 360° and rotate 270°. The drawbar can be pulled out and pinned for 10 inches of extended length if needed. Bushed with polyurethane and using a teflon disk it is smooth and secure. Rattle free towing thus far. Much better than the ball it had.
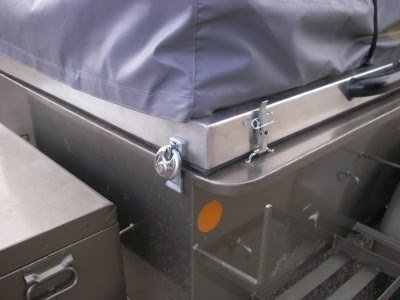
Here is one of a latch and the lock:
With the TW loaded and the trailers tanks dry there is barely any tongue weight. It pulls Ok, but I think it would be better with wet tanks.
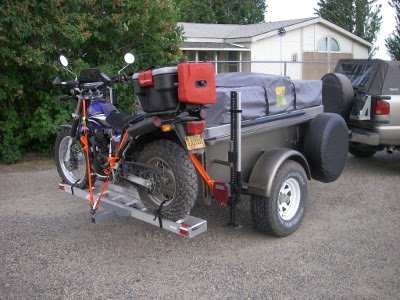
Couldn't resist, so I set it up:
Weighed it too. Dry weight 1500#
Good and bad from the shake down run.
We headed out to Twin Springs Creek. The weather was cool and cloudy. Sprinkling rain we still decided to give it a shot.
A brief tour of the Owyhee Dam museum and we were off late in the day. 5:00 pm before we left the pavement for roads unknown.
The climb up was not too bad. Pretty rough from all the rain the area has been getting. Every wash and rut had been cut deep.
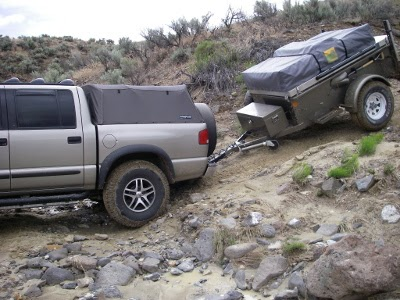
The offroad hitch works great. I scrubbed the rear tank shield and hitch pretty hard on that crossing.
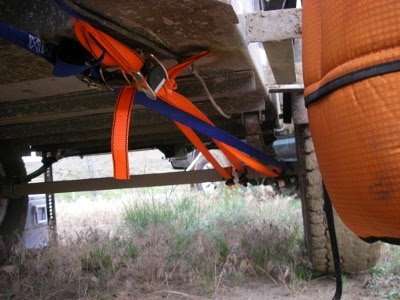
Up on top the left front spring mount broke loose. Those mounted Highlifts really came in handy. We jacked it up, pried it forward ,used tie downs and a ratchet strap to pull the axle forward into place.
That got us further. Rain and dark setting in we decided to make camp near an old windmill damaged and abandoned , with a dry stock water tank made from a large equipment tire. This is Cleaver's as I was later told. They now fill it using a gas powered pump. No cattle out here until much later in the year.

The night was good. Dogs and chili for dinner. Cold drinks, and hot chocolate. A nice campfire that held all night. The rain let up just in time for dinner prep.
The RTT works great.
Hazel nut chocolate creme crepes with homemade strawberry syrup. Ziploc baggie omelets, hash brown and patty sausages for breakfast. About four miles short of our goal we decided that it was best to head back the way we came.
Morning brought clear skies and warmer weather. Roads drying.
Not far after this the right front spring hanger also broke. One ratchet strap and one tie down left we did the same trail fix to the other side.
That was enough to get us home.
The Good: The trailer is a nice size. RTT rocks! I like it. Hitch works without a "hitch". Highlift jacks mounted like that are REALLY good both as stabilizers and for lifting a wheel. We took a fairly technical trail , fairly close to home base and within range of help if needed.
The Bad: I knew the lack of frame might be an issue. It was! Boy it was! I probably should have inspected it closer as it looked to have been cracked around the mounts before we got it. I am currently considering the direction that I want to go to fix this right.
The jacks were handy, but they get too easily coated with mud and effectively disabled. I really need to add a boot to protect them. The right side faces rear and was not as bad when covered with mud, but the left side was a real pain.
Over all it was a good learning experience. I have plans for some reorganization in the trailer. I will not leave home with out my good heavy ratchet straps again. Now I need to make time to tear the trailer down and revise the suspension mounting system.
I installed a skeletal frame on the interior of the trailer. Crossmembers and mounts are bolted in place with grade 8 half inch bolts now. The front mounts are welded to a crossmember as well as being bolted.
I reinforced the spare tire mount with a couple upper straps.
I found out the spare was mounted with a different size lug nut. That would have been an unpleasant surprise with one size lug wrench in the front box.
, so I changed out all to match.
We use the Coleman Extreme cooler. They hold ice a very long time. Now that I am packing two coolers I had a very good comparison with our old cooler. After five days I still had good ice in the Extreme and luke warm water in the old cooler. I added another Extreme cooler to our trailer and the old cooler is back in the garage.
Ordered a pair of neoprene jack covers for the trailer today. http://www.sierraexpeditions.com/ had the best price.
They are good people from what I can tell. They are members on Expedition Portal and have some reasonable prices. The service is outstanding. I have made several purchases from them. IIRC , my synthetic winchline was purchased from them too.
The jack covers should solve the whole "mud in the works" problems I had with the jacks. After the axle mount problems, I will not be adding mud flaps. I like how the wheel fit the fender and did not damage when things went bad. The fender rubbed and acted like a brake. Adding screws to attach mud flaps would change that. not what I want to do.
450 miles on it this time with no problems.
Not really rough roads this time, but quite a few miles. We went canoeing on Wallowa lake and then camping on hurricane creek.
One long hard pull in 90+ degree weather had me pushing 220 degrees engine temperature. Once I backed off it cooled right down. Overall it was not bad. I have not checked mileage yet, but it looks to have been acceptable.
We forgot several items. Those were stocked up this evening. Getting closer to having it all figured out.
The trailer got matching wheels today. 2" thick 4.5" to 4.75" wheel adapters made that possible. The Adventure caps finally all showed up, so everything has matching caps and wheels now.
I added 6 oz. of Airsoft pellets to each tire as balancing media. It pulls smooth
I also added a pair of Lev-o-gauges. That will be nice for set up.
Now I wait for the new BLT Offroad decals to arrive and I'll wash the mud off for some photos.
Finally had a minute to empty the water tanks for winter and take a picture of the new decals.
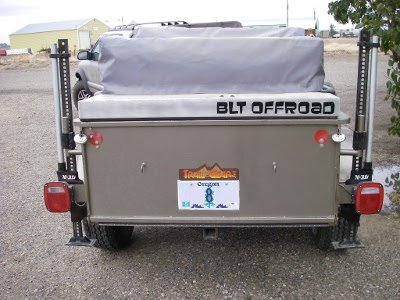
The two small ones on the box are brushed aluminum. They turned out pretty good. The Lev-o-gauge is also visible on the front. In the side shot above the shovel you can see the other one for leveling fore and aft.
If you look you can barely see the LED light bar under the tailgate on the back. That turned out really nice.
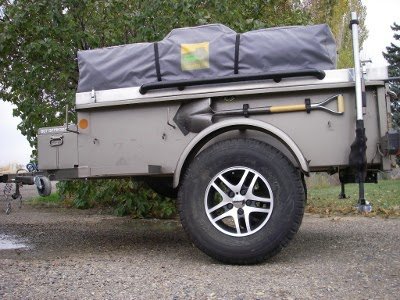
Matching wheels and hub caps now too. 2" AIM wheel adapters on all three including the spare.
Next up will be adding a battery and charging system for the refrigerator. I found a decent buy on a fridge, so that was sort of an unexpected addition this early.
I have heard good things about the Sears Diehard Platinum battery (rebadged Odyssey) Group 78 dual post. So this will go into the truck as my primary and the Deka Intimidaor will get moved to the trailer.
I ordered a nice big battery box that has a spacer for the 78 battery. That will leave room for power ports, switches and fuses. The power ports will offer a place to attach a solar panel if one is in my future.
This battery will power the Edgestar 43qt refrigerator and a LED light strip in the RTT.
For now charging will be through a cable plugged into the trucks rear power quick connector. This same connector plugs into the winch, booster cables and the generator. Lots of ways to connect different combinations. The parallel connection to the vehicle battery should offer a boost if needed. Both batteries, although not the same brand, are very similar. Both AGM group 78 compact plate design batteries. Hopefully they will play well together and charge up while traveling.
The manual quick connector is part of the KISS. Easy to connect and disconnect. The parts all interchange and can be swapped in a pinch. I don't think I would have problems if I forget to disconnect, unless is sits for a very long time. A good battery can run the fridge for three days on its own.
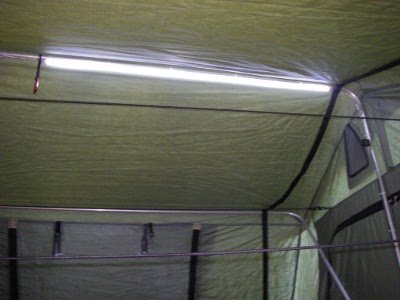
The power system is complete. Lighting done.
The led light strip attaches with zip-ties to the top bow. The little black box on the right is the switch to shut them off at night. I stitched the power cord to the flap around the outside of the tent. The connector plugs in to the top of the power box.
This port has a switch on the box to turn it off too. That way we can switch the lights on from outside before we crawl in for the night.
I struggled with what to do for a weather tight access port for the fridge cord. It took my nine year old son a little while to get his idea through to me, but he was right on the money. A simple outlet cover.
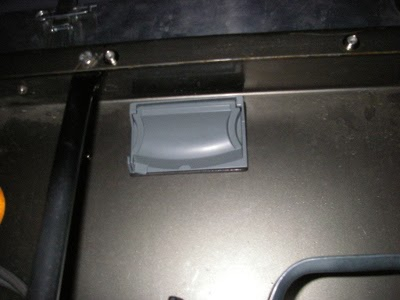
The cover can be pinned closed. I filed a notch at the bottom for the 12 volt power cord to fit. It should work great. Listen to those little helpers. I was trying to make things way too complicated.
The mounting strap for the power box was installed and the two supports for the shelf bolted in place. Next I decided it needed a cover , so I made one from some marine vinyl.
I installed a couple grommets and put the power studs through it. This bolts the cover to the box and allows me an easy way to attach a charger.
I finally had time to build a "stow" for my chock blocks. I found that not only were they taking up space in the box, but they were not getting deployed. Out of sight out of mind , I guess.
This will make them easy to deploy and a good reminder that they need to be placed. Opening the lid lifts the angle that retains them. Pretty simple.
Some minor adjustments after the Moab trip. A new 3500# axle with brakes.
A newly fabricated attachment / enclosure for the heater. A roll up table , cutting board and campfire grille added to the gear. Some reorganization of the front box and the addition of some magnetic shelving.
I have been thinking about a better way to dispense my water supply. I use four 7 gallon AquaTainers.

I already have enough things to efficiently drain my battery, so I'm not really thinking along those lines. What I have done in the past is to lift a container out and set it someplace. The hitch is not very convenient as there is not really room. The box works well, but inevitably it needs to be opened.
Sticking with the KISS principal. I began looking. The hand pumps are neat, but those look like work. I don't have the room for one under the lid and don't really want to open it any time I need water while at camp. There are many very nice water systems that I have looked through. It is very tempting to over complicate the project.
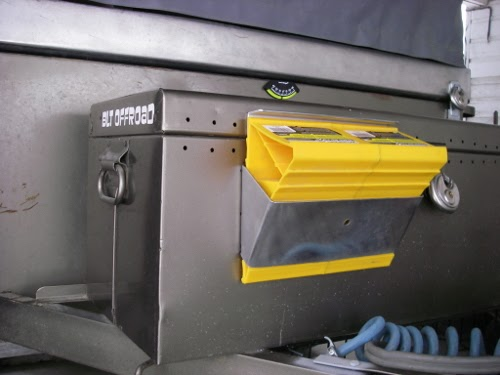
Here is what I came up with:
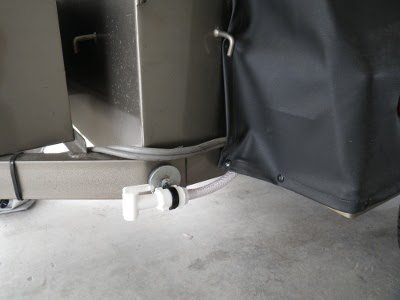
Using the spigot that comes with the AquaTainers, I added a 3/4" NPT female coupler and 3/4" NPT x 1/2 barb fitting attached to 10' of 1/2" hose. A line clamp over the coupler bolts it to an old speaker magnet. On the other end is a super siphon that drops into the water jug. The hose routes through the same access cover used to pass the fridges power cord.
Open the spigot, a few shakes of the super siphon to get water flowing and I am all set with running water. With the magnetic mount I can easily stow it inside for traveling and mount it where ever is convenient. The 10' of hose may be a bit much , but it allows me some flexibility. I may cut it down a little after I see what works for me.
Just thought I'd share the idea. I have less than $20 invested in it all together.
Just back from a little camping trip.
This was the first "long" trip with the TW200 on the back.
It pulled great. No problems with the hitch , rack, or weight distribution. The trailer grossed 2500# with the bike on the back and 32 gallons of water up front. The new axle performed nicely. The braking is subtle, just as it should be. There is no extra effort to stop this combination.
There was not enough sun to extend battery life very long. I did learn that I switched the power port and it must be on to charge. Duh...
I am still trying to get a handle on how well this is going to work. Right now I'm just not too sure it is the best way to go. running the truck a little bit charges things right back up pretty quickly.
The little propane heater kept things warm and dry inside. Extremely comfortable. That is a perfect addition. I don't know how cold it got at night. No frost in the mornings but close I suspect.
I really thought the 12 volt heated mattress pad might be the best answer. My mind has changed. This was just too easy and we were all comfortable with the heat available. The added bonus of the dry interior added to our positive review.
The siphon spigot worked just like it should. We only used one container of water in three days. This was not a dry camp , so there was a water source that offset some of the water needs.
The Sailor's Solution breathable under liner is THE way to go. It adds just a little more cushion.Actually, it is called "Max Vent" Skip that retailer and go directly to the source: Hypervent Marine Great stuff.
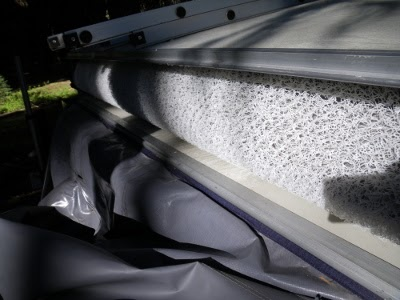
The picture doesn't show the condensation very well. I popped it open when we arrived home to find everything air dried just fine under there. No we mattress to deal with.
I had been looking for a larger tire for the jack. Nothing was commercially available.
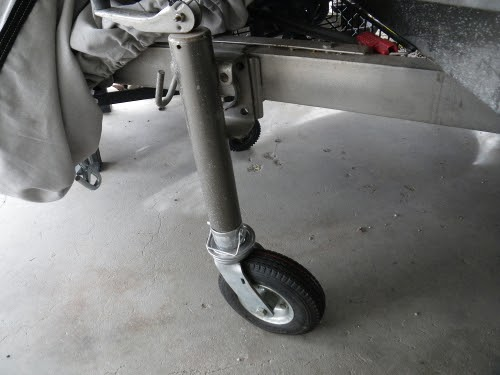
This was a caster wheel that I adapted to the removable foot. It should work much better. The pneumatic tire and its larger size should make maneuvering on rough surfaces much easier.
Added a retractable dog cable to the side.
We are now taking both motorcycles and want a way to tie-out the dog while we are gone. She stays with us pretty well while in camp, but we didn't want her loose while we were out riding. This way she will have some room to wander a little and hopefully the retractable cable will be less likely to get caught on stuff.
The original write up/build sheet is here: BLT OFFROAD adventures - BLT Offroad trailer
The story ends. BLT Offroad trailer has been sold and moves to western Oregon
Redirect Notice
Sold again. April 2019 the trailer is now off to it's new home in the Sierra Nevada. Lothar and his son picking it up in Eugene, OR
RosevilleGuy from Expedition Portal continues the journey....
Sold once more to Me! The story continues.......
BLT OFFROAD adventures - BLT Offroad trailer
For quite some time now I have been researching the best way to expand the gear and accommodations for the growing family. I have been watching camp trailers and different methods. I need the room added by a topper to carry gear enough for all of us. This does mean that we pack it all up each
sites.google.com
I am going to copy paste it here and continue the history as I go.....
Here ya go:
BLT OFFROAD TRAILER
For quite some time now I have been researching the best way to expand the gear and accommodations for the growing family. I have been watching camp trailers and different methods. I need the room added by a topper to carry gear enough for all of us. This does mean that we pack it all up each morning and carry it all with us when we explore. Not a bad way to go , but I have been watching for better solutions. I would really like to haul some bikes with us and lighten the load on the truck.
I think a good base camp for exploring is what we want. I do not want to be limited on where I can drag it though.
A Roof Top Tent has the attraction of a quick easy set up with out having ground preparations. This also gets us up off the ground away from the rock you missed under the tent and the creepy crawlies visiting during the night. I considered adding one to the back of my truck , but the length is an issue as well as the added weight.
As I posted above, last week I mentioned to a friend that I had been looking for a trailer and he suggested I come up and check out his old "Jeep" trailer. It was built for a person who hauled a Tee Pee. It has some racks on the sides for poles, that may need to be removed eventually. After some consideration I decided it was a good start and I could eventually take it where I wanted to to go. The investment would not be a loss. The thing that got me was that it was painted just slightly darker than my truck. Other than that a pretty good match. I bought it and towed it home.
The bed is made from heavy gauge steel. It looks to be 10 ga, or 1/8". The axle is sprung over and the hitch is set high for a good breakover. There is a nice big box on the front. It is shod with 31x10.5-15 rubber to give it pretty good ground clearance.
There are some things I don't like, but those can be corrected eventually.
It is a little longer than I would have liked. The bed is 7' long. A foot shorter would have been more to my liking. The tongue/drawbar is integrated into the front and the heavy gauge steel of the bed is the rear structure. This does save weight and increases clearance, but I may need to add a rear half frame eventually.
For now I am concentrating getting it functional. First I wired it for my truck and found a hitch to get up up high enough to sit right. Then off to email Fernando and get a tent coming. I ordered the big one from Campinglab.com A pretty good chunk of change for a tent, but I have seen these first hand and they are much more. It arrives day after tomorrow.
I have been working on it pretty steady. The tailgate chains had to go. I installed a buckle latch for the closure and hinged straps to hold it while it is down. The old hook and chain holes are now for padlocks.
The front jack was too low so I added a removable wheel. Now it raises high enough for raising off the hitch and I can roll it around. A grab handle was added to the top of the hitch to help when rolling it around.
Next some conversation with my welder guru and I decided upon a lid made of .100 aluminum. He will form and weld the lid for me as I do not have a brake big enough or a welder set up for aluminum. The lid will be hinged to one side and be 3" thick formed with lips for placing a seal around the top of the trailer. The seal for the lid was ordered from McMaster-Carr and arrived a couple days ago.
I picked up some gas struts and hardware from the salvage yard. These will hold the lid open and allow it to close gently.
I have scoped out some latches at the hardware store that I think will work. I am going to wait for the lid before buying those.
Last night I put together a 2" rear receiver that incorporates twin Highlift jacks to act as stabilizers. That really turned out great. Pull a pin and slide a collar and they are off to be used for other things. They work great for leveling the trailer and really provide a stable platform.
I took most of the day cleaning and re=painting the pair of old High-lifts. They look presentable now. I didn't have handle keepers, so I ordered them this evening.
The receiver can be used as a rear recovery point, or as a way to haul the Yamaha TW200. The hitch carrier does limit the declination angle, but once unloaded the carrier can be moved forward to a vertically mounted receiver on the front of the trailer for transport.
Today I bought a horse trailer mat. It is a heavy rubber mat for the bottom. 4'x7' fit perfectly. A nice tight fit. I like it.
Once the lid is done and the RTT arrives things will start really taking shape.
I attached rails , a hinge, mounted the lid to the trailer and then the tent on top of it. Today I mounted the gas charged lift struts, applied the lid seal and attached the ladder.
Boy there is lots of room in that coffin. It could easily sleep two. With a tightly sealed lid, it would be a long nap.
Here are some pictures of the coupler:
It can rotate on three axis. Vertically it will move just over 180°, horizontally 360° and rotate 270°. The drawbar can be pulled out and pinned for 10 inches of extended length if needed. Bushed with polyurethane and using a teflon disk it is smooth and secure. Rattle free towing thus far. Much better than the ball it had.
Here is one of a latch and the lock:
With the TW loaded and the trailers tanks dry there is barely any tongue weight. It pulls Ok, but I think it would be better with wet tanks.
Couldn't resist, so I set it up:
Weighed it too. Dry weight 1500#
Good and bad from the shake down run.
We headed out to Twin Springs Creek. The weather was cool and cloudy. Sprinkling rain we still decided to give it a shot.
A brief tour of the Owyhee Dam museum and we were off late in the day. 5:00 pm before we left the pavement for roads unknown.
The climb up was not too bad. Pretty rough from all the rain the area has been getting. Every wash and rut had been cut deep.
The offroad hitch works great. I scrubbed the rear tank shield and hitch pretty hard on that crossing.
Up on top the left front spring mount broke loose. Those mounted Highlifts really came in handy. We jacked it up, pried it forward ,used tie downs and a ratchet strap to pull the axle forward into place.
That got us further. Rain and dark setting in we decided to make camp near an old windmill damaged and abandoned , with a dry stock water tank made from a large equipment tire. This is Cleaver's as I was later told. They now fill it using a gas powered pump. No cattle out here until much later in the year.
The night was good. Dogs and chili for dinner. Cold drinks, and hot chocolate. A nice campfire that held all night. The rain let up just in time for dinner prep.
The RTT works great.
Hazel nut chocolate creme crepes with homemade strawberry syrup. Ziploc baggie omelets, hash brown and patty sausages for breakfast. About four miles short of our goal we decided that it was best to head back the way we came.
Morning brought clear skies and warmer weather. Roads drying.
Not far after this the right front spring hanger also broke. One ratchet strap and one tie down left we did the same trail fix to the other side.
That was enough to get us home.
The Good: The trailer is a nice size. RTT rocks! I like it. Hitch works without a "hitch". Highlift jacks mounted like that are REALLY good both as stabilizers and for lifting a wheel. We took a fairly technical trail , fairly close to home base and within range of help if needed.
The Bad: I knew the lack of frame might be an issue. It was! Boy it was! I probably should have inspected it closer as it looked to have been cracked around the mounts before we got it. I am currently considering the direction that I want to go to fix this right.
The jacks were handy, but they get too easily coated with mud and effectively disabled. I really need to add a boot to protect them. The right side faces rear and was not as bad when covered with mud, but the left side was a real pain.
Over all it was a good learning experience. I have plans for some reorganization in the trailer. I will not leave home with out my good heavy ratchet straps again. Now I need to make time to tear the trailer down and revise the suspension mounting system.
I installed a skeletal frame on the interior of the trailer. Crossmembers and mounts are bolted in place with grade 8 half inch bolts now. The front mounts are welded to a crossmember as well as being bolted.
I reinforced the spare tire mount with a couple upper straps.
I found out the spare was mounted with a different size lug nut. That would have been an unpleasant surprise with one size lug wrench in the front box.
, so I changed out all to match.
We use the Coleman Extreme cooler. They hold ice a very long time. Now that I am packing two coolers I had a very good comparison with our old cooler. After five days I still had good ice in the Extreme and luke warm water in the old cooler. I added another Extreme cooler to our trailer and the old cooler is back in the garage.
Ordered a pair of neoprene jack covers for the trailer today. http://www.sierraexpeditions.com/ had the best price.
They are good people from what I can tell. They are members on Expedition Portal and have some reasonable prices. The service is outstanding. I have made several purchases from them. IIRC , my synthetic winchline was purchased from them too.
The jack covers should solve the whole "mud in the works" problems I had with the jacks. After the axle mount problems, I will not be adding mud flaps. I like how the wheel fit the fender and did not damage when things went bad. The fender rubbed and acted like a brake. Adding screws to attach mud flaps would change that. not what I want to do.
450 miles on it this time with no problems.
Not really rough roads this time, but quite a few miles. We went canoeing on Wallowa lake and then camping on hurricane creek.
One long hard pull in 90+ degree weather had me pushing 220 degrees engine temperature. Once I backed off it cooled right down. Overall it was not bad. I have not checked mileage yet, but it looks to have been acceptable.
We forgot several items. Those were stocked up this evening. Getting closer to having it all figured out.
The trailer got matching wheels today. 2" thick 4.5" to 4.75" wheel adapters made that possible. The Adventure caps finally all showed up, so everything has matching caps and wheels now.
I added 6 oz. of Airsoft pellets to each tire as balancing media. It pulls smooth
I also added a pair of Lev-o-gauges. That will be nice for set up.
Now I wait for the new BLT Offroad decals to arrive and I'll wash the mud off for some photos.
Finally had a minute to empty the water tanks for winter and take a picture of the new decals.
The two small ones on the box are brushed aluminum. They turned out pretty good. The Lev-o-gauge is also visible on the front. In the side shot above the shovel you can see the other one for leveling fore and aft.
If you look you can barely see the LED light bar under the tailgate on the back. That turned out really nice.
Matching wheels and hub caps now too. 2" AIM wheel adapters on all three including the spare.
Next up will be adding a battery and charging system for the refrigerator. I found a decent buy on a fridge, so that was sort of an unexpected addition this early.
I have heard good things about the Sears Diehard Platinum battery (rebadged Odyssey) Group 78 dual post. So this will go into the truck as my primary and the Deka Intimidaor will get moved to the trailer.
I ordered a nice big battery box that has a spacer for the 78 battery. That will leave room for power ports, switches and fuses. The power ports will offer a place to attach a solar panel if one is in my future.
This battery will power the Edgestar 43qt refrigerator and a LED light strip in the RTT.
For now charging will be through a cable plugged into the trucks rear power quick connector. This same connector plugs into the winch, booster cables and the generator. Lots of ways to connect different combinations. The parallel connection to the vehicle battery should offer a boost if needed. Both batteries, although not the same brand, are very similar. Both AGM group 78 compact plate design batteries. Hopefully they will play well together and charge up while traveling.
The manual quick connector is part of the KISS. Easy to connect and disconnect. The parts all interchange and can be swapped in a pinch. I don't think I would have problems if I forget to disconnect, unless is sits for a very long time. A good battery can run the fridge for three days on its own.
The power system is complete. Lighting done.
The led light strip attaches with zip-ties to the top bow. The little black box on the right is the switch to shut them off at night. I stitched the power cord to the flap around the outside of the tent. The connector plugs in to the top of the power box.
This port has a switch on the box to turn it off too. That way we can switch the lights on from outside before we crawl in for the night.
I struggled with what to do for a weather tight access port for the fridge cord. It took my nine year old son a little while to get his idea through to me, but he was right on the money. A simple outlet cover.
The cover can be pinned closed. I filed a notch at the bottom for the 12 volt power cord to fit. It should work great. Listen to those little helpers. I was trying to make things way too complicated.
The mounting strap for the power box was installed and the two supports for the shelf bolted in place. Next I decided it needed a cover , so I made one from some marine vinyl.
I installed a couple grommets and put the power studs through it. This bolts the cover to the box and allows me an easy way to attach a charger.
I finally had time to build a "stow" for my chock blocks. I found that not only were they taking up space in the box, but they were not getting deployed. Out of sight out of mind , I guess.
This will make them easy to deploy and a good reminder that they need to be placed. Opening the lid lifts the angle that retains them. Pretty simple.
Some minor adjustments after the Moab trip. A new 3500# axle with brakes.
A newly fabricated attachment / enclosure for the heater. A roll up table , cutting board and campfire grille added to the gear. Some reorganization of the front box and the addition of some magnetic shelving.
I have been thinking about a better way to dispense my water supply. I use four 7 gallon AquaTainers.
I already have enough things to efficiently drain my battery, so I'm not really thinking along those lines. What I have done in the past is to lift a container out and set it someplace. The hitch is not very convenient as there is not really room. The box works well, but inevitably it needs to be opened.
Sticking with the KISS principal. I began looking. The hand pumps are neat, but those look like work. I don't have the room for one under the lid and don't really want to open it any time I need water while at camp. There are many very nice water systems that I have looked through. It is very tempting to over complicate the project.
Here is what I came up with:
Using the spigot that comes with the AquaTainers, I added a 3/4" NPT female coupler and 3/4" NPT x 1/2 barb fitting attached to 10' of 1/2" hose. A line clamp over the coupler bolts it to an old speaker magnet. On the other end is a super siphon that drops into the water jug. The hose routes through the same access cover used to pass the fridges power cord.
Open the spigot, a few shakes of the super siphon to get water flowing and I am all set with running water. With the magnetic mount I can easily stow it inside for traveling and mount it where ever is convenient. The 10' of hose may be a bit much , but it allows me some flexibility. I may cut it down a little after I see what works for me.
Just thought I'd share the idea. I have less than $20 invested in it all together.
Just back from a little camping trip.
This was the first "long" trip with the TW200 on the back.
It pulled great. No problems with the hitch , rack, or weight distribution. The trailer grossed 2500# with the bike on the back and 32 gallons of water up front. The new axle performed nicely. The braking is subtle, just as it should be. There is no extra effort to stop this combination.
There was not enough sun to extend battery life very long. I did learn that I switched the power port and it must be on to charge. Duh...
I am still trying to get a handle on how well this is going to work. Right now I'm just not too sure it is the best way to go. running the truck a little bit charges things right back up pretty quickly.
The little propane heater kept things warm and dry inside. Extremely comfortable. That is a perfect addition. I don't know how cold it got at night. No frost in the mornings but close I suspect.
I really thought the 12 volt heated mattress pad might be the best answer. My mind has changed. This was just too easy and we were all comfortable with the heat available. The added bonus of the dry interior added to our positive review.
The siphon spigot worked just like it should. We only used one container of water in three days. This was not a dry camp , so there was a water source that offset some of the water needs.
The Sailor's Solution breathable under liner is THE way to go. It adds just a little more cushion.Actually, it is called "Max Vent" Skip that retailer and go directly to the source: Hypervent Marine Great stuff.
The picture doesn't show the condensation very well. I popped it open when we arrived home to find everything air dried just fine under there. No we mattress to deal with.
I had been looking for a larger tire for the jack. Nothing was commercially available.
This was a caster wheel that I adapted to the removable foot. It should work much better. The pneumatic tire and its larger size should make maneuvering on rough surfaces much easier.
Added a retractable dog cable to the side.
We are now taking both motorcycles and want a way to tie-out the dog while we are gone. She stays with us pretty well while in camp, but we didn't want her loose while we were out riding. This way she will have some room to wander a little and hopefully the retractable cable will be less likely to get caught on stuff.
The original write up/build sheet is here: BLT OFFROAD adventures - BLT Offroad trailer
The story ends. BLT Offroad trailer has been sold and moves to western Oregon
Redirect Notice
Sold again. April 2019 the trailer is now off to it's new home in the Sierra Nevada. Lothar and his son picking it up in Eugene, OR
RosevilleGuy from Expedition Portal continues the journey....
Sold once more to Me! The story continues.......
Last edited: